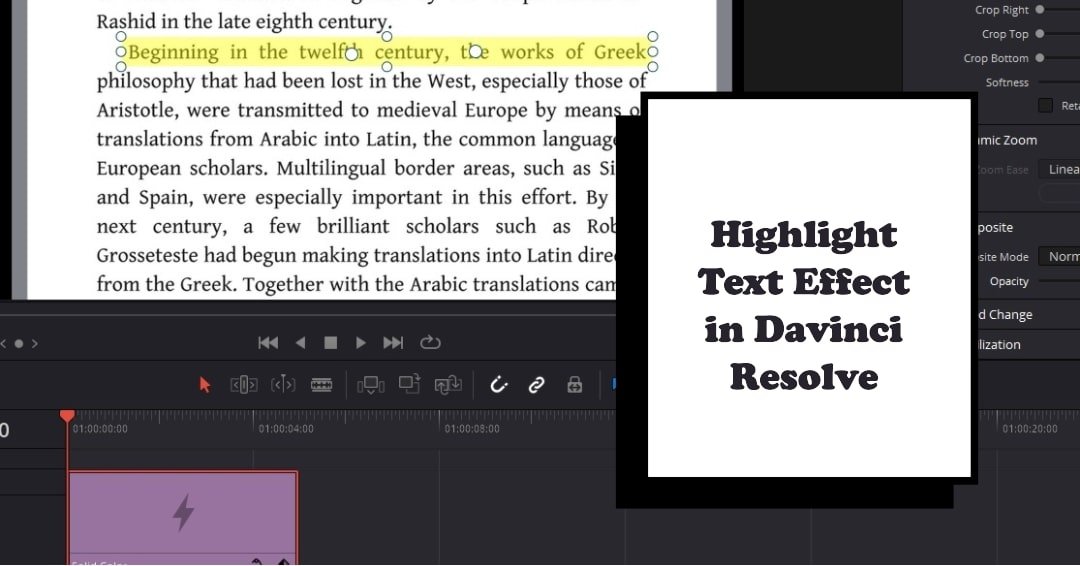
Hi, I’m Salik, the author of FilmmakingElements.com. I have been a filmmaker for over 10 years. I am also a certified DaVinci Resolve Trainer and I have used DaVinci Resolve for many of my projects. In this article, we are going to focus on a neat little trick for all you video editing enthusiasts out there. Specifically, we will demonstrate how to create a simple highlight text effect using DaVinci Resolve. This method is very efficient and does not require any additional downloads or significant tweaking.
Though DaVinci Resolve’s Fusion feature does offer arguably more sophisticated methods to achieve this effect, our goal here is to provide a quick and easy solution for those of you who may not have the time or need for more intricate processes. So without further ado, let’s jump right into it and open DaVinci Resolve to get started!
Implementing the Solid Color Generator for a Highlight Effect in DaVinci Resolve
In the broader context of creating highlight text effect within DaVinci Resolve, our next focus will be on implementing the solid color generator to create a highlight effect.
Step 1: Initialize the Effects Library
After importing and placing your media onto the timeline in the Edit tab of Davinci Resolve, navigate to the ‘Effects’ in the top left corner of the screen. Expand the toolbox to access the ‘Generators’ section, where you’ll find the ‘Solid Color’ option.
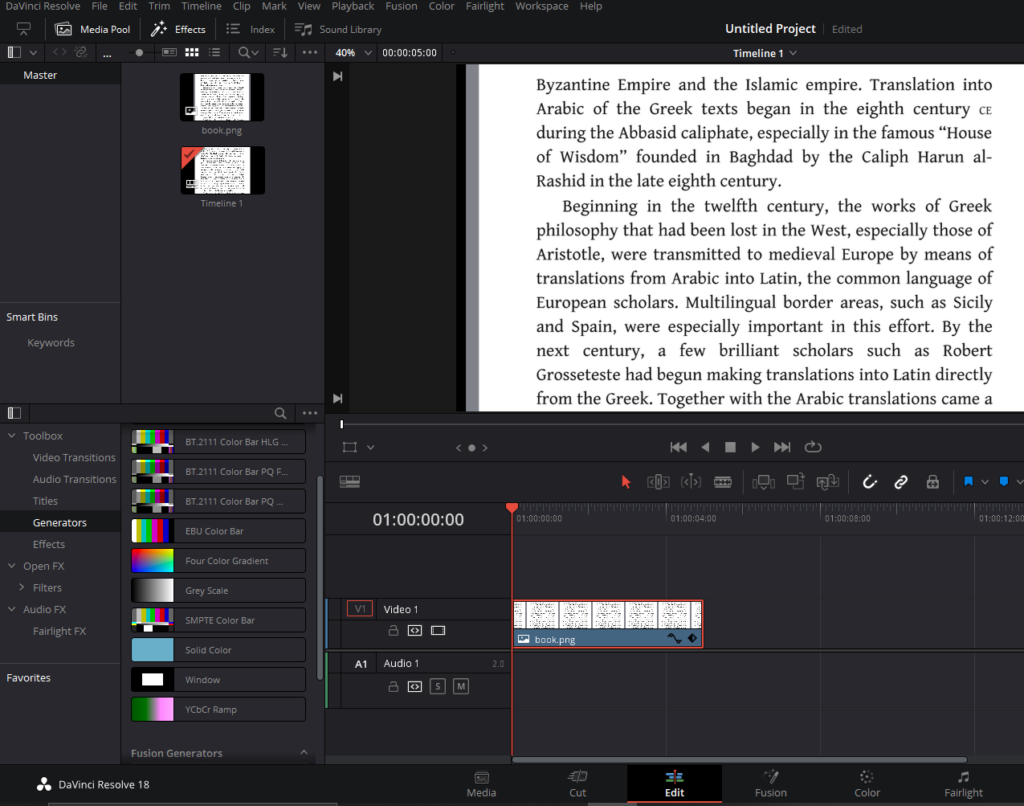
Step 2: Apply the Solid Color Generator
Click, hold, and drag the ‘Solid Color’ generator above the media on your timeline. For instance, place the solid color on video track number two. Ensure that the ‘Solid Color’ layer is selected by clicking on it, so it’s highlighted.
Step 3: Configuring the Highlight Color
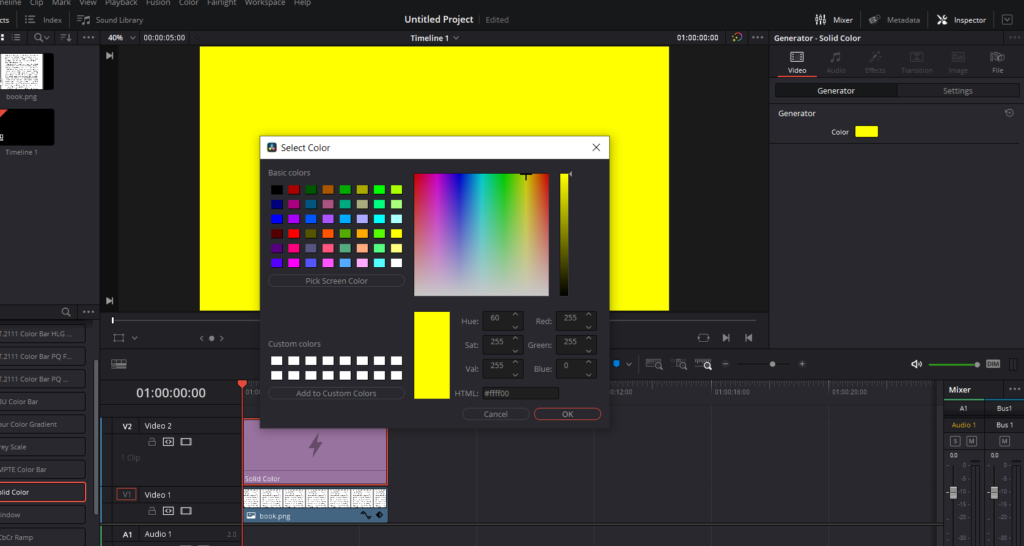
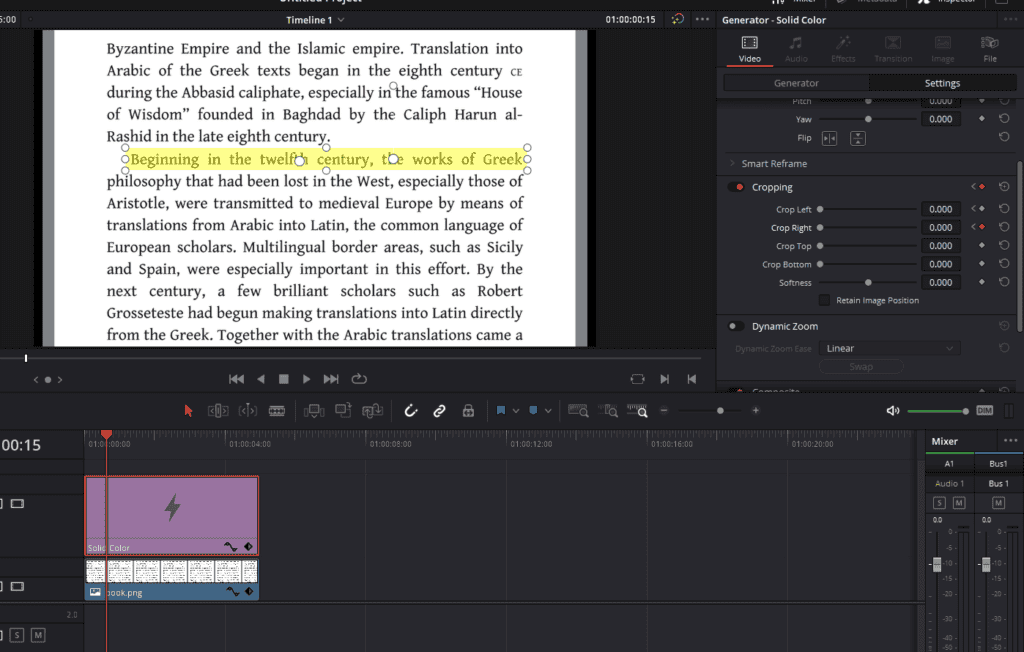
Proceed to the top-right corner of the screen to access the ‘Inspector’ tab. Make sure you’re under the ‘Video’ tab and subsequently the ‘Generator’ tab. Here you’ll encounter an option named ‘Color.’ Click on this to select the color of your highlighter. Feel free to experiment with different color selections that align with your project’s aesthetics.
Step 4: Modifying the Highlighter’s Opacity
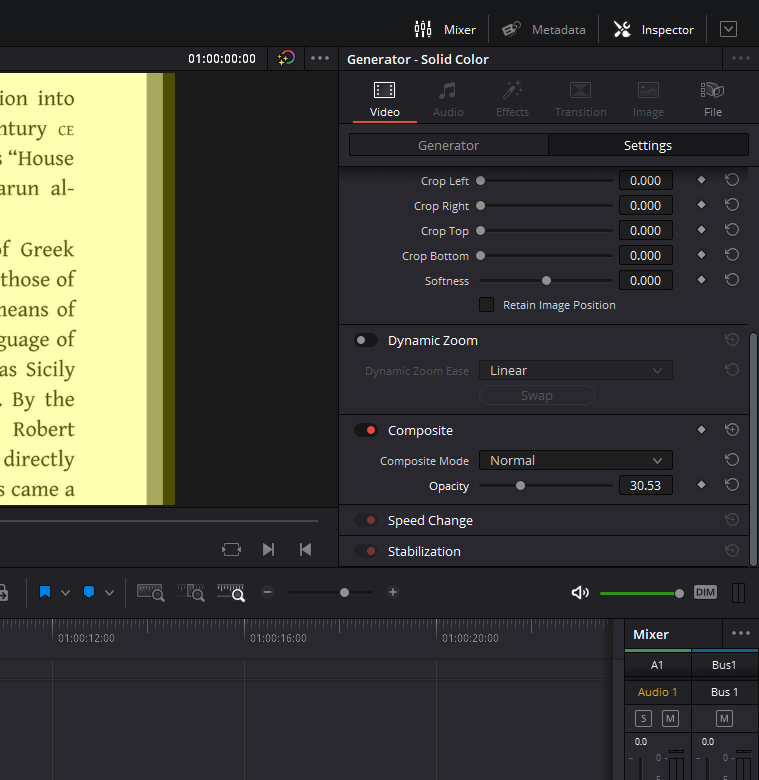
Now it’s time to refine the visibility of your highlight effect by adjusting the opacity. This will determine the intensity of your highlight, giving you control over how subtle or bold it appears on your text or media. While still in the Inspector, navigate to the ‘Settings’ tab and scroll until you come across ‘Composite.’ If the options underneath aren’t visible, click on ‘Composite’ to expand them. Here, you will find an opacity control, which you can adjust by dragging. In general, an opacity level between 25 and 30 tends to provide a well-balanced effect.
Resizing the Highlight in DaVinci Resolve
In our journey to master the highlight text effect in DaVinci Resolve, our next stop is resizing it. This process allows you to adjust the dimensions of your highlight and bring a dynamic element to it.
Step 1: Accessing the Transform Tool
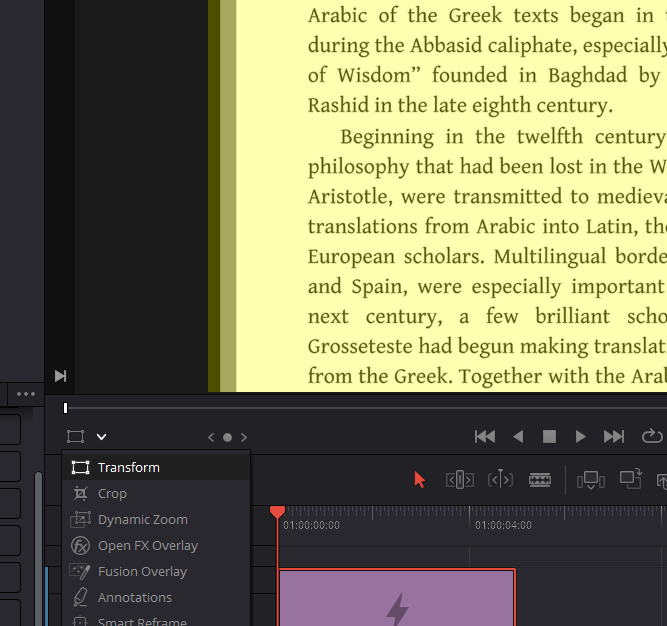
First, locate the dropdown menu beneath your preview window. Click on it and select the ‘Transform’ option. Once you do this, you’ll notice a set of dots appearing around the corner of the solid color.
Step 2: Resizing the Highlight
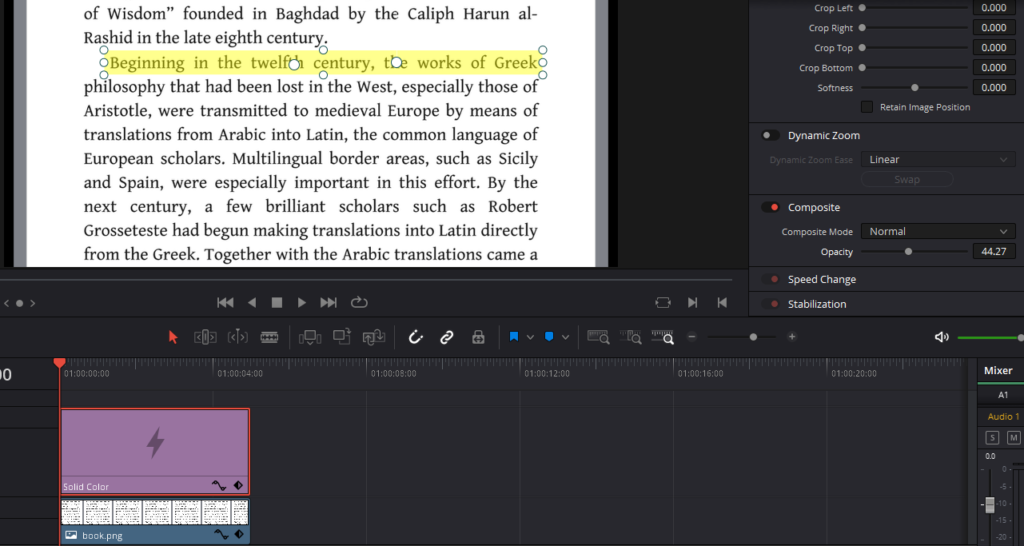
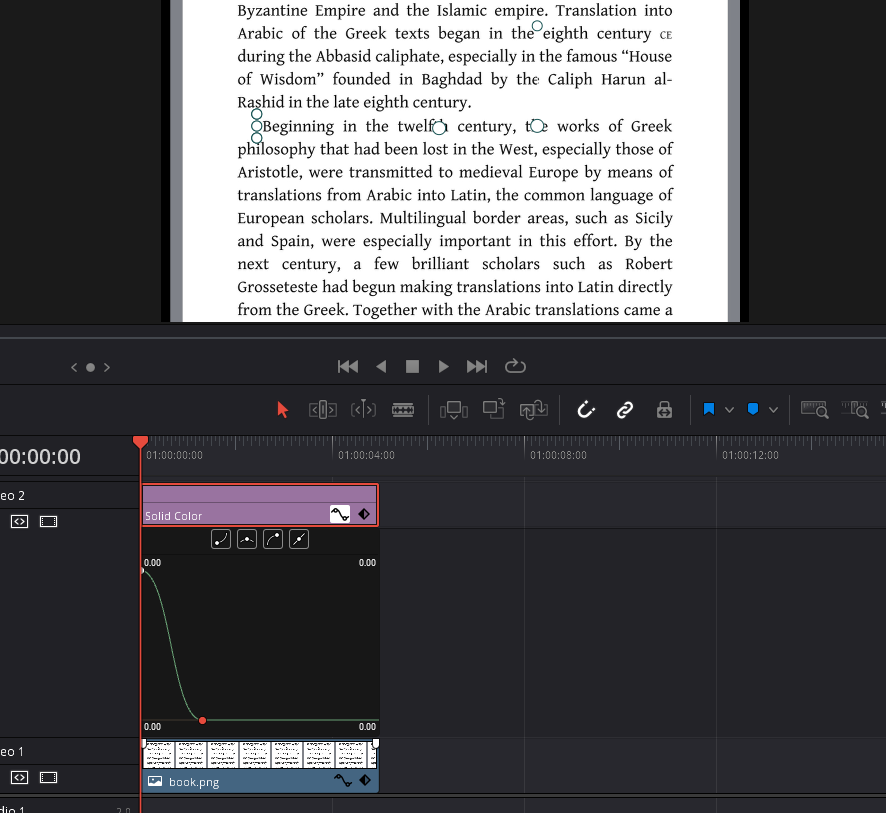
Now, it’s time to resize the highlight to fit your text or object. To do this, you simply need to drag the dots around the solid color to resize your highlight. For instance, you can highlight a specific line in a book, so you can adjust the highlight to cover this line accurately.
Step 3: Animating the Highlight
After you’ve adjusted the size of your highlight, you might notice that it doesn’t animate—it just pops in abruptly. To create a more fluid, attention-grabbing effect, we need to animate the highlight.
In the next steps of our guide, we will detail how to animate your highlight, adding a dynamic visual element to your project that can effectively guide the viewer’s focus.
Animating the Highlight using Keyframes in DaVinci Resolve
Now that you have resized the highlight, let’s proceed to the exciting part – animating the highlight effect. Animating your highlights adds a dynamic and eye-catching layer to your media, guiding the viewer’s attention and elevating the overall presentation.
Step 1: Setting Up the Keyframe
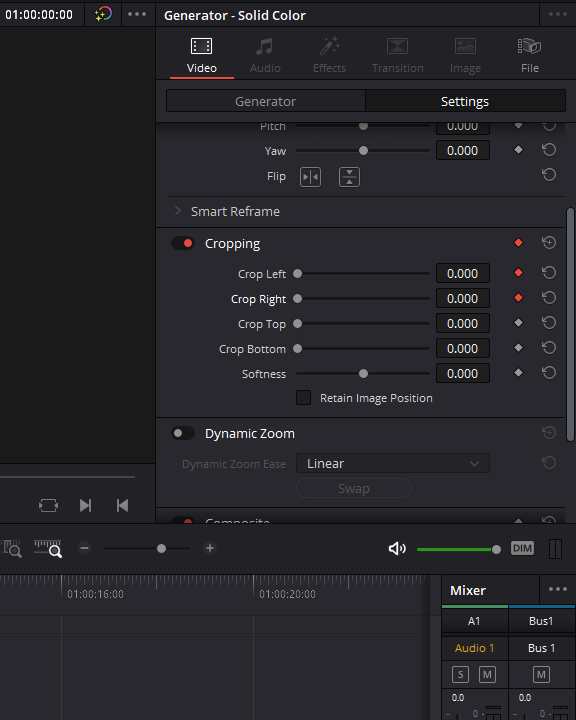
Move your playhead to the start of the solid color layer on your timeline. Ensure that the solid color clip is still highlighted in your project. Now, within the Inspector panel, scroll down to the ‘Cropping’ section. Here, click on the diamond-shaped icon in front of the ‘Left’ and ‘Right’ sliders to add a keyframe. Keyframes are critical for creating animations as they mark the start and end points of any transition.
Step 2: Cropping the Solid Color
Next, you need to crop the solid color layer to set it up for animation. Considering we want the highlight to move from left to right, we’re going to crop from the right. So, at this point, crop it all the way in so the solid color layer becomes invisible.
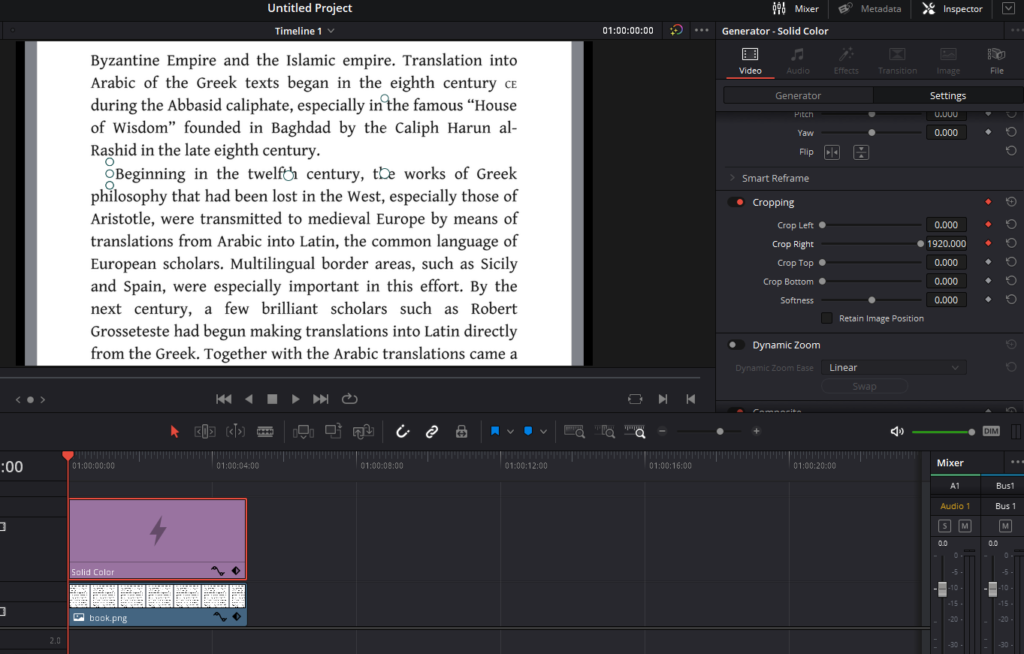
Step 3: Animating the Crop
After setting up the crop, move your playhead forward by approximately a second or so. Then, grab your crop from the right and pull it back, making the highlight fully visible.
With this adjustment, you have successfully set up an animation for your highlight. If you hit play now, you will notice the highlight animating from left to right, creating an engaging visual effect for your viewers. The magic of keyframe animation in DaVinci Resolve adds an extra layer of polish to your media, emphasizing the elements you want to stand out.
Fine-Tuning, Duplicating, and Reusing the Text Highlight Animation in DaVinci Resolve
Having already learned how to create a simple text highlight and animate it, the subsequent steps involve adding more finesse to the animation and extending it to highlight other parts of the text. This process will aid in creating a compelling and professionally edited video, leveraging DaVinci Resolve’s robust video editing tools.
Step 1: Refining the Animation
After you have created the basic animation, the next important aspect is making the highlight effect more fluid and visually appealing.
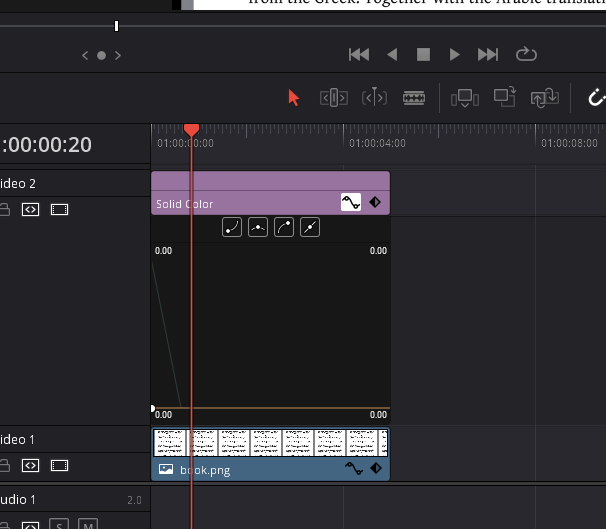
- Opening the Retime Curve: Select the solid color clip on your timeline, which represents the highlight effect. Look for a small icon in the bottom right corner of the solid color clip and click on it. This action opens up the ‘Retime Curve’, an important feature in DaVinci Resolve that provides you with fine control over the speed and timing of your animations.
- Understanding Keyframes In Retime Curves: These keyframes are the start and end points of your animation where you set the crop to its initial and final positions.
- Smoothing the Animation: To make your animation smoother and more natural, you have to change the transition type of the keyframes. There are four little icons on top of the ‘Retime Curve’ window. Click the second one from the left. This action changes the linear transition of your keyframes to a curved one, creating a more pleasing and professional motion for your highlight.
Now, play your video. You’ll see that the highlight animation is no longer a linear and abrupt transition but a smooth and gradual movement, improving the overall aesthetics of your video.
Step 2: Adjusting the Animation Timing
Fine-tuning the timing of your animation is a critical step in achieving a professional look. Here’s how to do it:
- Selecting the Keyframe: In the ‘Retime Curve’ window, click on the second keyframe, represented by the white dot at the bottom. Once selected, it turns red.
- Adjusting the Timing: Now, hold the ‘Shift’ key on your keyboard, click and drag the selected keyframe to the right or left. Dragging the keyframe to the right will slow down the animation, creating a more gradual highlight effect. Conversely, dragging the keyframe to the left will speed up the animation, making the highlight effect appear faster. This ability to control the speed of the animation allows you to match the pace of the highlight effect with the rhythm and mood of your video.
After you’re satisfied with the timing and speed of your animation, close the ‘Retime Curve’ panel by clicking the small icon again.
Step 3: Duplicating the Highlight Animation
Once you have fine-tuned your highlight animation, you might want to apply the same effect to other parts of the text. Here’s how to duplicate the highlight:
- Creating a Copy: Hold the ‘Alt’ key on your keyboard, then click and hold the mouse on the solid color layer (highlight effect) on your timeline. Drag it to a different track on the timeline and release the mouse. This action creates an exact copy of the solid color layer along with the animation you’ve set.
- Changing the Color: To differentiate between the different highlighted parts, you might want to change the color of the new highlight. To do this, select the newly created solid color layer, go to the ‘Inspector’ panel on the top right of your screen, click on ‘Generator’, and then on ‘Color’. A color palette appears, from which you can choose a different color for the new highlight. Let’s choose red for this instance.
Step 4: Positioning and Adjusting the New Highlight
With the color of the new highlight set, the next steps involve positioning it and adjusting its timing:
- Positioning the Highlight: Make sure your ‘Transform’ tool is activated, then click on the new solid color layer on your timeline and drag it to the desired position. You can place it over the specific text or object you want to highlight next.
- Trimming the Highlight: Depending on the length of the text or object you want to highlight, you may need to trim the new highlight layer. Hover your mouse at the end of the solid color layer until you see a bracket-like icon. Click and drag it inward to trim the layer, making it align perfectly with your text or object.
- Adjusting the Animation Speed: Play the video to preview the new highlight effect. If it appears too fast or too slow, you can adjust its speed by opening the ‘Retime Curve’ panel again, selecting ‘Crop Right’, and then dragging the second keyframe right or left while holding ‘Shift’, just as you did in Step 2.
By mastering these steps, you can effectively guide your viewer’s attention, emphasize key information, and deliver a polished and professional video using DaVinci Resolve.