Hi, I’m Salik, the author of FilmmakingElements.com. I have been a filmmaker for over 10 years. I am also a certified DaVinci Resolve Trainer and I have used DaVinci Resolve for many of my projects. In this article, we focus on an essential digital editing skill that you might find useful in your filmmaking journey – line animation. More specifically, we will be discussing how you can animate lines in Davinci Resolve, one of the most powerful and widely used video editing software.
Whether you’re making a documentary with animated elements, enhancing your storytelling with unique transitions, or simply adding a dash of creativity to your video content, understanding line animation can greatly enhance your production value.
How To Animate Lines In Davinci Resolve: Step-By-Step Guide
Step 1: Creating Fusion Composition in Davinci Resolve
To navigate your way towards mastering line animation in Davinci Resolve, we need to start with the basics. Let’s break down the initial process into easy, detailed steps. These will guide you through creating a Fusion Composition and familiarizing yourself with the nodes, setting a solid foundation for future endeavors.
- Create Your Project: Begin by creating your project. Depending on the nature of your work, set the required dimensions, frame rate, and other essential parameters.
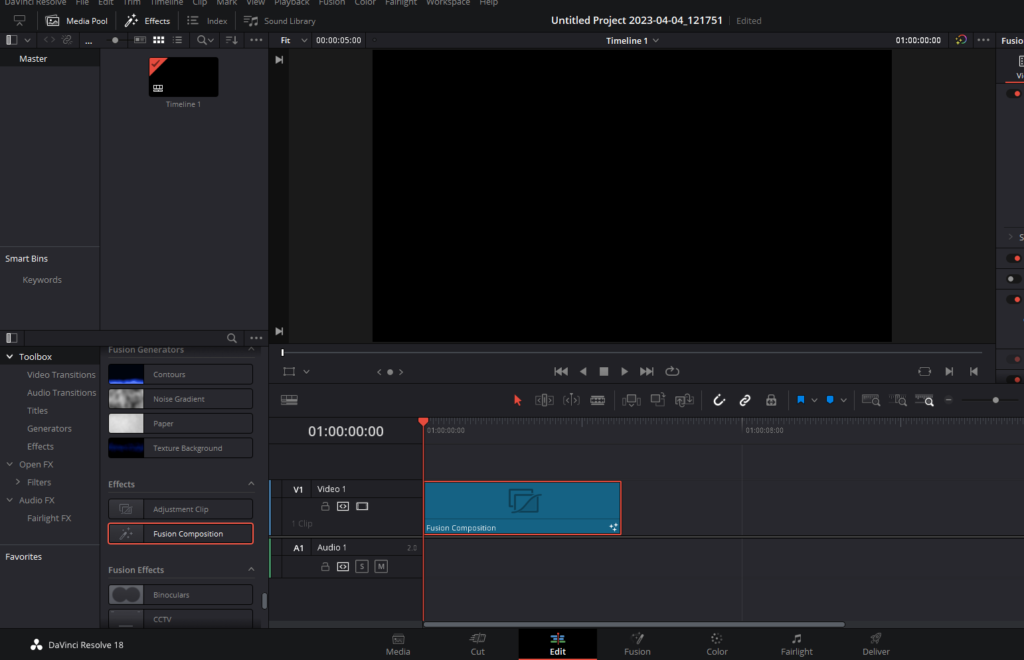
- Jump into the Edit Tab: After setting up your project, go to the ‘Edit’ tab in Davincj Resolve. This area is your primary workstation in Davinci Resolve, where most of the editing magic happens.
- Open the Effects Library: Locate the ‘Effects’ button on the top left corner of the interface. Clicking on it will open the ‘Effects Library,’ a comprehensive collection of effects and tools you can use in your project.
- Drag a Fusion Composition: Within the Effects Library, find the Fusion Compositions. Select and drag it onto your timeline. This Fusion Composition will be the basis for your line animation.
- Switch to the Fusion Tab: Once the Fusion Composition is in place, it’s time to go deeper. Click on the ‘Fusion’ tab, which is located at the bottom of the interface. This switch changes your workspace, allowing you to work more directly with complex effects and animations, like the line animation we’re focusing on.
- Familiarize Yourself with Nodes: Upon entering the Fusion workspace, you’ll notice a change in the interface, with ‘nodes’ at the bottom area of the interface. Nodes in Davinci Resolve are building blocks for effects and animations. They offer more flexibility than traditional layers. Understanding nodes is crucial as they allow you to control and manipulate your line animations accurately.
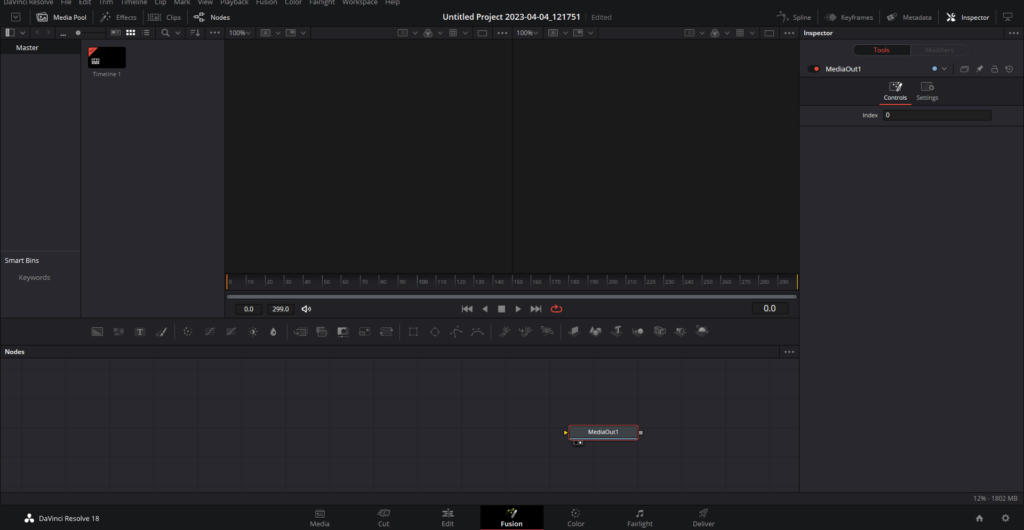
Remember, nodes work from left to right rather than top to bottom, which might feel a little different if you’re transitioning from other editing software with a layer-based system. Each node represents a step in the processing of your footage, starting from the raw footage on the left, moving to the finished product on the right.
Take your time with these steps. Familiarity with the interface and basic operations is the key to smooth, efficient work in Davinci Resolve.
Step 2: The Creative Process Before Animating Lines In Davinci Resolve
Having grasped the basics of creating a Fusion Composition and understanding nodes in Davinci Resolve, it’s time to delve into the heart of our discussion – animating lines. This segment will guide you in transforming simple lines into dynamic, moving elements, adding a new level of engagement to your project. Here’s a detailed walkthrough:
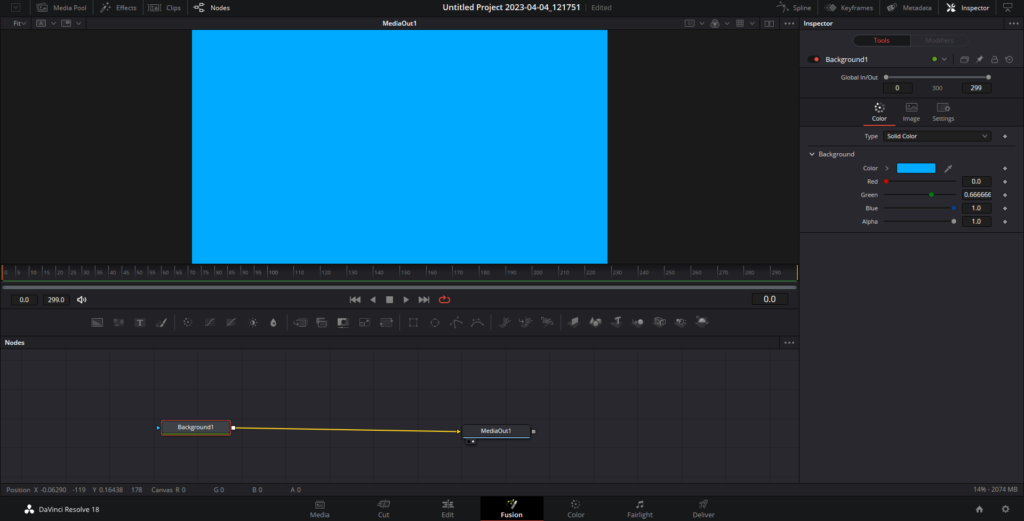
- Activating the Background Node: As your first step into line animation, we first need to add a background node. In the interface, locate the toolbar just above the node editor brimming with various icons, each symbolizing unique nodes. Spot the first icon, a rectangle, representing the background node. Simply click and drag this icon into your node editor.
- Connecting the Nodes: Upon placing the background node in your node editor, establish a connection with the ‘MediaOut1’ node. Accomplish this by pulling the line from the square output of the background node (found on the right) to the square input of the ‘MediaOut1’ node (located on the left).
- Personalizing Your Background: Once the background node is connected, it’s time to give your scene some color. With your background node selected, click on the color bar in the Inspector on the top right, and select a hue that fits your project’s theme.
- Introducing the Polygon Node: Next, bring your attention to the ‘Polygon Node.’ Keep your background node selected and press Shift + Space. This will open a dialogue box with all the tools. Search for the ‘Polygon’ and press ‘Add’.
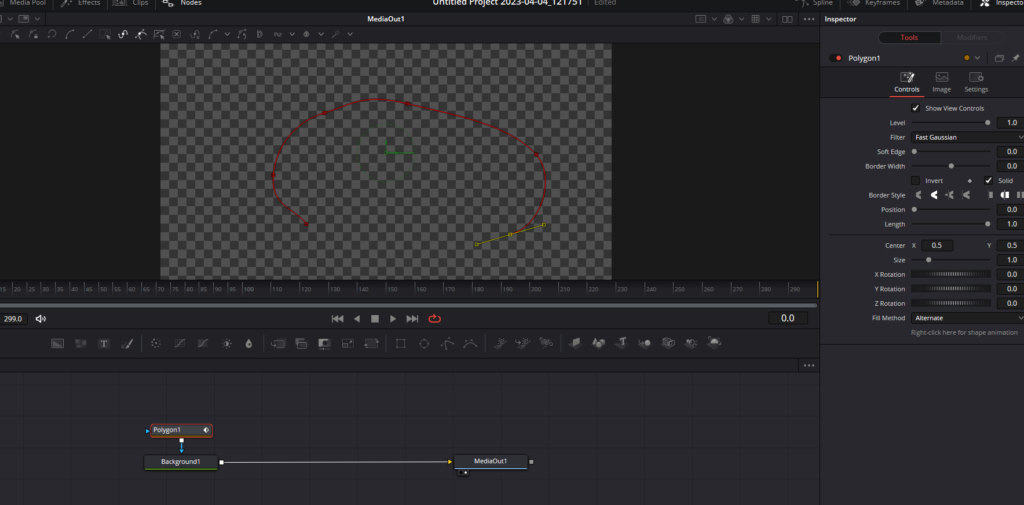
- Crafting Your Line: After the polygon node is automatically connected to the background node, the fun truly begins – drawing your line. Using your mouse or a graphic tablet if you prefer, draw a line of your choice on the viewer. Keep in mind that the lines won’t show up immediately after drawing.
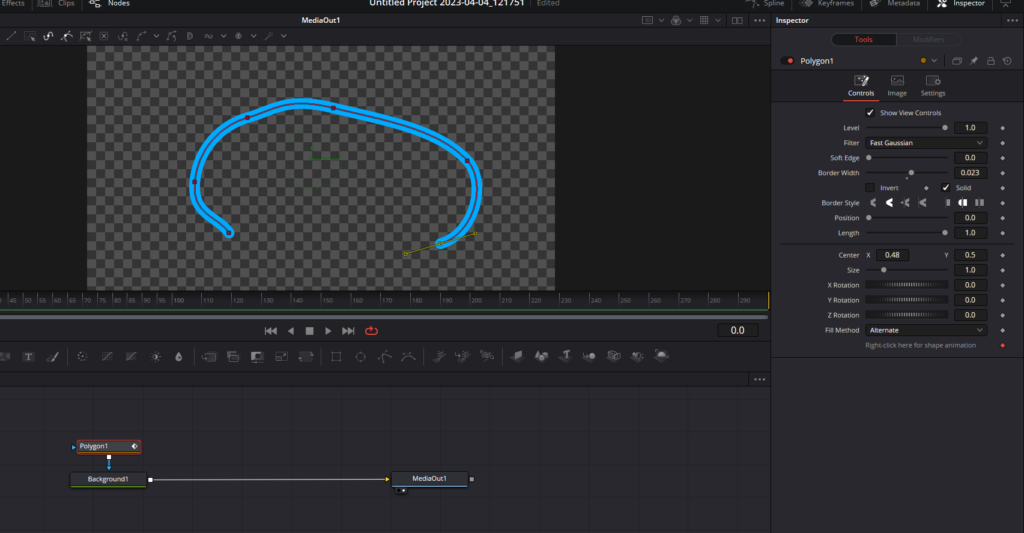
- Setting Line Attributes: Your line is invisible until you adjust its ‘Border Width’ in the Inspector Tab on the right. While the Polygon node is selected, click on the Inspector panel in the top right corner. Here you’ll find a range of settings you can modify. Start with the border width; slide the scale right to increase the line’s thickness and left to make it thinner. We’re aiming for a moderate thickness for this exercise.
- Exploring Styles and Positioning: Once you’ve established the border width, explore the other settings in the Inspector. The ‘Border Style’ lets you determine the style of your line endings, while the ‘Center’ settings allow you to change the line’s position by adjusting the X and Y coordinates. The ‘Size’ settings control the line’s scale, and the ‘Angle’ settings can help you rotate your line for a more dynamic look.
- Resetting to Default Settings: If you’ve made a series of adjustments and aren’t satisfied with the look, there’s a handy shortcut to revert to the default settings. Simply double click on the setting you want to reset, and it will return to its original state.
- Final Touches: With your line visible and customized, you can add further refinements. Smooth out corners, add extra curves, or create extra points on your line by clicking on it. You can also move points around to create a more dynamic shape. For instance, you can make a simple line look like a swirling twirl or an intricate geometric pattern.
Remember that the beauty of line animation lies in experimentation. Take the time to play with all the controls, observe how each tweak alters your line, and don’t be afraid to test unconventional combinations. This hands-on approach will not only yield creative results but also help you master the many features Davinci Resolve offers.
In the next section, we’ll turn these static lines into animated masterpieces, breathing life into your project.
Step 3: Animating Lines In Davinci Resolve
So far, we’ve created static lines, tweaked their appearances, and even added a little flair to their shapes. Now comes the exciting part—animating the paths of these lines to bring them to life! Let’s navigate the power of keyframes and dive into the fantastic world of animation in Davinci Resolve.
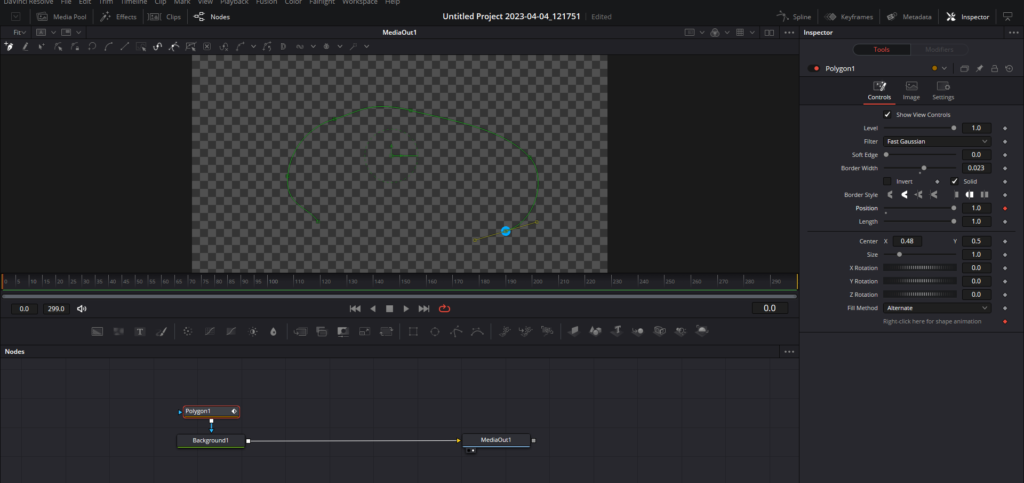
- Preparing the Animation: Suppose you want to animate the path of our previously created line from Step 2. To do this, with your Polygon node selected, look in the Inspector panel for the ‘Position’ and ‘Length’ parameters. Tweak these parameters, starting with dragging the position to the end, to prepare your line for animation.
- Setting Keyframes: Below the viewer, you’ll see a timeline. Make sure the playhead is at the beginning (0:00). Now, drag the ‘Length’ parameter in the Inspector all the way down. On the right, you’ll notice small diamond-shaped icons; these are your keyframes. Click the keyframe icon next to the ‘Length’ parameter, locking the initial state of the line.
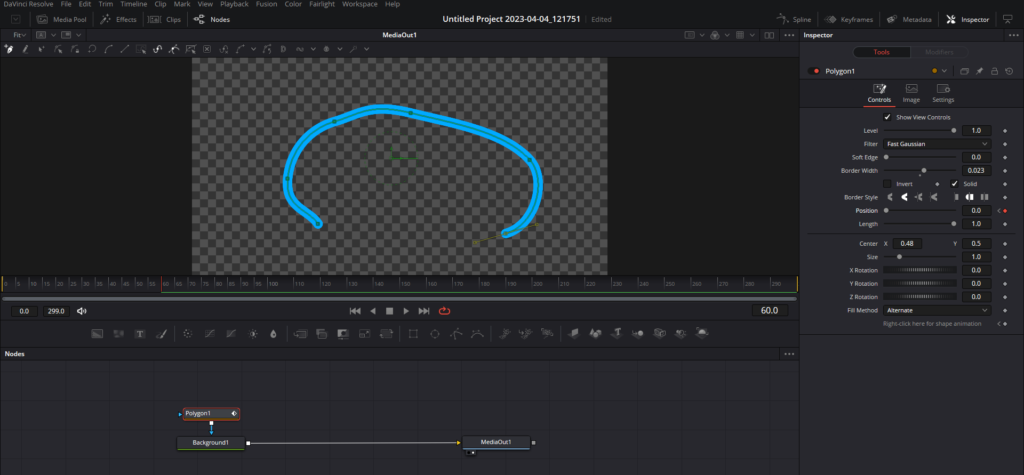
- Animating the Path: After setting the initial keyframe, move the timeline to your desired end point, say 60 frames in. Then, drag the ‘Length’ parameter back up in the Inspector. Once this is done, hit play to watch your line animate across its path.
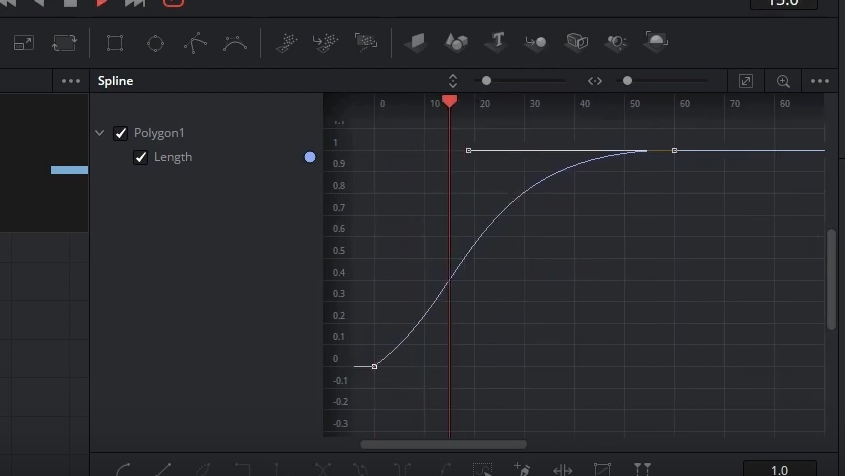
- Adding Smoothness with the Spline Tool: To give your animation a more professional feel, consider using the ‘Spline’ tool. This tool allows you to adjust the pace of your animation for a smoother experience. To access it, click on the Spline tab from the top right corner. Now, with nothing selected in the graph, select ‘Polygon1’ from the drop-down list to the left of the graph.
- Working with Keyframes in the Spline Editor: With the polygon selected, you’ll see the keyframes in the Spline Editor. It might seem overwhelming, but it’s not as complicated as it looks. The keyframes on the Spline Editor represent the beginning and end of your animation. By clicking and dragging these keyframes, you can adjust the easing in and out of your animation. This means your animation can start slow, speed up, and then slow down at the end.
- Refining Your Animation: To refine the pacing of your animation, click on one of the keyframes in the Spline Editor. This action will reveal small handles that you can drag to change the curve of your animation. By adjusting these curves, you can achieve a smooth, professional-looking animation that starts slow, speeds up, and then slows down again at the end.
And there you have it! By mastering these steps, you can create dynamic, animated lines in Davinci Resolve.
Last Words
That brings us to the end of this comprehensive guide on animating lines in Davinci Resolve. We’re glad you joined us for this journey, and we hope you found this tutorial enlightening and enjoyable. Stay tuned to FilmmakingElements.com for more exciting tutorials, tips, and insights to further enhance your filmmaking journey. As we always say, “Keep shooting and keep exploring. The world of film has no limits!”
Happy filmmaking!