Data Levels, Video and Full, have been in Davinci Resolve since starting but with a different name.
There are two things I want to point out about this topic that we’re going to cover.
Number one, it’s been a point of utter confusion for DaVinci Resolve Colorists ever since Davinci Resolve introduced it.
So if you’re confused about this topic, you’re not alone. Everyone gets confused about it, especially as you get more advanced and you start digging into some of these menus; you’re going to see this topic or this preference of “video levels” and “full levels” in “Data Levels” come up over and over.
Now the second point I want to make is for every 100 people watching this, 98 of you shouldn’t be touching this at all. You should look at it, you should acknowledge it, and you should move on. It would be best if you weren’t messing with it. Why? It’s going to screw things up completely. And for the most part, in 98% of the workflows that any of us will ever execute, you don’t need to touch it.
If you do touch it, you’re probably going to mess things up. If not for you, you’re going to mess it up for the person you handle your renders to, you hand your final grades to.
Video Vs Full Data Levels In Davinci Resolve
Finding Data Levels in Delivery Page
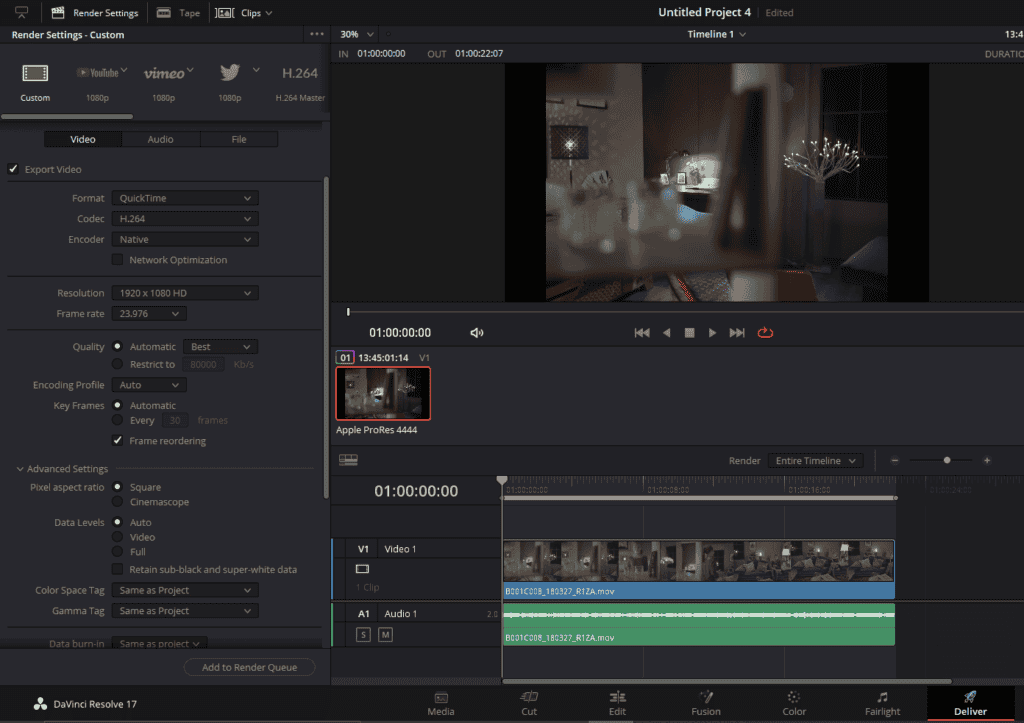
So, where you’re most likely going to run into this? I will jump into the delivery page and where most of you will find it. For the first time, this question of having to choose is under “Advanced Settings” in the export menu. You will discover Data Levels with three options to choose from, “Auto, Video, and Full.”
Now, by default, it’s set on auto, but there are two ways of overriding. You can force DaVinci Resolve to render out at video levels, or you can force it to render out at full levels.
What ends up happening is someone will render out at auto, they’ll hand off their footage, and then someone will complain that it doesn’t look right. Either the Blacks look like they’re lifted, or the Blacks look like they’re clipped out. The colorist will then do some research on the Internet.
They’ll figure out it’s probably related to video and full in data levels, and they’ll think it’s their fault. And then they’ll start playing around with these. And once you start playing around with these, you’re into the pit of despair.
So what Video Vs Full Data Levels In Davinci Resolve? The full data levels have got a range of zero to 1023. That’s strangely suspicious because even in 10bit, you’ve got 1024 steps between pure black and pure white, and then all those gradations from pure black to pure white, you’ve got 1024 steps.

Zero is your first step, to 1023, which is your last step. So full data level says, all right, I want to take zero black. And when I render this out to a codec, I will set zero black as it shows up on my scopes to zero as the bit code in the rendered file.
All right, so at zero bit is zero black, and then at 1023 bit is 100% white. That is full range.
All right, then you have this thing called video range. At the video range, some remapping takes place in Davinci Resolve. Black is not zero; white is not 1023.

Instead, black gets set to 64, and white gets set to 940. Why in the world would we use video levels and not full data levels and take these beautiful steps of gradation and reduce them by about 10%? Why would we take that away? And it has to do with legacy reasons. It has to do with backward compatibility to analog systems.
You can shoot and record on a lot of cameras till super white, right? Over 100%. Do you know what they’re doing? All they’re doing is working within video data levels and saying, we retain from 940 to 1023, and you can pull that down.
So when would you choose to select video or full or just leave it on auto? The truth is, it’s not your choice. It’s not something you should be actively managing, except in probably one very specific workflow.
Why? Because whether we set black at 64 bits or set black at 0 bit is decided by the codec that you’re rendering to. All right, so ProRes 422 HQ, there is only one choice to properly set black on ProRes 422 HQ.
When we’re rendering black, get set at 64. It’s a broadcast video codec. It’s designed to be compatible with broadcast systems. I don’t care if you’re going to YouTube. If you are rendering to ProRes 422 HQ, the codec determines whether it accepts and expects video versus full data levels encoding.
All right, where you’re handing it off doesn’t matter, because when you hand off ProRes 422 to YouTube if they do their job properly, it knows that that codec 0 black is at the 64-bit code value, and then it handles that information from there.
It does whatever it needs to do. All right? It’s all based on the codec. Some codecs have the ability to give you choices between video and full data levels.
For instance, ProRes 444 has two variants. There is the YCbCr variant where it’s video levels, and then there’s the RGB variant. If you’re recording at RGB, then the RGB variant generally expects zero black of the image to be set at the zero bit.
This is where people get into trouble. If you’re ever going to run into a problem with this, it’s going to be because you’re rendering out to ProRes 444. You hand it off to After Effects, or you hand it off to Nuke, and DaVinci Resolve defaults on ProRes; it defaults to video levels because they expect that most people are working in a video pipeline.
So it’s set to video levels; you hand it off to Nuke. There’s a good chance. Nuke looks at ProRes 444 and is thinking, that’s got to be RGB. That’s what I work in. That’s probably if they were handing off to nuke; they probably set this to render out to RGB full data levels.
Zero is set at zero. What happens? The Blacks look lifted if you hand video level data to a software expecting full data levels; remember, zero now has been remapped to 64.
Nuke or some other compositing app is looking at black at zero. All of a sudden, your darkest elements are up at 64. That is why it looks washed out.
When you render out to video levels, and you open it up with an app expecting full data levels, your image is going to look flat. It’s going to look washed out. Highlights are going to be dropped down. Blacks are going to be lifted. This is the problem. This is the only time when I would advise you to switch off of auto is when you’re in an explicit RGB pipeline, all right?
Otherwise, leave it at auto. Just go ahead into your Delivery page in Davinci Resolve and look at all the different codecs present for you to export.
Which one should you pick? Just set it on auto. Davinci Resolve knows what each and every codec wants and expects, and it’s going to map to that.
Also Read- How To Save Videos As MP4 In Davinci Resolve
Also Read- How To Rotate Video In Davinci Resolve
Also Read- How to Add Subtitles in DaVinci Resolve
Finding Data Levels in Project Settings
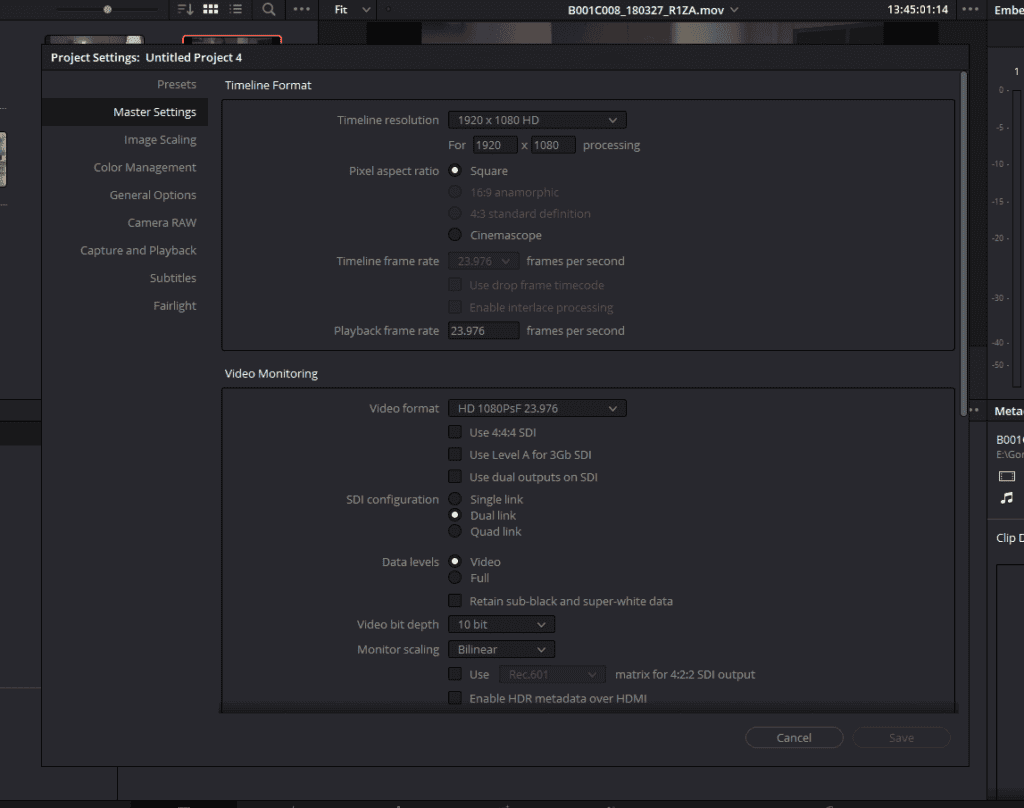
Now, where’s another place that people will find this choice and get confused?
I’m going to come up to project settings, and if you scroll down under video monitoring, we’ve got video and full data levels. All right, I’m working in a YCbCr pipeline. I’ve got this set for video levels. My external monitor is expecting black at the 64-bit code value.
Suppose I come down to video monitoring and set this to full data levels. Now, when I press save, Blacks get set deeper. I’m getting some clipping that wasn’t there before in the black—the same thing with the highlights. If I had highlights that were pinned all the way at 100 IRE, some of that detail is going to get clipped out as those code values get remapped.
The thing is that setting only affects video monitoring. It doesn’t affect DaVinci Resolve’s internal image processing. It doesn’t affect the scopes. It doesn’t affect the viewer.
So if you are working in an RGB workflow and really want to see what your image looks like, you’re going to want to go ahead and come into the video monitoring section, set this to full data levels, and then make sure your external reference monitor is also expecting RGB coming in, not your normal YUV image coming in.
Finding Data Levels In Media Pool
Now, let’s close this out. Let’s jump into the media pool because I want to show you one other thing, one other place where you’re going to find this option of video and full data levels. And that’s on the actual clip itself.
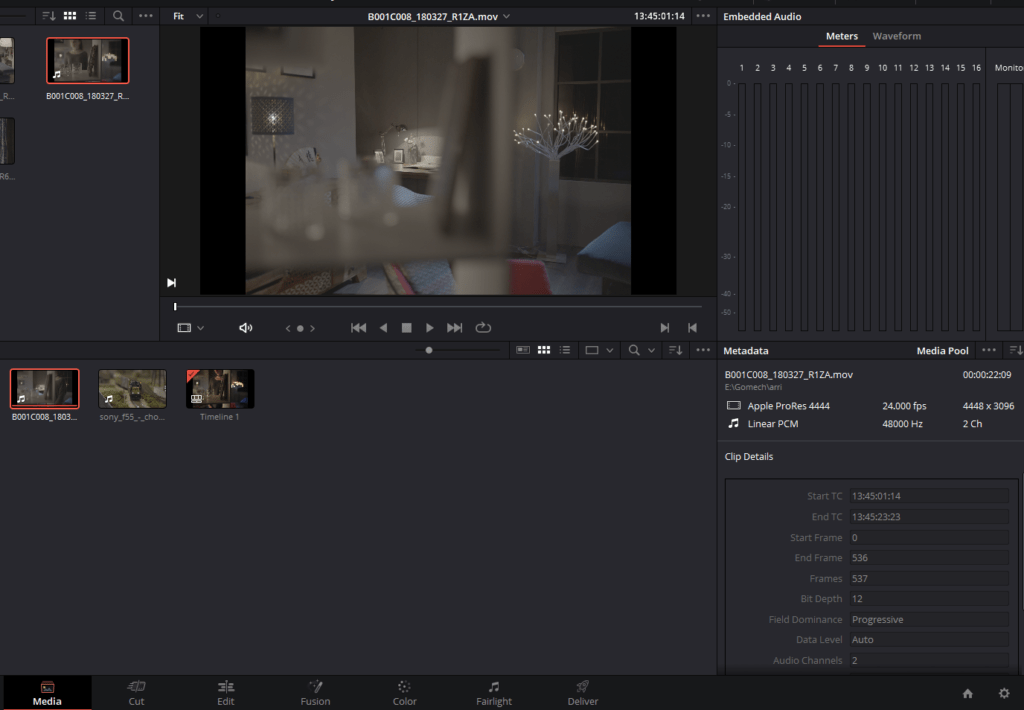
So I come into the media pool; I’m going to right-click on a clip and go into clip attributes. I’ve got full data levels, video data levels, and auto.
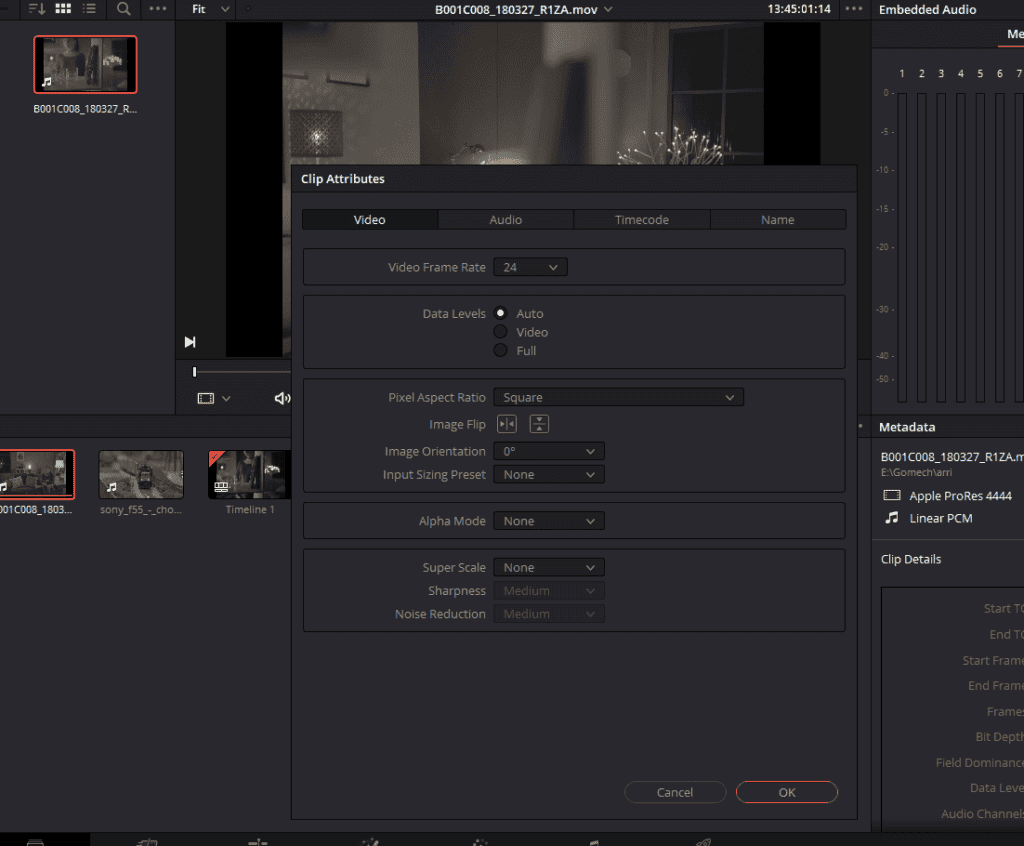
Again, let DaVinci Resolve do the work for you. It knows the codec that’s coming in. In this case, it’s ProRes 4444. It knows why data levels do this variant requires.
So it’s just going to automatically interpret it. The only time you need to mess with this is if, let’s say, after effects rendered out to ProRes 444. They rendered out to RGB levels full data levels, and Resolve is interpreting that as video levels. It’s not going to look right.
It’s actually going to clip out detail. It’s just going to take the Blacks below the 64-bit code value and ignore them and the whites above 960. It’s going to clip those out and ignore any of the whites above 960 to 1023. That’s how you know there’s a problem, and then you can override here on a clip attribute basis.
Admittedly, this is a little confusing, but one of the reasons it’s confusing is because mostly you shouldn’t be playing with this. You should not have to mess with this. Don’t touch it unless you absolutely need to.
Remember, in Project Settings, your video data levels and full data levels only affect monitoring it’s in the video monitoring section. It has nothing to do with rendering.
Data Levels and Scopes in Davinci Resolve
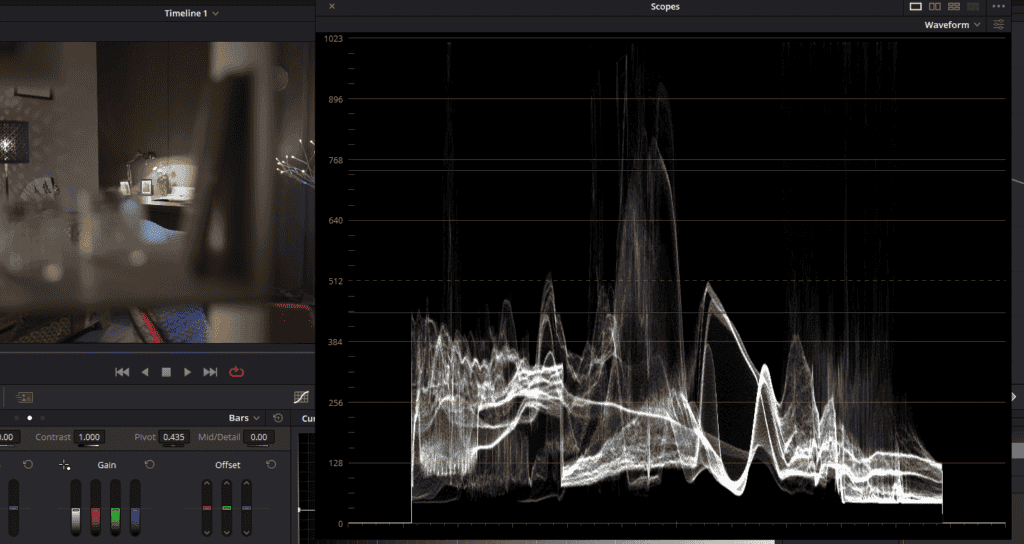
One last thing. Let me jump into the color page, and I’m going to go ahead and pull up my scopes. And one last point of confusion is the numbering on the waveforms and the parades.
You’ll notice 0 to 1023. But we’re working on a ProRes codec that’s at the video level. Shouldn’t that be 64 to 960? No, because what happens is internal. Davinci Resolve looks at that ProRes clip that we have here says, oh, okay, it’s setting 0 black at 64. It’s setting pure white at 960. I am now going to take that and just expand it out to work at full 10 bit, 32-bit float with black at zero, white at 1023.
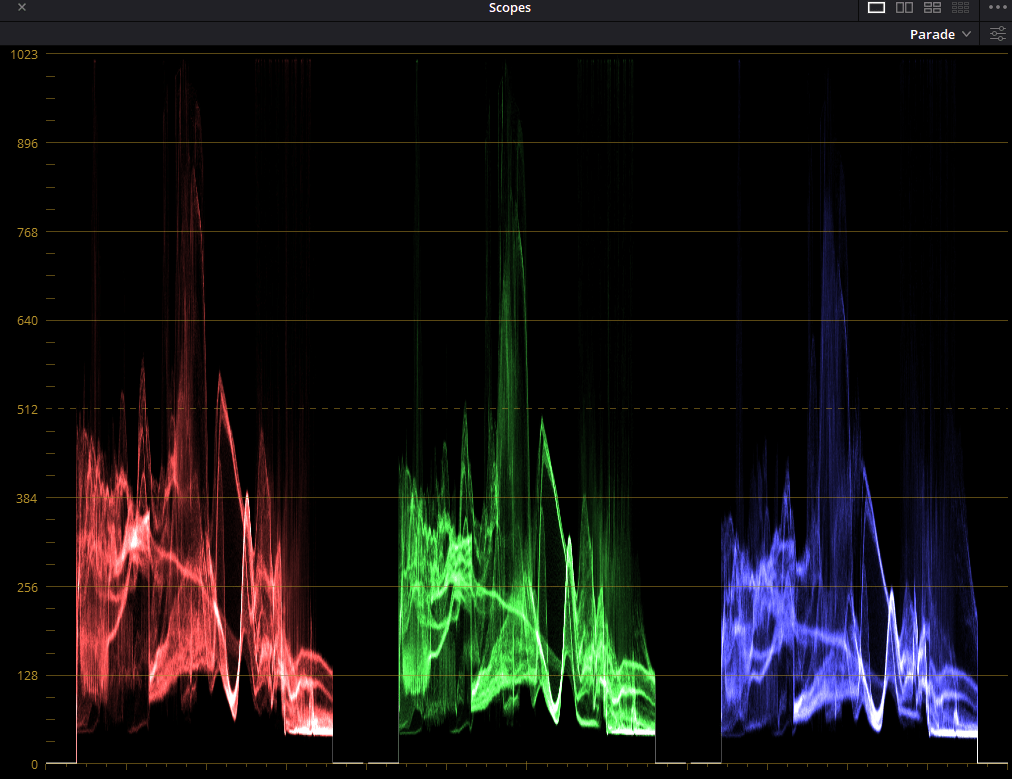
It does all of its processing in full 10-bit, and then whether or not it then remaps 0 to 64, 100 down to 960 depends on the codec you’re rendering too.
If you’re rendering out to DPX, it’s most likely going to render out at full data range, and if it’s rendering out to ProRes 422 HQ, it’s going to render out with the code values at video range.
All right, that’s how all of this works. Don’t worry that you need to set these settings at full data levels or range because you want adventures to work within the full 10-bit range.
Internally it is always working at full 10-bit, 32-bit float, so don’t use that as an excuse to go play around with these settings; only play with them when you want to, and then Davinci Resolve becomes a much more pleasant place to work, and you’re not going to have to jump onto the color grading forums and yell and scream wondering what the heck is going on with my images because now you know

