
In the vast realm of video editing, nothing quite shatters the momentum of an edit session like technical hiccups. DaVinci Resolve, as advanced and powerful as it is, isn’t without its share of quirks. Over my years of wielding this tool to craft stories, one of the most vexing issues I’ve encountered has been audio stuttering. It’s that annoying, persistent stutter that not only disrupts your playback but also pulls you out of your creative zone. But fear not, fellow editors. Drawing from my own trials and tribulations, I’ve put together this guide, offering 6 Fixes for DaVinci Resolve Audio Stuttering.
Fix 1. DaVinci Resolve Audio Stuttering: Delving into Frame Rate Synchronization
Every video editor knows the feeling: you’ve poured hours into your latest project, meticulously piecing together your footage, only to be greeted by the frustrating stutter of unsynchronized audio and video during playback. Such issues can disrupt an otherwise smooth editing flow, especially when using industry-standard software like DaVinci Resolve.
A Deceptively Simple Problem
DaVinci Resolve is a powerhouse, providing an array of sophisticated tools to professionals across the globe. However, like any advanced software, it has its quirks. Among the most confounding is audio and video stuttering. On the surface, the issue might seem intricate, given the myriad of settings and options available. But oftentimes, the root cause is a simple misalignment of frame rates.
The Frame Rate Culprit
Now, frame rate, in layman’s terms, refers to the number of individual frames or images displayed per second in a video. It’s crucial in determining how smooth your video looks during playback. The human eye and brain synchronize to perceive motion at around 24 frames per second (fps), which is why this rate (or close approximations like 25fps or 30fps) is commonly used in film and television.
Where things can go awry in DaVinci Resolve is when there’s a mismatch between the Timeline Frame Rate and the Playback Frame Rate.
Navigating to the Solution
The fix is more straightforward than you might imagine:
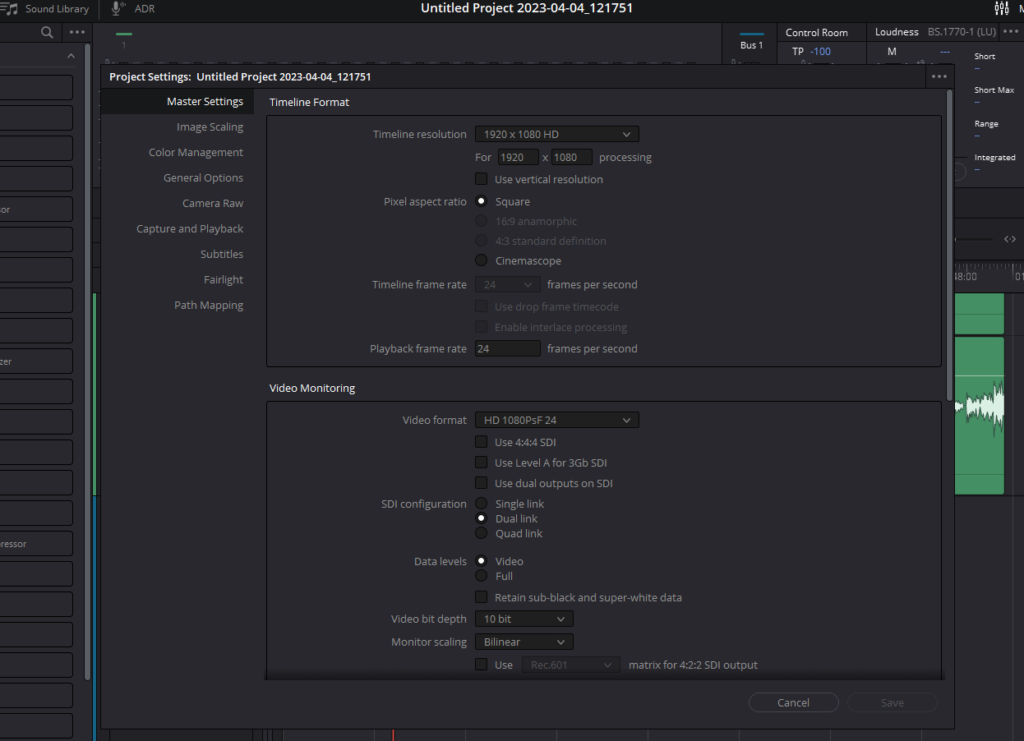
- Access Project Settings: Begin by clicking on File and then navigating down to Project Settings from the menu bar on top of Davinci Resolve UI.
- Spotting the Frame Rates: Once inside, you’ll need to find the Timeline Frame Rate. This option will be grayed out, indicating a preset or default setting. Right next to it or within the vicinity, you should see the Playback Frame Rate.
- Ensuring Synchronization: It’s imperative that these two rates match. If there’s any disparity, it’s likely the source of your playback stuttering. So if the Timeline Frame Rate is 24fps then Playback Frame Rate should also be 24fps.
Understanding the Importance of Consistency
Why does such a simple discrepancy cause such a pronounced issue? Think of your video project as a finely-tuned orchestra. Each instrument (or setting) needs to play in harmony with the others. When one instrument is out of tune or offbeat, it disrupts the entire performance. Similarly, when your frame rates are not in sync, it throws off the rhythm and flow of your video, leading to stuttering during playback.
Fix 2. Improving Playback Speed in DaVinci Resolve To Remove Audio Stutter
In our ongoing series of mastering DaVinci Resolve, here’s another critical tip that can be a game-changer for many editors, especially when dealing with high-resolution footage that tends to slow down during playback. If you’ve ever been in the middle of a project and found yourself frustrated by laggy playback resulting in audio stuttering, you’ll appreciate this advice.
Adjusting Timeline Proxy Resolution for Smoother Playback
DaVinci Resolve offers a nifty feature known as the Timeline Proxy Resolution. What it essentially does is reduce the resolution of your playback, thereby demanding less from your computer’s hardware and ensuring a smoother editing experience.
Here’s a step-by-step guide to adjust it:
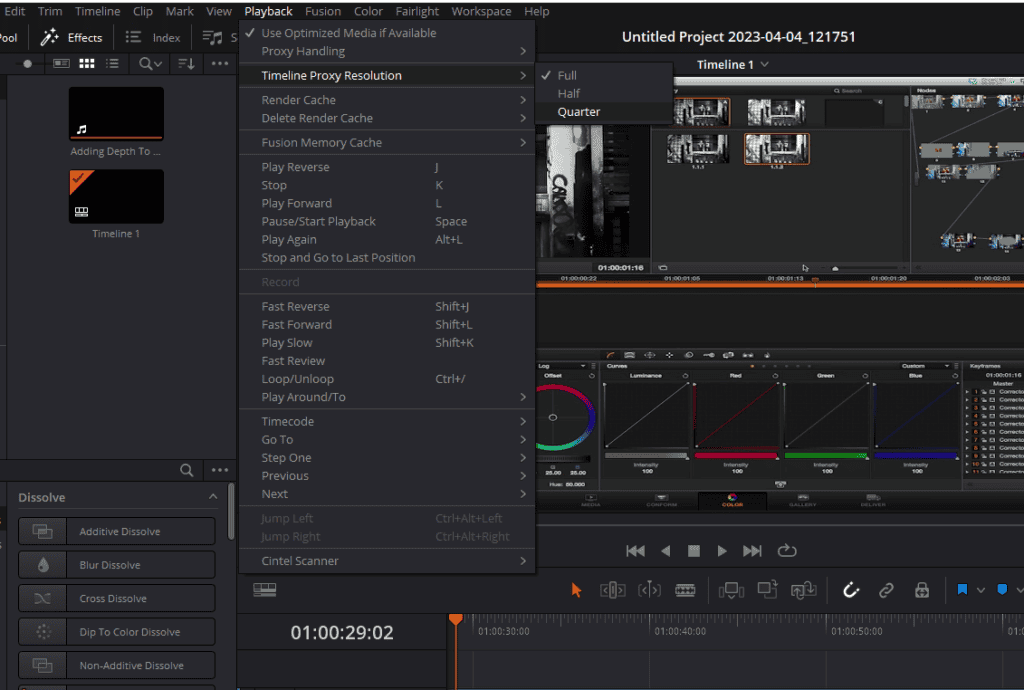
- Look towards the top of your DaVinci Resolve interface and locate the Playback tab.
- Click on it and a dropdown menu will appear.
- From the dropdown, select Timeline Proxy Resolution.
- Set it to Quarter.
By setting it to a quarter, you’re lowering the playback quality. While this might make the video appear less sharp during the edit, it drastically improves playback speed. Once you’re ready to export, DaVinci will still render out in full quality, ensuring your final product looks crisp and clear.
Utilizing the Render Cache Feature
Another invaluable feature to improve playback speed in DaVinci Resolve is the Render Cache. By setting this feature to “Smart,” DaVinci Resolve will automatically render clips in your timeline that it deems might cause playback issues. This proactive rendering ensures that when you play back your timeline, it runs smoothly without hiccups.
To activate this:
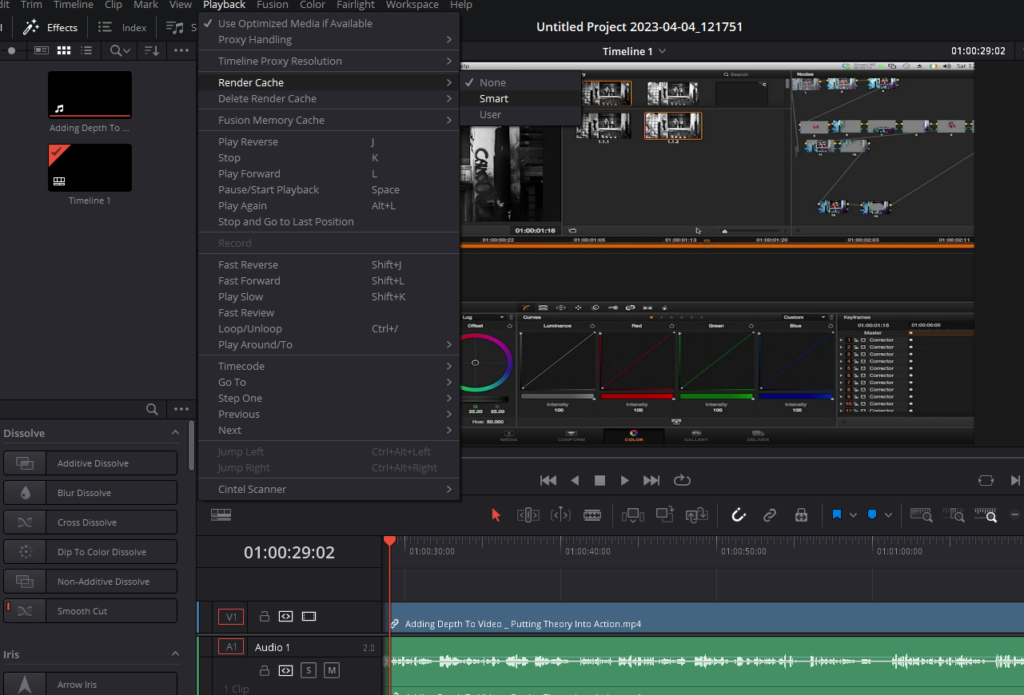
- Go back to the Playback tab at the top of your screen.
- In the dropdown menu, find and click on Render Cache.
- Set it to Smart.
Remember, while this function makes playback smoother, it might slightly increase the time it takes for DaVinci to process your clips initially. However, this small wait can be a worthy trade-off for a seamless editing experience.
Fix 3. Tackling Audio Artifacting in DaVinci Resolve
DaVinci Resolve is celebrated for its exceptional video editing capabilities, but like any sophisticated software, it can present challenges from time to time. One such challenge that’s been vexing many users is audio artifacting post-render which results in audio stutting. In this guide, I’ll walk you through a solution that rectified the issue for me, and hopefully, it will do the same for you.
Identifying Audio Artifacting
First, let’s discuss what audio artifacting is. If, after rendering out your videos in DaVinci Resolve, you’ve noticed some high-pitched squeaks or unexpected sound distortions – what some might describe as “squeals” or “glitches” – then you’re likely facing this issue.
The Deliver Page Solution
Your journey to rectified audio begins on the Deliver page of DaVinci Resolve:
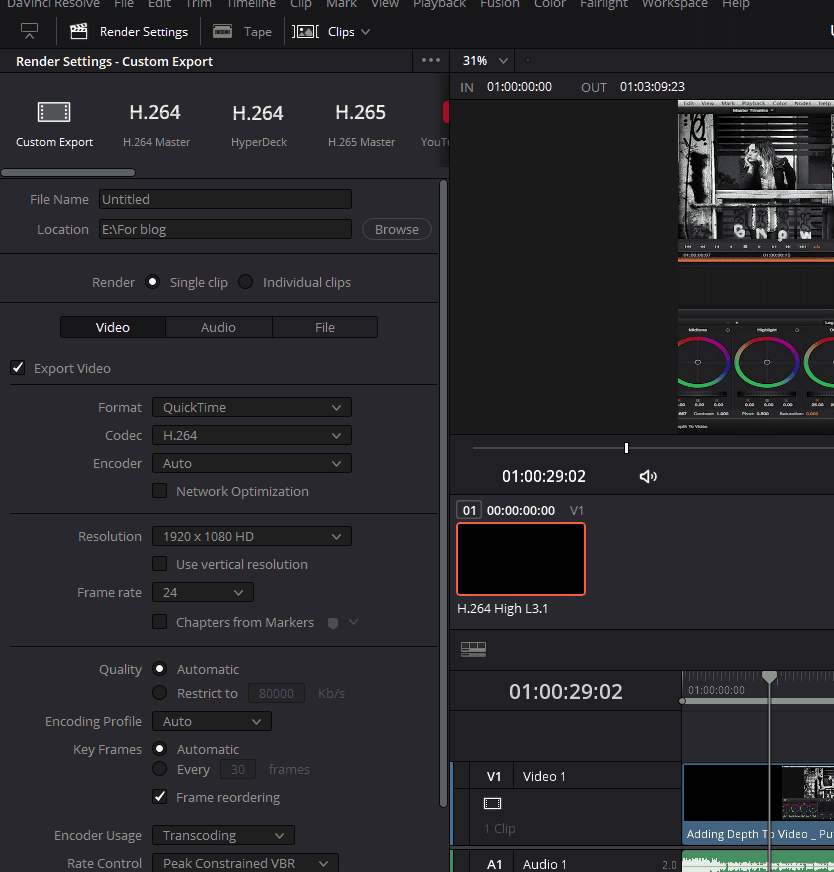
- Ditch the Default YouTube Preset: While many of us, myself included, are accustomed to using the YouTube preset under the Deliver tab, it’s essential to avoid it for this fix. Instead, navigate to the Custom option.
- Selecting the Proper File Type: Once you’re in the custom settings:
- Assign any title; it’s not consequential for this fix.
- Head to the video section.
- In the ‘Format’ drop-down menu, instead of MP4, select QuickTime from the format dropdown
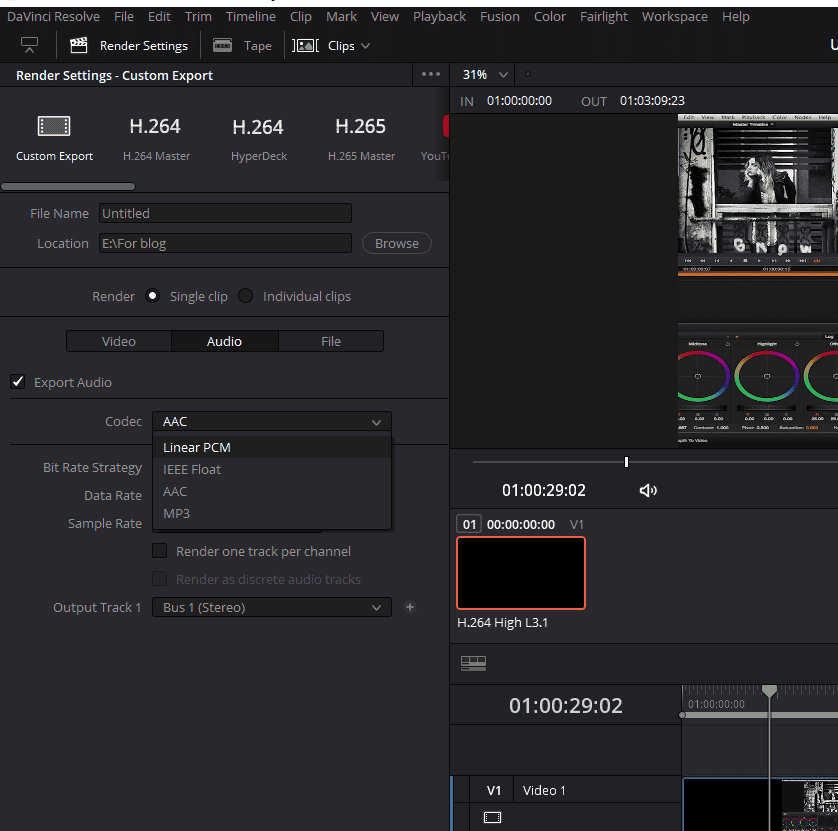
- Adjusting the Audio Codec:
- Click on the audio tab.
- With MP4, you typically see only the AAC in the ‘Codec’ option. However, QuickTime opens up more possibilities.
- Choose Linear PCM from the codec dropdown.
- Fine-Tuning the Bit Depth:
- Still under the audio tab, find the Bit Depth option.
- Instead of the default 16, select 24.
After implementing these settings, render your video, and with a bit of luck, your audio artifacting and stuttering woes should be history.
Fix 4. A Quick Solution to DaVinci Resolve’s Audio Stutter: Regulating Render Speed
For all the DaVinci Resolve users out there, you’re probably all too aware of the prowess of this software. However, even the most sophisticated software can come with its fair share of glitches. Today, we’re diving into a specific audio glitch in DaVinci Resolve, understanding its root, and most importantly, unearthing its solution.
Recognizing the Audio Glitch
While working on a project in DaVinci Resolve, you might come across sudden jarring interruptions in the audio resulting in audio stuttering. The core issue appeared to be an overload on the CPU.
In fact, during my investigation, I unearthed an archived forum post suggesting that this audio glitch is not a recent phenomenon. Many DaVinci Resolve users have grappled with this glitch for a while.
Throttling Your Render: The Magic Fix

So, how did I finally resolve this persisting issue? Let’s step back into DaVinci:
- Navigate to the Deliver Page: Once you’re there, whether you opt for ‘custom’ or any other setting, make your way to the ‘File’ option and for option ‘Render Speed’.
- Adjust the Render Speed: By default, your render speed might be set at ‘Maximum’. While this speed promises maximum efficiency, it’s this very speed that might be causing those pesky glitches. The solution? Throttle it down. Bring your render speed to a moderate 50.
Once these adjustments are made and you re-render your project, the audio should play seamlessly, devoid of any stutters.
Fix 5. Using Proxy Generator in DaVinci Resolve
DaVinci Resolve, a name synonymous with professional video editing, often comes with its own set of challenges. One recurrent issue has been audio stuttering, leading to choppy playback, a frustrating hiccup in an otherwise seamless editing process.
Understanding Proxy Files
For the uninitiated, proxy files are the unsung heroes of the editing world. These are essentially lower-resolution replicas of your original high-definition video files. Why are they so significant? Because they allow for smooth playback in your editing software, without the weight of high-resolution files slowing down the process.
Enter The Proxy Generator
DaVinci Resolve comes with a Proxy Generator, a game-changer that streamlines the process. Unlike its predecessor, the Proxy Generator is:
- Faster.
- More efficient.
- User-friendly.
Although an integral part of the DaVinci Resolve experience, the Proxy Generator is a separate application, installed simultaneously with Resolve.
Making the Most of the Proxy Generator
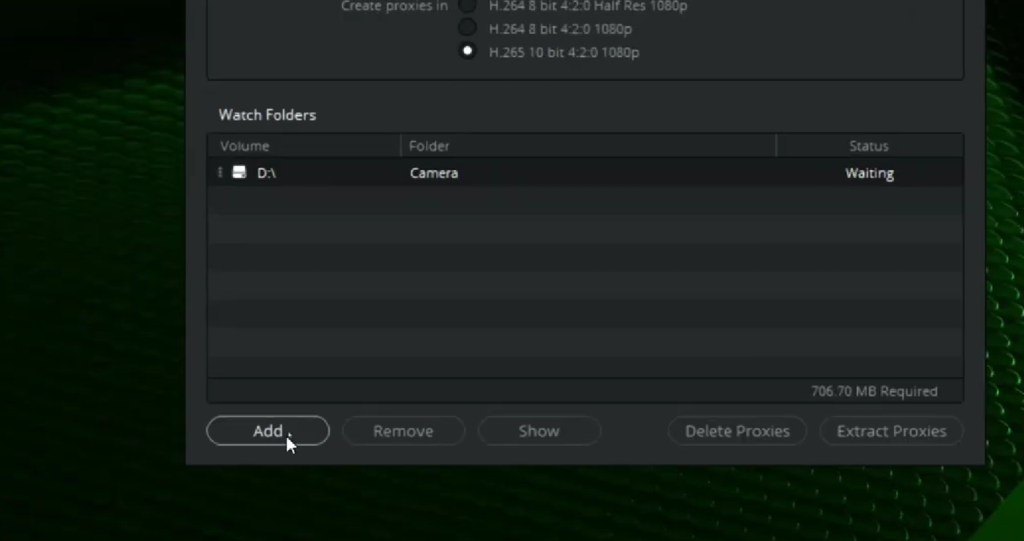
- Setting Up: Launch the Blackmagic Proxy Generator and direct it to a ‘watch folder’ – the one with all your media files. These are the files you intend to create proxies for. If you have multiple such folders, just click ‘add’ and repeat.
- Choosing Your File Type: Depending on your OS (Windows or Mac), you’ll have various file format options. For those with a less robust computer setup, ‘H.264 8 bit 4.2.0 Half Res 1080p’ will be the ideal choice, ensuring smoother playback.
- Let It Run: After setting your preferences, hit ‘start’. The Proxy Generator will then produce proxy folders within your designated watch folders and begin the proxy file creation. One standout feature? Anytime you add a new file to your original folder, the Proxy Generator instantly crafts a corresponding proxy file. It’s automation at its finest!
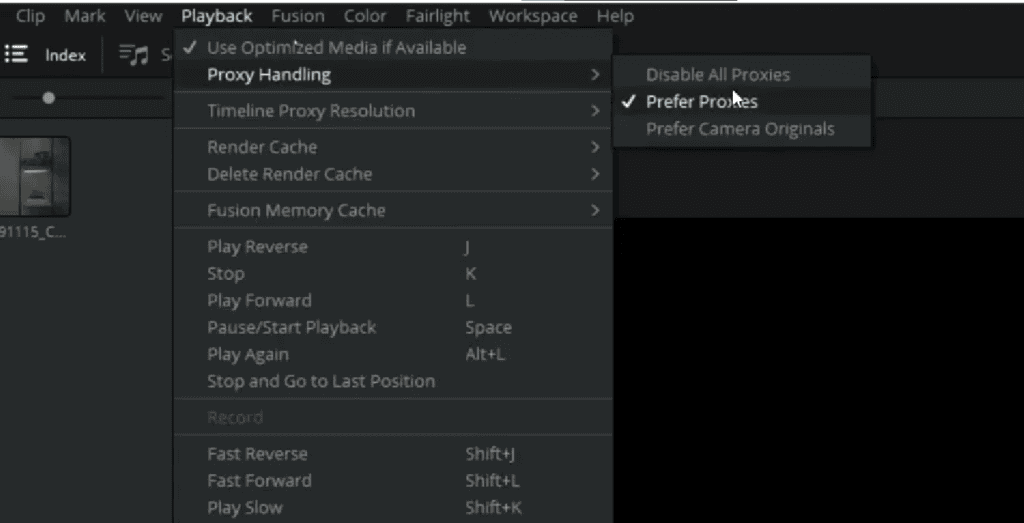
- Switching Between Proxies & Originals: While proxies excel at establishing your timeline, for intricate tasks like effects compositing or color grading, the full-resolution files remain unmatched. DaVinci Resolve has made toggling between the two effortless. After generating proxies, head to Davinci Resolve, and in the Playback menu on top, select ‘proxy handling’, and choose between proxies or camera originals.
Fix 6. DaVinci Resolve Audio Stuttering: The Importance of Audio Hardware Settings
DaVinci Resolve is an editing software powerhouse, renowned for its features and capabilities. But like any software, it’s not immune to technical glitches, especially when it comes to audio. While we’ve explored many fixes for audio stuttering in DaVinci Resolve, today we’re zoning in on the often-overlooked yet crucial aspect: Audio Hardware Settings.
Understanding the Problem
For many editors, it’s a natural assumption that higher-end audio hardware would naturally gel with professional software like DaVinci Resolve. However, the reality can be quite the opposite. The compatibility and settings of your sound interface, be it an external sound card or an integrated one, can sometimes be the root cause of audio hiccups.
Personal Experience Snapshot:
I had a smooth sailing experience editing a project on my home setup. Every audio clip played without a stutter. But when I transferred the same project to a high-end studio workstation, the audio stuttered, causing immense frustration. Surprisingly, the fault lay not in the software or the project files but in the audio hardware settings.
The Solution: Tweaking the Audio Hardware Preference
Navigating the maze of settings in professional editing software can be daunting, but sometimes the fix is just a few clicks away.
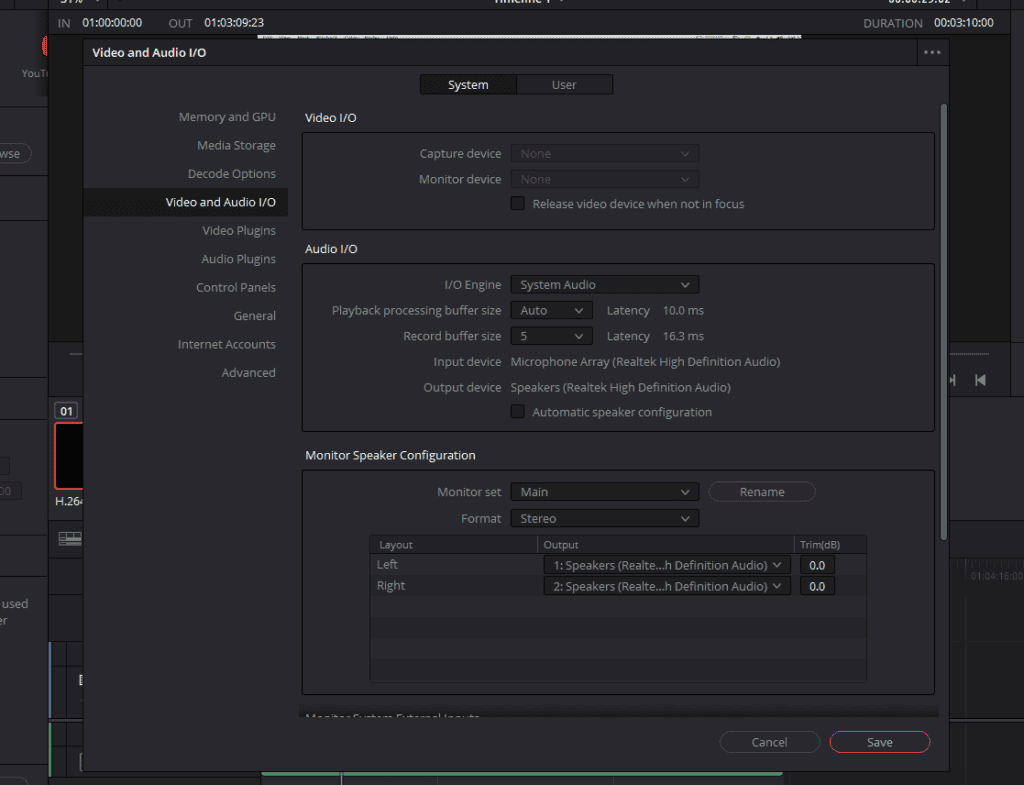
- Accessing Preferences: Click on the DaVinci Resolve button from the menu on top and head to Preferences.
- Navigating to the Right Tab: Once in the preferences window, select Video and Audio I/O.
- Exploring Audio Output Device Options: Here, you’ll find an option ‘Output Device’. Uncheck the box which says ‘Automatic speaker configuration’.
- Switch and Test: Start by selecting an alternate audio device from the dropdown. Once selected, play your project to see if the audio issues have been resolved. It might take a couple of tries to find the one that’s most compatible.
Last Words
In the ever-evolving world of video editing, it’s essential to equip oneself with solutions to common challenges. Audio stuttering in DaVinci Resolve can halt your creative momentum, but armed with the strategies outlined above, you can smoothly sail through your projects without a hitch. Remember, while DaVinci Resolve stands as a pinnacle in the editing world, it isn’t infallible. Always be prepared to troubleshoot, adapt, and find solutions to keep your editing flow uninterrupted. With the six fixes in your arsenal, you’re better poised to handle any audio quirks that come your way, ensuring that your final product is nothing short of perfection. Happy editing!