Hello filmmakers and welcome back to FilmmakingElements.com! In this article, we will provide you with nine essential fixes to address audio recording issues in DaVinci Resolve. If you are experiencing problems such as missing waveforms, unresponsive microphones, or silent audio, this article will help you get back on track. Say goodbye to your voice-over recording troubles in DaVinci Resolve as we guide you through these effective solutions. Let’s dive back into Resolve and explore these fixes.
Davinci Resolve Not Recording Audio: 9 Fixes
Fix 1 – Discover the Solution to Cracking and Popping Voiceovers
One of the common audio recording issues in DaVinci Resolve is cracking and popping voiceovers. If you’ve been struggling for days, trying different microphones, and adjusting settings without any success, we have the solution for you. Jump into Davinci Resolve and explore the key setting that needs to be changed to resolve this frustrating issue.

During our investigation, we checked sample rates and other settings, but the critical change needed was found in the preferences. To access this, go to DaVinci Resolve > Preferences from the top left corner, then navigate to the System side and select Video and Audio I/O. Here, you want to ensure that your Input Device is correctly set to your microphone. The crucial adjustment, however, lies in the “Record Buffer Size.” If this is set to zero, the audio will not record properly, resulting in cracking and popping sounds.
By adjusting the “Record Buffer Size” to a different value (e.g., 5 or 8), you should notice a significant improvement in the audio recording quality.
So, if you’re experiencing garbled, popping, and echoing voiceovers in DaVinci Resolve, try adjusting the “Record Buffer Size” in the preferences. This simple solution may save you days of frustration and help you record high-quality audio directly into Resolve.
Fix 2 – Ensuring Microphone Selection and Restarting Davinci Resolve
This fix emphasizes the importance of selecting the correct input device and adjusting system settings to use the microphone as the primary input.
To apply this fix, ensure that your microphone is selected as the input device in DaVinci Resolve’s preferences. However, keep in mind that you may need to restart Davinci Resolve for the changes to take effect. Sometimes, the program doesn’t immediately register the update, so restarting is a helpful step to ensure proper microphone selection.
Additionally, confirm that your computer’s system settings are set to use the microphone as the primary input. This crucial step is often overlooked but can make a significant difference in getting your audio to record correctly.
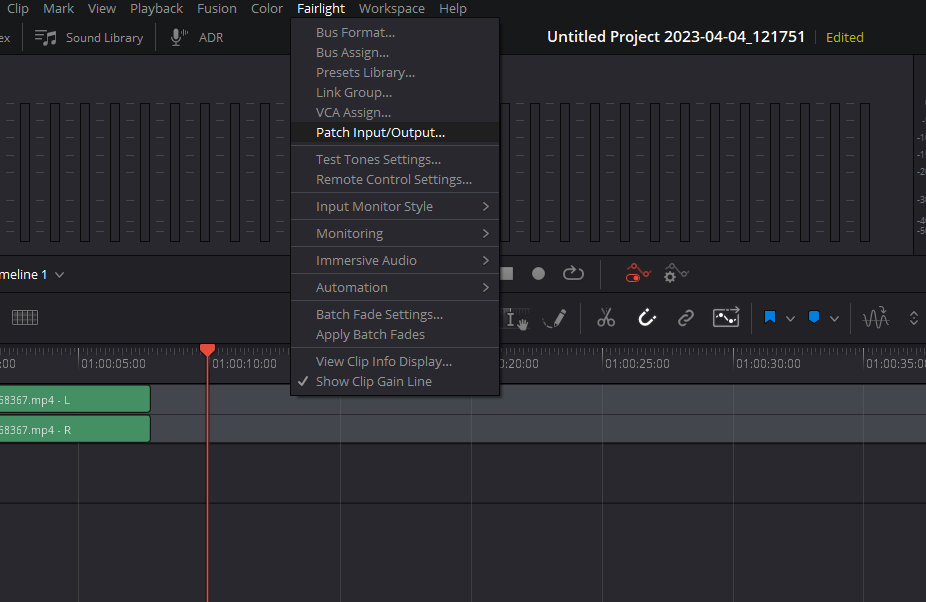
Fix 3 – Patching Your Microphone Correctly in DaVinci Resolve
In this section, we will discuss the third fix for audio recording issues in DaVinci Resolve, which focuses on properly patching your microphone within the software. This is another common issue that people may encounter when trying to record audio.
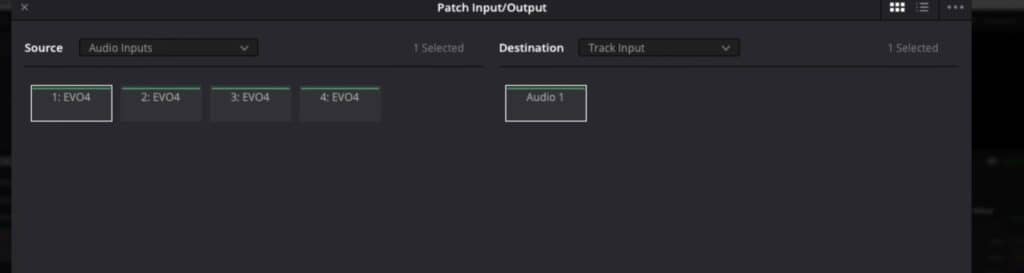
To ensure your microphone is correctly patched, follow these steps:
- If you don’t see your microphone in the patch settings, try restarting Davinci Resolve. Although not always necessary, some users may need to do this to refresh the settings.
- Navigate to the Fairlight drop-down menu from the menu on top and click on “Patch Input/Output” to access the patch settings.
- Make sure “Audio Input” is selected in the Source drop-down on the left side of the patch settings window, while “Track Input” is selected on the right side (Destination side).
- If you have a mono track, you should see “Audio 1” in the list. If your microphone is not patched, the fields will be empty.
- To patch your microphone to Resolve, click on both “Audio Input” and “Track Input” options, and then hit the “Patch” button at the bottom of the window.
By following these steps, your microphone should now be properly patched to DaVinci Resolve, allowing you to record audio seamlessly.
Fix 4 – Arming the Track to Record and Adjusting Input Monitor Style
In this section, we will address the fourth fix for audio recording issues in DaVinci Resolve, which deals with arming the track to record and adjusting the input monitor style. If you find that your meters aren’t moving or nothing happens when you hit record, this fix will help you get back on track.
Firstly, make sure you arm your track to record by clicking on the “R” (record) button in your track. This step is essential, as your recording won’t work if the track isn’t armed.
Next, you might wonder why your meters aren’t moving even though the track is armed. The answer lies in the input monitor style settings. Follow these steps to access and adjust these settings:
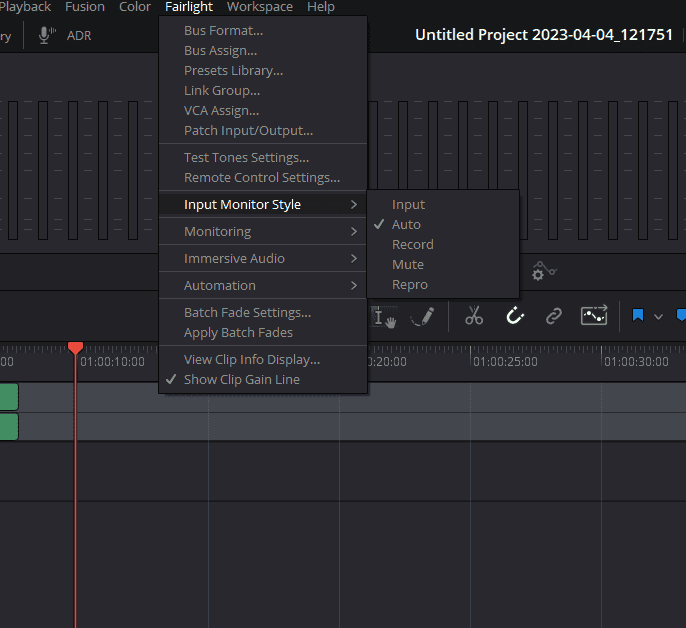
- Navigate to the Fairlight menu from the top and click on “Input Monitor Style.”
- You will see various options that determine how you hear or monitor your recording:
- Input: Hear the recording only on the input.
- Auto: Constant monitoring through your microphone (recommended for most cases).
- Record: Hear the recording only when you are recording.
- Mute: Disable monitoring entirely, useful if you’re experiencing feedback from speakers or don’t have headphones.
- Repro: Listen only to what has already been recorded, rather than the live input.
Fix 5 – Recording and Monitoring Waveforms in DaVinci Resolve
In this section, we will discuss the fifth fix for audio recording issues in DaVinci Resolve, which involves recording and monitoring waveforms during the process. If you encounter issues with waveforms appearing flat or not being visible, this fix will help you get the desired results.
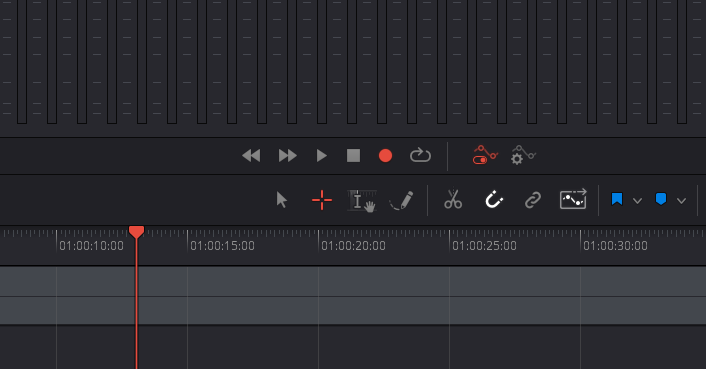
Once your track is armed and you’re ready to record, click on the record button (circle looking icon). If you notice that the waveform looks like a flat line, it could be due to your input monitor settings. For example, if the input monitor is set to “Mute,” you won’t be able to hear or see anything while recording.
To resolve this issue, adjust your input monitor settings as follows:
- Go back to the Fairlight menu and click on “Input Monitor Style.”
- Change the setting to “Auto” (or another preferred option).
Now, when you record, you should see the waveforms appearing as you speak. If you stop the recording and play it back, you will be able to hear the audio without any issues.
Fix 6 – Ensuring Audio Tracks are Sent to the Correct Bus
In this section, we will address the sixth fix for audio recording issues in DaVinci Resolve, which involves making sure your audio tracks are being sent to the correct bus. If you encounter a situation where the bus meter isn’t moving or you can’t hear anything during playback, this fix will help you resolve the issue.
Sometimes, your audio track might not be sent to the appropriate bus by default. To check and adjust this setting, follow these steps:
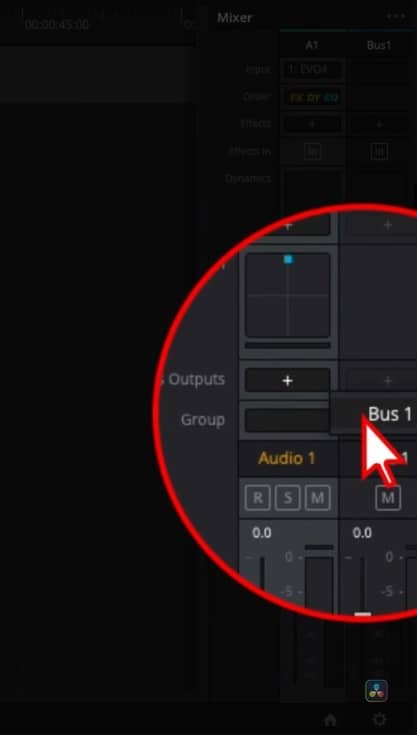
- Play through your track and observe the meters. If the bus meter isn’t moving, it means the audio track is not being sent to the correct bus.
- To fix this, select the Mixer from the top right corner. In the Mixer on the right side, click on the “+” symbol infront of Bus Outputs of Audio 1.
- Select the correct bus (e.g., Bus 1) from the list.
Once you have completed these steps, both the audio track and bus meters should show movement during playback. This indicates that the audio is being routed correctly, and you should be able to hear it without any issues.
Fix 7 – Ensuring the Correct Audio Bus is Selected for Monitoring
In this section, we will discuss the seventh fix for audio recording issues in DaVinci Resolve, which involves making sure you have selected the correct audio bus for monitoring. This issue may arise when you have multiple buses set up in your project and are unable to hear the audio during playback, despite seeing meters moving for both the audio track and bus.
Here’s how to check and change the audio bus settings for monitoring in Fairlight:
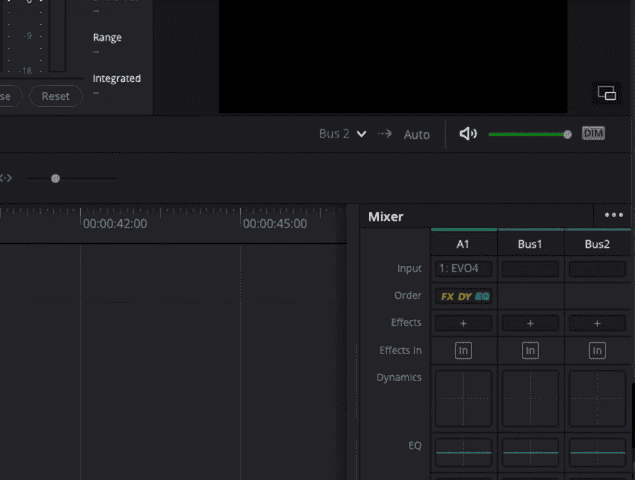
- Play through your track, and if you can’t hear anything even though the meters are moving in the mixer, check the bus settings in the Fairlight tab.
- Locate the bus selection dropdown below to the viewer window in Fairlight.
- If the bus currently selected for monitoring does not correspond to the bus you are using, click the dropdown and choose the correct bus (e.g., Bus 1).
After adjusting the bus settings for monitoring, you should be able to hear the audio during playback. It’s crucial to ensure that the correct audio bus is selected for monitoring, as it directly affects what you hear through your headphones or speakers.
Fix 8 – Matching Microphone and Resolve Sample Rates
In this section, we will discuss the eighth fix for audio recording issues in DaVinci Resolve, which is ensuring that the sample rates of your microphone and the Resolve project match. If the sample rates do not match, your audio may not sound or play back correctly, leading to frustration.
Follow these steps to check and set your sample rates:
- Verify your microphone’s sample rate. Typically, the default sample rate for Resolve is 48,000 Hz, so make sure your microphone is set up to use the same sample rate.
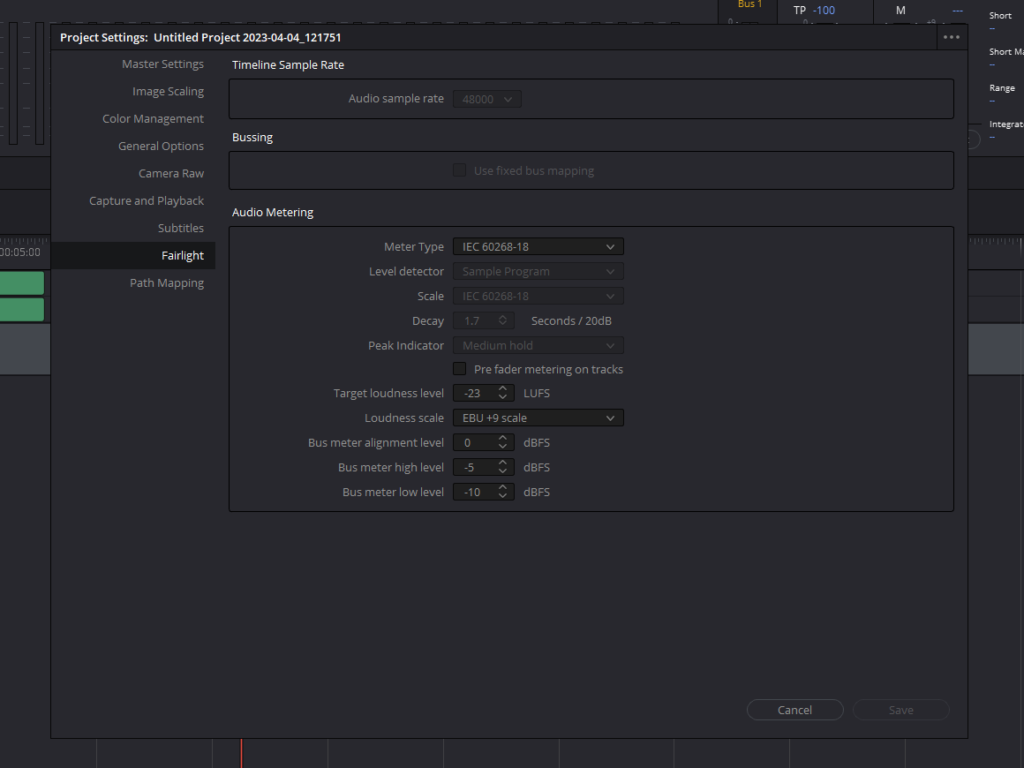
- Check the sample rate in Davinci Resolve by opening the Project Settings. Click on the gear-looking icon in the bottom right corner to open Project Settings.
- Navigate to the Fairlight tab in the Project Settings, where you will find the audio sample rate. Note that the sample rate is greyed out and cannot be changed once a timeline has been created.
- To change the sample rate, you need to delete the existing timeline in the Edit tab.
- Once the timeline is deleted, reopen the Project Settings. Now, the audio sample rate option should be available for changes.
- Set the sample rate to match your microphone’s sample rate (e.g., 48,000 Hz) and create a new timeline.
Fix 9 – Checking the Sample Rate on Your Computer
In this section, we will address the ninth fix for audio recording issues in DaVinci Resolve, which is checking and setting the sample rate on your computer to match DaVinci Resolve’s sample rate. This is essential for ensuring smooth and error-free audio recording.
For Mac users, follow these steps:
- Open the Audio MIDI Setup application on your Mac.
- Select your audio interface or microphone in the list of devices.
- Check the format settings for both input and output. Make sure the sample rate matches the one you’ve set in DaVinci Resolve (e.g., 48,000 Hz).
For PC users, the process may differ depending on your system and audio interface. Refer to your device’s manual or manufacturer’s support site for specific instructions on how to set the sample rate.
By matching the sample rate on your computer and in DaVinci Resolve, you can avoid issues with audio quality and recording. Remember to double-check these settings when setting up your voiceovers or recording audio to ensure a smooth and hassle-free experience.
These nine fixes should help you troubleshoot and resolve any audio recording problems you may encounter when using DaVinci Resolve. By following these steps, you can ensure that your voiceovers and audio recordings are of high quality and free from technical issues. Happy recording!