If you’re a video editor, you might have heard of DaVinci Resolve, a powerful software that lets you create stunning videos with ease. But did you know that the quality of your exported videos can vary depending on the device you use? In this article, I’ll show you Davinci Resolve Best Export Settings on iPad.
But first, let me introduce myself. I’m Salik, the author of FilmmakingElements.com. I have been a filmmaker for over 10 years. I am also a certified DaVinci Resolve Trainer and I have used DaVinci Resolve for many of my projects. I have firsthand experience with using DaVinci Resolve on different devices, including iPads and Macs. I know the pros and cons of each device and how to tweak the settings to get the most out of them.
In this article, I’ll focus on the “Quick Export” feature of DaVinci Resolve, which allows you to export your videos in a fast and easy way. However, this feature also comes with some drawbacks, especially when you use it on an iPad. You might notice that your exported videos are much smaller in size than when you use a Mac. This might seem like a good thing, but it also means that your video quality might suffer. Why does this happen? How can you fix it? What are the best export settings for your iPad? These are some of the questions that I’ll answer in this article.
Davinci Resolve Best Export Settings on iPad
Quick Export Discrepancies Between Devices
When it comes to video editing, the choice of software is crucial. DaVinci Resolve has emerged as a preferred tool for many, offering a myriad of features suitable for both beginners and seasoned professionals. Among its many offerings, the “Quick Export” option in the iPad version of the Davinci Resolve stands out for its simplicity and speed. However, using DaVinci Resolve across various devices reveals certain nuances, especially in the quick export feature. Let’s delve deeper into the disparities observed when using this feature on an iPad versus a Mac.
- Understanding Quick Export:
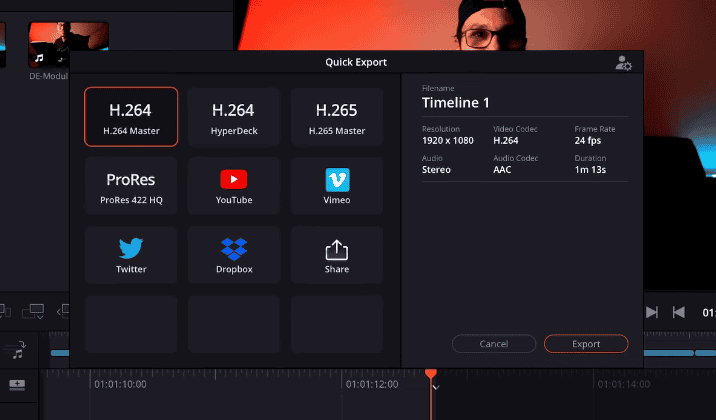
- Function: Wehn you click on the ‘Export’ button on the top-right corner of the iPad version of Davinci Resolve, you will see a ‘Quick Export’ window. Quick Export offers a streamlined avenue for users to promptly render and export their video projects in iPad version of Davinci Resolve. Instead of navigating a maze of complex settings, this feature provides a one-click solution, simplifying the export process.
- Settings: While the quick export function prioritizes speed and convenience, it inherently comes with predefined settings. These settings, while suitable for general use, might not cater to specific quality requirements or individual preferences.
- Insights from the User Community:
- A Discovery by Chris: A keen observation by Chris, an active community member, brought to light an interesting variation. When he used the quick export feature on an iPad and replicated the process on a Mac using the export preset on the deliver page of Davinci Resolve, he found that the output video file sizes differed considerably.
- What This Implies: Such disparities are not merely a matter of storage space but can also hint at potential differences in the final video quality.
- Unpacking the Compression Puzzle:
- Compression in Video: Compression plays a pivotal role in determining the size and quality of a video file. By reducing data, compression can make files more manageable in size, but it can sometimes come at the cost of video quality.
- iPad vs. Mac: The crux of the issue lies in how DaVinci Resolve, developed by Blackmagic Design, handles compression on different devices. For the iPad’s quick export, the software employs a more aggressive compression algorithm. This choice results in smaller video files, but with the trade-off of potentially reduced video quality.
- Deciphering Bit Rate:
- Definition: Bit rate denotes the rate at which bits (data) are processed over a specific duration in a video. It’s a pivotal parameter that influences the clarity, detail, and quality of a video.
- Quality Implications: A higher bit rate usually corresponds to a video of higher quality, capturing more details and nuances. Conversely, a video with a lower bit rate might lose some details, leading to artifacts or a grainy appearance.
- File Size: While higher bit rates can enhance video quality, they also invariably lead to larger file sizes. This balance between size and quality is a constant juggling act in the world of video editing.
Customizing Export Settings on iPad
While the convenience of the “Quick Export” feature in DaVinci Resolve is undeniable, there are times when you might desire more control over the final output. Especially on the iPad, ensuring that your videos are of top-notch quality without unnecessarily large file sizes becomes essential. This section will guide you through optimizing your export settings on the iPad to achieve just that.
- Diving Deeper: The Deliver Page:
- Accessing the Deliver Page: Move away from the quick export option and navigate to the “Deliver Page” in DaVinci Resolve. By tapping on the rocket-looking icon on the bottom menu of the iPad version of Davinci Resolve, you will be headed to the ‘Deliver Page’. Here, you’ll discover a broader range of customization options to tweak your video’s export settings.
- Why it Matters: The Deliver Page offers granular control over the export settings, enabling you to precisely tailor the video quality, compression, resolution, and more.
- Exploring Compression: The H.264 Option:
- What is H.264?: H.264, also known as AVC (Advanced Video Coding), is a popular video compression standard widely used for recording, compressing, and distributing video content.
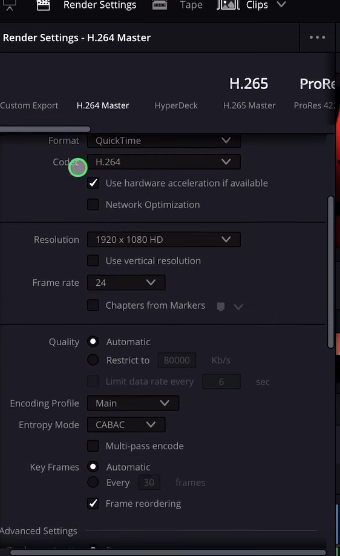
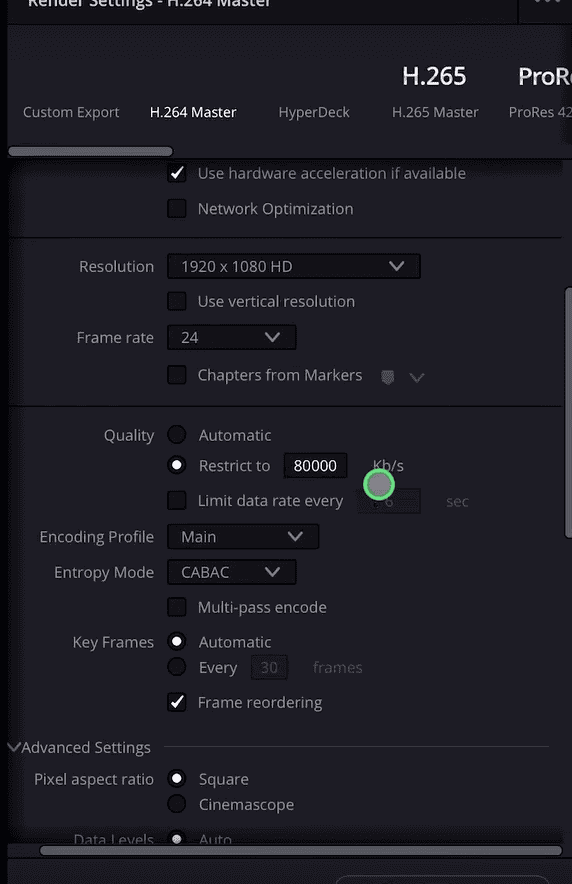
- H.264 on iPad: In the Deliver Page, you’ll find an option for ‘H.264 Master’ which will be located in the top-left corner with all the export presets, which can be customized to your preference.
- Test Insights: Through testing different settings, I observed the same file:
- At default “Quick Export” generates a 54 MB file.
- Adjusting settings manually with H.264 on the deliver page can lead to varied file sizes, from 100 MBs (automatic setting) to a hefty 650 MBs with a bitrate set at 80,000 kbps.
- Bitrate: The Cornerstone of Video Quality:
- Setting the Bitrate: To change the bitrate of your video, scroll down on the left menu on the deliver page till you see an option called, ‘Quality’. Change the option from ‘Automatic’ to ‘Restrict to’. By changing the option to ‘Restrict To’ you can now manually change the bitrate. You can define the video’s bitrate, which directly impacts its quality and size.
- The Trade-Off: A higher bitrate enhances video clarity and detail but results in a larger file. Conversely, a lower bitrate might sacrifice some quality for a smaller file size.
- Practical Application: If you’re targeting specific platforms or have storage constraints, adjusting the bitrate becomes crucial. For instance, a simple vlog might not need the highest bitrate, while a cinematic video might benefit from that extra detail.
- Fine-Tuning Other Parameters:
- Resolution: Ensure the resolution (like 1920×1080) matches your intended output. You can adjust this based on the platform you’re targeting or personal preference.
- Frames per Second (FPS): Standard timeline settings might default to 24 FPS, but depending on your project, you can switch to other frame rates like 30, 50, or 60 FPS.
Optimizing Export Settings for YouTube in Davinci Resolve on iPad
Sharing your creations on platforms like YouTube requires a fine balance between quality and file size. With YouTube being one of the most popular platforms for content creators, it’s vital to ensure that your videos are optimized for the best viewing experience. Let’s explore how to tailor your DaVinci Resolve export settings on the iPad to match YouTube’s recommendations.
- Understanding YouTube’s Recommendations:
- Purpose: YouTube provides specific guidelines to ensure that uploaded videos maintain good quality while allowing for efficient streaming.
- Bitrate Guidelines:
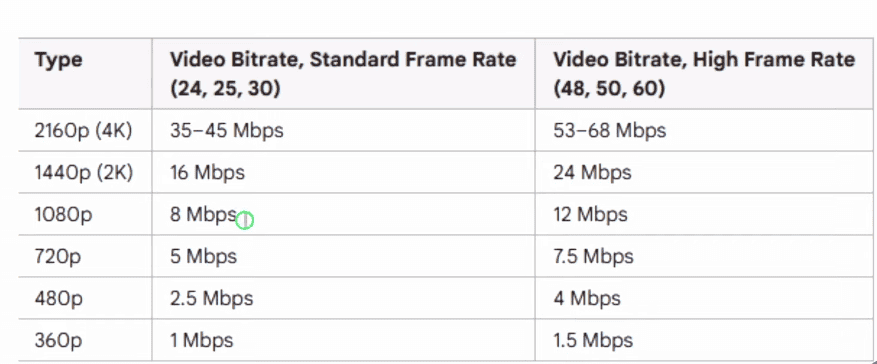
- For 1080p videos at standard frame rates (24, 25, or 30 FPS): YouTube suggests a bitrate of 8 Mbps.
- For higher frame rates like 50 or 60 FPS: A bitrate of 12 Mbps is recommended.
- For 4K videos: Depending on the frame rate, the recommended bitrate ranges from 35 to 45 Mbps.
- Adjusting Bitrate in DaVinci Resolve:
- Locating the Setting: Within the Deliver Page, search for the ‘Quality’ option and change it to ‘Restrict To’.
- Setting the Right Value: Based on YouTube’s recommendation and your video’s resolution and frame rate, adjust the bitrate accordingly.
- Remember the Trade-Off: A higher bitrate means a larger file size but better quality. Ensure you strike the right balance based on your video’s content and purpose.
- Other Key YouTube Settings to Consider:
- Resolution: Match the resolution in DaVinci Resolve to your desired output (e.g., 1080p or 4K). Ensure your project settings align with this.
- Frame Rate: Stick to common frame rates like 24, 30, or 60 FPS for the smoothest playback experience on YouTube.
- Quick Export vs. Custom Settings:
- Pros of Quick Export: It’s fast and requires minimal intervention. However, as previously discussed, this might compromise video quality, especially for platforms like YouTube.
- Advantage of Custom Settings: By adjusting the settings manually based on YouTube’s recommendations, you ensure optimal video quality tailored to the platform.
- Final Checks Before Uploading:
- Preview Your Video: Before uploading, always preview your video to check for any quality issues or glitches.
- Check Audio Levels: Ensure audio levels are consistent and clear, providing a pleasant listening experience for your viewers.