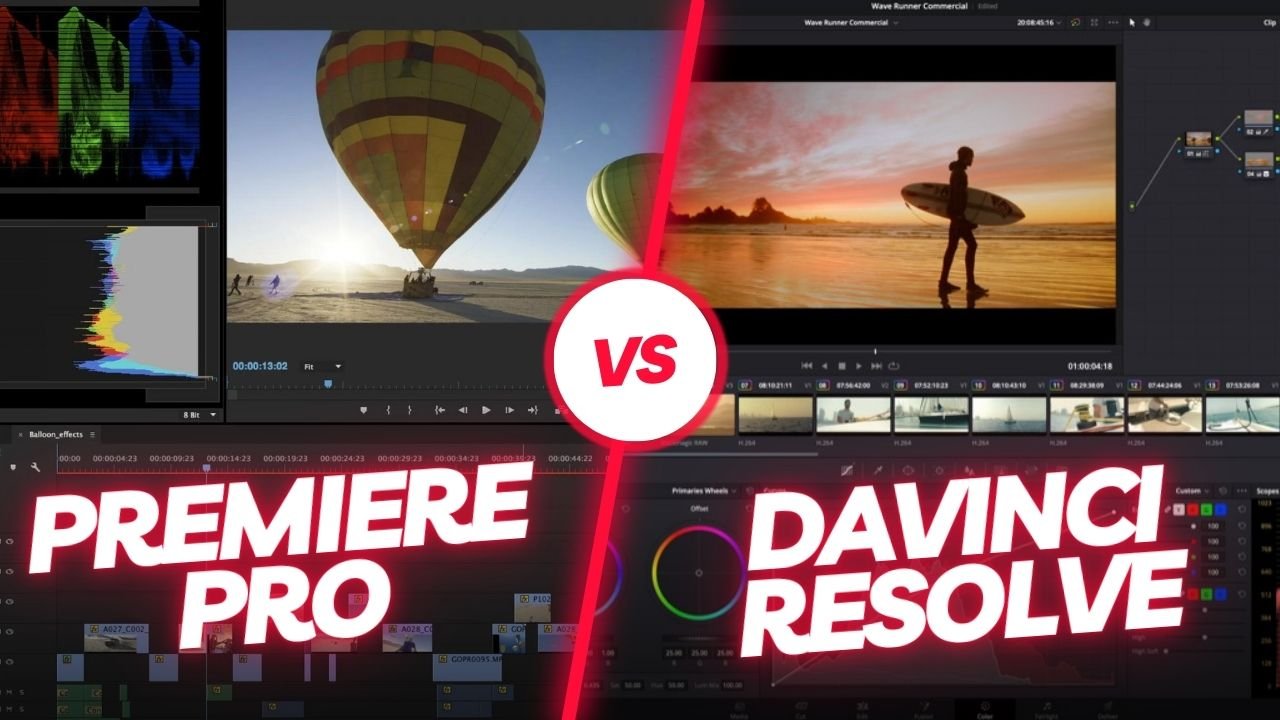
Hey y’all, welcome back to another article, in this one we are covering “Color Grading In Davinci Resolve Vs Premiere Pro“.
I recently found myself comparing color grading in DaVinci Resolve and Premiere Pro, and I just have to share the three reasons why I’ve become such a huge fan of DaVinci Resolve. I know many of you might be using Premiere or even Final Cut, and you’ve probably been told time and time again to switch to DaVinci Resolve for color grading. Be it from some random guy on the internet, or a friend who’s an editor and has completely embraced DaVinci Resolve, you must have heard praises for this professional coloring platform.
Well, I’m here to tell you that those people are absolutely right!
I began using DaVinci Resolve for color grading numerous projects at work, and I’ve genuinely enjoyed the experience. In this blog post, I’ll discuss the four reasons why I find color grading in DaVinci Resolve more enjoyable and simply better overall. If you find this post helpful or entertaining, please like and share it to help our community grow. You all are fantastic!
Color Grading In Davinci Resolve Vs Premiere Pro
1. User Interface Comparison Of Davinci Resolve and Premiere Pro
The first thing I want to discuss, and probably my biggest issue with Lumetri Color and Premiere Pro, is the user interface. I’m referring specifically to the tiny color grading tools in Premiere. They’re so small, especially considering that I do most of my work on a laptop. The worst offender? The curves. It’s unfortunate because this is where I believe the most in-depth color grading happens, particularly with HSL curves. But the most egregious of all is the tone curve, which is arguably the most powerful color grading tool in the software.
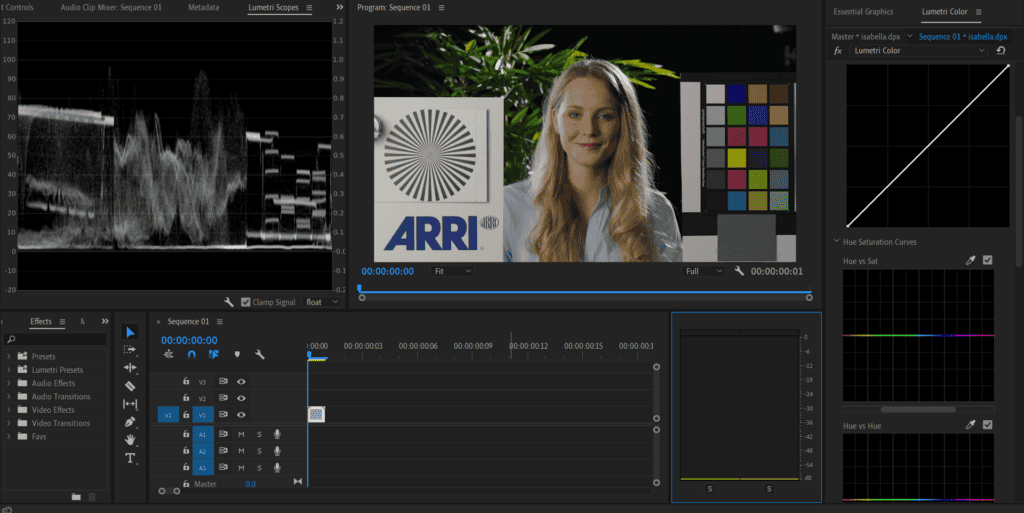
This tiny square box is incredibly difficult to work with. When adjusting the tone curve, you often need to make intricate moves, but the small size of the square makes it nearly impossible to see what’s happening. Now, I know what you’re thinking: “Just customize the layout in Premiere and drag the window out.” Well, let’s test that theory.
As I drag the window out, two problems emerge. First, my video becomes really small. I could make my scopes tiny to see my entire video, but then I can’t see my scopes. Alternatively, I could move my scopes and resize them, but then I lose sight of my timeline and can’t switch between adjustment layers and clips. I’m sure there’s probably a good setup if I invest time in building it out, but that doesn’t excuse issue number two.
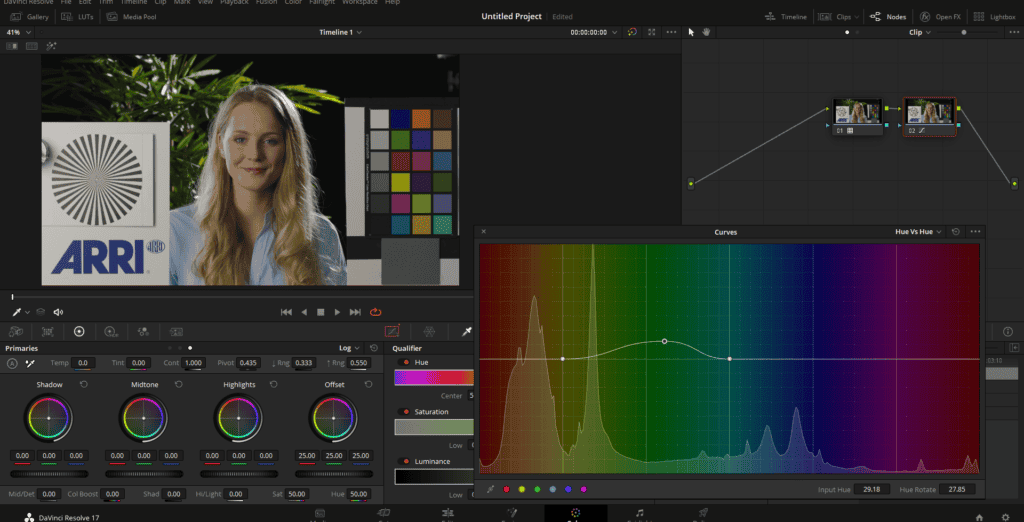
When I expand the color panel, the HSL curves get closer to those in Resolve, but the tiny tone curve square remains frustratingly small. It doesn’t grow proportionately, and I can’t help but wonder why it isn’t a giant rectangle. Now, let me show you why I prefer DaVinci Resolve’s approach. As soon as I open it, I’m greeted with a massive tone curve. Not only is it significantly larger, but it’s also shaped like a rectangle, which actually makes more sense to me because it represents the video format. The same goes for the giant HSL curves in Resolve. It’s not just that, you can undock it and resize it to your liking.
While I might be a tad overdramatic, I genuinely believe that DaVinci Resolve’s user interface is superior for color grading, making the whole process much more enjoyable and efficient.
The crux of the user interface issue lies in the fact that DaVinci Resolve was created with color grading as its primary purpose. If its color grading UI fell short, that would be a major letdown. So, while I can understand that Lumetri might not have the most appealing color panel design, it’s still surprising that Adobe hasn’t put more resources into developing a top-tier color grading platform. I realize I may have been quite animated on this topic, but my enthusiasm comes from experiencing the sheer brilliance of DaVinci’s color interface. You can instantly sense that it was engineered to harmonize with the color grading process. The feeling is simply amazing. When I’m immersed in color grading within DaVinci Resolve, I can’t help but think, “Ah, this is my blissful coloring haven.” It’s just enchanting.
Now that we’ve covered that, let’s shift our attention to the next two aspects, which concentrate on the features of the software that Premiere either doesn’t possess or struggles to perform well while color grading.
2. Mathematically and photometrically accurate exposure controls in Davinci Resolve compared to Premiere Pro
Moving on to the second point, let’s discuss exposure controls. In Premiere, the standard method for adjusting exposure involves opening the basic tab and using shadows, highlights, whites, and blacks to fine-tune the exposure of your image. While there isn’t necessarily anything wrong with this approach, I found that I greatly preferred DaVinci’s primary method of exposure adjustment once I started using it.
This method consists of using the lift, gamma, and gain wheels. At first, I was utterly confused by these terms—lift, gamma, and gain? It sounded overwhelming. I expected to see something related to shadows, mid-tones, and highlights, or maybe something about light or exposure. But as soon as I began using these controls, it felt incredibly intuitive and became a much more natural way to adjust the exposure of my images.
In a nutshell, lift, gamma, and gain correspond to shadows, mid-tones, and highlights. Adjusting the lift affects the blacks in the image while adjusting the gain impacts the whites, and tweaking the gamma alters the mid-tones. The real magic lies in how these adjustments affect your image.
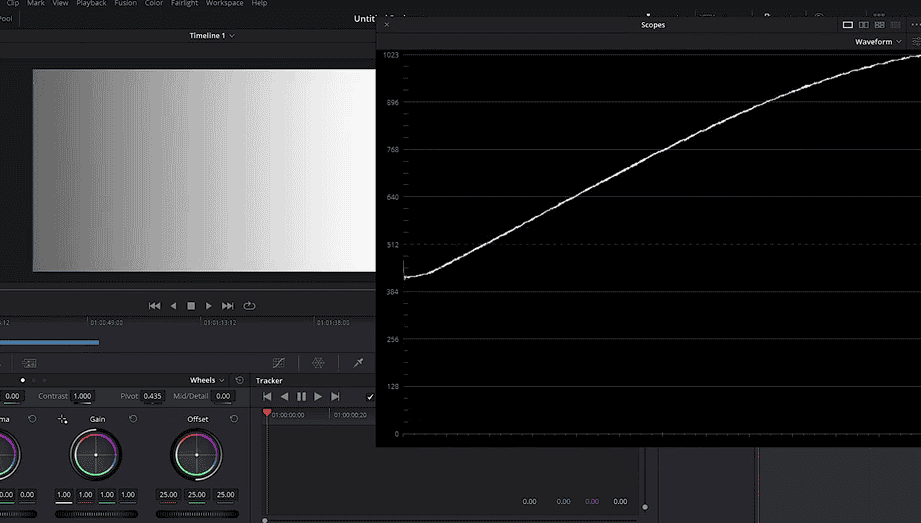
For instance, if you take a grayscale image with a gradient from black to white and many grays in between, along with the waveform monitor. As you can see, the waveform closely resembles our tone curve. When I adjust the lift, it not only impacts the blacks but also influences the rest of the image, including the mid-tones and gain, to create a smooth roll of exposure adjustment. This method just makes perfect sense to me.

In contrast, when I work with the shadows wheel in Premiere, there’s a distinct cutoff point for the shadows’ influence. This results in a rather unnatural-looking adjustment in the image. Overall, using lift, gamma, and gain in DaVinci Resolve feels more fluid and satisfying, which is why it’s become my preferred method for exposure control.
To summarize my thoughts, lift, gamma, and gain affect the shadows, mid-tones, and highlights of your image in a way that feels and looks natural, as evidenced by the waveform monitor. In contrast, the exposure tools in Premiere’s basic tab aren’t necessarily bad—I use them all the time, and they do a decent job. However, they impact the curve of your image in somewhat odd ways.
Davinci Resolve has a superior color science working under the hood. Tools like HDR wheels and Color Warper are color space-aware tools, meaning if the color management is properly set in Davinci Resolve, these tools produce photometrically accurate results. This can help achieve better results more quickly.
3. Secondary Color Grading In Davinci Resolve Vs Premiere Pro
Imagine this scenario: you want to add some pop to a person’s face in a video frame. If you were using DaVinci Resolve, you could quickly achieve this by employing qualifiers, windows, and the impressive tracking features available in the free software. For those who haven’t used these tools before, let me quickly guide you through the process.
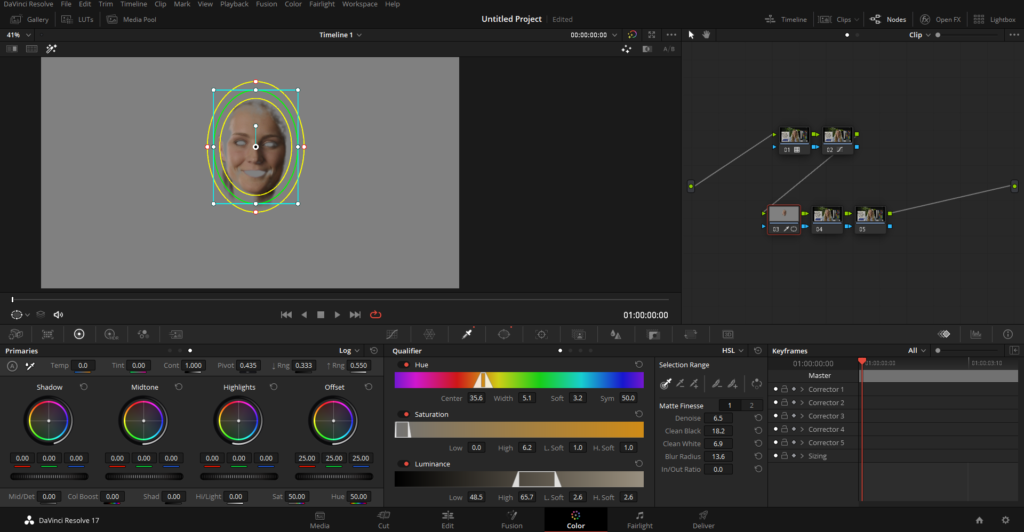
If you were to work on a frame where you wanted to enhance the subject’s face, you could start by using a qualifier to select specific parts of the image, like skin tones. However, in many instances, you might find that other elements in the frame, such as the background, have the same color as the skin tones. To focus solely on the face, you could use a window to isolate it, feather it out, and then track the face as it moves within the frame. With DaVinci’s impressive tracking capabilities, a simple click would allow the software to track the entire image seamlessly.
After successfully isolating and tracking the face, you could then boost the mid-tones, add some contrast, and increase the saturation, all in a matter of seconds. Although Premiere Pro offers similar tools, you might find that not only are they better organized in DaVinci, but they also perform much better—especially the tracking feature. This is just one instance that highlights the advantages of using DaVinci Resolve for color grading. Davinci Resolve excels in color grading secondaries.
4. The Superior Color Management of DaVinci Resolve Over Premiere Pro for Color Grading

As a video editor and colorist, I’ve had the opportunity to work with both DaVinci Resolve and Adobe Premiere Pro. Both programs have their strengths, but when it comes to color management, I have discovered that DaVinci Resolve takes the lead. In this article, I’ll delve into the technical aspects of color management and discuss why DaVinci Resolve’s color management system is superior to Premiere Pro’s, especially when working in a scene-referred workflow.
- Scene-Referred Workflow in DaVinci Resolve
Throughout my experience, I’ve found that DaVinci Resolve has always been a trailblazer in the world of color grading. It has consistently improved and refined its color management system to cater to the increasing demands of professional colorists like myself. One significant advantage of DaVinci Resolve over Premiere Pro is the ability to work in a scene-referred workflow more efficiently.
A scene-referred workflow is a color-grading approach that maintains the original, linear light values captured by the camera sensor. This method allows for more accurate and flexible color manipulation, making it easier for colorists to achieve their desired look. DaVinci Resolve’s color management system, known as DaVinci Color Management (DCM), is built to support scene-referred workflows natively, allowing users like me to take full advantage of the captured data.
- Input Color Space and Output Tone Mapping
In DaVinci Resolve, I can define input color space, gamma, and output color space directly in the project settings. This flexibility enables me to work with footage from different camera systems without the need for time-consuming manual adjustments. Additionally, DaVinci Resolve supports a wide range of color spaces and gamuts, including ACES, Rec. 709, Rec. 2020, and more, making it compatible with virtually any workflow.
On the other hand, Premiere Pro’s color management system, known as Lumetri, is not as robust. Although it supports color grading in various color spaces, the software lacks the advanced input and output tone mapping features found in DaVinci Resolve.
Comparing other features of Davinci Resolve Vs Premiere Pro
1. Price comparison between Davinci Resolve and Premiere Pro
Let’s talk about the price comparison between DaVinci Resolve and Premiere Pro, two powerful video editing programs. When considering the cost of these programs, we find some significant differences.
For instance, if you were to purchase only Premiere Pro on Adobe’s subscription platform, it would set you back a little over $250 a year. If you wanted the full suite of Adobe programs, including After Effects, Photoshop, Lightroom, and others, it would cost you around $630 a year. On the other hand, Blackmagic generously offers their editing software, DaVinci Resolve, for free! Despite being a free version, it still includes tons of fantastic features and all the essentials you need for editing. Additionally, you can upgrade to DaVinci Resolve Studio, which unlocks accelerated hardware decoding, higher resolutions, and frame rates, the DaVinci Neural Engine, and many more advanced features. This upgrade comes at a flat rate of $295, with no monthly payments. Furthermore, it’s free if you purchase a Blackmagic Cinema Camera or certain Blackmagic equipment.
It’s clear that DaVinci Resolve is the more affordable option of the two. I mean, it’s tough to beat free unless someone is paying you to use it, right? Even when taking into account the Studio version’s $295 price tag, it’s still cheaper than Premiere Pro in the long run, as long as you plan on using it for at least a year. So, in the price category, DaVinci Resolve is the clear winner.
Disclaimer: Prices may vary depending on when are you reading this article.
2. Ease of use
In our second category, we’re comparing the ease of use between DaVinci Resolve and Premiere Pro. To be honest, both programs can be quite intimidating. It took me a few months to feel comfortable navigating Premiere Pro without needing to search for a tutorial on YouTube. I’d say Premiere has a medium difficulty level for beginners. Surprisingly, I found Resolve to be even more overwhelming.
I assumed that my experience editing with Premiere Pro would make transitioning to Resolve a breeze, but there was one significant issue. Premiere Pro felt easier to grasp because it uses traditional layers, like Photoshop, After Effects, and most other editing programs. Resolve, on the other hand, uses layers for standard video editing but switches to nodes for the Fusion and Color pages. Nodes were a foreign concept to me at first, but eventually, everything clicked, and it all made perfect sense.
For example, if I wanted to create a composition in Premiere, I would simply stack layers, which is a familiar process for most people. In Resolve, I would use the Fusion page, and instead of layering, I’d work with nodes from left to right. If you’ve never dealt with nodes before, they can be quite intimidating, and this learning curve often deters people from fully transitioning to Resolve.
Despite the initial challenges, I believe that with determination and the right tutorials, anyone can master Resolve like any other editing program. There are some things that each program does better in terms of ease of use. DaVinci has intuitive features, like reflecting audio level adjustments directly on the clip. However, Premiere Pro’s familiarity makes tasks like speed ramping, keyframing, and masking easier for me.
While DaVinci’s approach might not be as intuitive at first, I think most users could adapt quickly. Still, Premiere Pro wins this category for being slightly more natural to use.
3. Visual Effects Comparison between, Davinci Resolve and Premiere Pro
Moving on to our third category, we’re discussing visual effects, which include motion graphics, masking, overlays, and more. It’s challenging to determine a clear winner here, as both programs offer impressive capabilities. Personally, I find Premiere easier to use for compositing because of its layer-based approach, as opposed to DaVinci Resolve’s node-based system.
In recent years, Premiere has enhanced its visual effects capabilities, allowing me to complete most of my VFX work directly within the program. The same goes for DaVinci Resolve. However, a standout feature that gives Premiere Pro an edge in this category is the dynamic link. This allows me to seamlessly switch between Premiere Pro and After Effects, ensuring all changes are perfectly synchronized.
I know it might seem like cheating since After Effects is a separate program, but if you have access to the full suite of Adobe programs, you’ll have After Effects at your disposal. So, although both programs perform similarly on their own, with the dynamic link, I have to give this category to Premiere Pro.
4. Reliability Comparison
Our fourth category focuses on reliability, and honestly, I don’t think I need to say much here. It’s no secret that Premiere Pro is infamous for crashing quite often—you’ve probably seen all the memes circulating about this issue.
Personally, I haven’t faced significant problems with Premiere Pro crashing, maybe once every couple of months it’ll freeze and shut down, but it’s never been frequent enough for me to consider switching programs solely for that reason. On the other hand, crashes with Resolve seem far less common. I’ve experienced a crash just once, but I should note that I’m using the beta version right now, and Blackmagic typically addresses these issues before releasing the official version.
One primary reason why Resolve handles so much better is its ability to balance the workload between the CPU and the GPU, preventing either from becoming overworked. In contrast, Premiere Pro relies heavily on the CPU, so if your processor isn’t up to par, you might encounter some hangups while editing. With all that said, DaVinci Resolve takes the win in this category for being significantly more reliable.
Conclusion
In conclusion, both Premiere Pro and DaVinci Resolve are powerful and feature-rich editing programs, each with its strengths and weaknesses. While Premiere Pro may be more intuitive for beginners and boasts seamless integration with other Adobe software, it’s known for its reliability issues. DaVinci Resolve, on the other hand, offers robust performance and affordability, with its free version providing incredible value.
One key area where DaVinci Resolve outshines Premiere Pro is in color grading. Its superior color tools and dedicated color page make it an industry-standard choice for professional colorists. The node-based approach to color grading offers greater flexibility and precision compared to layer-based grading in Premiere Pro, which ultimately allows for more creative control and better results.
Ultimately, the choice between the two comes down to your personal preferences, budget, and the type of work you do. If you’re already well-versed in the Adobe ecosystem and prioritize visual effects and motion graphics, sticking with Premiere Pro might be the better option for you. However, DaVinci Resolve could be the perfect choice if you’re looking for a more reliable and budget-friendly alternative that excels in color grading, node-based compositing, and performance.
Regardless of which program you choose, remember that practice and determination will help you master the software and create stunning videos. Keep experimenting, stay curious, and always strive to improve your skills. Happy editing!
- Also Read- How to export from Premiere Pro?
- Also Read- Move Premiere Pro Timeline to Davinci Resolve (XML Workflow)
- Also Read- Premiere Pro: Color Management & Export Highest Quality
.