
Hi, I’m Salik, the author of FilmmakingElements.com. I have been a filmmaker for over 10 years. I am also a certified DaVinci Resolve Trainer and I have used DaVinci Resolve for many of my projects. In this article, we talk about Premiere Pro: Color Management & Export Highest Quality, a Colorist Guide.
We will be looking at Premiere Pro the way it was intended as a straight SDR Rec. 709 broadcast compliant workflow, and I’ll explain that from import through processing and exports and all the work that goes with that set up your system and everything.
How Color Management and Exporting Highest Quality Video From Premiere Pro is different from other software

One of the big differences that Premiere has between it and any other app and why it causes so much problem, and confusion is it’s designed very differently. Let’s say it’s the difference between expectations and reality.
Our expectations as a user come out of using things like Photoshop and After Effects. Davinci Resolve applications have a whole series of menu options to choose from as the user to tell the program what your color space is for your images coming in, what your working color space is, what your monitor is, what your exports are going to be.
In Premiere Pro, we don’t have that, so people assume it doesn’t have color management. The engineers in the design phase did a very different route with Premiere Pro. They decided that it would be used primarily for a broadcast workflow.
The broadcast workflow is defined as Video sRGB, Rec. 709 with a Gamma of 2.4, and 100 nits brightness on the monitor. Premiere can be used with other workflows with other screens, but it takes a lot of special setup, practice, and testing to ensure you can do it.
Setting Up Project settings

There is a crucial bit of setup information, though, and it’s in the Project Settings dialog box. The Mercury Acceleration option, how this is set, determines whether the render and maximum depth options are needed for renders and exports.
If you have a GPU that Premiere can use, you’ll see options here like CUDA for the Nvidia cards or Metal for AMD cards, maybe even OpenCL.
If you don’t have a GPU, software only will be the only option displayed. Suppose the Mercury Acceleration option is set to software only in the Project Settings, then in the Sequence Settings dialog box or the Export dialog box. In that case, you must check the maximum bit depth option.
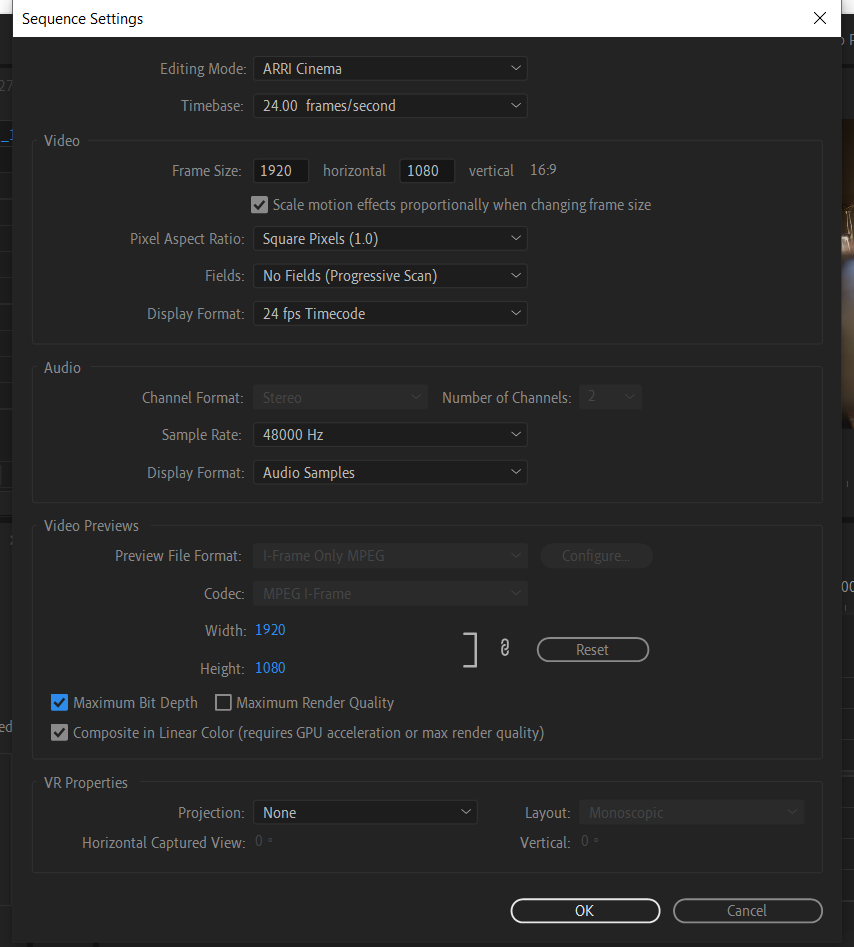
This then tells Premiere to order the CPU to process the data from the image in the manner that the GPU, which uses the full 32-bit float math all the way through, rather than dropping into eight-bit, which the CPU might if you don’t have that selected.
Should I Use the “Render at maximum bit depth” option?
If you are using anything other than software only for the Mercury Acceleration setting, whether CUDA, Metal, or OpenCL, ignore the Render at Maximum Depth option in both the Sequence and Export dialog boxes, as it does absolutely nothing.
I’ve seen a lot of people on forums complaining that there are times when checking the box “render at maximum depth” can cause some weird issues and artifacts. And whatnot with your exports if you have a GPU involved? So I always tell people, Leave that unchecked.
What about the software or hardware encoding in the Output summary
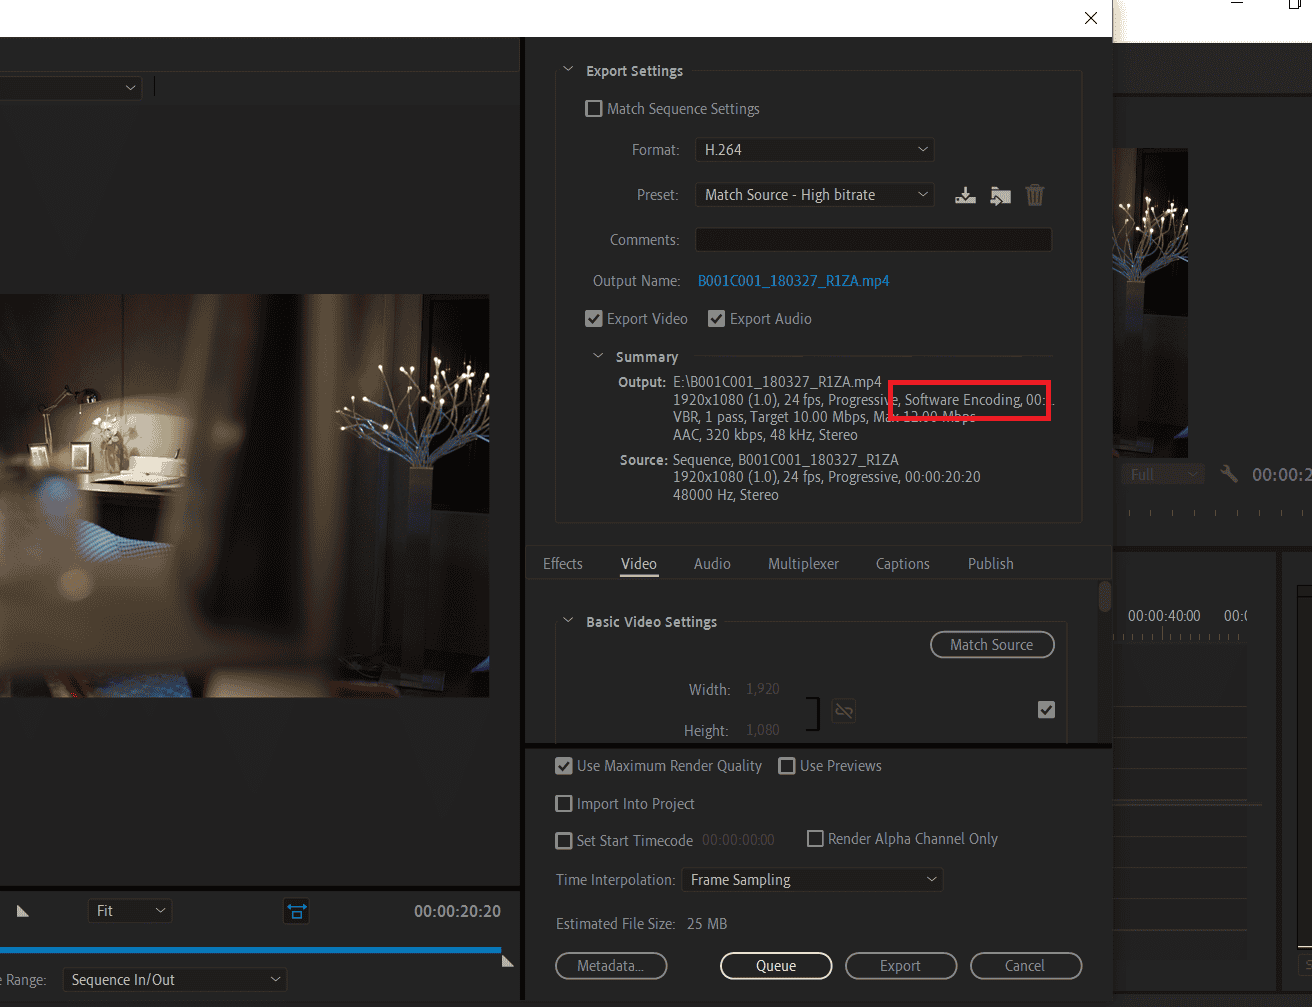
To further confuse things, a phrase can appear in the Export Dialogue summary section for H.264 Format Exports.
It will say either Hardware encoding or Software encoding, and it is based entirely on whether your computer has an Intel CPU with Quick Sync onboard and enabled. This has nothing to do with your GPU used by Premiere, so ignore it.
Should I Use the “Enable Display Color Management” option in preferences?
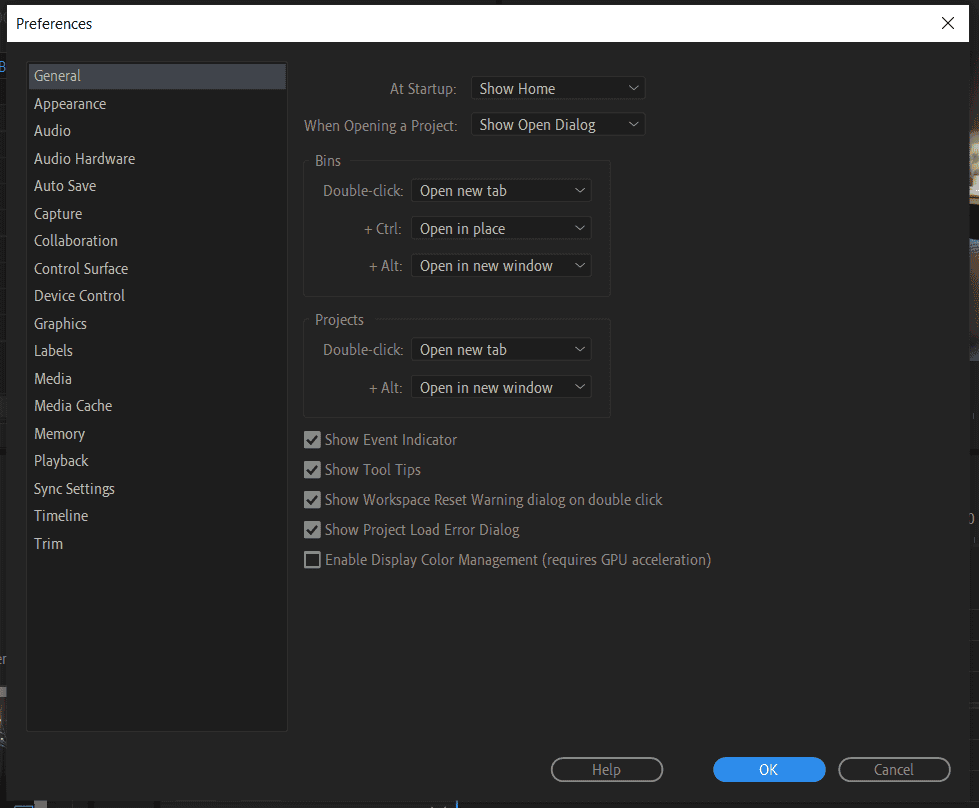
Our last item of basic setup is found in the Edit>Preferences>General dialog box. It’s the last option, “Enable Display color management.” This is not used for Rec.709 broadcast compliant workflows.
So again, if your monitor is set up for Rec.709 work, do not check that box.
Premiere Pro’s Processing Pipeline
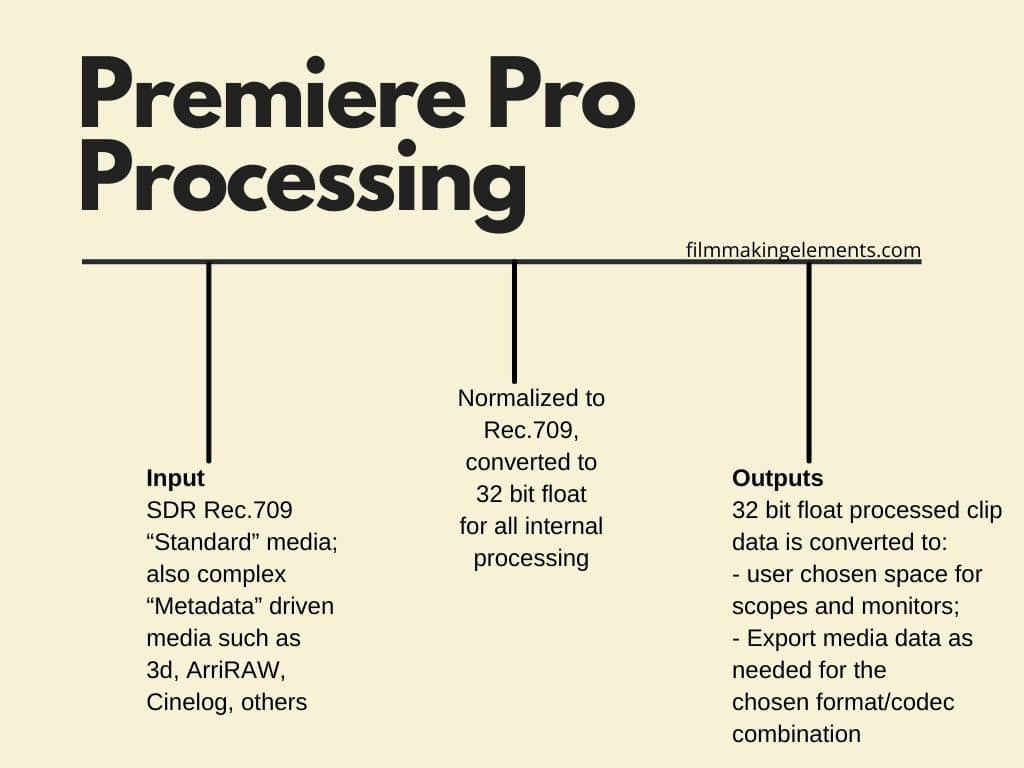
Premier’s processing pipelines are pretty simple. Here we have the basic layout. In the diagram or chart, you have an import SDR Rec.709 standard media or the complex metadata-driven media. Premier stores that data that it picks up from the clip into its internal database.
In processing, it’s normalized to Rec.709 converted to 32-bit float, and all internal processing is at the 32-bit float.
For output, the 32-bit float process clip data is converted to the user-chosen space for scopes and monitors and to the export media data as needed for the chosen format codec combination.
Color Grading HDR, HLG Footage in Premiere Pro
In the vast landscape of digital media, the term ‘High Dynamic Range’ or HDR has become increasingly prevalent. With the surge in the quality of digital displays and the demand for ultra-realistic visuals, HDR, specifically HLG (Hybrid Log-Gamma) footage, has gained significant traction. But what exactly does this mean for video editors and creators? How does one work seamlessly with such advanced media formats? Let’s dive in.
Understanding HLG Footage:
HLG footage stands out because it possesses a high dynamic range, essentially meaning it can showcase a broader range of colors compared to standard footage. Think of it as having an enriched palette of colors that brings out the finest details in both the brightest and darkest parts of a frame.
Setting up Premiere for HLG Footage:
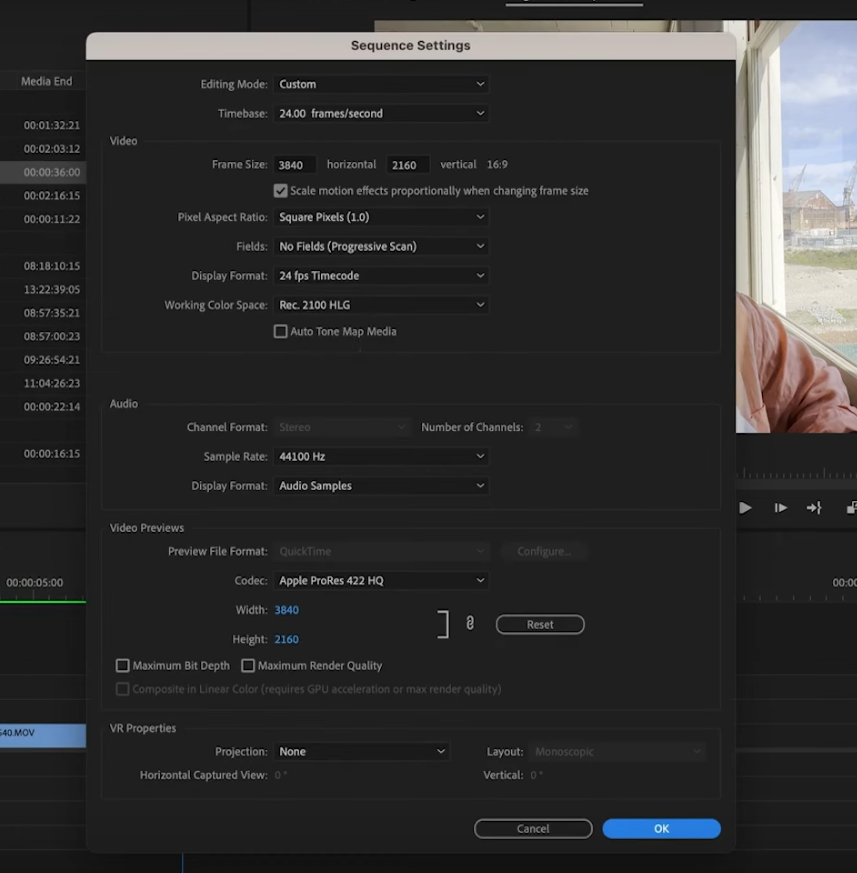
- Identifying the Color Space: To confirm if your media is in high dynamic range, navigate to
Sequence > Sequence Settingsfrom the menu on top. If your media is indeed in HDR, it will display “Rec 2100 HLG” under the color space settings. - Automatic Detection: Premiere is quite intuitive. When you’re working exclusively with HLG HDR clips, Premiere will automatically recognize it and adjust your sequence settings, ensuring that you’re working with the full range of colors available.
Dealing with Mixed Color Spaces:
It isn’t uncommon to find oneself working with a mix of HDR and standard clips. This is where challenges arise:
- Mismatched Exposure Levels: If your timeline has footage in both HDR and standard format, the HDR clips will often appear as if they’re overexposed compared to the standard clips.
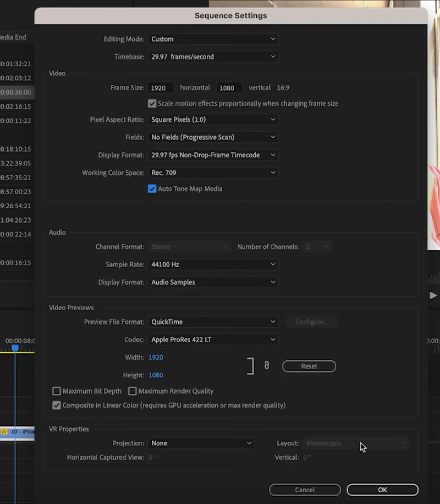
- Correcting the Mismatch: To harmonize the exposure levels:
- Navigate to
Sequence > Sequence Settingsfrom the menu on top. - Set the color space to “Rec 709”.
- Following that, enable the “Auto Tone Map Media” feature. This ensures that your HDR media harmonizes with your standard media, even when they’re on the same timeline.
- Navigate to
Incorporating Log Footage:
If you begin your editing process with Log Footage, take the following steps:
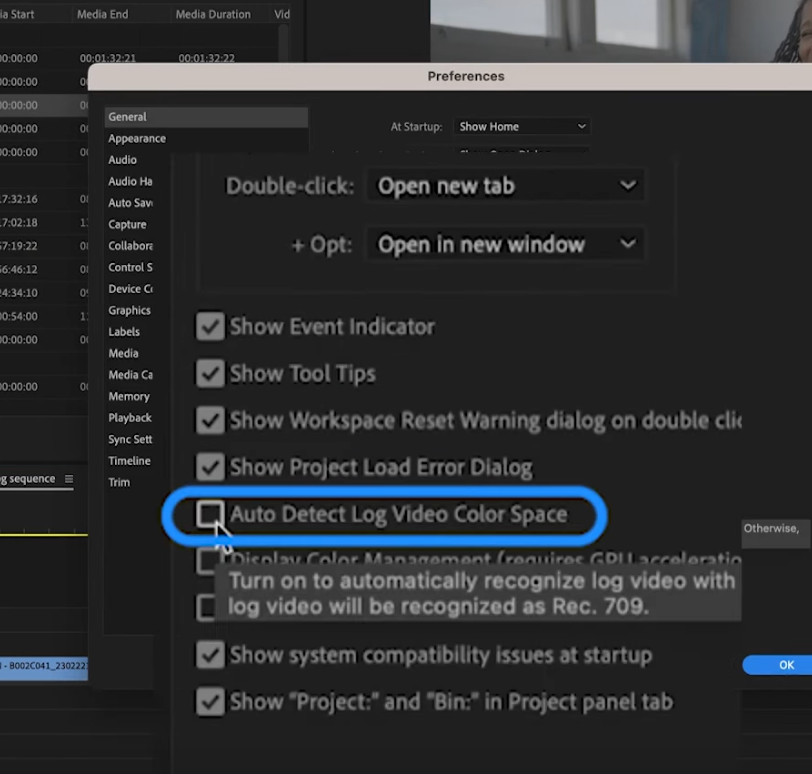
- Open your
Preferencesmenu. - Enable “Auto Detect Log Video Color Space”.
- After this is done, whenever you add Log Footage to a Rec 709 timeline, Premiere will automatically brighten the colors for you.
Remember, these automated settings are simply tools to make your editing process smoother. For professionals who like to have granular control over their edits, these settings can be turned off, enabling a wholly manual color workflow.
Master Clip Properties For RAW Footage
Now the cameras, such as again the RED, Arri, Blackmagic Cinema Cameras, and others that can store metadata in the files that give the processing options to the colorist or the editor.
The Adobe engineers have designed a system for normalizing that media within Premiere Pro called the Master Clip Properties, with a clip loaded into either the source monitor or placed on a sequence or timeline. Check the Effects control panel. Any settings options for metadata-driven media that Premiere allows will be shown in the Masterclip tab.
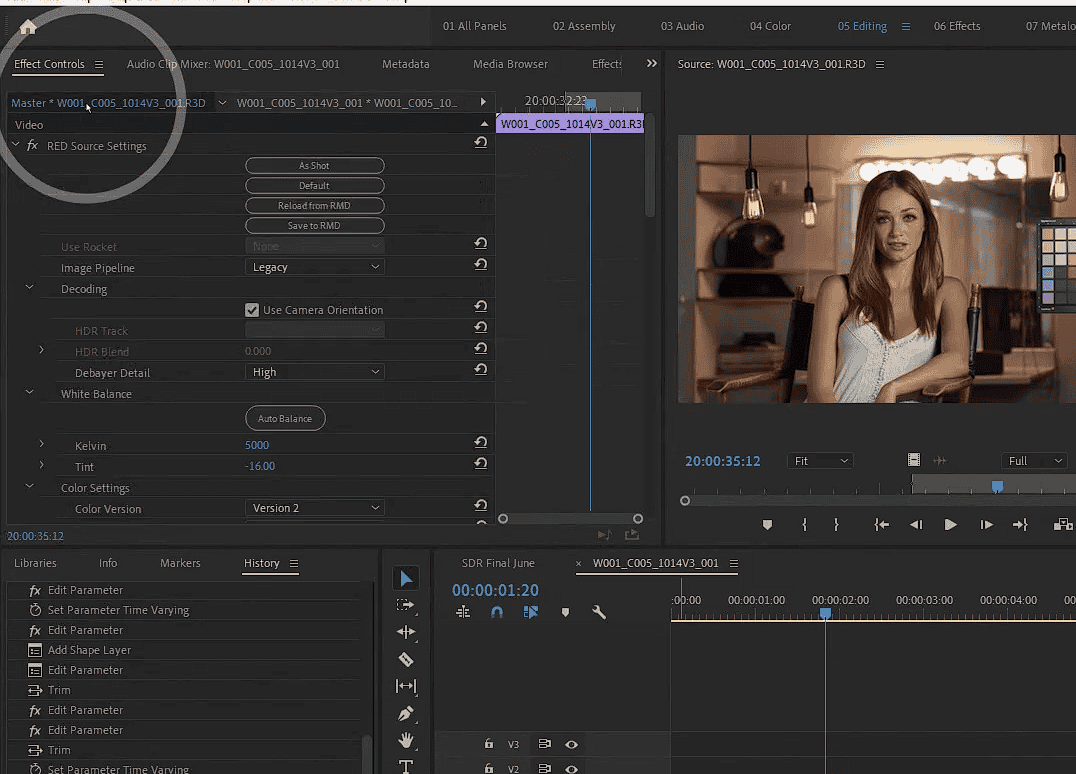
For this RED Weapon 6K demo clip, for example, we have as shot or default. We have a series of RED pipelines, curves, gamma, and color space options.
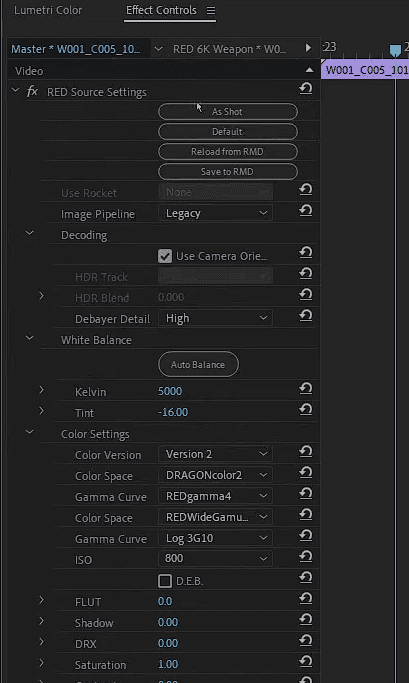
Now those will change of course, by maker and probably even by the camera. So you would need to check in the Masterclip Settings tabs to see what you have available for your normalization settings.
Important note. Master clip settings apply immediately to every instance of a clip used anywhere in your project. So if you use this to normalize a clip and you decide at some point later on to change it. It will now change it everywhere, and it’s used in any other sequence.
Probably you’ll only want to use this to normalize, to begin with, and leave it alone after that and do all the rest of your work in your normal clip effects.
Timeline Color Space in Premiere Pro
Now for the internal processing pipeline. Primary sequences do not have a bit depth association with them. Bit depth is only associated with the clip, so when placed on a sequence, Premiere takes each clip’s stored data, including bit depth, normalizes it to Rec.709, and converts it to 32-bit float.
All internal processing is done in a 32-bit float unless the user chooses an eight-bit effect from the Effects panel. For example, the Levels effect is a GPU accelerated effect.
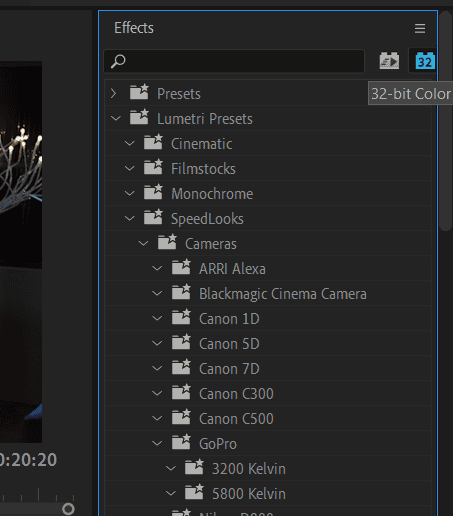
By choosing the 32-bit color block, you can make sure you are not using GPU accelerated effects.
Using this or any other non-32-bit effect drops the internal processing pipeline to 8-bit while that effect is being processed. So before using any effect from the Effects panel, make sure it’s got the 32-bit block next to it.
Premiere Pro Output Pipelines
Premiere Pro has three output pipelines, one each for the scopes, monitors, and export dialog.
Understanding scopes
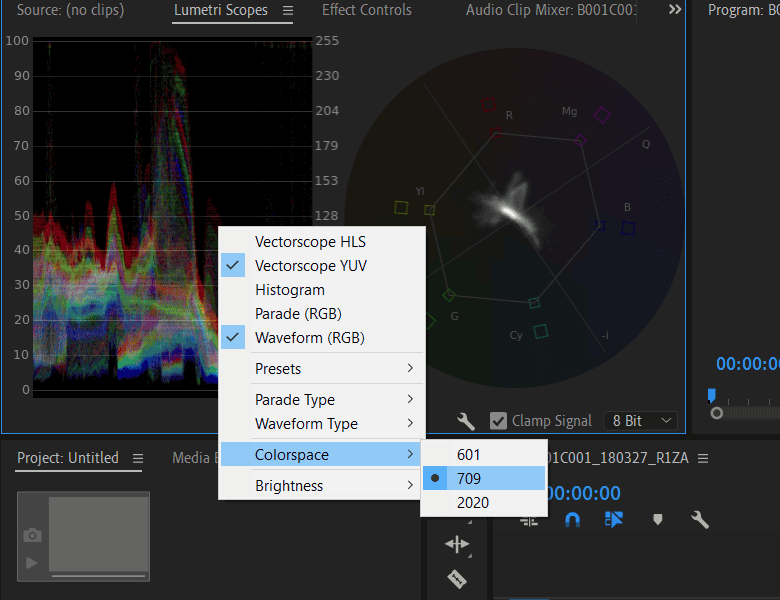
Let’s start with the scopes. Right-click on the scopes panel and select the needed color space. Rec.601 isn’t used much anymore. Rec.709 is the standard one you’ll use most of the time, and Rec.2020 is used for HDR.
The 32-bit float internally processed data is then converted to the color space chosen for display in the scopes. The options in the bottom right drop-down under the viewer are used to determine what sort of scale will be displayed on the left and right sides of any scope.
The left side scale will show the values in Nits or Ire, and the right side values will be the levels of the clip. And remember, the options here do not make any changes to the processing.
They only change the value of the scales of the type of scales that are displayed alongside the image.
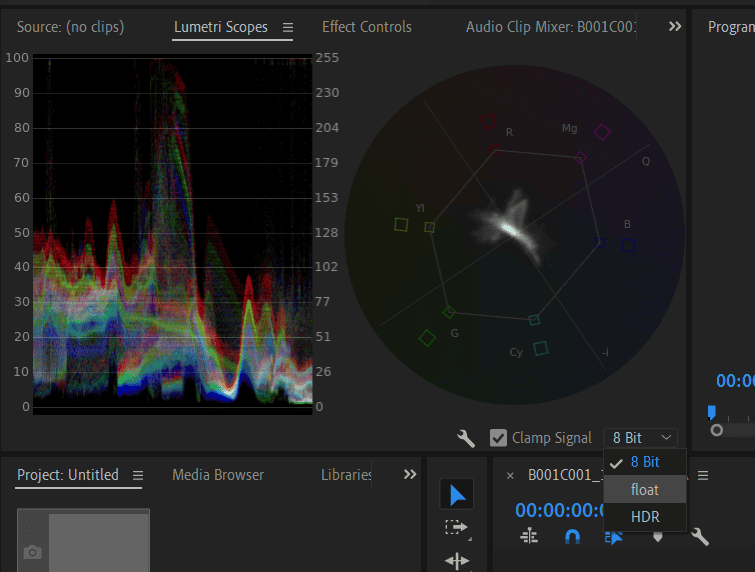
HDR gives numbers on the left side that range from 0 to 10K. Next up is float. This is something very few users will ever need. It gives left side values in the standard Nits, Ire scale, and the right side values are in the float notation of .00 to 1.0.
The most useful and confusing one is the top one, 8-bit. Now first, remember, Premiere doesn’t have working space bit depth. Bit depth is only associated with each clip individually, so when you’re working down a sequence, it can easily have multiple clip bit depths involved.
Depending upon the type of scope chosen, you can get the either limited or full range.
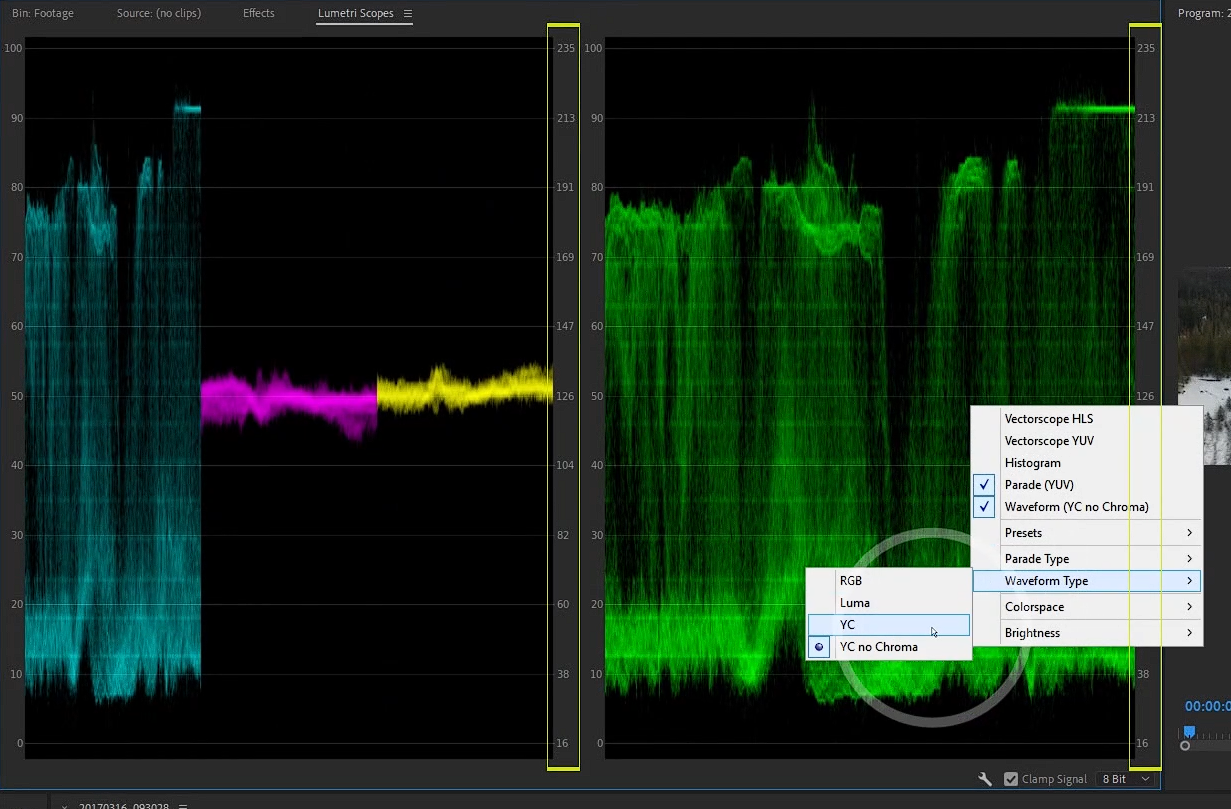
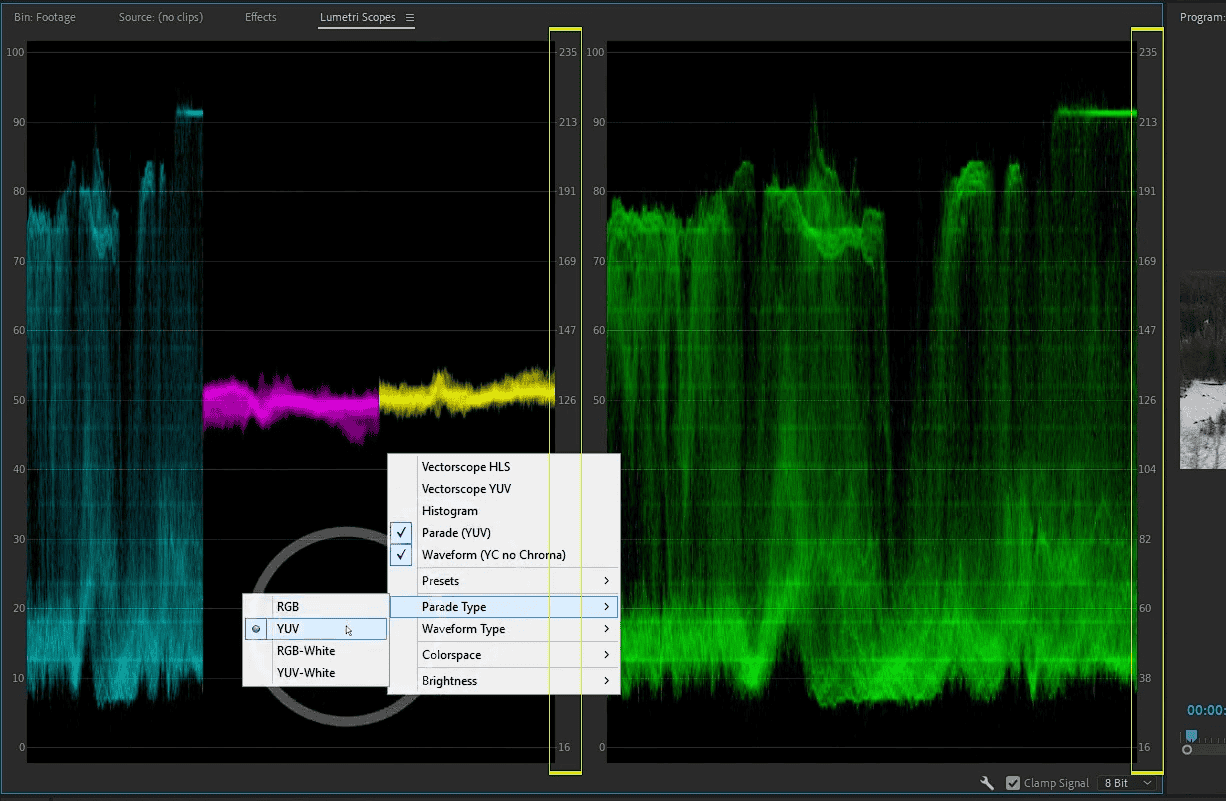
Let’s take a look at the Waveform YC types show a limited range as to the parade YUV types.
Waveform RGB and Luma types and the parade RGB types show full range numbers.

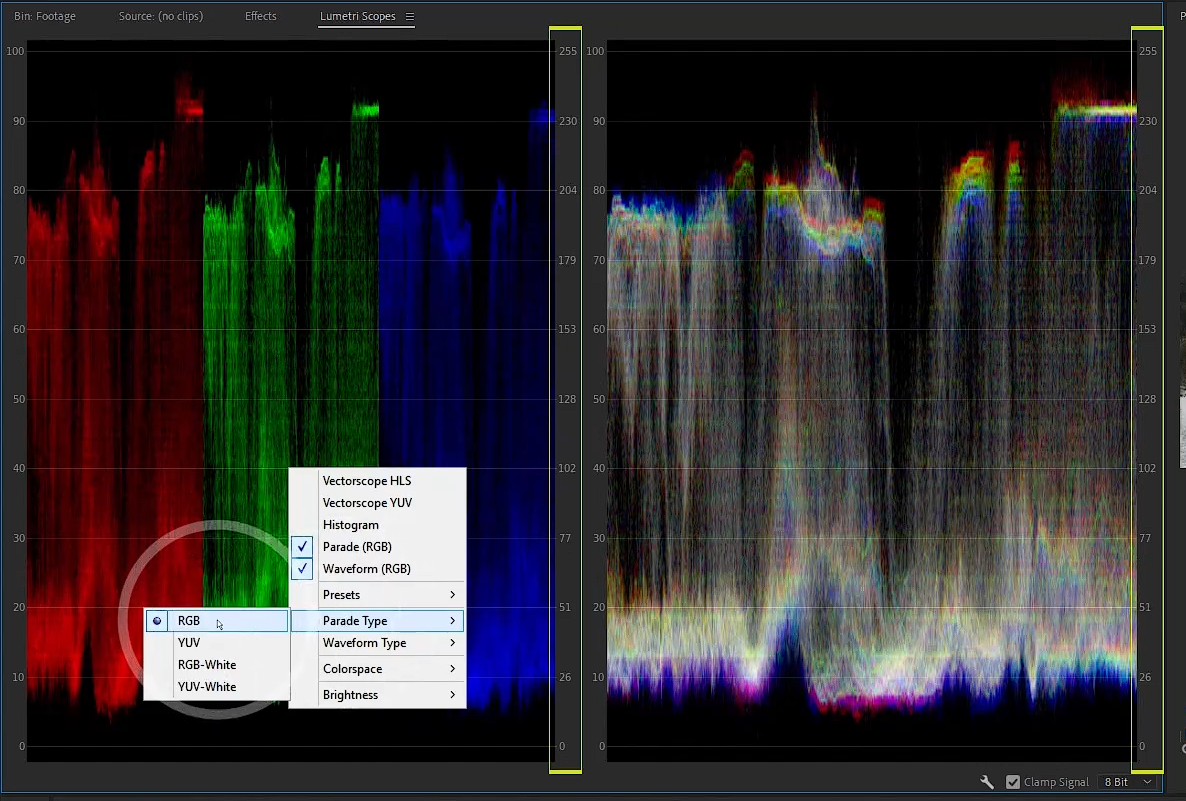
As these are intended only as generic numbers, the user has to do a little bit of mental translation to understand that no matter whether it’s showing zero to 255 along the right side compared to the zero to 100 nits ire scale that if you have limited range 8-bit, the number is 16 to 235.
If you have a limited range of 10-bit, the number is 64 to 940. If you have 12-bit media, you need to do the same translation. And if you have that rarest of all beasts, the actual full-range media, then Premiere is handling that properly.
Also Read- Proxy Workflow on Davinci Resolve
Also Read- Video Vs Full Data Levels In Davinci Resolve
Also Read- Move Premiere Pro Timeline to Davinci Resolve
Understanding Monitoring In Premiere Pro
Now to the monitors. Remember when I said earlier that Rec.709 is the basic setup for premiere pro, and all the internal monitors, the reference source program, and transmit out are assumed to be running on a Rec.709 system.
It’s, of course, video sRGB, Rec.709, Gamma 2.4, and a brightness of 100 nits.
If your monitors are properly calibrated and profiled for Rec.709, you’ll have no issues with color grading results from working within premiere pro.
Understanding the export pipeline in Premiere Pro
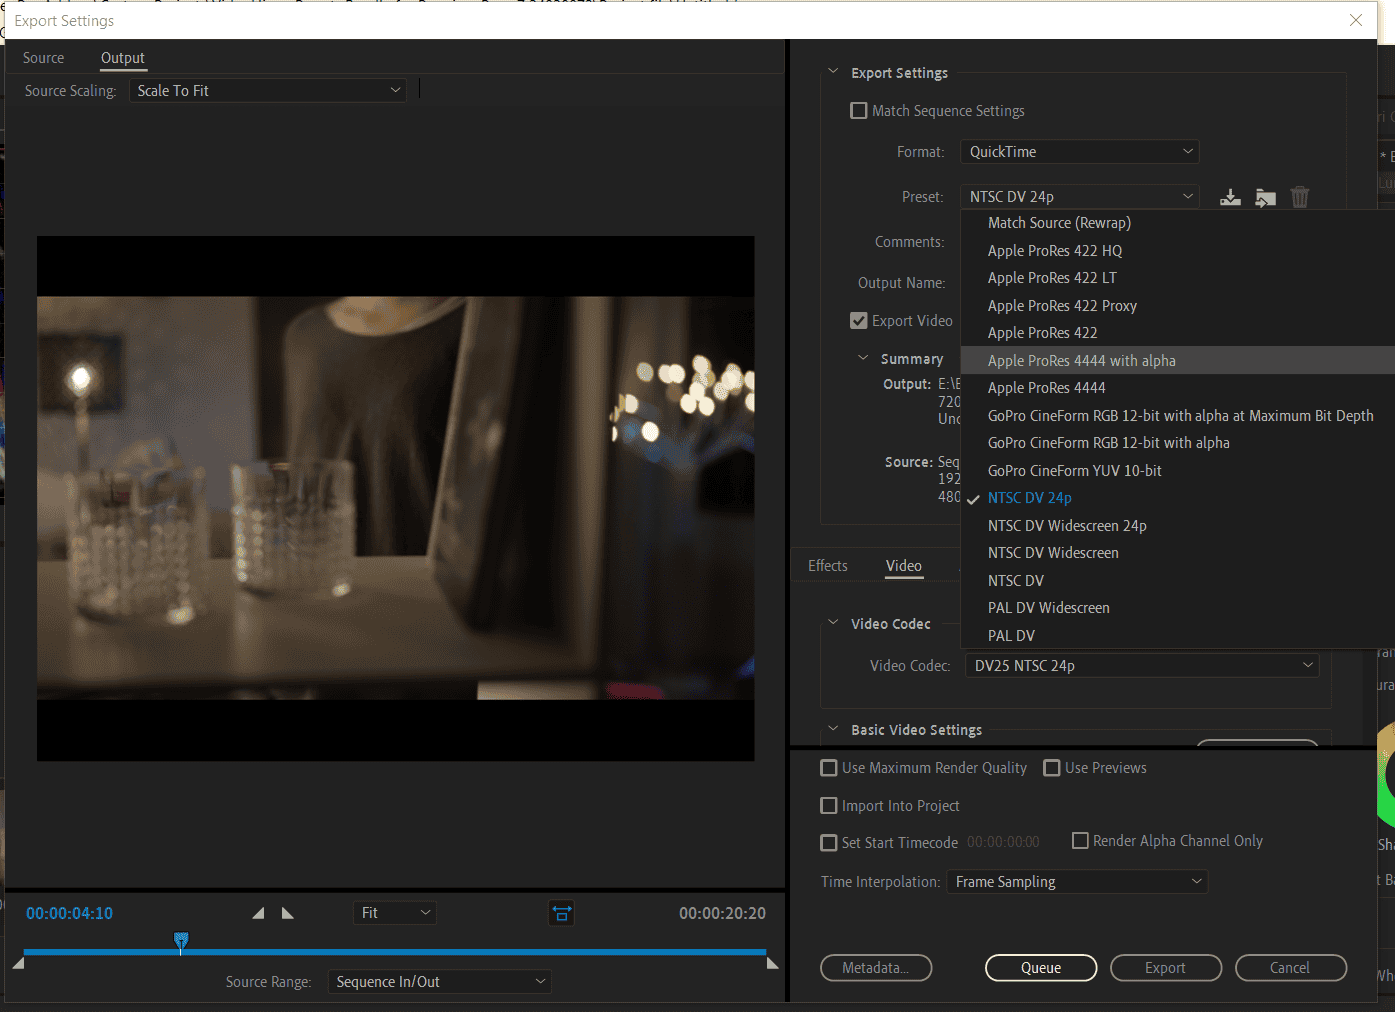
Comparatively, the export pipeline is very simple. At the time of export, Premiere takes the 32-bit float data from the processing pipeline. It converts that process clip data into the appropriate bit depth, dynamic range, and frame size for the format codec combo chosen for that export.
Many of the codec options in the export dialog drop-down list show the bit depth in the name.
At any rate, it’s again up to you as the user to choose your format and codec combinations for the appropriate bit depth for your output. And with that, hopefully, it’s a wrap for this article.