
Welcome to our latest blog post! Have you ever marveled at the mystique of rain in films and music videos, and thought, “How can I create that same effect in my own videos?” Well, today, we are about to transform your dream into reality.
This article is an in-depth exploration into how you can create mesmerizing rain effects using DaVinci Resolve, one of the most robust and versatile video editing software out there.
DaVinci Resolve, known for its advanced color correction and audio post-production capabilities, is also a playground for adding impressive visual effects, or VFX, to your video projects. The software offers a plethora of tools to add drama, texture, and atmosphere to your videos.
One such fascinating effect is the simulation of rain, which can add a level of depth and cinematic quality to your scenes.
No umbrella required for this journey, as we’re about to dive into two distinctive methods to create a rain effect in DaVinci Resolve.
Whether you’re a seasoned filmmaker or just starting to get your feet wet in video editing, these methods will surely amplify your storytelling prowess and elevate your creative projects to new heights.
Creating a Realistic Rain Effect in DaVinci Resolve Using Fusion- Method 1
Rain effects can make your videos more atmospheric, enhancing the overall mood or setting. DaVinci Resolve, a powerful post-production software, allows you to create this effect using its Fusion page. This detailed guide will walk you through the steps of creating a realistic rain effect in DaVinci Resolve using the Fusion tab and the particle system.
1. Preparing Your Footage
The first thing you need to do is to have your footage ready. Find a suitable video clip where you want to add the rain effect. Once you’ve selected your clip, drag it onto the timeline on the Edit page of Davinci Resolve.
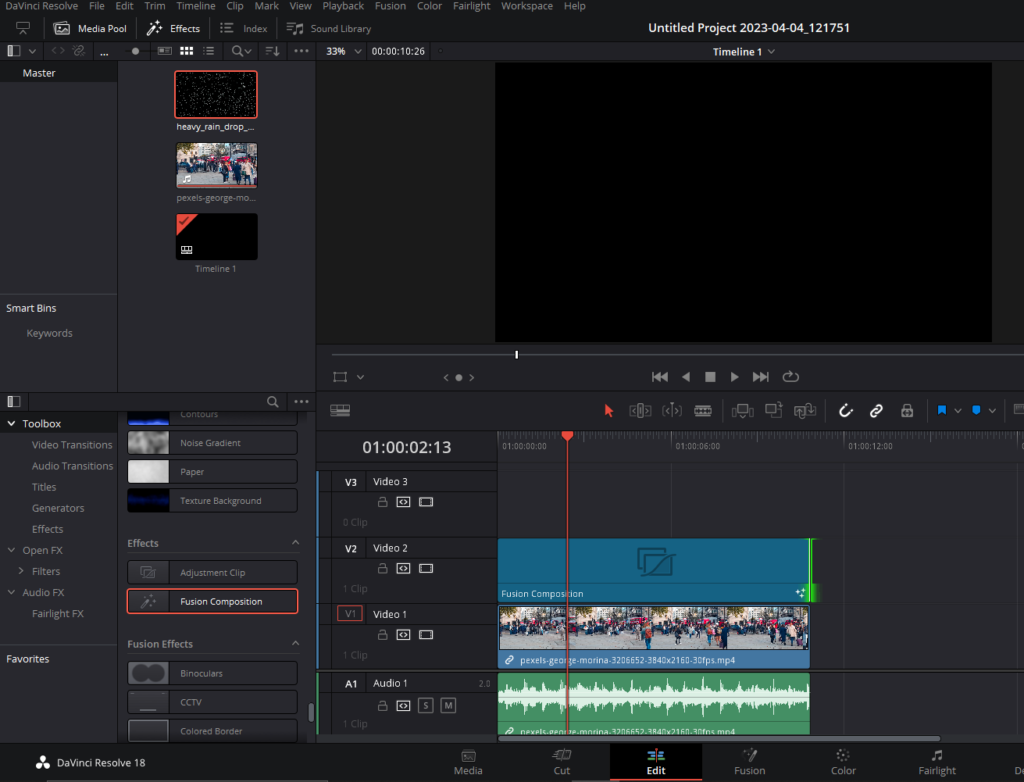
Now, click on the Effects button on the top-left corner and find Fusion Composition. Drag Fusion Composition on the video track above your chosen clip and stretch it to match the length of the chosen clip.
2. Adjusting the Composition’s Resolution.
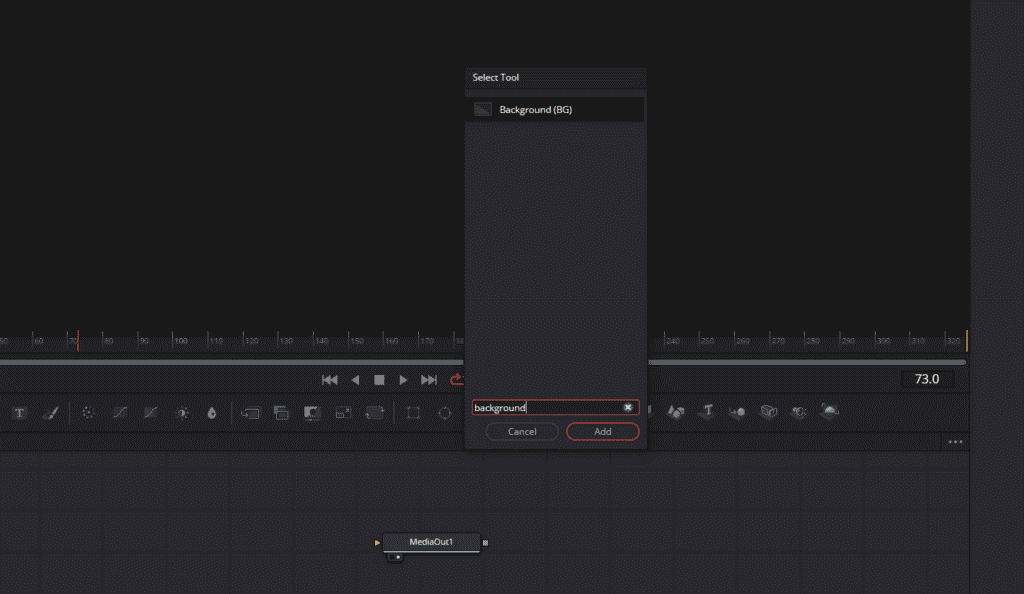
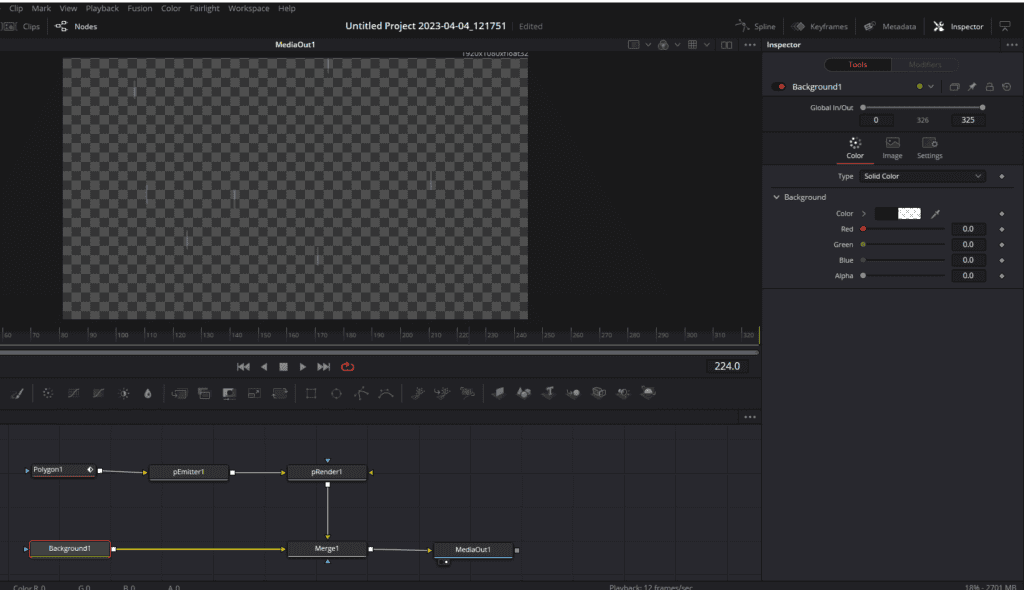
Now with the Fusion Composition selected head to the Fusion page. The next step involves adjusting the resolution for your Fusion Compostion. To achieve this, you need to bring in a background node. Click anywhere in the node editor and then press Shift + Space to bring the tool search window. Type Background and click on Add button.
Connect this Background node with MediaOut1 node.
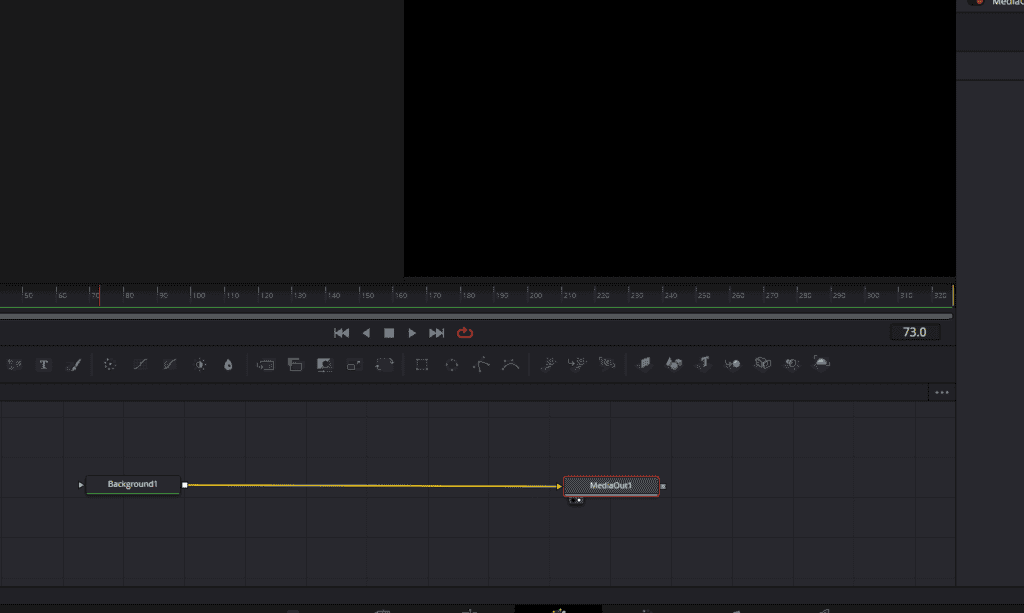
This will automatically configure your Fusion Comp resolution to match the resolution of the background node.
3. Building Your Rain System
Now, you’re ready to start building your rain system. To create a rain effect, you need two critical nodes: an Emitter and a Render.
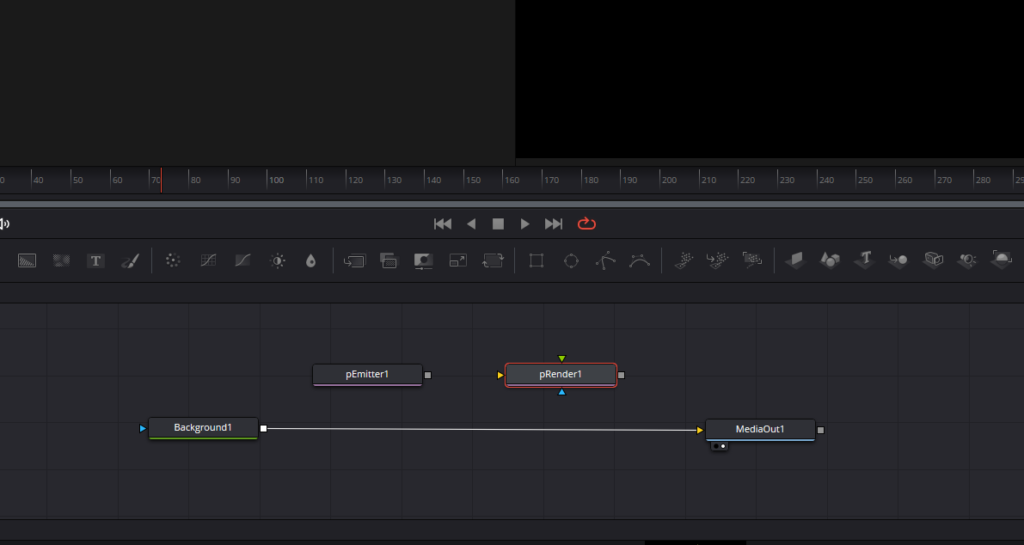
- To bring in the Emitter node, click anywhere in the node editor, press Shift + Space, search for pEmitter, and click Add.
- Repeat the same process to add a Render node, click anywhere in the node editor and press Shift + Space, search for pRender, and click on Add.
- Connect both the nodes, click and drag from the square on the right of the Emitter node to the triangle on the left of the Render node.
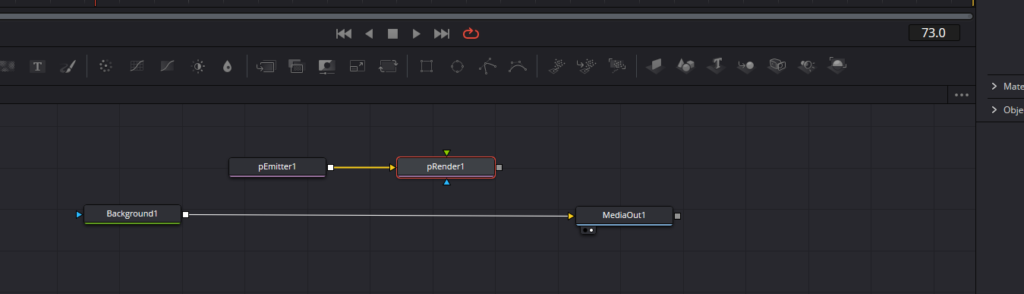
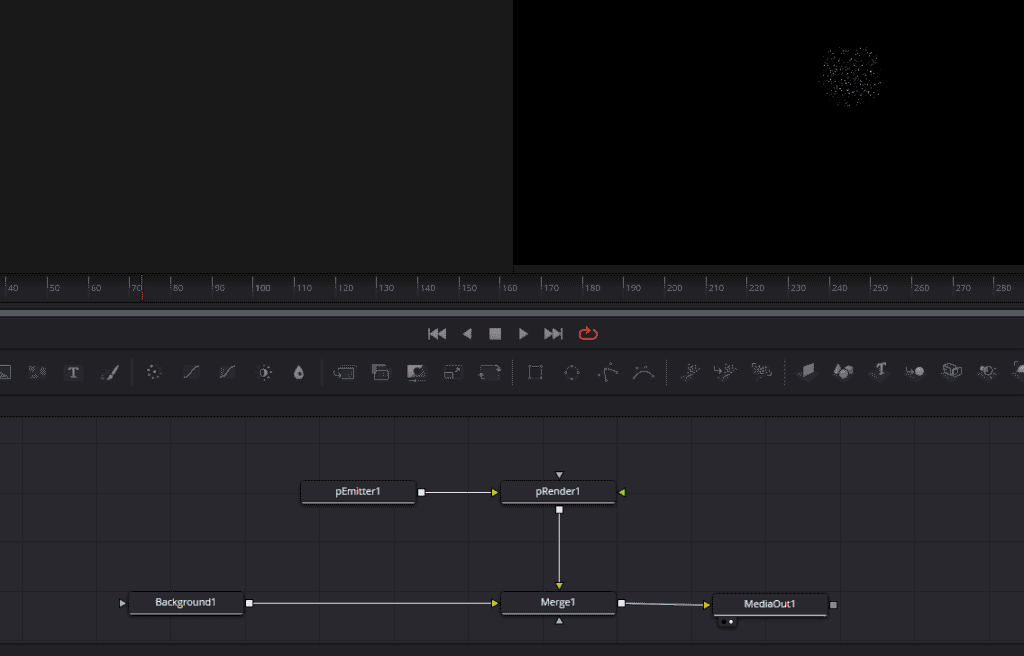
After adding the emitter and render nodes, adjust their placement so they don’t overlap. Then, take the output from the render node (represented as a small square on the right side of the node), and plug it into the output of the background node. This operation overlays the particle system (which will soon become your rain) over your background.
4. Pre-generating Frames and Adjusting Particle Settings
Real rain doesn’t abruptly start and stop; it usually comes and goes gradually. To simulate this effect, you need to pre-generate frames. This technique ensures the particles are already born at frame zero, creating the illusion of continuous rain from the start of your scene.
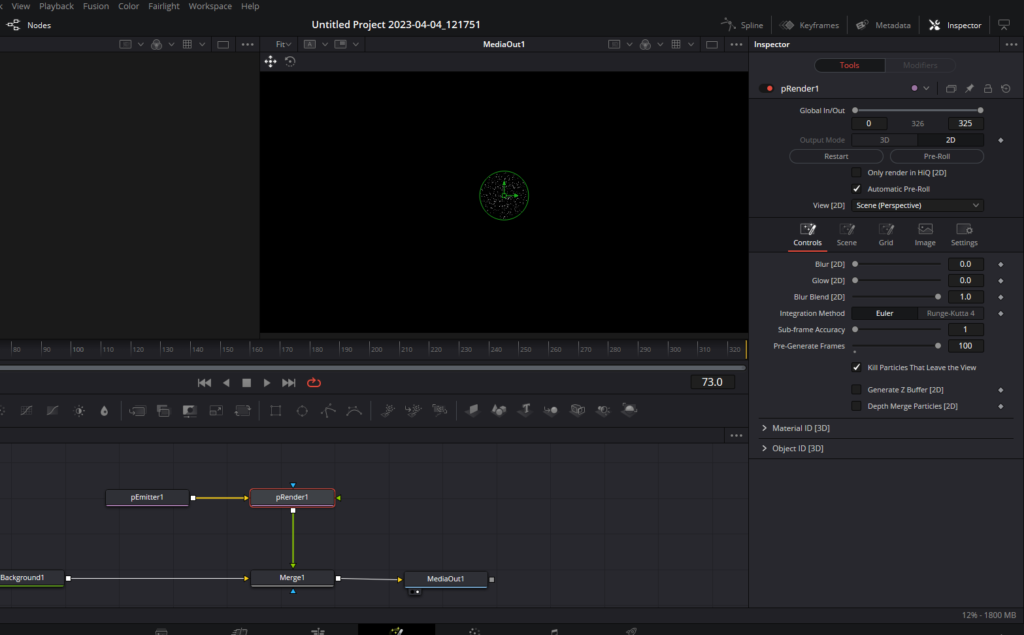
- To pre-generate frames go into the “Inspector” panel on the right while your Render node is selected.
- In the “Pre-generate Frames” slider, drag it to the maximum right.
- Also check the box which says, Kill Particles That Leave The View.
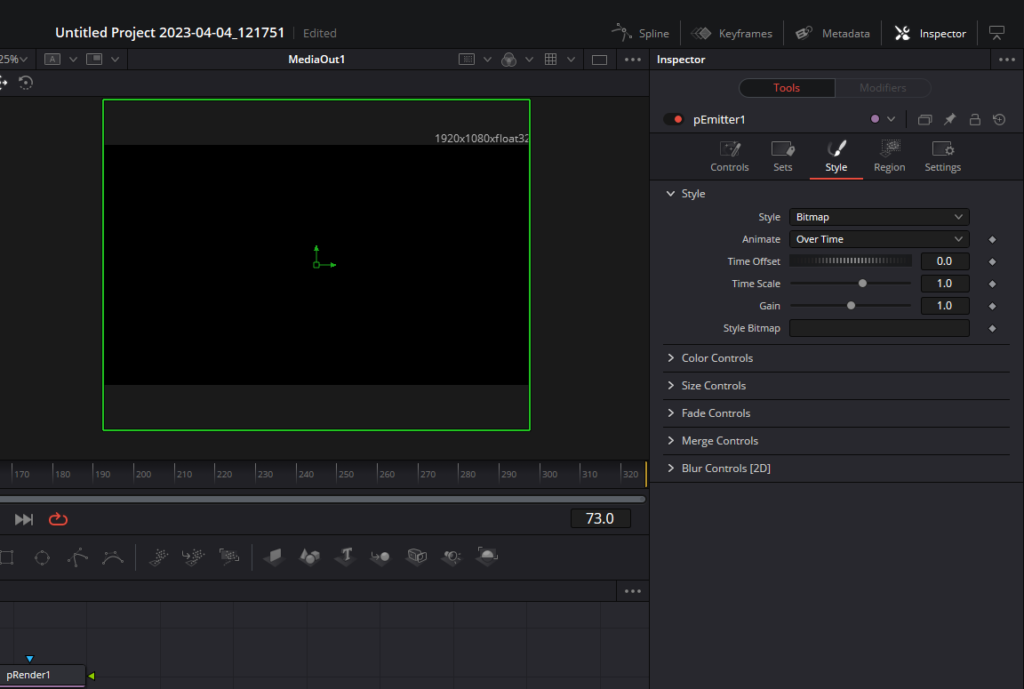
5. Configuring the Particle Emitter
After adjusting the particle rendering system, it’s time to tackle the particle emitter node. The emitter’s role is to generate the particles (i.e., the raindrops). Here, you’ll need to adjust the emitter’s region (the area where particles are generated) to cover the entire frame because by default it just covers a small circle in the center for the frame.
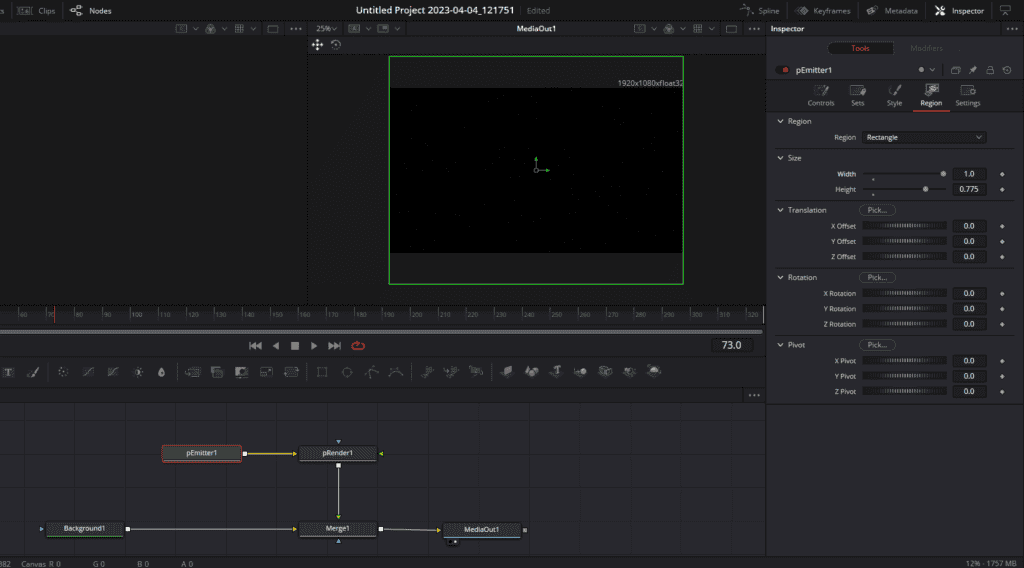
- To achieve this, go into the “Inspector” tab on the right while the emitter node is selected.
- Head to the “Region” section,
- Here you will a drop-down menu that says ‘Region’, open it and change it to ‘Rectangle’.
- Set the width and height values to match the frame’s dimensions. Make sure you leave some extra space as well so that the droplets leave the frame more realistic.
- Next, head to the ‘Style’ tab and change the style from points to bitmap. This alteration will make the particles look less like points and more like small images, simulating raindrops.
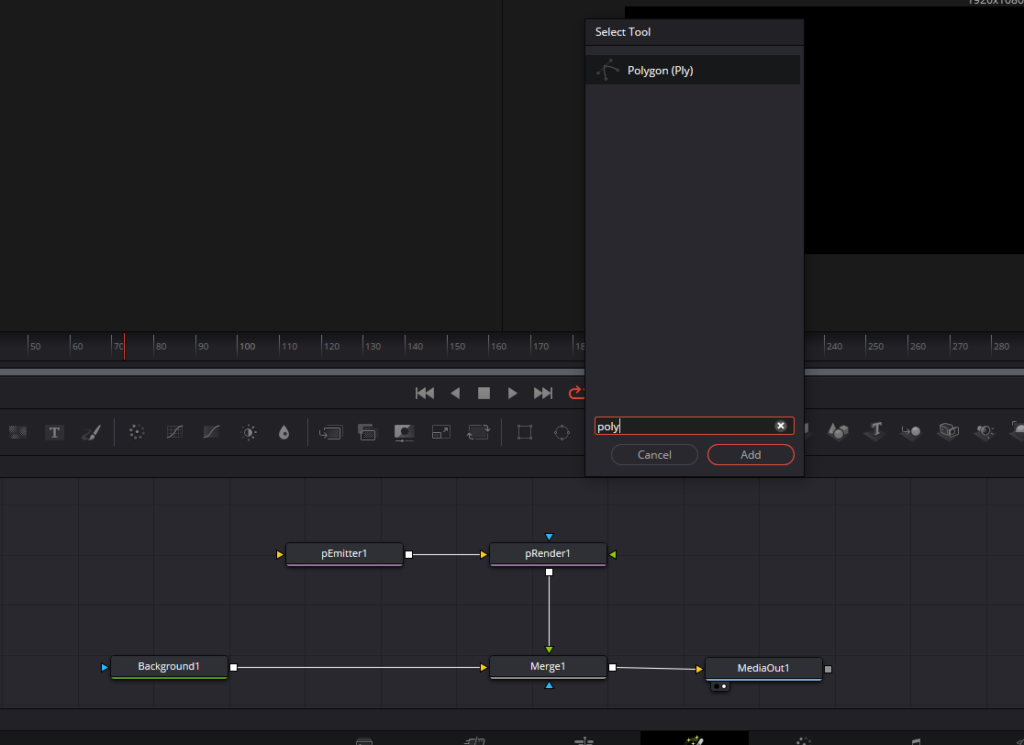
6. Creating the Raindrop Sprite
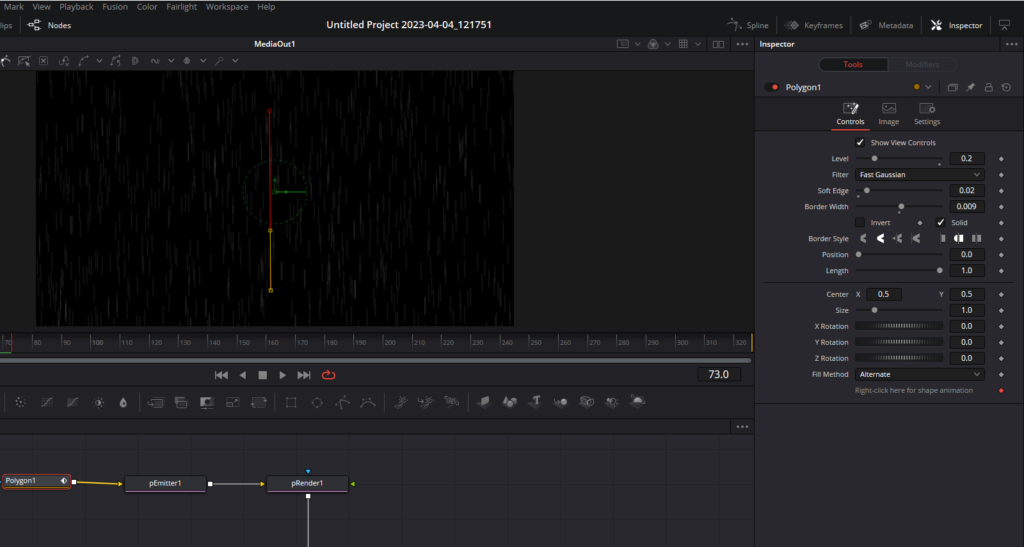
The next step is to create the image (or sprite) that will be used as the raindrop. You can do this by using the polygon tool to create a shape that resembles a raindrop. To achieve this, firstly, click anywhere in the node editor, press Shift + Space, search for Polygon, and click Add.
Connect the Polygon node to the Emitter. A polygon mask is a tool that allows you to draw custom shapes directly onto the Fusion viewer.
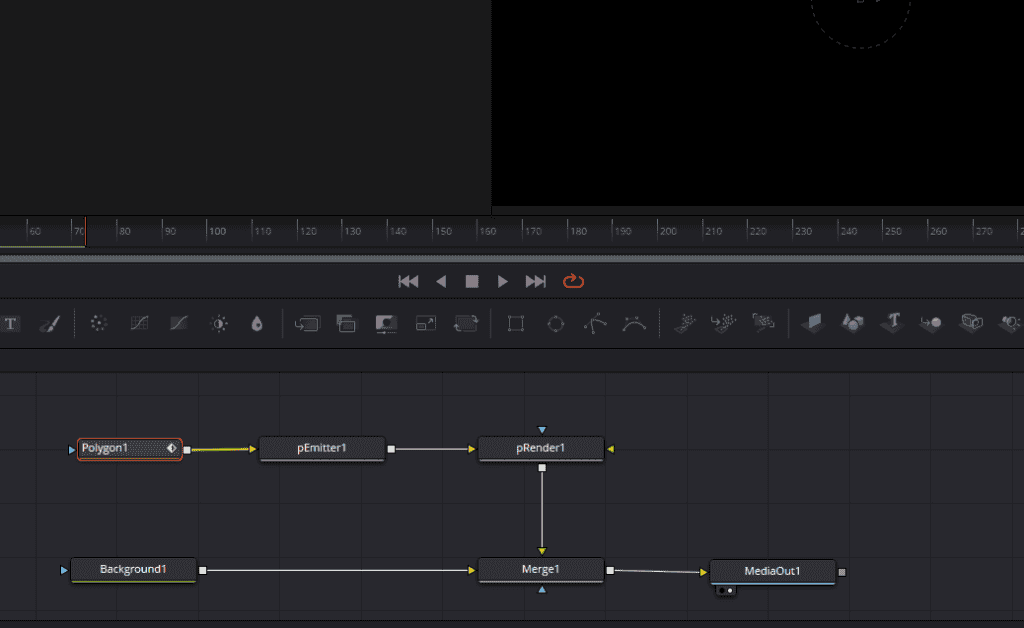
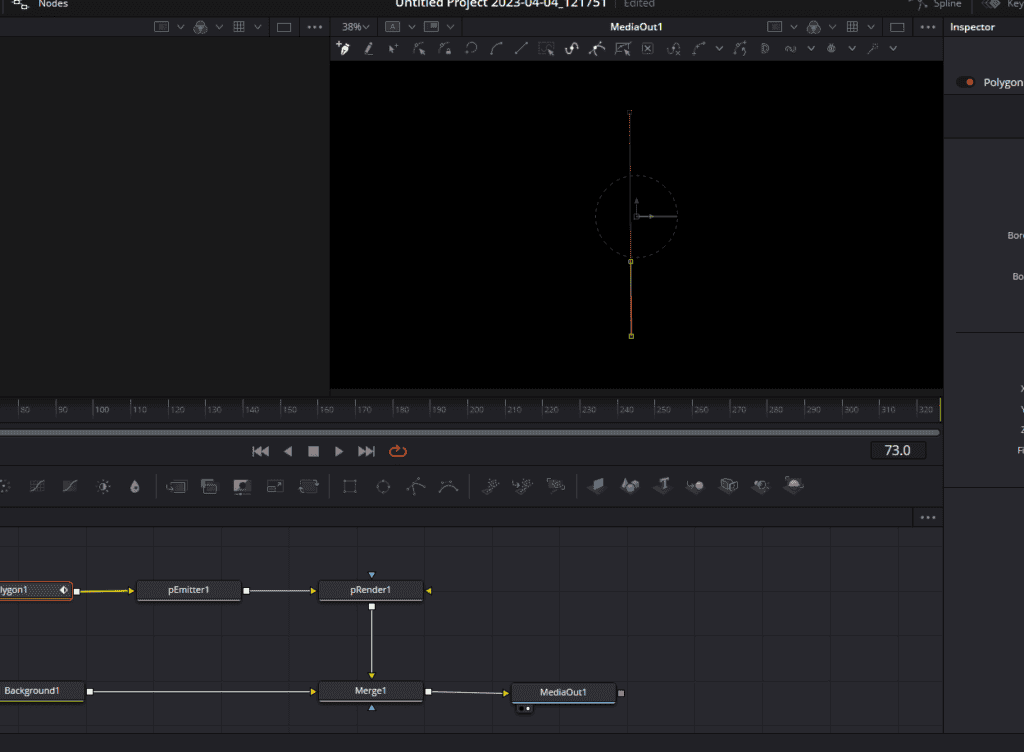
- To create the raindrop, activate the polygon mask in the viewer by selecting it in the node area. Then, simply click in the viewer to create points that define the shape of your raindrop (just create a vertical line).
- While the Polygon node is selected, head to the ‘Inspector’ panel.
- Change the Border Width to 0.006.
- Change the Soft Edge to 0.02
- Change the Level to 0.2.
- You can also play around with the settings to find a better fit for your project.
8. Customizing Rain Properties
Now, you’re ready to customize your rain. By adjusting the velocity, direction, and other properties of your particles in the emitter node settings, you can make the rain fall at the speed and direction that you want. Click on the Emitter node and head to the Inspector panel.
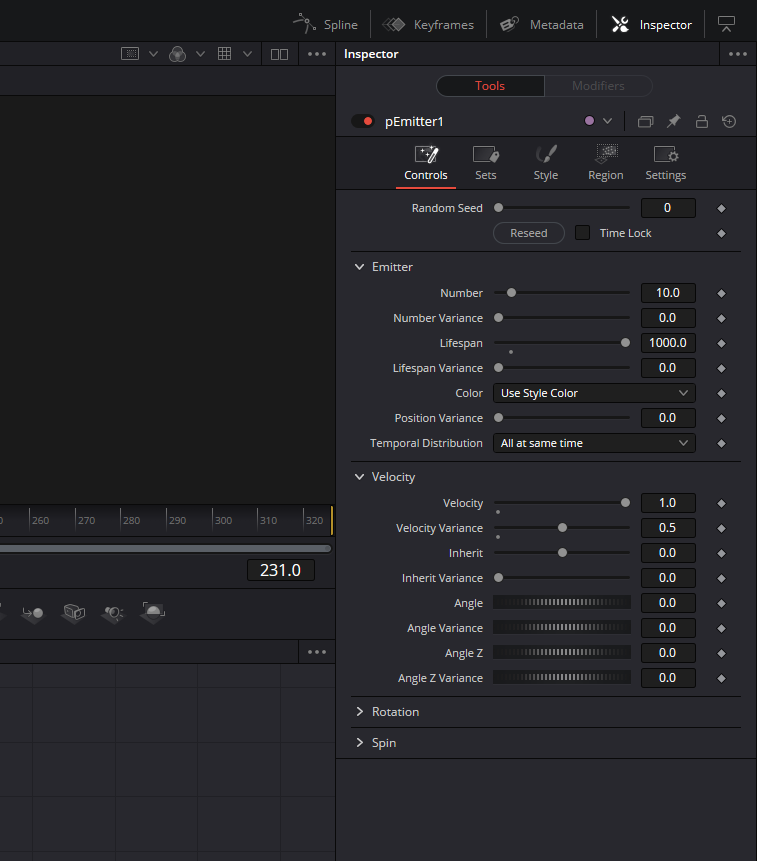
In the Controls section of the Emitter node, set the “Velocity” (speed) to a higher value (1.0). The “Angle” field can be adjusted to simulate wind direction.
One last thing to do is, max out the Lifespan slider to the right. This makes sure the rain effect is endless.
You have just created yourself a realistic looking rain effect in Davinci Resolve.
10. Compositing Your Rain onto Your Footage
To superimpose the rain effect that you just created on your footage, simply click on the Background node and head to the Inspector panel on the right. Drag the Alpha slider all the way to the left so that there is no background left.
You can now head back to the Edit page and you will see the Rain Effect into play.
Creating a Rain Effect in DaVinci Resolve Using Overlays on the Edit Page- Method 2
DaVinci Resolve is a versatile video editing software that provides multiple ways of creating effects. If the Fusion page method seems a bit too advanced or time-consuming, you have an alternative method – using a rain overlay on the Edit page. This method involves using a pre-recorded rain video to enhance your original footage.
Step 1: Procuring a Rain Overlay
A rain overlay is simply a video recording of rain that can be superimposed onto your original footage to create a realistic rain effect. This method saves time and still gives an authentic look to your scene. You can download rain overlays for free from various stock video websites, or you can use the one we provide here. These overlays come in various “flavours,” or styles, so don’t hesitate to experiment to find the one that suits your scene best.
Step 2: Importing the Overlay
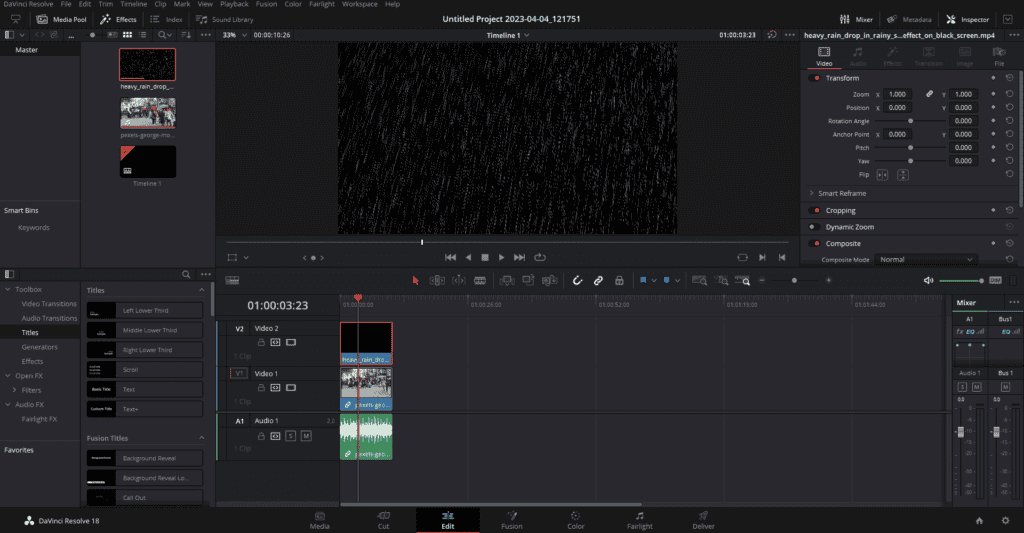
With your rain overlay at hand, the next step is to import it into DaVinci Resolve. Navigate to the Media Pool in the Edit page and import your chosen rain overlay. Drag and drop it onto your timeline, on top of the footage you want the rain effect on.
Step 3: Setting the Composite Mode
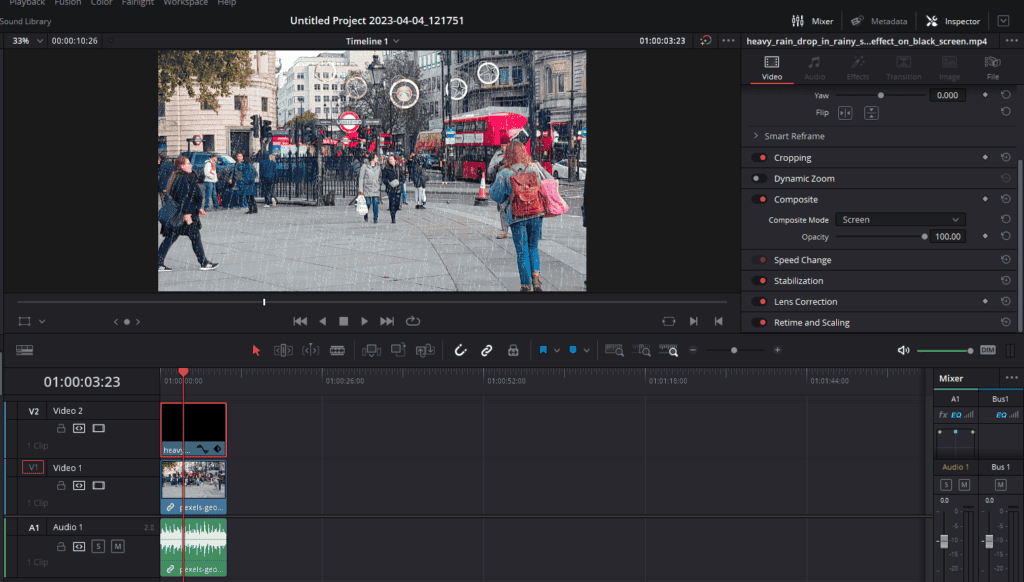
Now, to make the overlay blend seamlessly with your footage, select the rain overlay in your timeline and open the Inspector in the top-right corner. Scroll down to the Composite section and change the Composite Mode to ‘Screen’. This setting allows the overlay to blend with the footage beneath it, creating a natural-looking rain effect.
Step 4: Enhancing the Rain Intensity
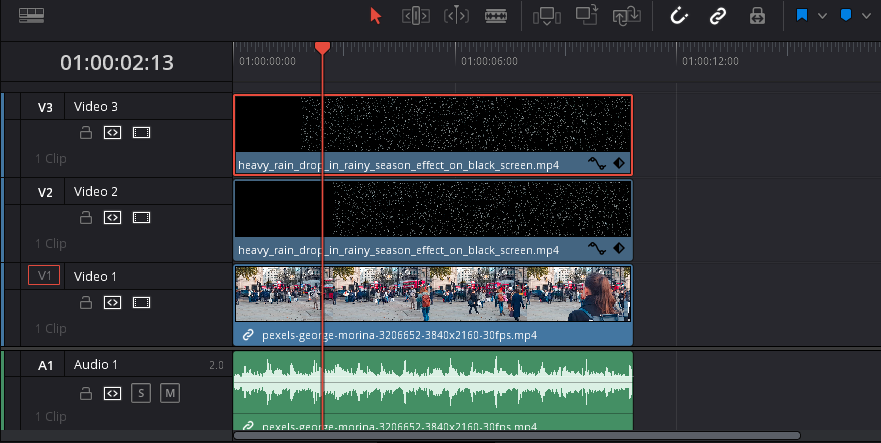
If your scene calls for a heavy downpour rather than a light drizzle, simply intensify the rain effect by duplicating the rain overlay. Simply click and hold the ‘Alt’ key and click on the rain overlay video and drag it above. This will create a copy of the rain overlay. You further click and drag the duplicate rain overlay video one frame forward to increase the volume of the rain drops.
This will create a more pronounced rain effect, making it look like a torrential downpour.
Step 5: Adding Special Effects
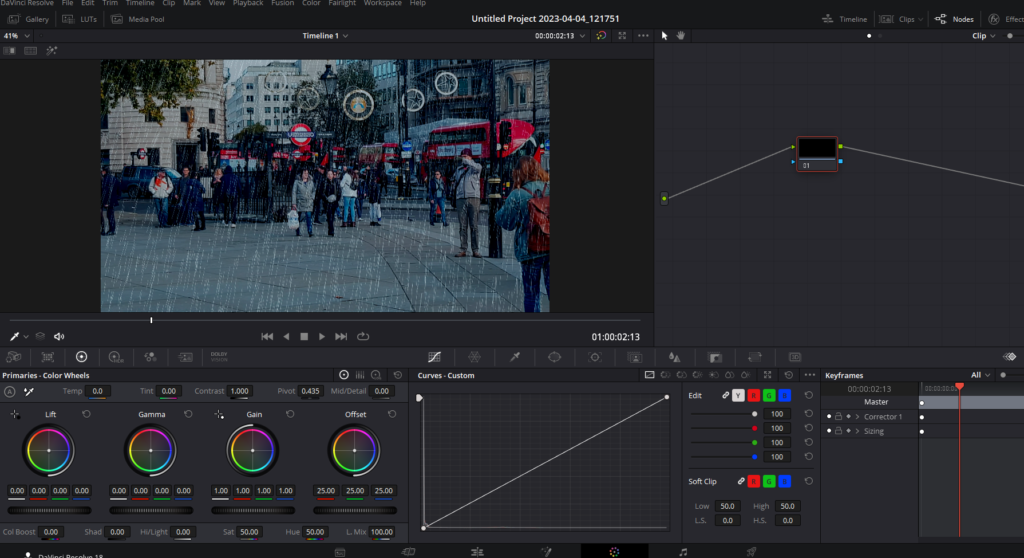
Finally, to further customize your scene, consider adding other special effects. For instance, you could adjust the color grading to make the scene appear darker and more stormy, or add sound effects of thunder to enhance the overall mood of your scene.
So, seize the power of DaVinci Resolve and let your creativity rain over your next video project!