If you’re a filmmaker looking to add a touch of drama or an air of mystery to your videos, you’re in the right place. One classic technique seen in police series and action movies is the typewriter effect – and you can achieve it for free using DaVinci Resolve. In this blog post, we’ll walk you through the process of creating the Typewriter Effect in DaVinci Resolve. In just a few minutes, you’ll be able to enhance your videos with this iconic effect.
Typewriter Effect DaVinci Resolve: Step By Step Guide
Creating and Customizing Text in DaVinci Resolve

Step 1: Accessing the Effects Menu and Adding Text
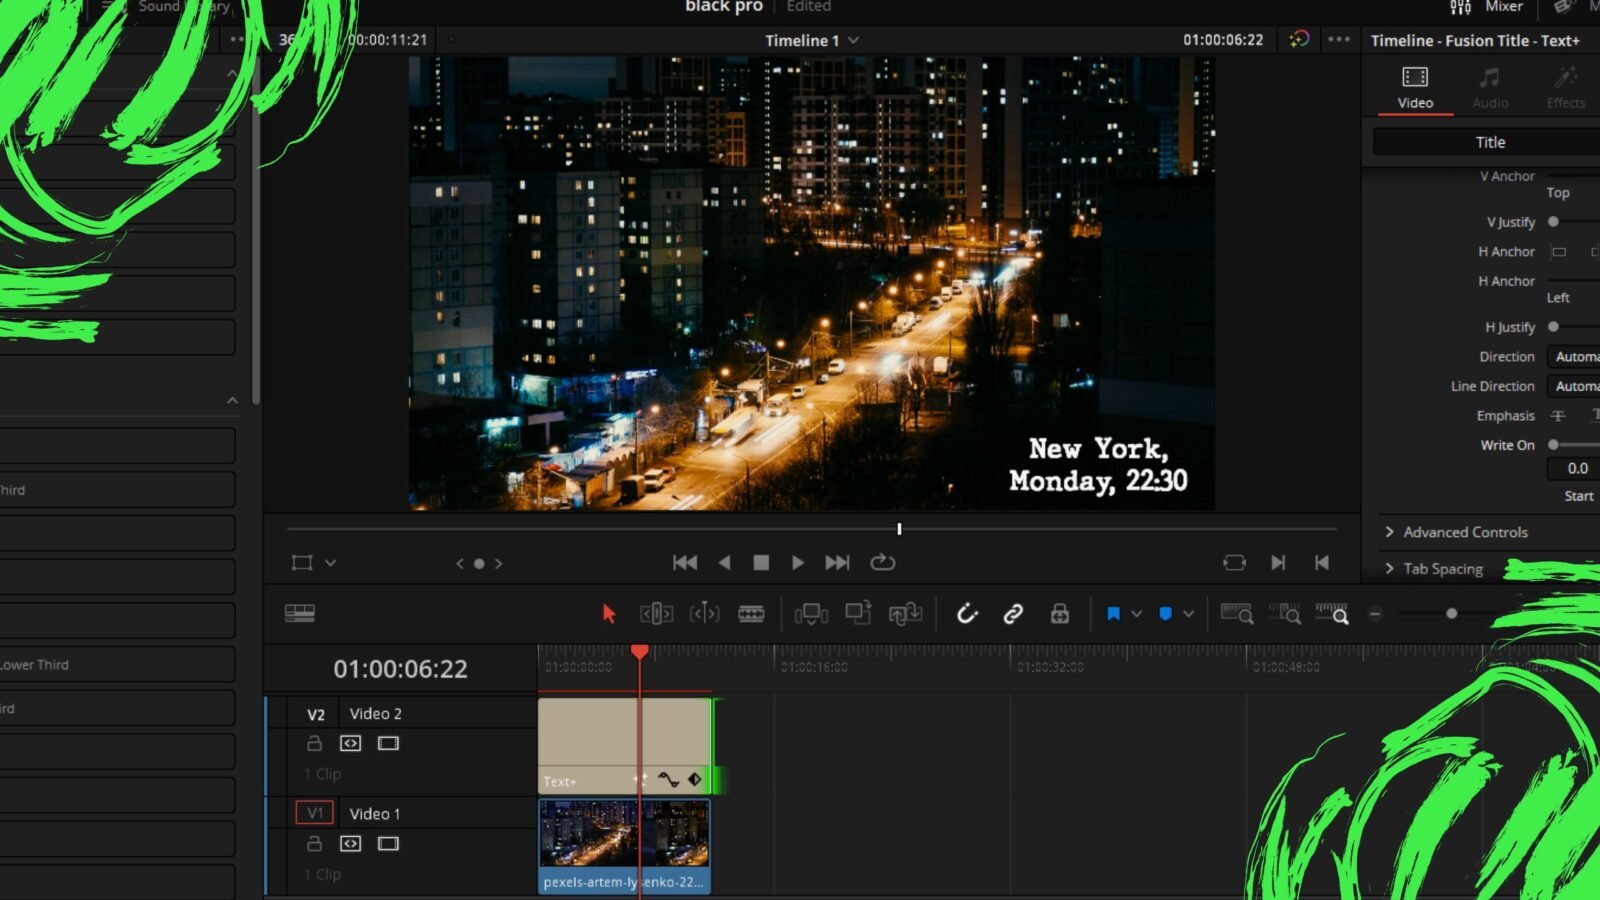
To get started with the typewriter effect in DaVinci Resolve, first, head to the Effects menu located in the upper left part of the Edit page. Open the Toolbox category and navigate to the Titles section. From there, select the Text+ effect and drag it to your timeline. Adjust the duration of the Text+ clip to match your video clip.
Step 2: Customizing Your Text
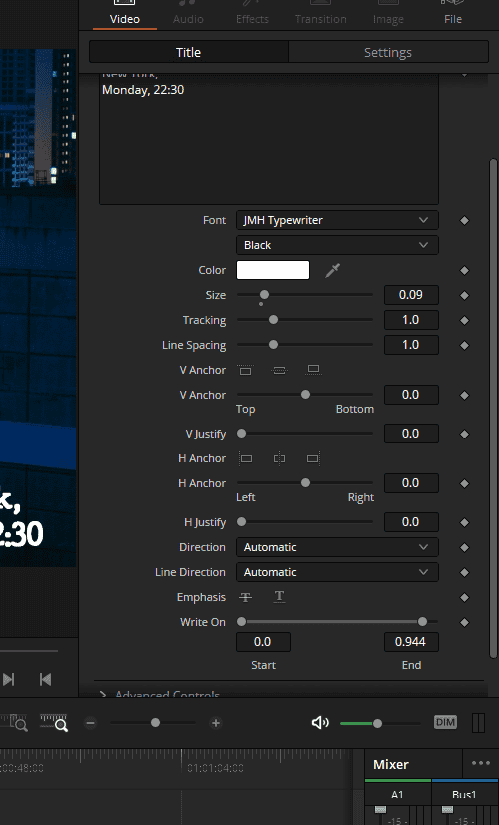
With the Text+ clip in place, it’s time to customize your text. Select the clip in the timeline and open the Inspector menu in the upper right corner. Inside the Title menu, you can modify your text as desired. Let’s suppose you want to display the text “New York, Monday, 22:30.” Next, choose the font for your title. For added flair, consider using a custom font to make your text stand out.
Finding and Installing Free Typewriter Fonts
To achieve the perfect typewriter effect, you may want to use a dedicated typewriter font. If you don’t already have one, follow these steps to download one for free:
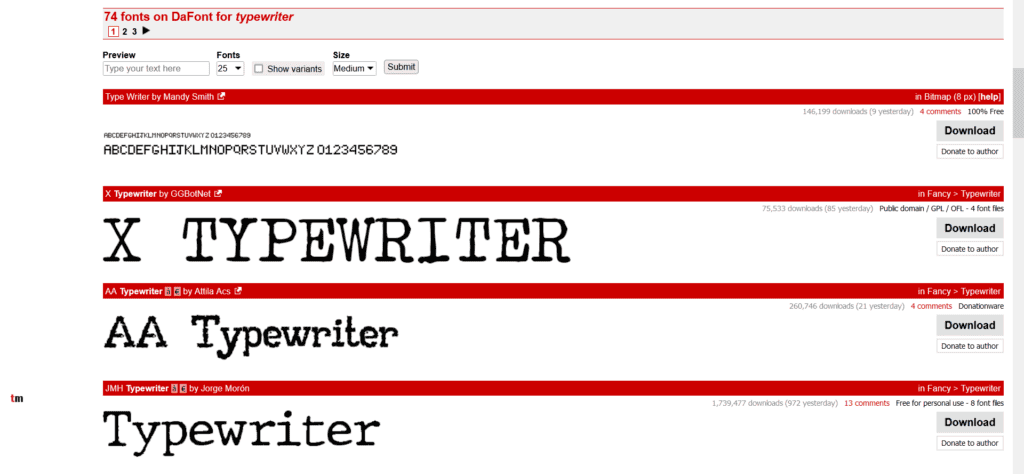
- Go to Google and search for “Dafont.”
- Or Click on the website here Dafont.
- Accept the cookies if prompted.
- In the search bar, type “typewriter” and click on “search.”
- Browse through the available typewriter fonts and choose one (or several) that best suit your video.
- Click on “download” for your chosen font(s).
- A compressed file will be downloaded. Extract the installation file from the font and install it.
- Click on the title clip on the timeline and return to the inspector menu to change your font to one of the typewriter fonts you just downloaded from the Font drop-down menu.
All the fonts on Dafont are free and copyright-free. Keep in mind that if you have DaVinci Resolve open while installing the font, you will need to restart the program to make the newly installed fonts available. Once DaVinci Resolve is restarted, simply search for the font you just installed (e.g., JMH Typewriter) and apply it to your text.
Customizing Text Position and Size
With your desired font applied, it’s time to adjust the position and size of your text. Here’s how you can do that in DaVinci Resolve:
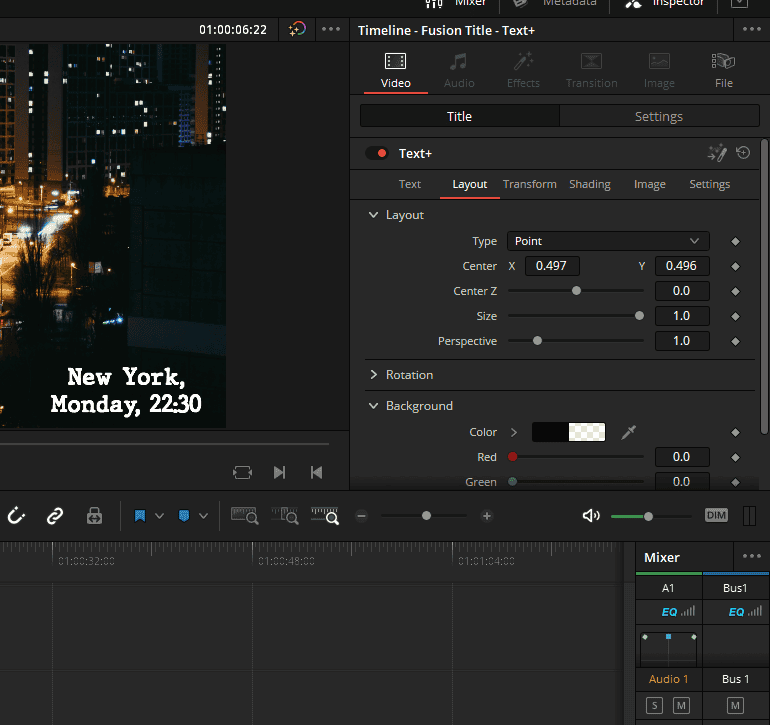
- In the Layout section of the Text+ settings in the Inspector menu, click to access the X-axis and Y-axis controls.
- Adjust the position of your title by moving the X-axis and Y-axis sliders.
- Position the text to your liking (e.g., in the corner of the video).
- If necessary, adjust the text size in the Text section of the Inspector menu.
Once you’ve positioned and resized your text, decide at which point in the video you’d like the text to start appearing:
- Scrub through the timeline to locate the desired starting frame for the text.
- Adjust the start of the Text+ clip to align with this frame.
By doing so, you’ll create a brief introduction to the location before the text appears, providing viewers with more specific information. With your text in place, you’re now ready to create the Typewriter Effect in DaVinci Resolve.
Animating the Typewriter Effect
Now that your text is in place, it’s time to create the typewriter effect animation. Follow these steps to achieve the desired result:
- In DaVinci Resolve, go to the Text+ configuration menu where you previously modified the text.
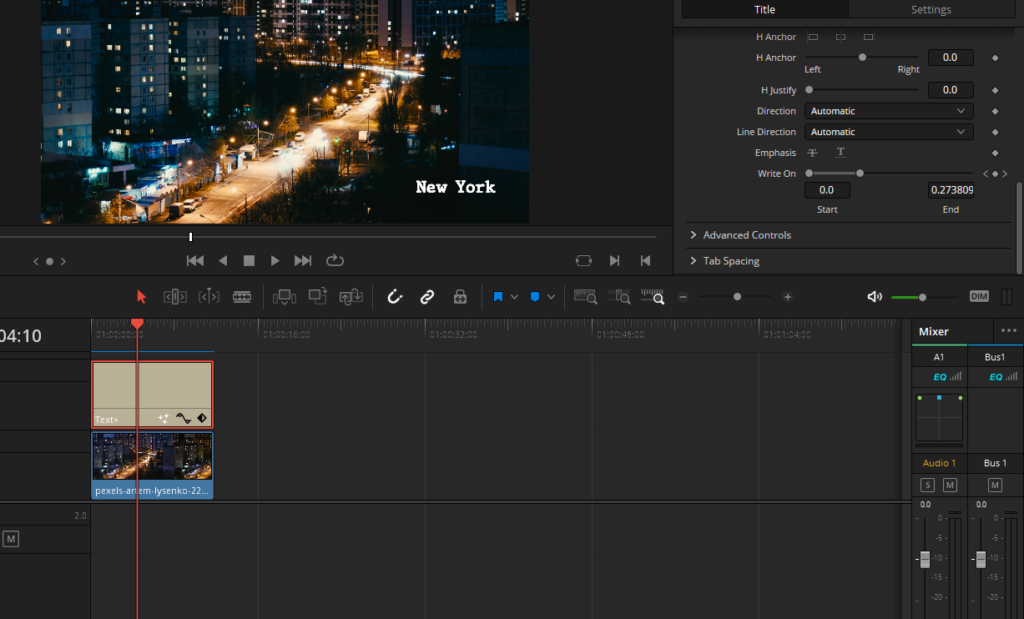
- Scroll down to find the “Write On” option.
- Adjust the “End” value to make letters of your title appear and disappear one by one.
- Move the playhead to the beginning of your text clip.
- Click on the keyframe icon (diamond-looking icon) next to the “Write On” option to create a keyframe.
- Reduce the “End” value to 0.0.
- Move the playhead to the frame where you want the typing animation to finish.
- Increase the “End” value to the maximum (1.0). A new keyframe will automatically be created.
Now, your typewriter effect animation is complete. Play the video to see how it looks.
Adjusting Animation Speed:
If you’d like to change the speed of the animation, simply delete the last keyframe and create a new one:
- Place the playhead on the last keyframe.
- Click on the keyframe button (diamond-looking icon) icon to delete it.
- Move the playhead to a new position for the desired animation speed.
- Set the “End” value back to 1.0 to create a new keyframe.
By adjusting the keyframe positions, you can control the speed of your typewriter effect animation. With these steps complete, your professional-looking writing effect is ready to impress your viewers.
Typewriter Sound Effect For Completing Typewriter Effect In DaVinci Resolve

To make your typewriter effect even more authentic, adding a sound effect is essential. Here’s where you can find and download a typewriter sound effect for free:
- Open Google and search for “Pixabay.”
- Pixabay is a popular resource for downloading photos, videos, and sound effects for various projects.
- Locate the drop-down menu next to the search bar, and select “Effects” to filter your search to sound effects only.
- Type “typewriter” into the search bar and browse through the available sound effects.
- Listen to the different typewriter sound effects and click “Download” on the one that best suits your video.
Importing the Sound Effect to DaVinci Resolve
With your typewriter sound effect downloaded, follow these steps to add it to your video project in DaVinci Resolve:
- Import the sound file into DaVinci Resolve.
- Add the sound effect to your video by placing it on an audio track in the timeline, aligned with the text animation.
Fine-Tuning the Sound Effect
To ensure the sound effect matches the timing of the typewriter animation, you may need to make some adjustments:
- Trim or extend the sound effect clip as needed to match the duration of the text animation.
- Adjust the volume level of the sound effect to ensure it doesn’t overpower other audio elements in your video.
By adding a typewriter sound effect, you’ll create a more immersive experience for your viewers, elevating the overall impact of your video. The combination of visual and auditory elements helps to craft a professional and engaging final product that’s sure to impress.
Exploring Pre-built Animated Titles for the Typewriter Effect in DaVinci Resolve
DaVinci Resolve offers a variety of pre-built animated titles that can help you achieve a typewriter effect with minimal effort. By using these built-in options, you can easily create a writing effect without having to create your custom animation. Here, we’ll explore two Fusion titles, Jitter and Random Write On, that can be used to create a unique typewriter effect in DaVinci Resolve.
Step 1: Accessing Fusion Titles in DaVinci Resolve
To access the built-in Fusion titles, follow these steps:
- Go to the Effects menu in DaVinci Resolve.
- Select the Toolbox and navigate to the Titles section.
- Locate the Fusion Titles category.
Step 2: Creating the Typewriter Effect with Jitter Fusion Title
The Jitter Fusion title can be used to create a dynamic writing effect:
- Find the Jitter Fusion title within the Fusion Titles category.
- Drag the Jitter title to your timeline to apply the effect.
By default, the Jitter title features moving white lines behind the text. If you prefer to remove these lines, follow these steps:
- Go to the Title menu.
- Open the Jitter Edge tab.
- Reduce the Red, Green, Blue, and Alpha values to minimize the lines’ visibility.
With these adjustments, you’ll have a clean writing effect using the Jitter Fusion title.
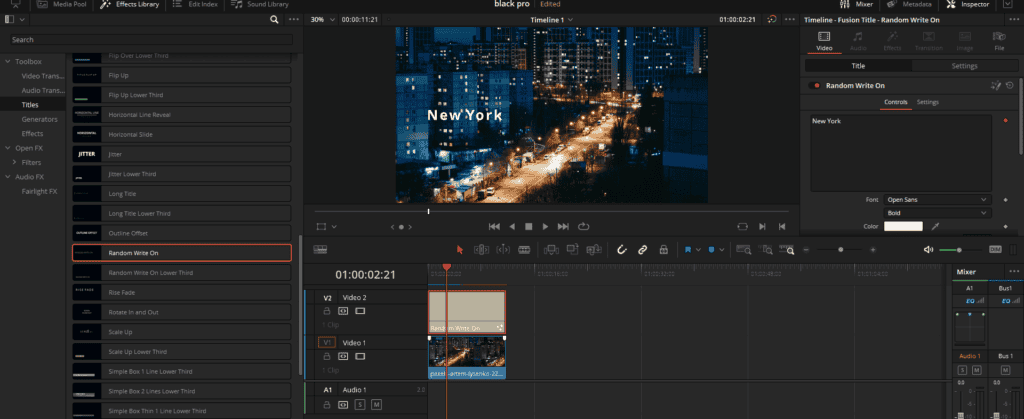
Step 3: Creating the Typewriter Effect with Random Write On Fusion Title
The Random Write On Fusion title offers a unique take on the typewriter effect, with letters appearing randomly and featuring a slight flicker:
- Locate the Random Write On Fusion title within the Fusion Titles category.
- Drag the Random Write On title to your timeline to apply the effect.
The Random Write On title provides a more unpredictable and dynamic typewriter effect, which can add an extra layer of excitement or intrigue to your video.
We hope this guide has provided valuable insights into creating the typewriter effect in DaVinci Resolve. Thank you for your continued support, and we wish you the best of luck in all your future filmmaking endeavors!