Welcome back to filmmakingelements.com, your trusted resource for all things related to filmmaking. In this article, we’ll be discussing how to effectively use ProRes RAW in DaVinci Resolve. ProRes RAW is an efficient and high-quality video format that is widely used in the filmmaking community. However, using and utilizing the metadata of ProRes RAW in DaVinci Resolve can be a challenge.
I will share a personal guide on working with ProRes RAW in DaVinci Resolve. As many of you might already know, ProRes RAW is a go-to video format for many filmmakers like myself. Yet, melding its metadata with DaVinci Resolve often feels like threading a needle. Not to worry, I’ll walk you through a method I’ve found quite effective.
Converting ProRes RAW Files for DaVinci Resolve
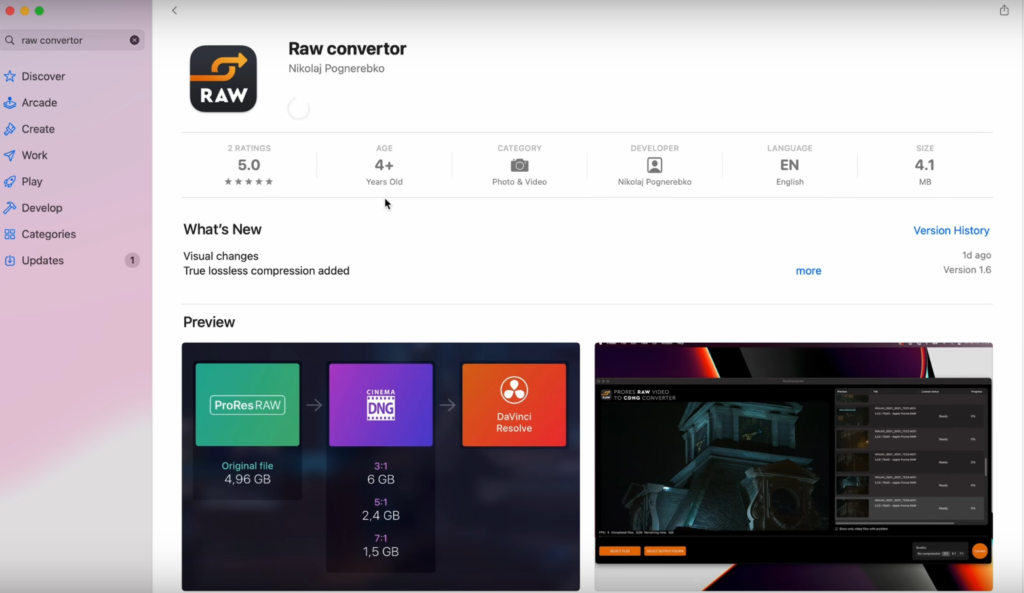
To get started, you’ll need to download a RAW converter from the Apple App Store. While this app is paid, you can test it out for free before committing to a purchase. This particular converter I use deciphers ProRes RAW files and change them to Cinema DNG format, maintaining critical information such as white balance, tint, and gamma.
Once the conversion is complete, you’ll notice that your footage is now saved as a series of individual pictures, with each frame represented by a separate image. Don’t be alarmed – this is normal for Cinema DNG files. When you import these files into DaVinci Resolve, the software will recognize them as a video, allowing you to work with them in the Camera RAW tab as you would with any other video file.
The name of the app is Raw convertor on Apple App Store and Microsoft Store.
Click here to download the app for mac.
Click here to download ProRes RAW to Cinema DNG converter for windows.
Common Cinema DNG Myths: Storage and Audio Concerns
As I’ve navigated the intricacies of post-production, there are two persistent myths about Cinema DNG that I’ve encountered time and again. Let me share my hands-on experiences to shed light on these misconceptions.
Myth 1: The Storage Nightmare of Cinema DNG
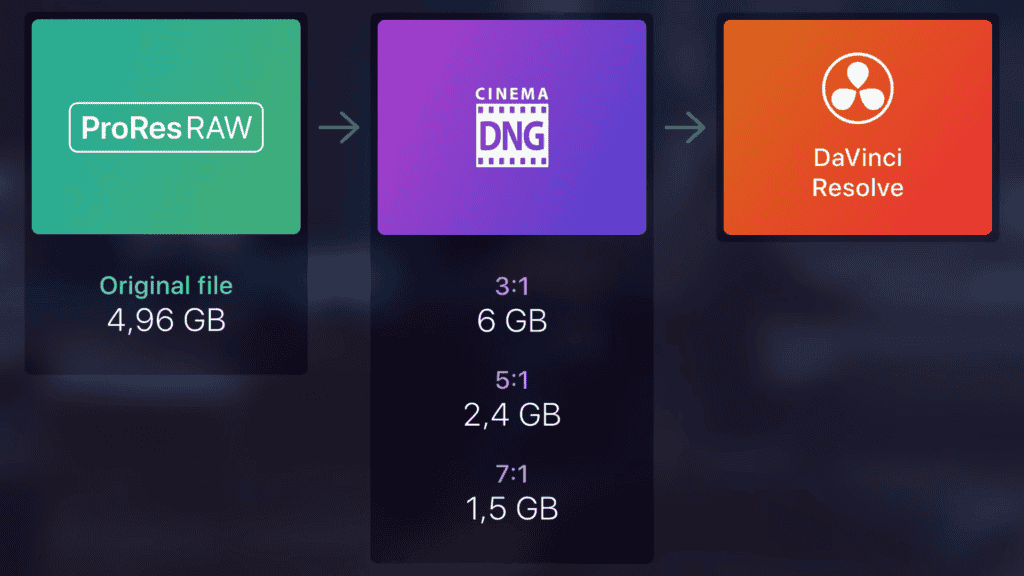
Yes, I’ll admit, when I first began working with Cinema DNG, the file sizes seemed daunting. They can be pretty massive, especially if you’re saving in the uncompressed format. But here’s the thing I’ve learned: you have options. By opting for a compressed ratio like 3:1 or 5:1, not only did I slash the file size considerably, but I also noticed that the visual quality didn’t drop off. These compression options are nearly lossless, and they’ve been a lifesaver for me in maintaining those crisp visuals for my projects.
Myth 2: The Disappearing Audio Act with Cinema DNG
Here’s another one that caught me off guard early on. Rumor had it that when you convert to Cinema DNG, you’d wave goodbye to your audio. My experience? Absolutely not the case. With the right RAW converter (and I’ve tried a few), the audio track sticks around, clear as ever, during conversion. So, whenever I jump into DaVinci Resolve with Cinema DNG files, I’m confident that both my video and audio remain untouched and synchronized.
How to Use RAW Converter: A Step-by-Step Guide
In this section of our blog post, we’ll provide a detailed walkthrough of the RAW converter app, which is essential for converting ProRes RAW files to Cinema DNG format for use in DaVinci Resolve. Understanding the various features and options within the app will make your conversion process smooth and efficient.
Navigating the RAW Converter Interface
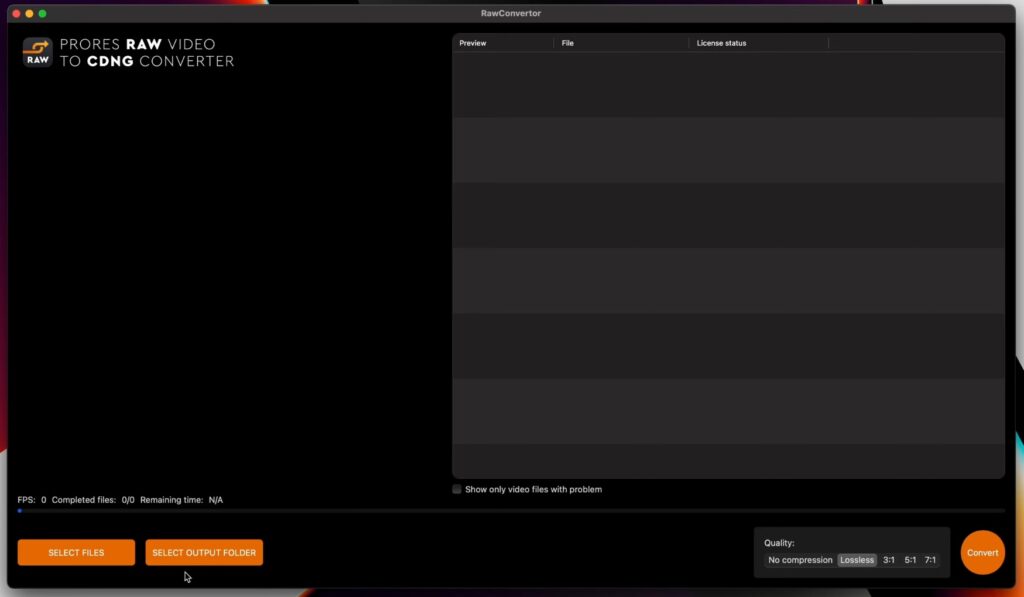
- Compression Quality Settings: Located in the bottom right corner, these settings allow you to select the desired compression ratio for your converted files, such as uncompressed, 3:1, or 5:1.
- Conversion Button: This main button starts the conversion process once you’ve selected your input files and settings.
- File Selection Buttons: On the left side, these buttons allow you to choose one or multiple videos for conversion and designate a folder for saving the converted footage.
- Conversion Statistics: Located above the file selection buttons, this area displays important information such as conversion speed and remaining time.
- Selected Videos Table: In the top right corner, this table shows the videos you’ve chosen for conversion, along with previews and additional information.
- Problematic Video Selection Checkbox: Beneath the table, this checkbox allows you to filter and display videos with issues such as unsupported formats or camera types.
- Video Playback: In the top left corner, this player enables you to preview your selected videos before conversion.
Putting It to the Test: Comparing Conversion Quality
To demonstrate the app’s capabilities, we’ve conducted a test conversion with a sample video at four different quality settings. The uncompressed option offers the fastest conversion time (around 70 fps), while compressed options (such as 3:1 and 5:1) are slightly slower (around 30 fps).
However, it’s important to note that the 3:1 and 5:1 compression ratios are virtually lossless in terms of visual quality, making them an excellent choice for preserving disk space without compromising your footage. You can download and compare the sample conversions using the link in the description to see the difference for yourself.
Importing Converted Videos into DaVinci Resolve
Once you’ve successfully converted your ProRes RAW files to Cinema DNG using the RAW converter, the next step is to import these videos into DaVinci Resolve for further editing and color grading. In this section of our blog post, we will guide you through the process of importing converted files and working with them in DaVinci Resolve.
Importing and Working with Cinema DNG Files in DaVinci Resolve
- Importing Videos: To import your converted videos, navigate to the Media tab in DaVinci Resolve and drag the folders containing your footage into the Media Pool. You’ll notice that Resolve automatically detects the correct frame rate for your videos.
- Maintaining Audio: When you drag your videos onto the timeline, you’ll see that the original 4-channel audio remains part of the video, ensuring that none of your audio data is lost during the conversion process.
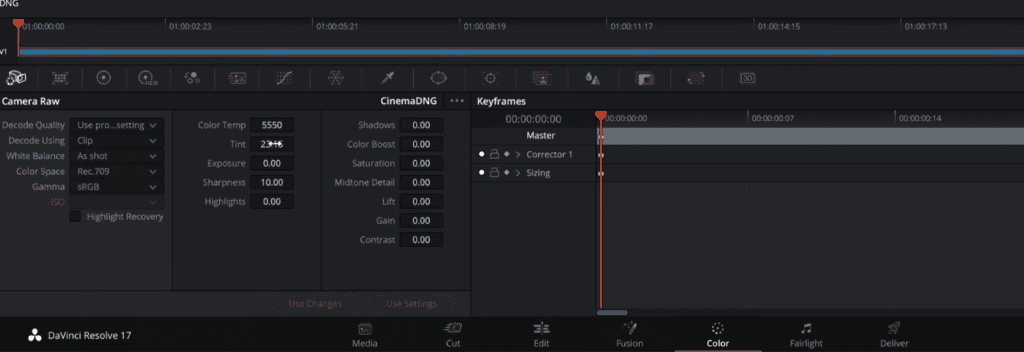
- Color Grading: In the Color tab, you’ll have access to the Camera Raw tab with all its options, including white balance, tint, and gamma. Although the ISO column is not usable, you can achieve similar results using the exposure reel.
- Preserving Dynamic Range: The conversion process does not compromise the dynamic range of your footage. For example, if you have overexposed areas in your video, such as the sky, you can easily adjust these without losing any data.
Setting Up Color Management for Converted ProRes RAW Files in DaVinci Resolve
In this part of our blog post, we will demonstrate how to properly set up color management in DaVinci Resolve for ProRes RAW files that have been converted to Cinema DNG. This guide will cover DaVinci Resolve’s native YRGB color management, ACES workflow.
DaVinci Resolve Native YRGB Color Management for Converted ProRes RAW Files
In this section of our blog post, we’ll guide you through setting up DaVinci Resolve’s native YRGB color management for your converted ProRes RAW files to Cinema DNG. By following these steps, you’ll be able to maintain your footage’s dynamic range and achieve optimal results during the color grading process.
Step-by-Step Guide to YRGB Color Management in DaVinci Resolve
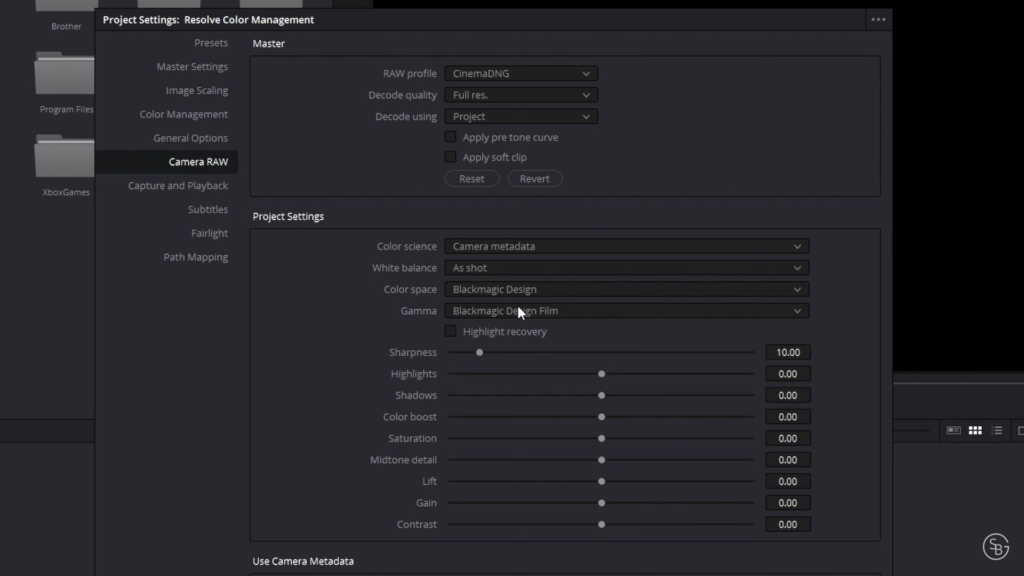
- Camera Raw Settings: Navigate to File > Project Settings > Camera Raw tab. Select Cinema DNG for the “RAW Profile” option and change “Decode Using” to Project. Uncheck Apply Pre-Tone Curve to preserve more dynamic range in your footage.
- Color Space and Gamma: Choose Blackmagic Design as the color space and gamma.
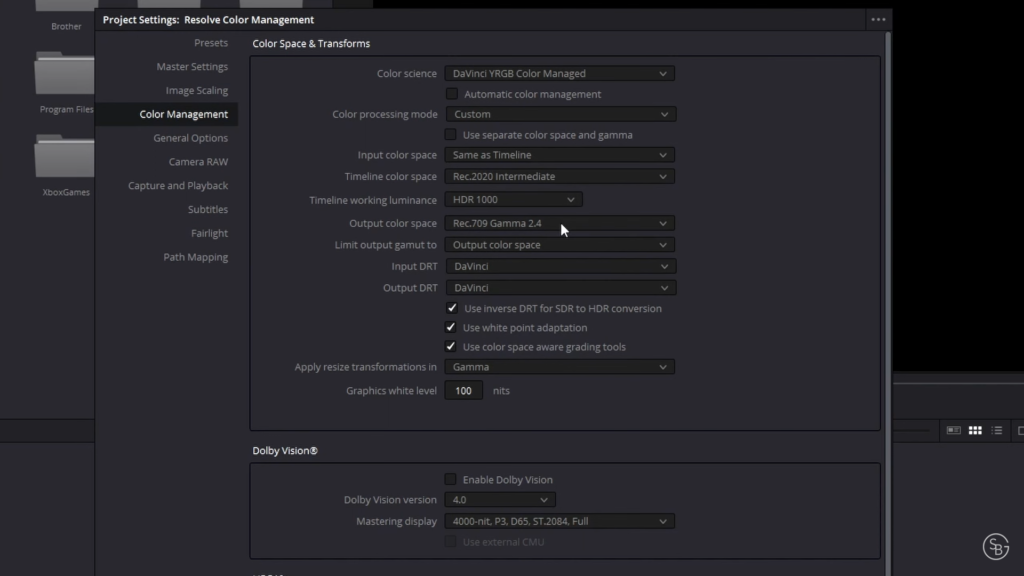
- Color Management: Go to the Color Management tab, and select DaVinci Resolve YRGB color managed. Under the preset, choose Custom.
- Input Color Space: Select Bypass or Same As Timeline, depending on your DaVinci Resolve version.
- Timeline Color Space: Choose the Rec 2020 Intermediate color space.
- Output Color Space: Select Rec.709, gamma 2.4 (Standard Dynamic Range).
- Save: Click Save to apply your settings.
- You will see now all your clips will be color corrected and you will have a nice starting point for look development.
Working with the ACES Workflow for Converted ProRes RAW Files in DaVinci Resolve
In this section, we’ll explore another color management workflow using ACES (Academy Color Encoding System) in DaVinci Resolve for your converted ProRes RAW files to Cinema DNG. ACES can be a bit tricky, but by following these steps, you’ll be able to achieve optimal color grading results while maintaining the integrity of your footage.
Setting Up the ACES Workflow in DaVinci Resolve
- Camera Raw Settings: Before changing color management, set up your camera raw settings first. Go to File > Project Settings > Camera Raw. Select Cinema DNG for the “RAW Profile” option and change ‘Decode Using” to Project. Choose Blackmagic Design as the color space and gamma, and hit Save.
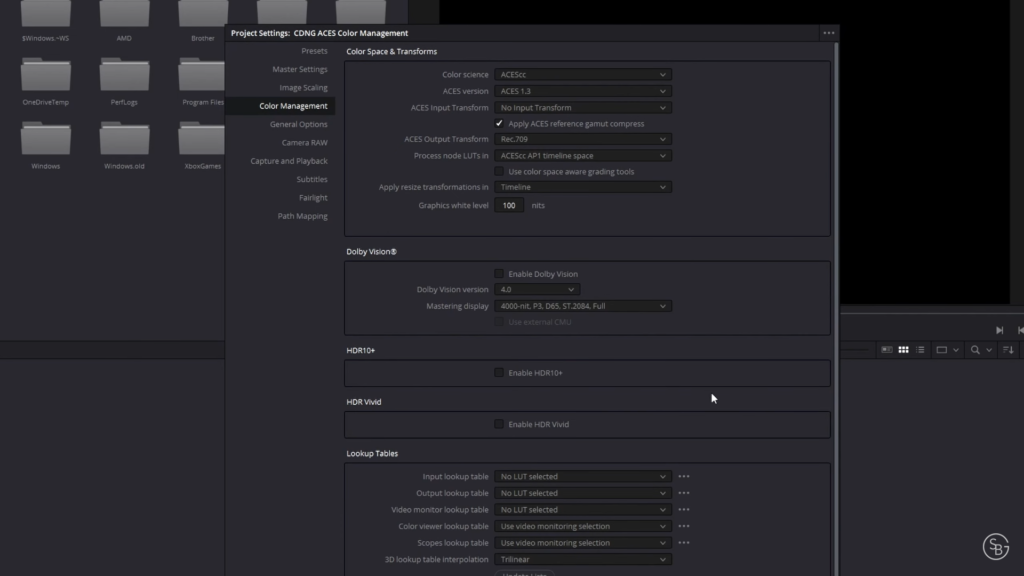
- Color Management: Navigate to File > Project Settings > Color Management tab. Select ACEScc or ACESCCT
- Input Device Transform (IDT): Select No Input Device Transform. Although you set the color space and gamma to Blackmagic Design earlier, these settings are bypassed when working in raw in ACES workflow with DaVinci Resolve.
- Output Device Transform: Set this to Rec.709 and gamma 2.4, click Save.
- Now, you will have a nice starting point for look development and color grading.
With your ACES workflow set up, it’s essential to note some peculiarities when working with Cinema DNG in DaVinci Resolve:
- Avoid resetting or reverting options in the Camera Raw menu, as it can lead to incorrect ACES transformations.
- Be more conservative with highlight and shadow adjustments to prevent artifacting. Use the exposure slider for extreme adjustments and make shadow adjustments as needed.
When working with ACES, you may find yourself making adjustments in the primaries as well. After making primary adjustments in the first node, continue building out your node tree and color grading as usual.
We hope this comprehensive guide helps you unlock the full potential of ProRes RAW and DaVinci Resolve. As always, don’t be afraid to experiment and play around with different settings and workflows. After all, filmmaking is an art, and sometimes the most incredible results come from unexpected places. So, keep exploring and pushing the boundaries. Happy filmmaking!