Hi, I’m Salik, the author of FilmmakingElements.com. I have been a filmmaker for over 10 years. I am also a certified DaVinci Resolve Trainer and I have used DaVinci Resolve for many of my projects. In the realm of contemporary filmmaking, the technology has ushered in an era of infinite possibilities. One significant breakthrough is the technique known as match moving. In this segment at FilmmakingElements.com, we’ll walk you through how to use the match move feature in DaVinci Resolve to its utmost potential.
What is Match Moving?
Match moving is a unique filmmaking process that involves tracking and calibrating live footage frames to incorporate them into a virtual model. In essence, it enables filmmakers to replicate the real-life camera’s movement onto a camera within a computer graphics (CG) software. The result is a seamless amalgamation of live camera shots and a 3D environment.
How does Match Moving work?
The cornerstone of match moving is its ability to blend virtual and real scenes into a single perspective. Instead of tracking the objects in the footage, the technique relies on tracking the motion of the camera. The application of match moving in DaVinci Resolve, an acclaimed post-production and color grading software, is particularly effective thanks to its built-in ‘Match Move’ effect.
Where To Find Match Move in DaVinci Resolve
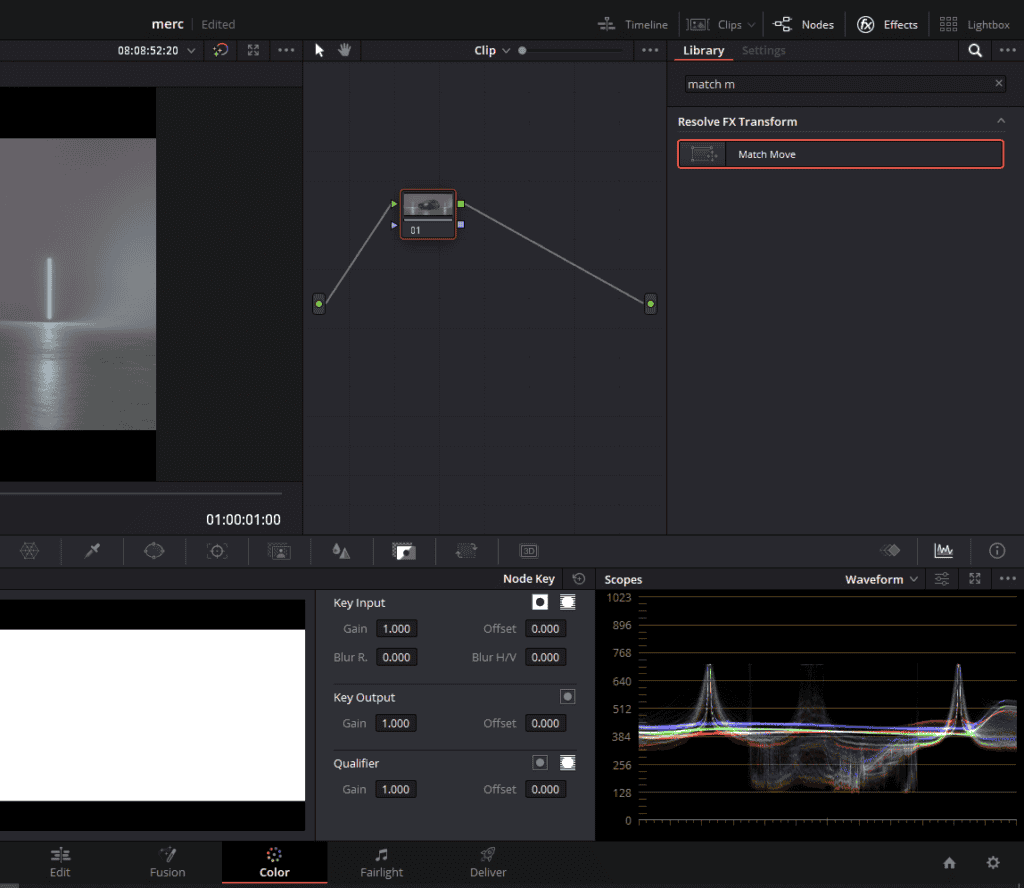
- Navigate to the Color Page in DaVinci Resolve via the toolbar at the bottom.
- Click on the Effects Button located on the top-right corner.
- Search for ‘Match Move‘ in the search bar and drag the effect onto a node.
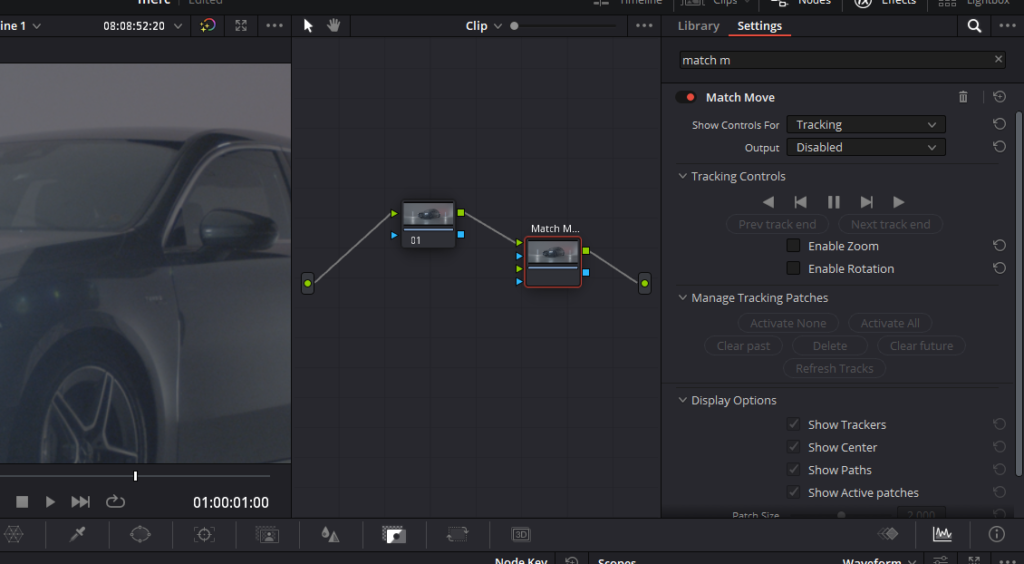
Match Move Effect in DaVinci Resolve
This highly versatile tool is a patch-based tracker that allows you to define a pattern region with the help of tracker controls.
Understanding Tracker Control

To add trackers, simply apply the Match Move effect to a node and click on the feature you want to track in the Viewer. It’s advisable to select features that have high contrast details with sharp angles for better tracking accuracy.
Every tracker control consists of several components:
- A center point that designates where the tracked motion path will be centered.
- An inner box that identifies the patch of the image you’re tracking. This box can be resized to better fit your tracking needs.
- An outer box that outlines the search region for the track, which is also resizable.
- A patch window that offers a zoomed-in view of the patch you’re tracking. The patch window can be resized, and the other tracking controls can be hidden or shown, using the controls in the Display Options section of the Match Move settings.
Adjusting and Deleting Trackers
If you’ve mistakenly placed a tracker control in an undesired location, there’s no need to worry. You can either drag anywhere within the inner box to relocate it, or you can Option-click it to delete the tracker. Once a tracker is in place, you can adjust the amount of image detail considered for analysis by resizing the tracker control.
Motion Data Analysis
The Match Move effect is programmed to automatically analyze motion data based on the number of trackers you’ve placed:
- A single tracker tracks horizontal and vertical position (pan and tilt).
- Two or more trackers also track rotation.
- Four or more trackers additionally track perspective.
- If you place six or more trackers, the Match Move effect is capable of automatically selecting the optimal tracker data from the overall set to yield the most accurate track possible.
Effectively utilizing the Match Move effect in DaVinci Resolve can significantly enhance your video editing process. Stay tuned for our next segment where we’ll delve into more advanced techniques to further boost your filmmaking skills.
Creating an Immersive Composite with the Match Move Effect in DaVinci Resolve
In this part of our DaVinci Resolve guide, we will take you through the process of importing a foreground clip to composite with a match move to follow a background clip already in your timeline.
Steps to Match Move In Davinci Resolve
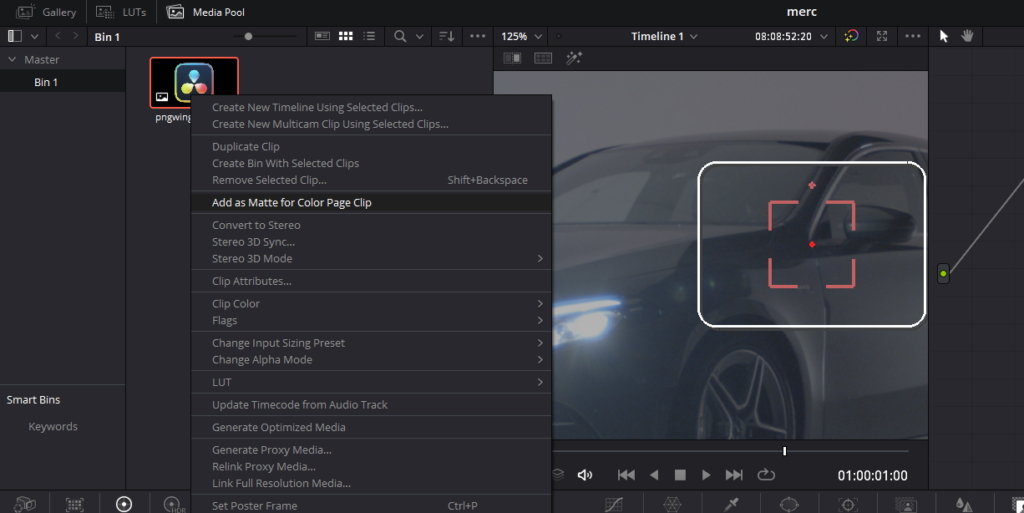
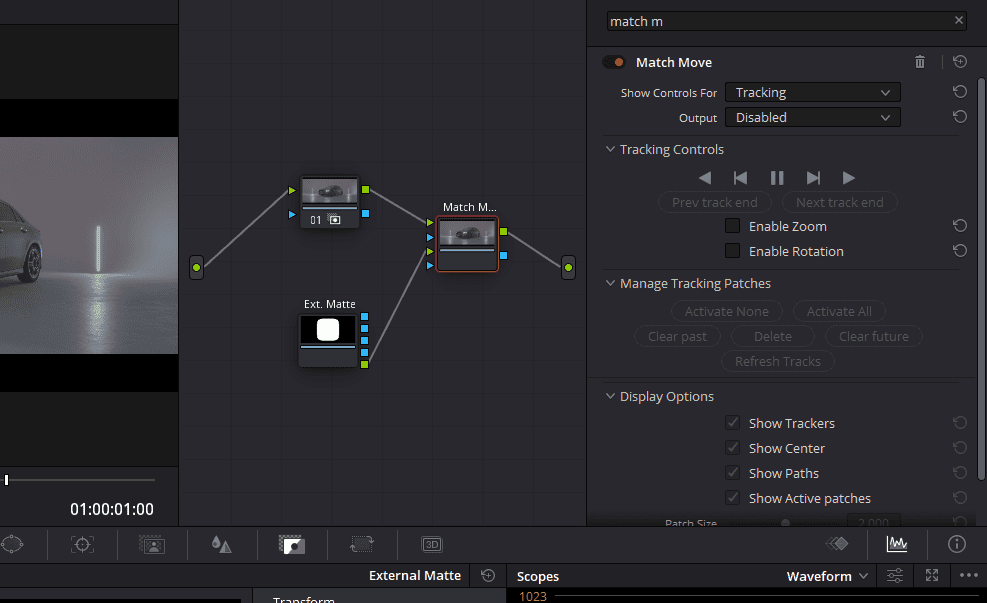
- Adding Clips: In the Color page, open the Media Pool from the top-left corner, right-click the clip you want to match move to a clip in the Timeline. Choose “Add as Matte For Color Page Clip” to add it to the Color page Node Editor of the currently selected clip as a Timeline Matte. This is the only way you can match move and composite a foreground clip against a background clip in the Color page.
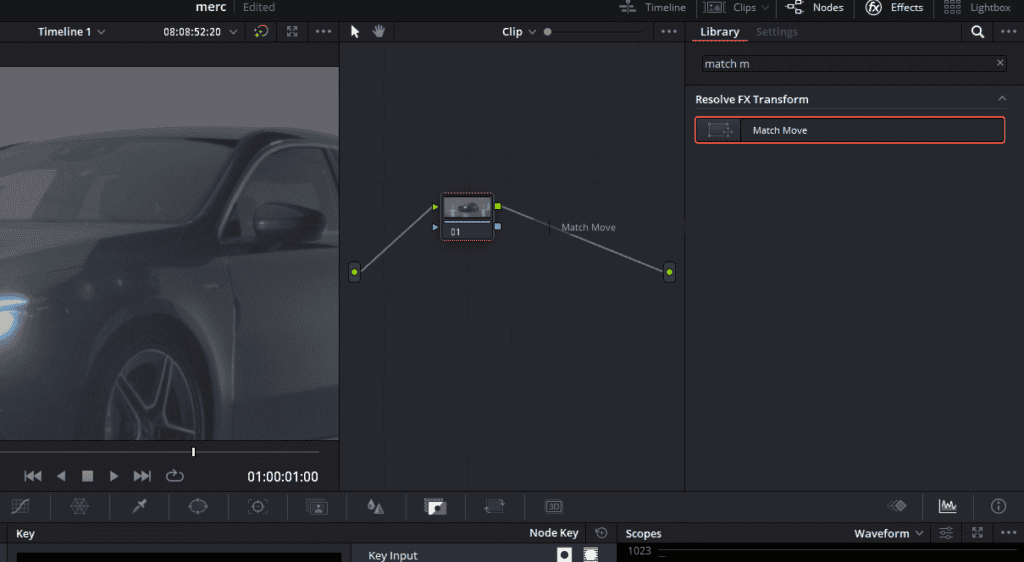
- Applying the Match Move Effect: On the Color page, ensure the background clip you want to match move to is selected. Open the OpenFX library and drag the Match Move plugin directly onto the connection from the last node in the tree to the Output, to add it as a stand-alone FX node. Make sure to not drag it onto any node rather drag it on the connection line.
- Adding an Ext. Matte Node: Right-click any corrector node in the node tree (Node 01, for instance) and choose the clip you added in step 1 in the Add Matte > Timeline Mattes submenu of the contextual menu to expose that clip as an Ext. Matte node. Disconnect the new Ext. Matte node and then reconnect its RGB output to the second input of the FX node.
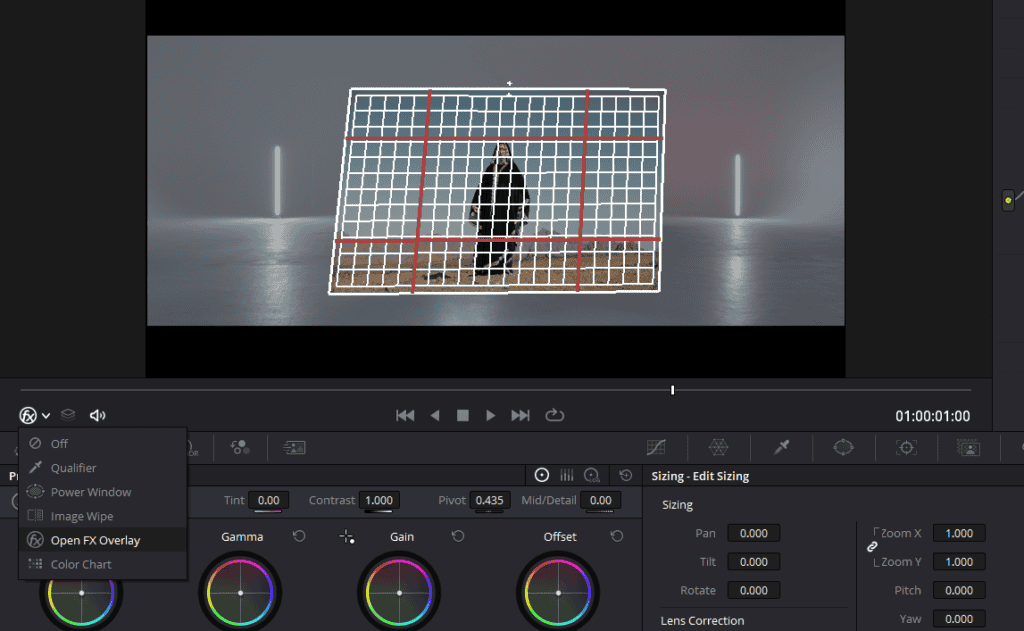
- Placing Tracker Controls: Select the FX node, ensure the OpenFX onscreen controls are enabled, decide whether you want to start at the first or last frames of the clip to begin the tracking process, and then click within the Viewer to place tracker controls on the surface of the image you’re going to attach the foreground image to. If you want to do a perspective track, place at least four tracker patches in areas that won’t be obscured by other things in the frame.
- Deleting Unwanted Trackers: (Optional) If necessary, you can delete trackers you don’t want by Option-clicking them.
- Begin Tracking Analysis: With your tracker controls set up, you’re ready to begin the tracking analysis. Click Track Forward or Track Backward depending on your needs. DaVinci Resolve will automatically analyze all tracker controls within the clip until the last frame of the clip is reached.
- Handling Tracker Issues: (Optional) If anything obscures a patch that’s being tracked, or if the tracked feature starts going off the edge of the frame, you can restart with the steps described above.
- Positioning the Grid: When DaVinci Resolve finishes its analysis, move the playhead back to the first frame of the track, and choose Positioning from the “Show controls for” pop-up menu. Adjust the grid, which represents the positioning canvas for your foreground image. You can corner-pin and resize it by dragging the corners and move it by dragging the center.
- Checking the Track: Scrub back and forth to verify that the grid tracks correctly and looks right once it’s in motion.
- Finalizing the Composite: Choose Compositing from the “Show controls for” pop-up menu to expose the compositing controls. Set the Output pop-up menu to “Composite” to output the final match-moved composite. You can use the Composite Type and Plate Cropping controls to blend the foreground image with the background and crop any unwanted parts of the image from the edges.
Understanding Key Controls
In this segment of our DaVinci Resolve guide, we delve deeper into the “Show controls for” and “Output” options that drive the match moving workflow. By understanding these features, you’ll be better equipped to create seamless composites and sophisticated effects in your projects.
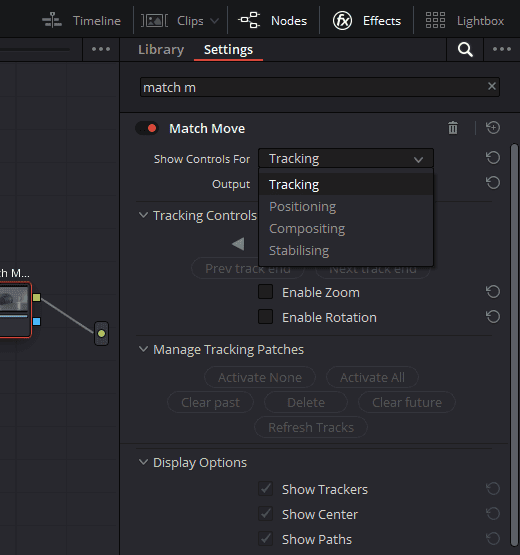
Breaking Down “Show Controls For” Options
- Tracking Controls: This represents the first stage of match moving, providing all necessary controls for setting up, executing, and refining multi-patch motion tracks. Key subgroups include:
- Primary Controls: These consist of tracking buttons allowing you to execute tracks automatically or manually.
- Manage Tracking Patches: The two buttons at the top let you choose which tracking patches are enabled to contribute to the match moving result, or disabled. You can clear bad tracking data forward or back in time, delete tracking data at the current frame, or update the tracked feature at that frame.
- Display Options: This group enables the visibility of different onscreen controls like trackers, paths, and patches.
- Positioning: These controls govern the second stage of match moving, providing the tools you need to transform the foreground image to fit against the background. Key features include:
- Canvas Options: This section offers tools for corner-pinning, repositioning, and resizing your image.
- Display Options: This group lets you toggle the visibility of onscreen controls like trackers and paths.
- Compositing: These controls are involved in the third stage of match moving, helping fit the foreground image against the background image to make a seamless composite. Important features are:
- Rendering Options: This feature lets you choose whether the composite that’s being output is an overlay of the Ext. Matte over the background, or the background Plate only.
- Plate Cropping: Four sliders allow you to crop the image as necessary.
- Global Blend: This controls the opacity of the foreground layer.
- Stabilizing: While not directly related to match moving, these controls use the motion tracking accomplished with the Tracking Controls to stabilize the image. The Edge Behavior pop-up menu lets you choose how to handle blanking around the edges as a result of the background image being transformed to keep the subject of the frame in place.
As for the “Output” pop-up menu, it allows you to choose what you want to output, with choices for Disabled, Positioning Reference, and Composite.
By grasping these controls, you can more effectively execute the match moving process, enhancing your video editing skills in DaVinci Resolve.
Thank you for investing your time to read this article. Your interest in mastering the match moving workflow in DaVinci Resolve is commendable, and I hope the insights shared here will be instrumental in boosting your video editing skills. Remember, like any skill, practice is key to proficiency, so don’t shy away from exploring these features in your projects. Good luck in your journey, and may your creativity continue to shine brightly in every video you produce. Stay tuned for more insights and tips to guide you on your video editing journey.