
Unleashing the creative power of DaVinci Resolve has never been more accessible or versatile.
As a powerful video editing and color grading tool, DaVinci Resolve offers an array of functionalities that bring your visual stories to life. One such feature that stands out is masking, a technique that allows you to isolate specific parts of your video frame and apply effects or adjustments only to those areas.
Whether you want to enhance the colors of a certain object, add some flair to a scene, or create a stunning visual effect, mastering masking techniques is a must.
In this article, we will dive into the world of masking in DaVinci Resolve and explore three different ways to accomplish this task.
1. Masking in the Color Page Of Davinci Resolve
DaVinci Resolve’s Color Page offers a robust set of Window tools, allowing you to create and track custom masks for isolating specific parts of your footage and applying various effects. Here’s a detailed step-by-step guide to masking in the Color Page using Window tools:
- Create a new node: Navigate to the Color Page in DaVinci Resolve and create a new node. Press Alt+S to create a new node, which will be used to define the mask and apply the desired effects.
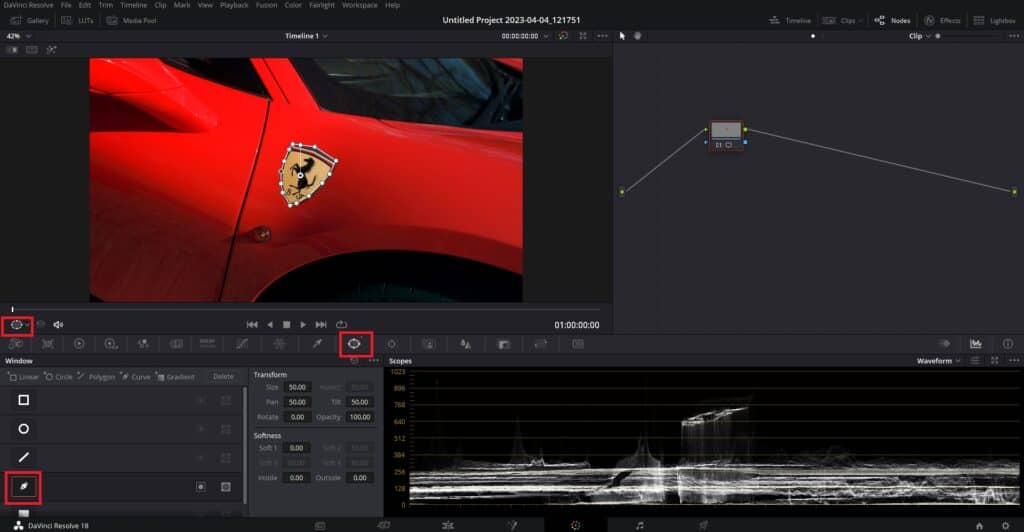
- Open the Window tab: Click on the Window button (icon looking like a circle with 4 dots) to open the Window tab, which offers a variety of preset window shapes for masking. Create a custom window using the Curve tool (icon looking like pen).
- Draw your custom window: Carefully draw around the object you want to mask out using the pen tool. Click to create points and adjust the curves to create a precise window around the object. If the pen is not working, click on the drop-down menu below the viewer and select the Power Window button.
- Softening the window edges: To make the window blend more seamlessly with the surrounding footage, you can soften the edges. Click on the Softness sliders and adjust them to achieve the desired level of edge softness.
- Track the window: Open the tracking window by clicking on the Tracker button located on the right side next to the Window button. In the tracking window, you’ll find options for tracking the mask based on different parameters, such as Pan, Tilt, Zoom, Rotate, and 3D. Make sure the appropriate options are selected for your footage. Click the play button to track your window forward and then track it backward to cover the entire timeline.
- Refine the tracking data: If necessary, you can refine the tracking data by clicking on the Frame button and going frame by frame, and manually adjusting the window position or shape.
- Apply adjustments: Once the window is tracked, you can adjust the color, brightness, or other properties within the window. For example, you can adjust the Lift, Gamma, and Gain color wheels to modify the object’s color or increase the brightness using the Offset or Gamma controls.
- Add effects: Additionally, you can apply effects to the node with the window, such as blurring the object within the window. Open the effects tab located in the upper right corner, find the desired effect (e.g., Gaussian blur), and drag it onto the node. Adjust the effect in the inspector tab as needed.
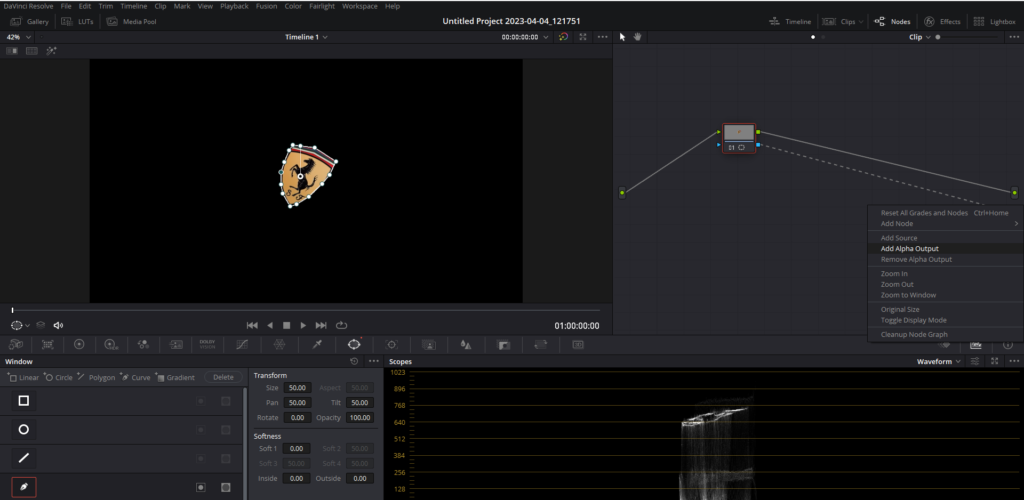
- Add Alpha Output: To remove the masked subject from your footage and reveal another video track as the background, in the node tree area on the Color Page of DaVinci Resolve, right-click in an empty space and select “Add Alpha Output.” A blue dot will appear in the right corner of the node tree section.
- Connect the Alpha Channel: Connect the blue square on the node where you created the window (mask) to the blue dot (Alpha Output) you just created. This step will make the masked area transparent, revealing the content in the video track below.
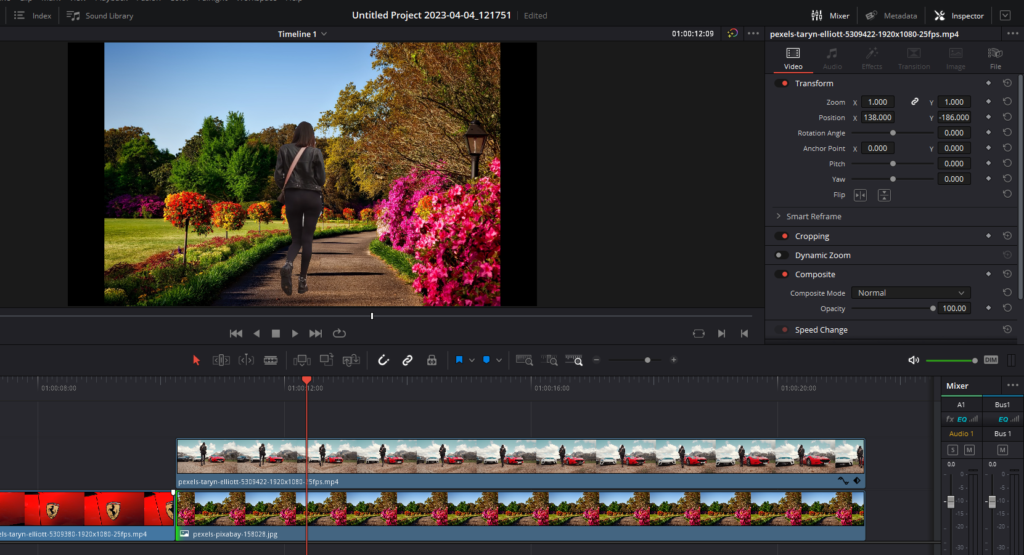
- Layer the video tracks: Move to the Edit Page and place the video with the masked subject on Video Track 2. Place the background video or image on Video Track 1, below the masked video. The content in Video Track 1 will now act as the background, visible through the transparent area created by the mask.
2. Masking in the Color Page Using Magic Mask
DaVinci Resolve’s Magic Mask feature is a powerful and versatile tool for creating and tracking masks, making it easy to isolate specific parts of your footage and apply various effects. Follow this in-depth guide to get the most out of Magic Mask in the Color Page:
- Import your clip: Import your desired clip into the Edit page in DaVinci Resolve. Ensure your clip is properly trimmed and positioned on the timeline.
- Switch to the Color Page: Navigate to the Color Page by clicking on the “Color” tab located at the bottom of the interface.
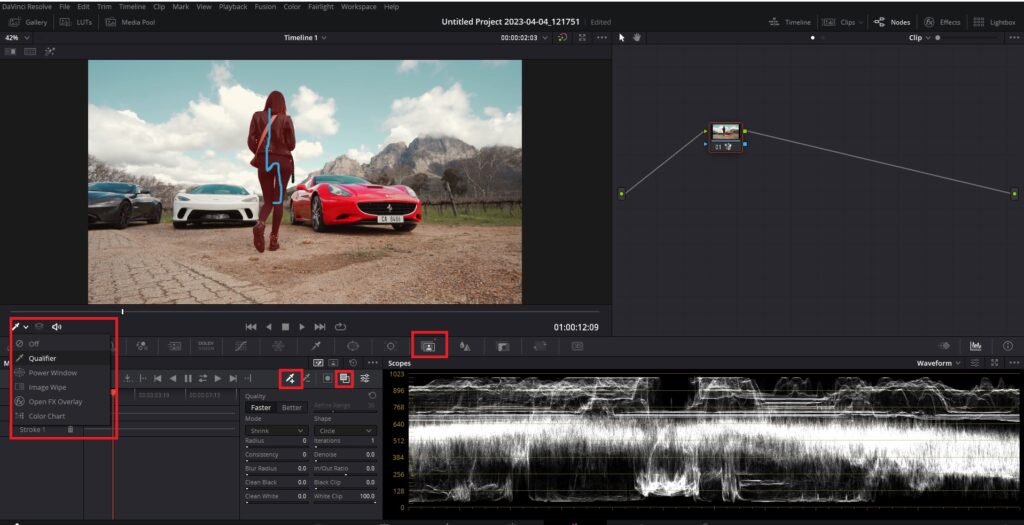
- Activate Magic Mask: Click on the Magic Mask button located in the toolbar on the ride side of the Tracker tool.
- Select the Qualifier tool: Ensure the Qualifier tool with a plus sign (dropper-looking icon) is selected in the magic mask tab. If the qualifier is not working, click on the drop-down menu below the viewer and select the Qualifier button.
- Draw over the subject: Use your mouse or a tablet pen to draw over the subject you want to mask. The software will intelligently detect the subject and create a mask around it.
- Toggle mask overlay: Click on the “Toggle Mask Overlay” button to view the masked area in red. The button is located on the right side (the icon looks like a square above a square) of the Qualifier tool with a plus sign. This visual aid helps you see the selected area more clearly.
- Choose mask quality: In the Magic Mask panel, select either “Faster” or “Better” mask quality, depending on your computer’s processing power and your desired level of accuracy.
- Select mask type: Choose between “Object Mask” or “Person Mask” in the Magic Mask panel. If you select “Person Mask,” you can further refine your selection by choosing specific features such as arms, clothing, hair, and face.
- Track the mask: Use the arrow tracking buttons in the Magic Mask panel to track the mask forward, backward, or both ways, depending on your clip’s position. Tracking ensures that the mask follows the subject throughout the entire clip.
- Adjust the mask: Once the mask is tracked, you can use the tools in the Color Page to adjust the color, brightness, contrast, or other properties of the masked subject or the background.
- Invert the mask: To apply adjustments to the background instead of the subject, click the “Invert Mask” button in the Magic Mask pane (icon looks like a circle in square box)l.
- Isolate the subject: To remove the background and leave only the subject, right-click in the nodes area on the Color Page, select “Add Alpha Output,” and connect the blue square on the node to the blue dot (Alpha Output).
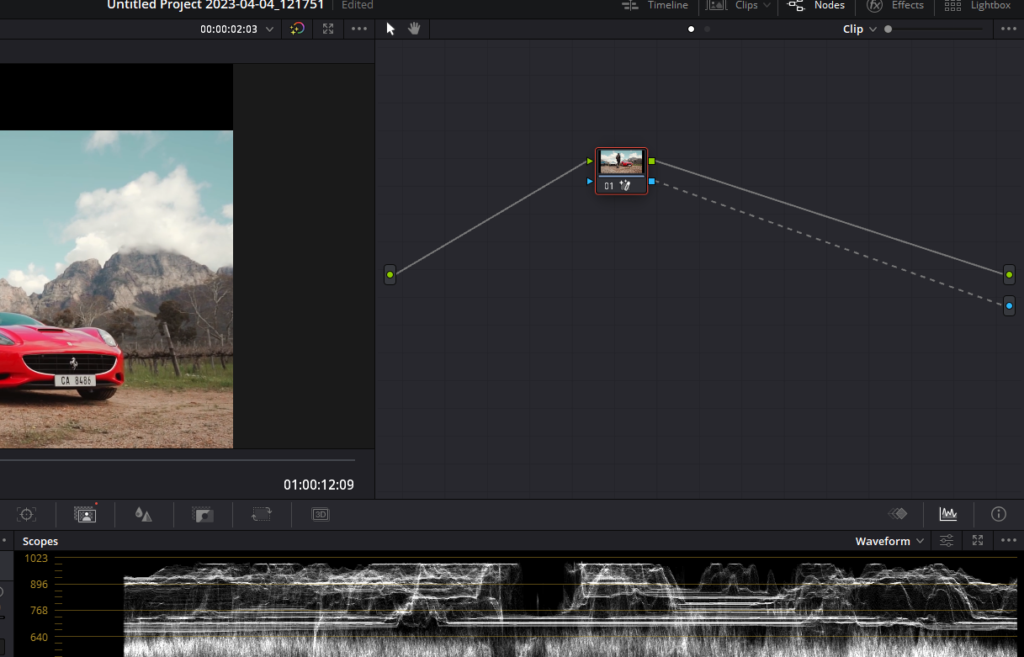
- Composite with new background: In the Edit page, place the isolated subject on a new video track above your desired background, such as a beach or moonlit scene. Adjust the position and size of the subject to match the new background.
- Control color grading separately: To apply different color grading to the subject and the background without affecting each other, duplicate the original clip and place it below the isolated subject on the timeline. Apply the desired color grading adjustments to each clip separately in the Color Page.
3. Masking in the Fusion Page Of Davinci Resolve
In this section, we will discuss various masking techniques available in the Fusion page of DaVinci Resolve. Masking is a cornerstone of compositing and can be used to separate elements, remove unwanted objects, or limit the effect of a particular tool.

- Import your clip: Import the clip you want to work on into the Edit page. Make sure your clip is trimmed and positioned on the timeline.
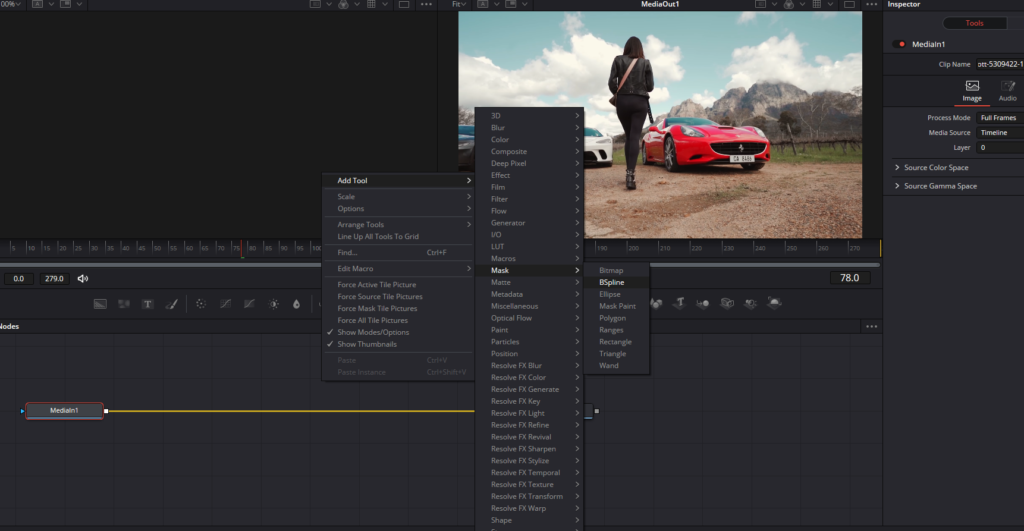
- Switch to the Fusion Page: Click on the “Fusion” tab located at the bottom of the interface to navigate to the Fusion Page.
- Create a mask: Fusion provides various mask tools, such as Bitmap, BSpline, Ellipse, Polygon, Rectangle, and Triangle. We will use the B-spline mask tool. Right-Click and go to the “Add Tool” button, go to “Mask,” and select “BSpline.”
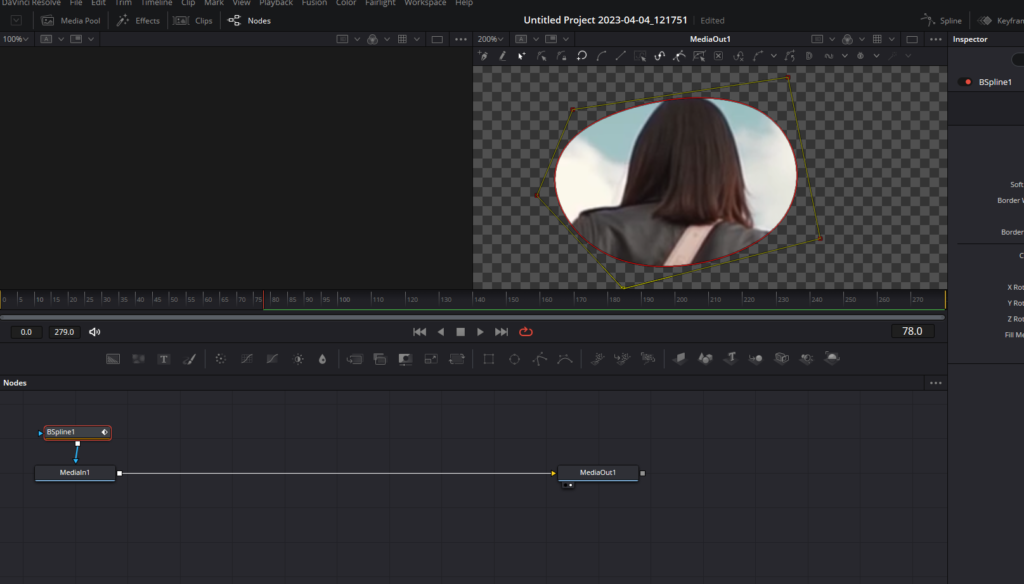
- Draw the mask: Click within the viewer to create vertices, forming a spline between them. Keep clicking to create a shape. Close the shape by clicking on the first vertex.
- Adjust the mask: Click on individual vertices or click and drag a marquee to select multiple vertices, then move them to adjust the mask shape.
- Connect the mask to a node: Connect the BSpline mask to the desired node, such as the MediaIn1 or an effect node. This will make the mask limit the area of the effect.
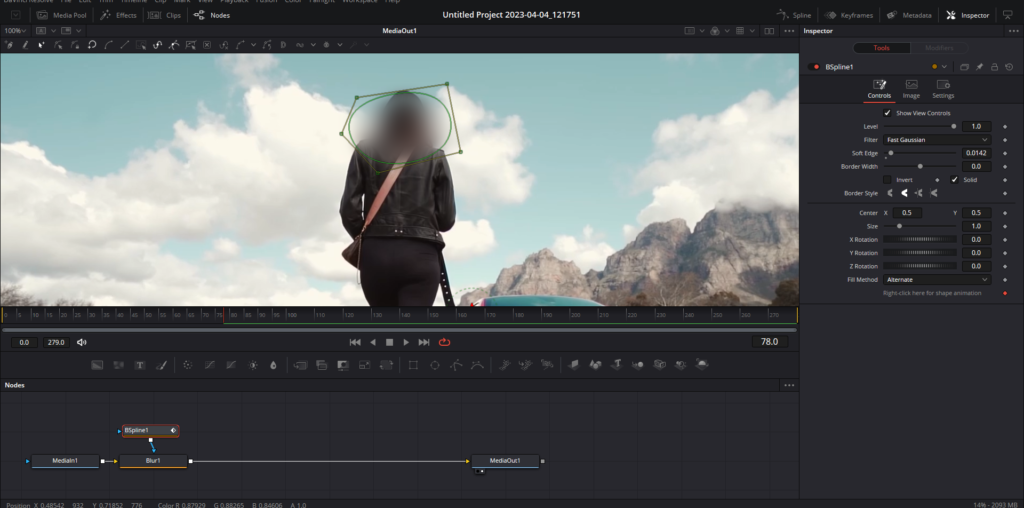
- Add an effect: Add an effect to the footage, such as a blur tool, click on the MediaIn1 node, Shift + Space, and look for the blur tool and add it. Disconnect the BSpline node from MediaIn1 node and connect it to the blur node.
- Adjust the mask properties: Click on the BSpline mask node to reveal its properties on the right. Adjust the soft edge and border width to refine the mask.
- View the alpha channel: Press the “A” key to view the alpha channel, which displays the transparency levels. Press the “C” key to return to the color view.
Creating Masking Transitions in DaVinci Resolve
Now that you know how to create a mask in Davinci Resolve, we’ll guide you through the process of creating a masking transition in DaVinci Resolve. Follow these detailed steps to create a seamless and creative masking transition:
- Choose the right clips: Select two clips with an object or a person covering the frame from top to bottom throughout the shot, like a leaf or a person walking across the frame.
- Edit the clips: Cut the first clip where the object leaves the frame, drag it onto the layer above, and then place the second clip underneath the top clip at the spot where the object starts entering the frame.
- Activate alpha output: Go to the Color tab, right-click in the node section, and click ‘Add Alpha Output.’ Connect the blue square to the alpha output to activate it.
- Access the window section: Click the icon to open the window section, where you’ll find the masking tool. Select the masking icon to start masking the object.
- Keyframe the mask: Go frame by frame and draw a mask that fits the object’s shape. Add more points to the mask by clicking along the line. Keyframe the mask for each frame until the second clip takes over the frame.
- Refine the mask: Add softness to the mask by adjusting the softness value for each keyframe. This will make the transition look smoother.
- Add speed ramping: Right-click on each clip and select ‘Retime Controls’ (or use the shortcut Command+R) to add speed ramping. Add a speed point and adjust the speed to your preference.
- Finalize the edit: Apply a color grade and sound effects to complete the masking transition.
If you want to read in more detail, head to, Masking Transition In Davinci Resolve: Step-By-Step Guide.
We hope you found the information valuable and easy to understand. By reading through the entire post, you’ve taken a significant step in expanding your video editing skills. Keep up the great work, and we’re confident you’ll be able to apply these techniques to create stunning and engaging videos in the future. Happy editing!