Hello everybody! In this article, I want to tell you how to undo in DaVinci Resolve, and I’ll also share some more awesome shortcuts of DaVinci Resolve that will make your life easy. By the end of this article, you will be able to revert unwanted changes without completely starting from scratch on one of your video clips inside DaVinci Resolve.
How to Undo in DaVinci Resolve ?
There can be many types of mistakes that you want to undo in DaVinci Resolve, such as any property like cropping, position, adjustment, etc, or removing keyframes. There are various methods by which you can undo in DaVinci Resolve. We will discuss all the possible ways in which you can undo in DaVinci Resolve including the customized settings.
Default Shortcut to Undo in DaVinci Resolve
A universal shortcut for undoing the unwanted changes is Ctrl+Z or Command +Z depending on whether it’s windows or Mac. This same shortcut works in DaVinci Resolve as well.
Shortcut for Undo in DaVinci Resolve – Ctrl+Z or Command + Z
Sometimes this shortcut doesn’t work. One reason for that can be that in your system, the shortcut of Undo in DaVinci Resolve is set to a different key. You can change the shortcut keys as per your requirement. To do so, you need to follow the below-mentioned steps.
Setting Customized Shortcut in DaVinci Resolve
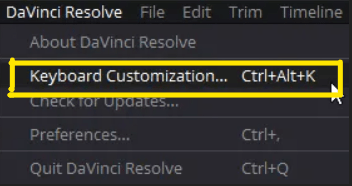
- Go to the DaVinci Resolve Option in the top left corner of you screen in top Navigation menu.
- Go to the Keyboard Customization option under it, as shown in the screenshot above. There’s also a hotkey combination to get into this, which is hitting ctrl+alt+ k.
- It will pop up the keyboard customization menu, as shown in the screenshot below. In DaVinci resolve, you can use either the DaVinci Resolve default key bindings, but if instead, you’re more used to another program such as adobe premiere, you can select that as well.
- Click on the top right-hand corner, as shown in the screenshot, and you can switch to other popular programs.
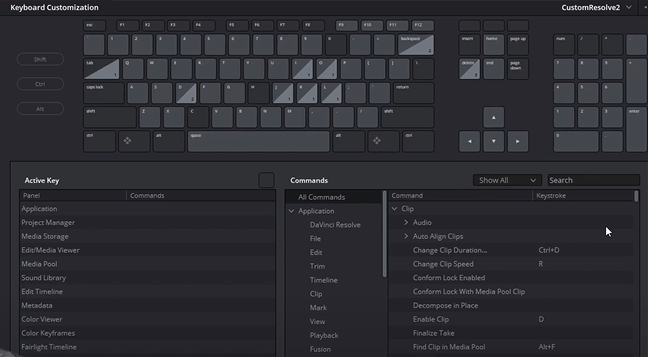
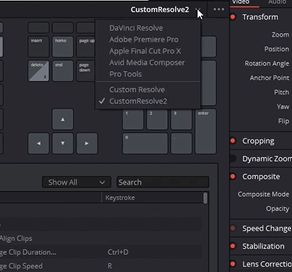
If you want to set any customized shortcut for Undo in DaVinci Resolve you can also do so.
- Go to the kewboard customization as shown above.
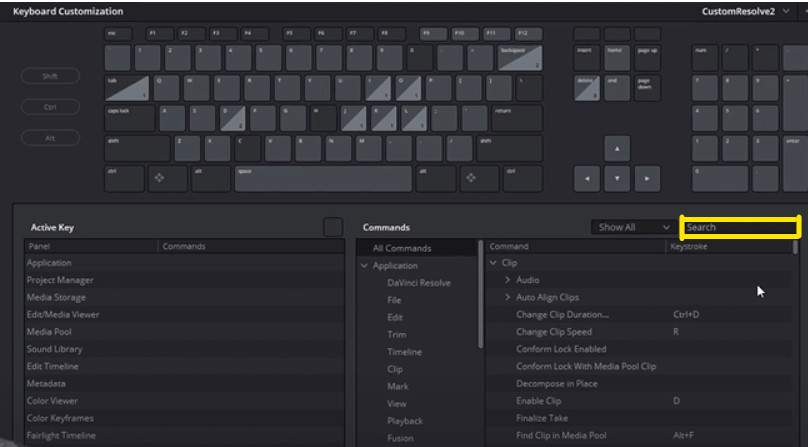
- Type undo in the search column, as shown in the screenshot.
- Set the customized shortcut for undo, as per your choice.
- Click save and exit the menu. You will be able to undo in DaVinci Resolve using the customized shortcut you have set.
Removing Keyframes in DaVinci Resolve
I’ve messed up a clip with keyframing intentionally by changing unnecessary settings and adding open effects on top of a clip to make it look suitably ridiculous for this tutorial. One way we can undo in DaVinci Resolve and revert some of these unwanted changes is to take a look at the keyframes and delete extra or unnecessary keyframes. So that, as it animates over time, it looks a bit smoother and more appropriate to what we actually want.
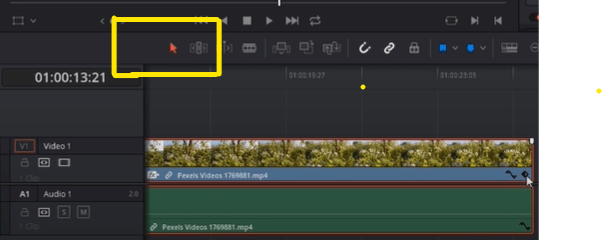
- In order to see all of your keyframes, go over to the right on your video clip enable selection mode with the A key or click on the selection option as shown in the screenshot below.
- Then you can click where you see the keyframing diamond as shown in the screenshot below, and when you do that, that’s going to open up several bars for the settings that you keyframed, showing where the keyframes are at across the timeline.
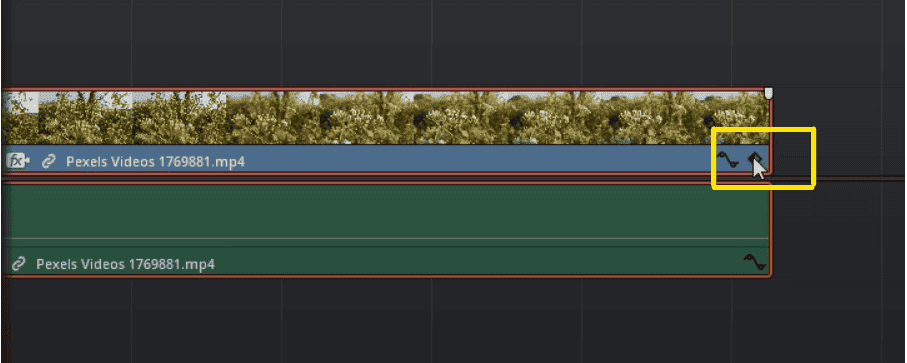
As shown in the screenshot below, I have added three keyframes in quick succession for the tutorial purpose. One time this can easily happen is when you’re clicking around in your timeline. You are trying to go back and change the setting of a previous keyframe, thinking that you’re going to modify that, but then you accidentally add in a completely new keyframe by clicking very close to it but not on the exact frame.

- For that reason, it’s usually better to navigate between your keyframes by hitting the back and forward keys in the inspector, as shown in the screenshot.
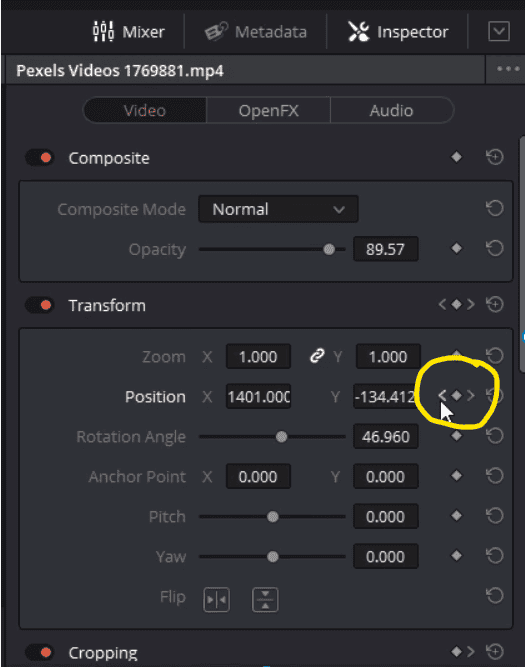
Using this technique, you won’t accidentally miss click, but if you do, you can actually click on each of these individual keyframes without going to the frame in the timeline and just deleting them. When you have the keyframes on the timeline, it’s easy to see where you may have made a mistake.
- To remove these unwanted keyframes, you can click over on them in the timeline. While you have this mode open, it will automatically snap very easily to those keyframes.
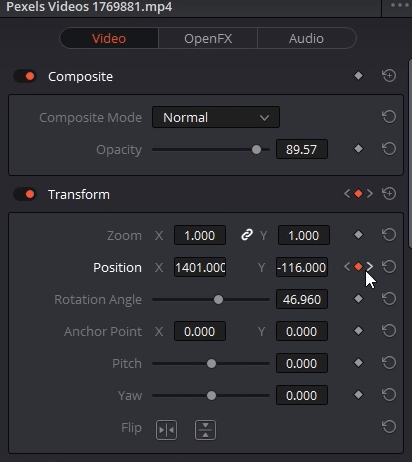
- Then while you’re on the frame, you can click on the red diamond inside of the inspector, as shown in the screenshot.
- It’s going to remove that keyframe.
- Also Read- How To Rotate Video In Davinci Resolve- 2 Ways (Transform Tools)
- Also Read- How to Add Subtitles in DaVinci Resolve ? ( Best Explained)
- Also Read- How to Deinterlace in DaVinci Resolve ? ( Best Explained)
Undo Properties like Croping or Rotation in DaVinci Resolve
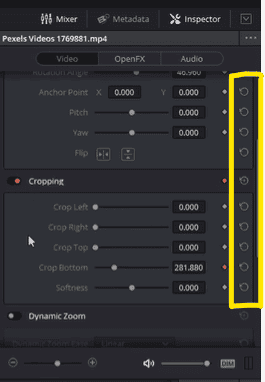
If you want to undo in DaVinci Resolve the properties, you have to follow the below-mentioned steps. If you have cropping or rotation animating over time, it should pop up with its own bar in the timeline, as shown in the screenshot. Let’s say that you’ve changed one of your settings, maybe you’ve keyframed a lot of times, and you want to remove something like cropping completely, or you don’t remember the original values for something like position.

- You can reset everything for that property to its default value. Click on the revert icons to the right of any property in the inspector, as shown in the screenshot.
- So, if you want to revert cropping, you can click for revert crop bottom. You can also revert individual crop properties such as bottom crop or top crop, or you can undo the whole crop at once as well.
- This will remove all keyframing, resetting everything to the default value of no cropping. You can reset all of the position values to the default values for positions X & Y, and all you need to do is click over the reverse button on the right.
Undo Special Effects or OpenFX in DaVinci Resolve
If you’ve added a special effect or an open FX to a clip, and you want to remove that.
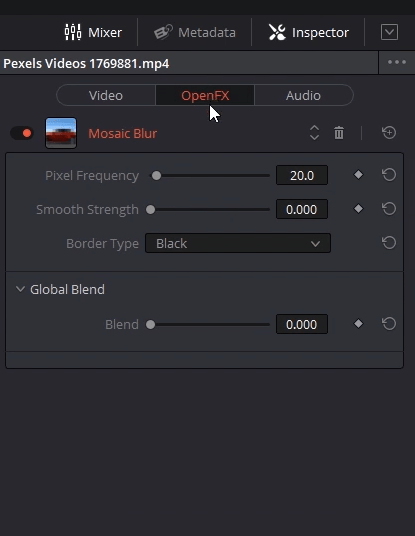
- You can go up to the inspector in the top right-hand corner, and there will be an extra tab here while you have this video FX called open effects.
- Click on that; you’ll see any effects you’ve added to the video clip. Just like with the other settings, you can undo any of the customizations you’ve made by clicking the undo icons.
- But if you decide that you want to remove it entirely, just hit the trashcan icon in the top right-hand corner for that effect, and the effect is gone.
Some Awesome Shortcuts For DaVinci Resolve
Here is a list of some shortcuts that can be very helpful for you, and would make working in DaVinci resolve very easy.
- Cut: [Ctrl/Cmd + X] – It will cut the selected clip, audio, or effect of the timeline.
- Copy: [Ctrl /Cmd + C] – It will copythe selected clip, audio, or effect of the timeline.
- Undo: [Ctrl/Cmd + Z] – It will help you to undo in Davinci resolve any type of unwanted edit.
- Redo: [Ctrl/Cmd + Shift + Z] – It will help you to redo any type of edit that you have undo.
- Paste: [Ctrl/Cmd + V] – It will paste the copied or cut clip, audio, or effect in the timeline.
- Select All: [Ctrl/Cmd +A]
- Deselect All: [Ctrl/Cmd + Shift + A]
- New Timeline: [Ctrl/Cmd + N] – It will give you a new timeline.
- Import Project: [Ctrl/Cmd + I] – It is a shortcut if you want to import another project in DaVinci Resolve.
- Export Project: [Ctrl/Cmd + E] – It is a shortcut to export the current project from DaVinci Resolve.
So, I hope you were able to find the answer to all of your questions regarding DaVinci Resolve like How to undo in DaVinci Resolve ? and other ways to do so. And if you have any more doubt regarding DaVinci Resolve, make sure to check out our other articles. If you have any suggestions feel free to contact us.


