Hi, I’m Salik, the author of FilmmakingElements.com. I have been a filmmaker for over 10 years. I am also a certified DaVinci Resolve Trainer and I have used DaVinci Resolve for many of my projects. Today, I’ll be addressing a common query I’ve heard from many of you: “How do you Record Audio in DaVinci Resolve?” As we all know, impeccable audio is just as crucial as stunning visuals in filmmaking. So, I’ve put together a comprehensive step-by-step guide on recording voice-overs in DaVinci Resolve.
We’ll explore how to seamlessly transform your written content into clear and crisp waveforms using the Fairlight tab. So, whether you’re a seasoned professional or just starting out, this guide is designed with you in mind. Let’s dive right in!
How to Record Audio in DaVinci Resolve?
To record audio in DaVinci Resolve, you need to follow some basic steps as mentioned below-
Step 1: Quick Setup to Record Voice-Over in DaVinci Resolve
You need to do two quick setup things before you record audio in DaVinci Resolve.
First, make sure your computer knows that it’s listening to the microphone.
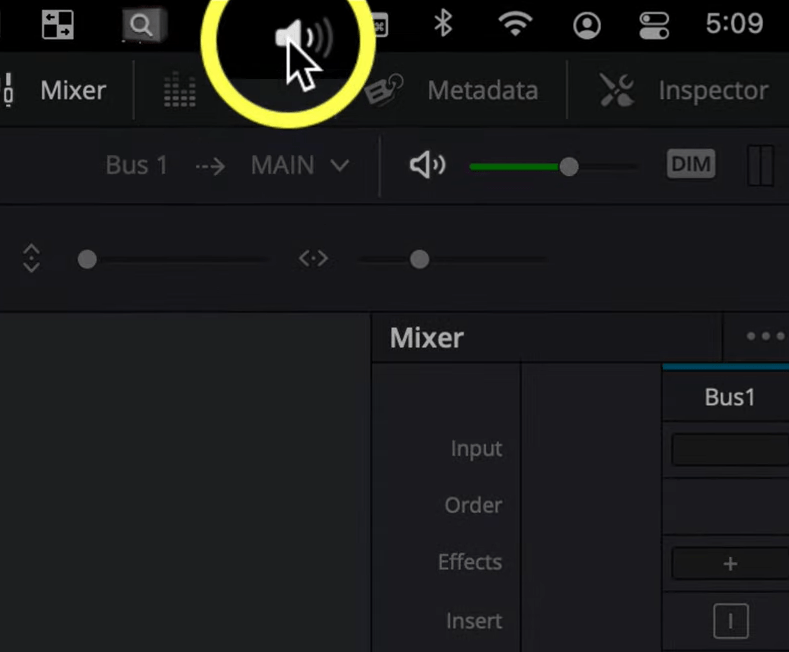
- To do that, you have to go up to the little speaker icon, as shown in the above screenshot.
- Hold down the option key on your keyboard. This lets you see the inputs on a mac.
- You can do the same by going in inputs in settings if you are using windows.
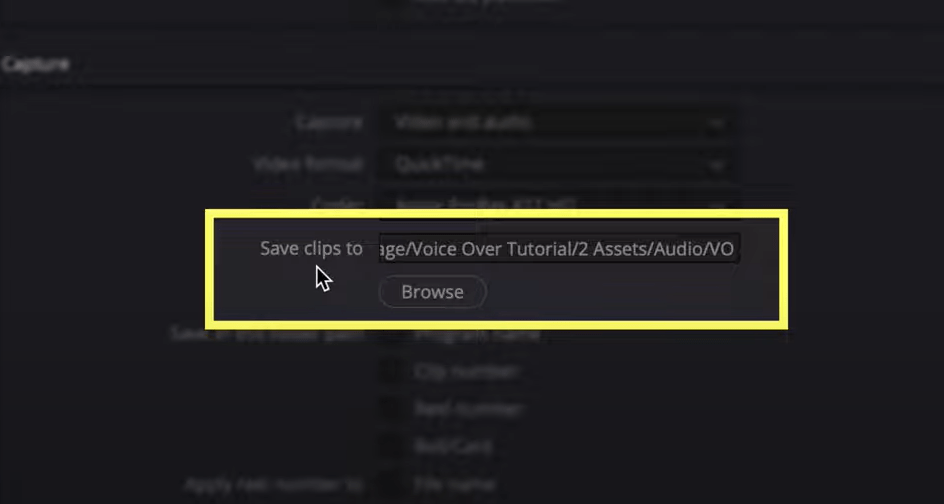
Another setup thing you want to do is make sure you understand where you’re saving your voice-over files on your hard drive.
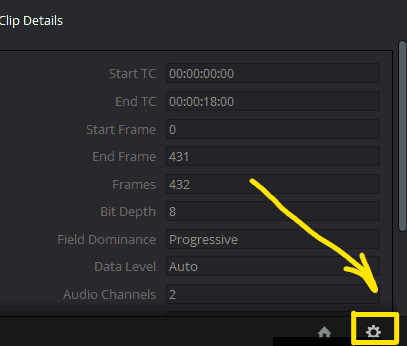
- You have to go down to the little project settings cog in the lower right-hand corner to find that, as shown in the above screenshot.
- Go over to capture and playback. It’s on the left side, as shown in the screenshot.
- Then down to capture and “save clips to” section, as shown in the screenshot below.
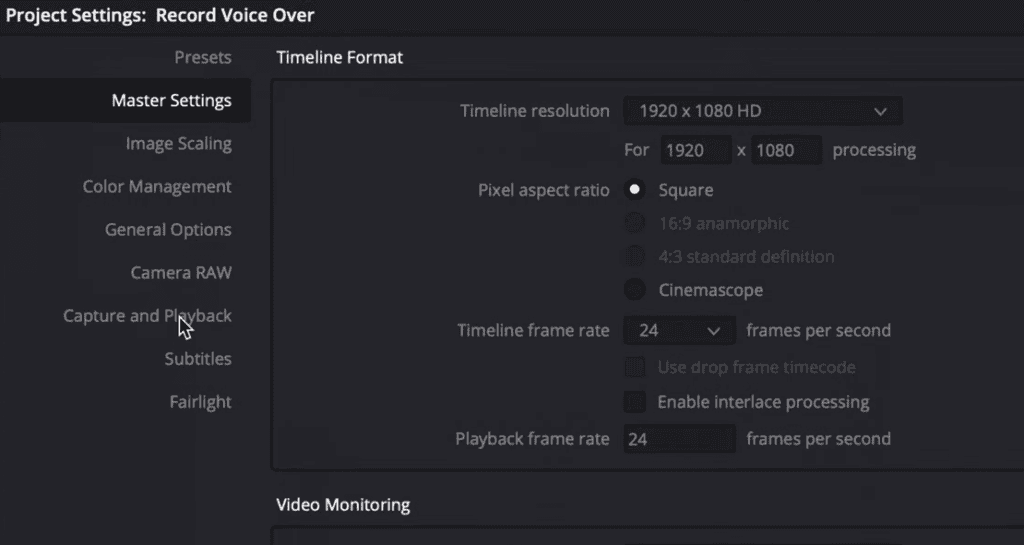
It tells you where it’s going to be creating the audio files. If you choose to browse, you can select your project folder, which I suggest you do if you have a structure built specifically for each project.
Step 2: Setting Timeline to Record Audio in DaVinci Resolve
We need a timeline to record Voice-Over in DaVinci Resolve.
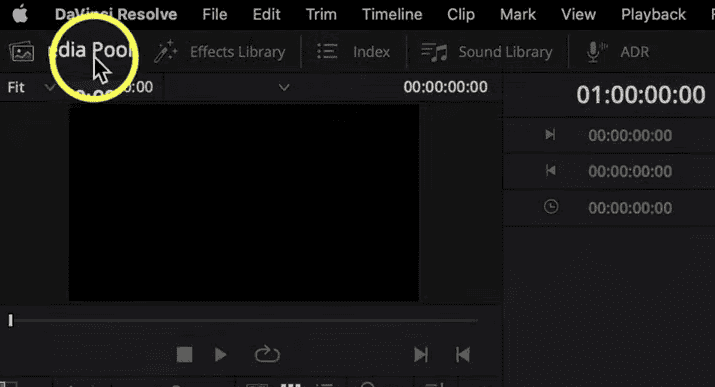
- If you don’t see the media pool, you can check the media pool button on the top left corner, as shown in the screenshot.
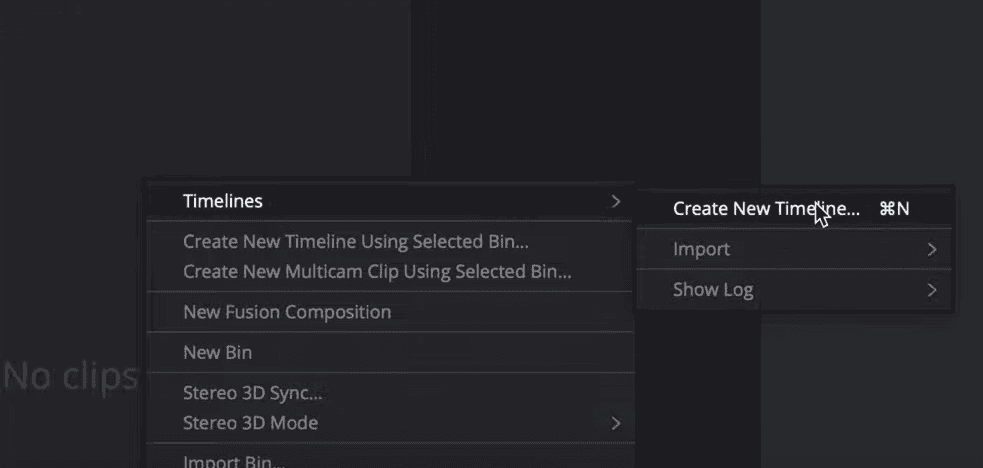
- Create a timeline by right-clicking in the media pool area, as shown in the screenshot.
- Select timelines option.
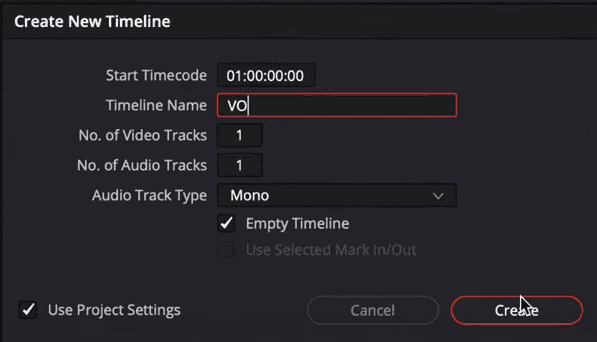
- Then go to create a new timeline option or press command+ N, as shown in the screenshot.
- I’m changing the timeline name to “VO” and audio track type to “mono” for Voice-over.
- Then click create.
While we created the timeline, why don’t we create a bin for organization within the project?
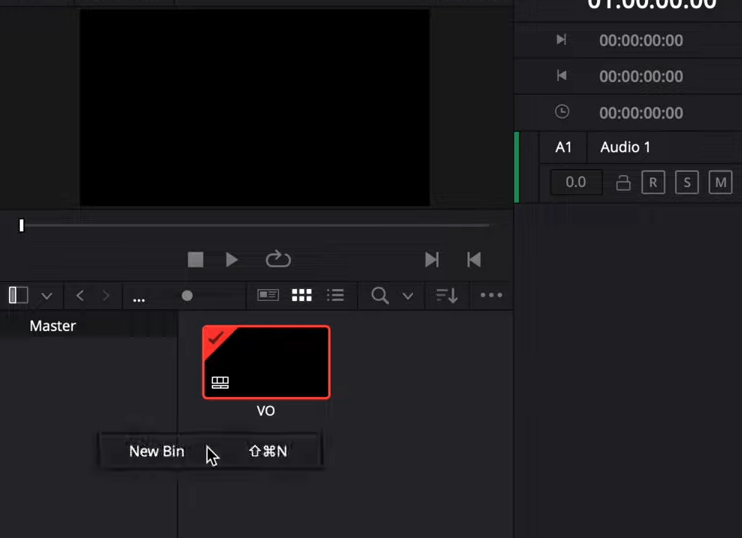
- Right-click under the master area to create a bin, as shown in the screenshot. When it gets big, we can find all our audio clips.
- We’ll call that “VO” as well.
- Also Read-Improve Audio Quality In Davinci Resolve
- Also Read-Film Halation Emulation In Davinci Resolve
- Also Read- 10 Best Movies To Watch If You Like Cyberpunk Aesthetic
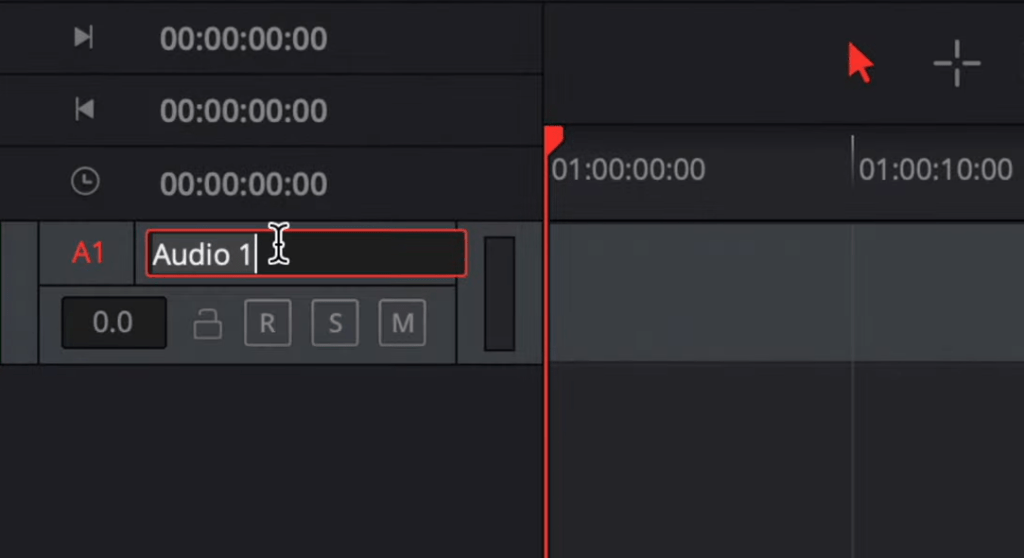
While we’re renaming everything, let’s also rename the track.
You can rename tracks. Once you have a timeline with many different audio tracks, you can quickly know where your voice-over is.
- You need to double-click on the audio track to rename it, as shown in the screenshot.
- I want to point out that if you want to see your tracks larger, hold down shift on the keyboard and your scroll mouse. It will let you make the audio tracks nice and big, which is a handy little trick.
- The other thing I want to do is select the bin we have created. If you choose the voice-over bin when you are recording, it’s automatically going to be putting the clips into the one selected in the media pool.
So, that’s another little tip; now we need to get everything patched, and then we can start recording.
Step 3: Patch Microphone Input in DaVinci Resolve
There are two ways to get to patching your microphone into the track.
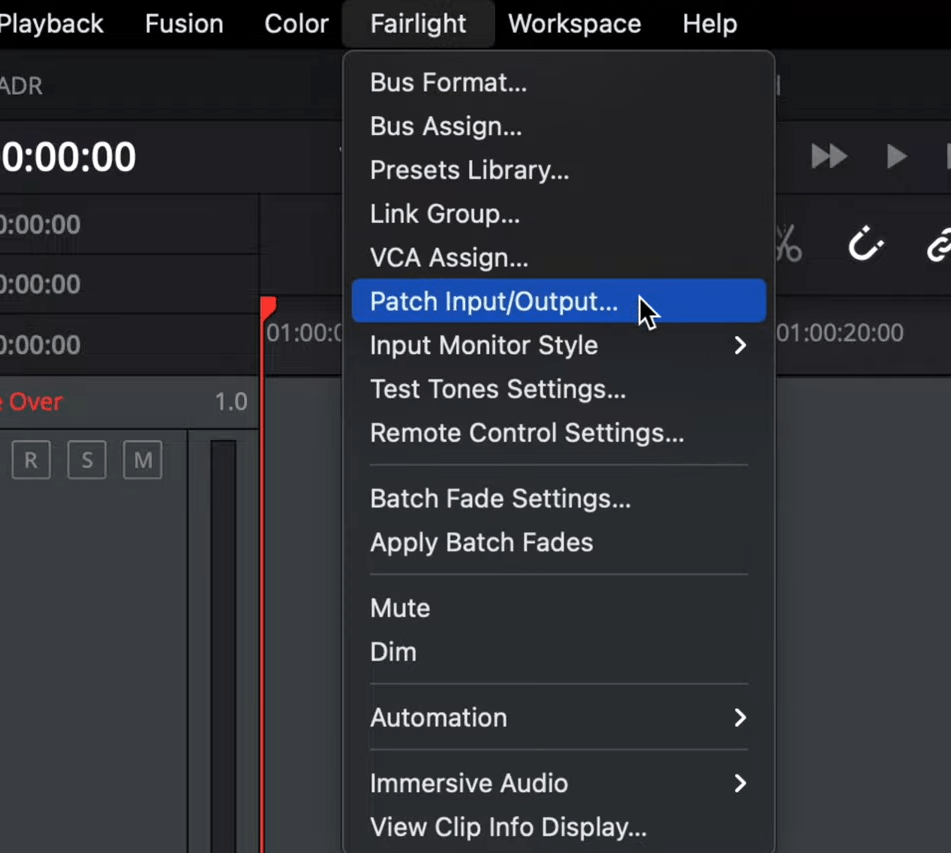
- The first one will be if you go up to Fairlight in the top navigation menu, as shown in the screenshot.
- Then go to patch input/output.
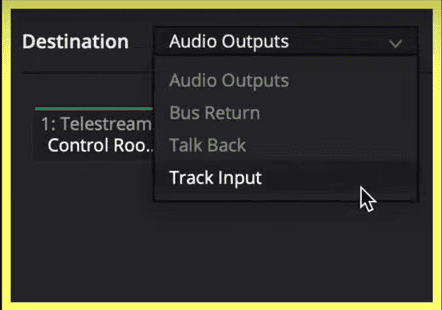
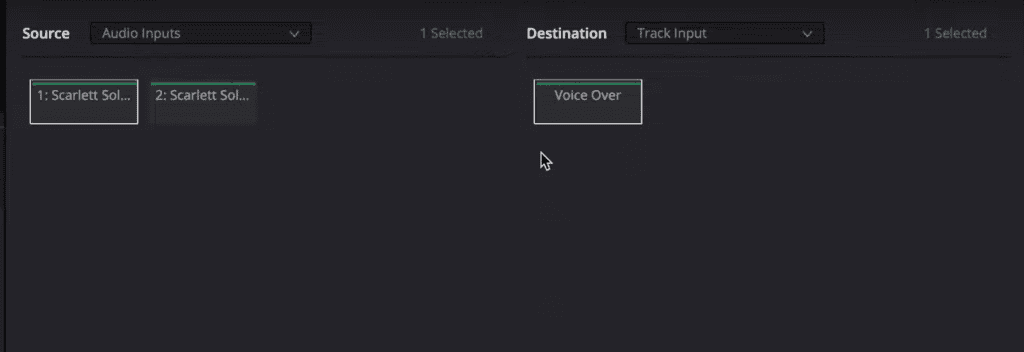
- Under here, you get this confusing window, as shown in the screenshot. But, it’s not all that bad. We have the source on the left side, and on the right, we’ve got the destination.
- Our source is audio input. I’m going to use the left one because that’s the one I’m using.
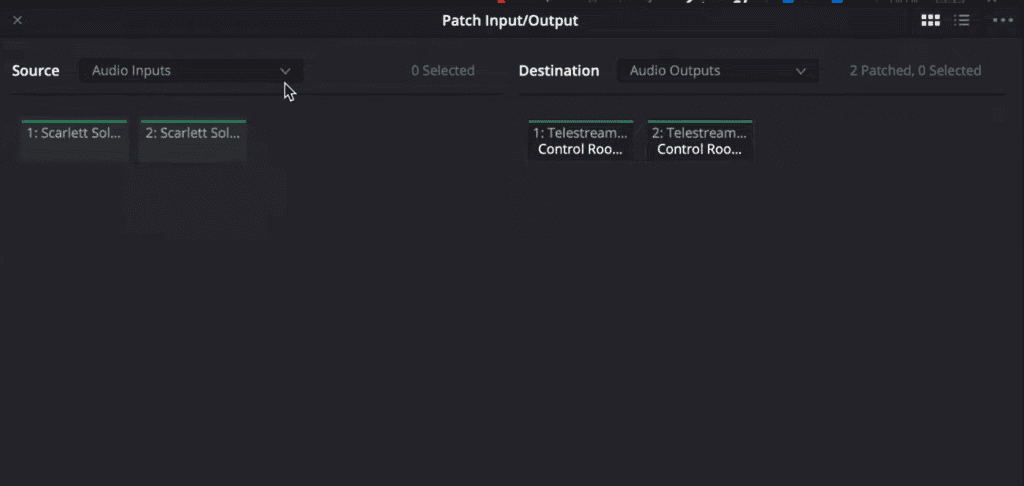
- Then the destination is where renaming the audio tracks comes in handy. We will choose track input instead of audio outputs, as shown in the screenshot.
- I only have one track right now. It’s that one we renamed to voice-over, so you select that.
- Now that you can see that’s highlighted, as shown in the screenshot, we hit the patch button, and now the microphone is talking directly to that track.
The other way to do that is maybe quicker for some people, rather than going up to the Fairlight menu.
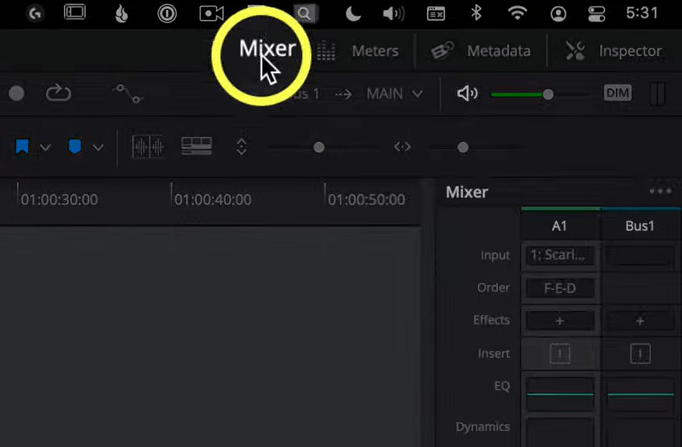
- Open your mixer, and the way you open your mixer is by clicking the mixer button on top-right, as shown in the screenshot.
- Go to the input section, as shown in the screenshot. This basically shows us what’s patched, and we’ve already patched it.
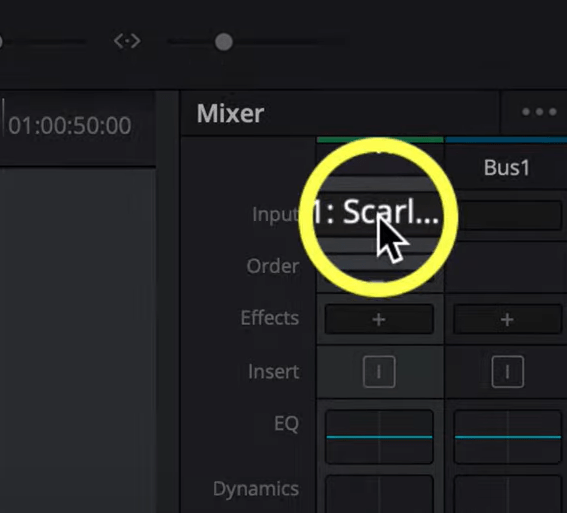
- But if you click on the section and select input, as shown in the screenshot.
- It takes us to that same window that we were just at, as shown in the screenshot below.
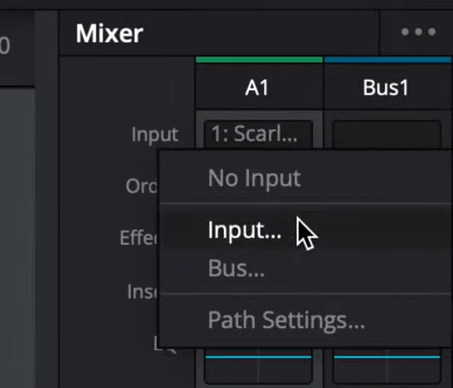
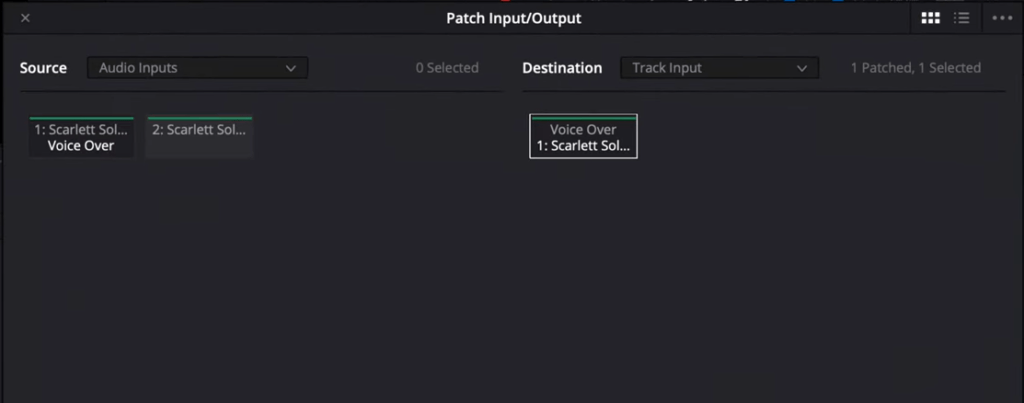
So, you could do it, either way, I tend to like going to the mixer, but I want to show you where it was on the menu as well.
Step 4: Record Audio in DaVinci Resolve
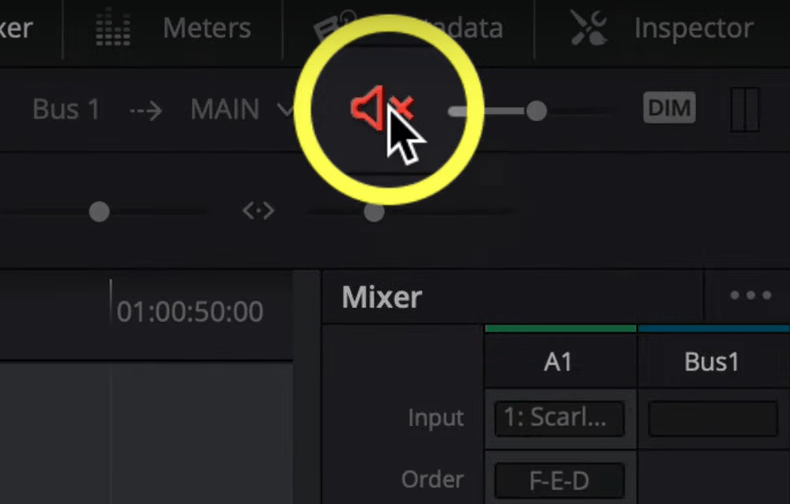
Before starting recording, at the top right corner, there’s a little speaker icon.
- Click on that and turn it off, as shown in the screenshot.
- It will ensure that no sound’s playing back out of your speakers, which is essential because you don’t want your speakers to interfere with your recording of your voice coming to the microphone.
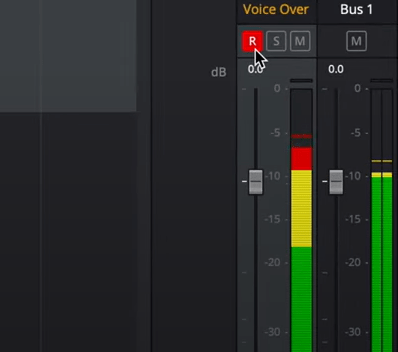
- Now we need to arm the track. Arming the track means it’s getting itself ready to be recorded.
- There are a couple of ways to do that. First, if we have the mixer open, there is a little R on the bottom right side of the screen, as shown in the screenshot.
- It is not going to record; it’s going to arm it. So, the R now we can see, it’s red. We can see my microphone levels coming into there, which is excellent.
- The other way to do this instead of doing it through the mixer is to choose it over in the track header, as shown in the screenshot.
- Look at that; it says arm for the record, which is super helpful.
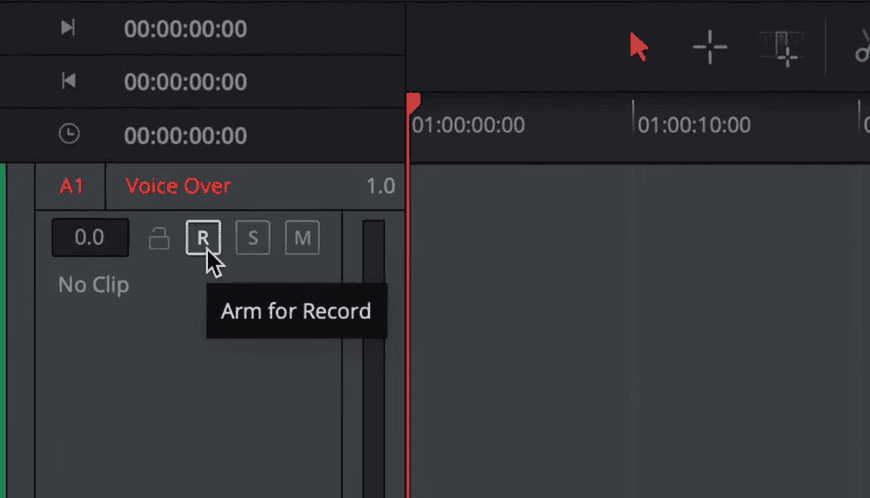
Now that we’ve got it all armed, all you need to do is hit the record button, talk the fantastic voice-over that you’ve written down and start recording.
- The other thing I’ll point out before we record audio in DaVinci Resolve is the little meters shown in the below screenshot. These are helpful for knowing where to set your levels because I’m using a Focusrite Scarlett. The gain is set on a little dial, and this is perfect right now.
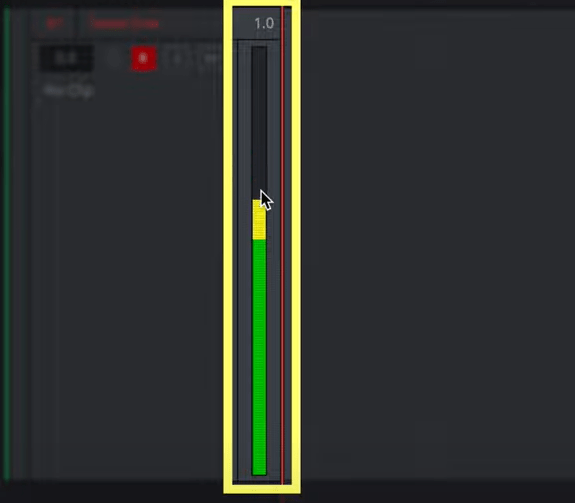
It tells us that we’re in the yellow range, and yellow is kind of where you want to keep your voice. You don’t want that in the red. If it’s in the red, you turn it down. If it’s only in the green, turn it up slightly.
So, this is an excellent healthy gain staging for our voice-over. Let’s hit record.
- There’s the record button on the top of the tracks, as shown in the screenshot.
- I just hit, and you can see it’s rolling, it’s recording, and we’re getting some words there, some waveforms going for us.
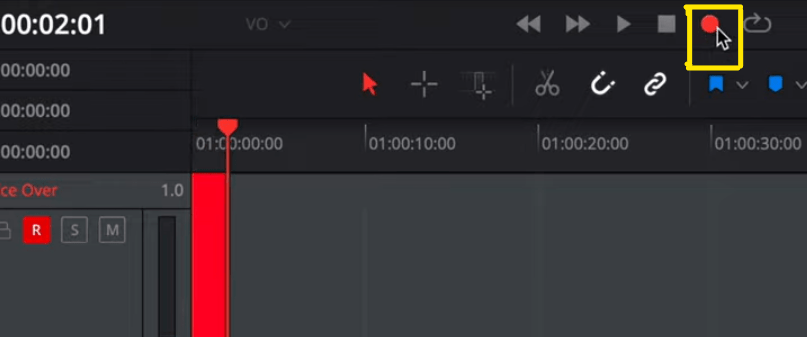
- Once you are done recording, you can hit stop, as shown in the screenshot.
- You can see we have some waveforms from our words.
- Now that we’re done recording, we can unarm it by hitting the R button.
- And then also unmute it by going back up to the top, as shown in the screenshot.
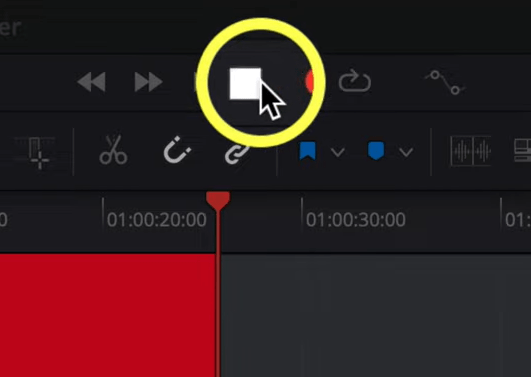
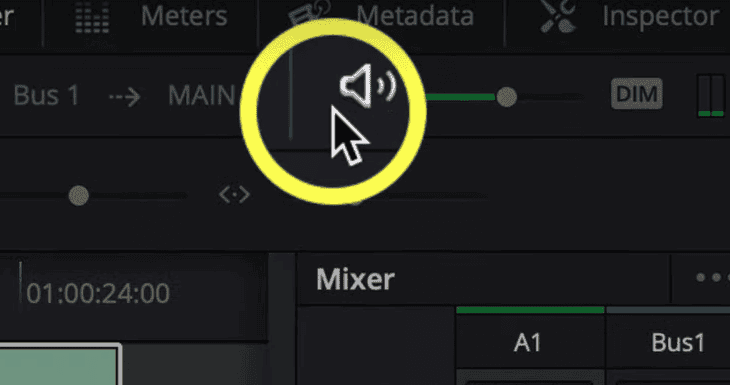
So, there we go! we’ve got voice-over recorded. You can even check where it got saved. To check that-
- Right-click on it in the bin, as shown in the screenshot.
- Then go to reveal in finder option, as shown in the screenshot.
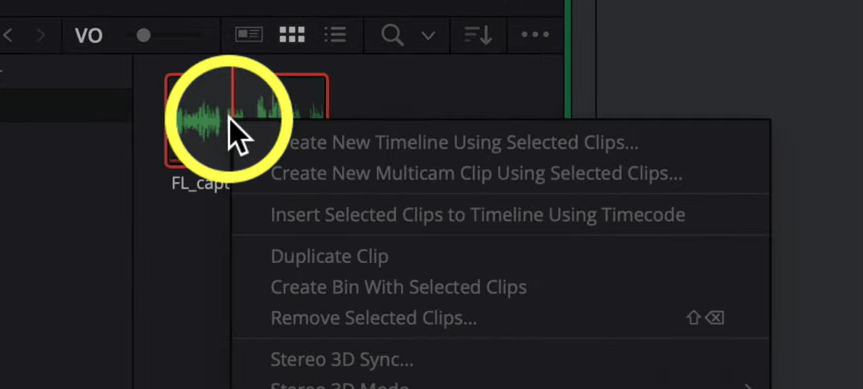
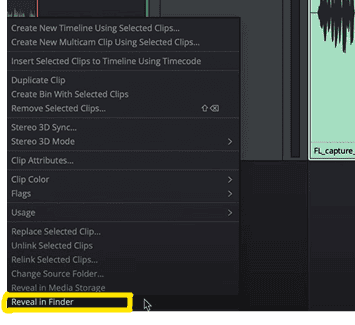
As shown in the screenshot, it will take you right to where the actual file is. I created a 24-bit wave file it says FL for Fairlight capture with the date and all other details.
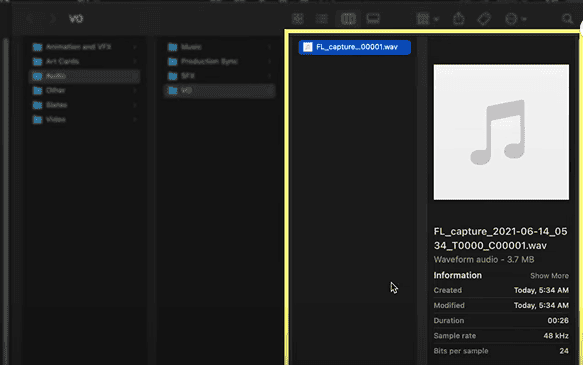
It’ll keep making unique names as it goes. So, that’s how you can send it to someone else.
So, I hope now you know all about how to record audio in DaVinci Resolve17 or Record voice-over in DaVinci Resolve. Now, lets look into some bonus tips.
Bonus Tips to Make The Voice-Over Sound Professional
I’m going to teach you what I learned, and hopefully, that will improve your voice-overs for your videos, so let’s discuss tips to make your voice-over sound professional.
Normalize Audio Level and Add Fairlight Effect in DaVinci Resolve
- Open up DaVinci Resolve, and let’s get started.
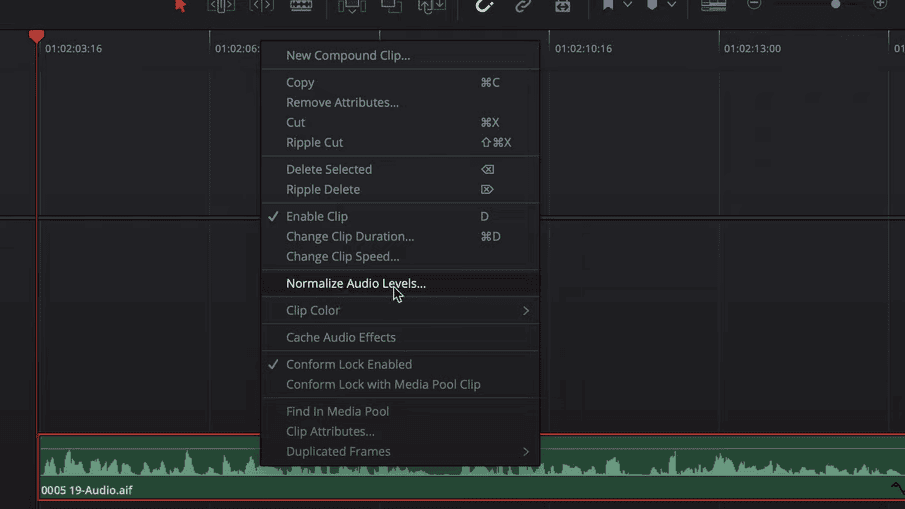
- I like to come into the Edit tab and right-click on the audio that I want to normalize, as shown in the screenshot.
- Click on normalize audio levels, as shown in the above screenshot.
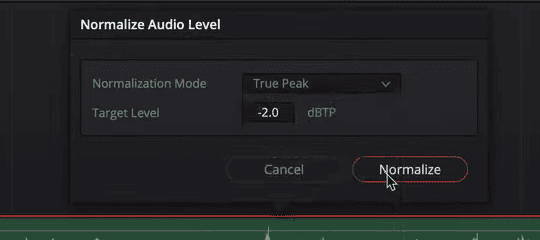
- Select the normalization mode as true peak and target level at negative 2 dBTP, as shown in the screenshot. It will bring it up or down to negative 2.
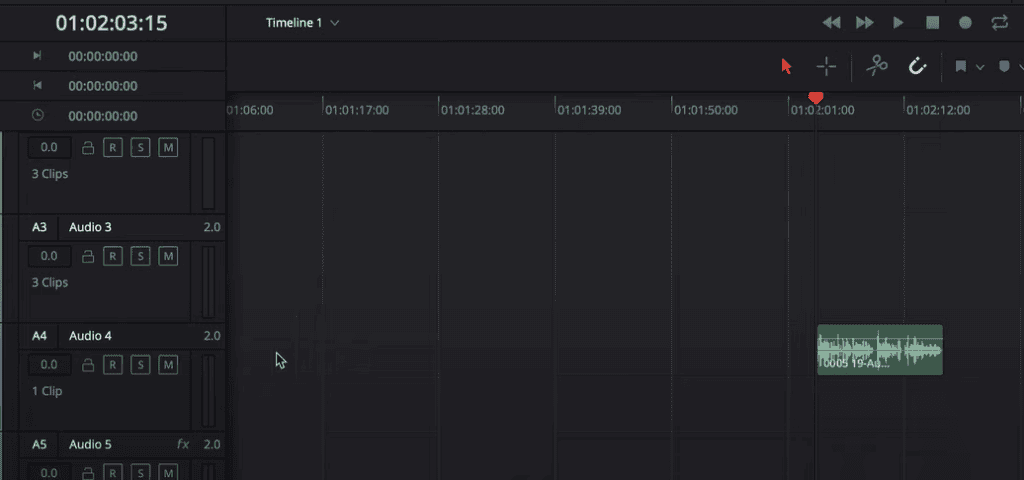
- Then click on the Fairlight tab.
- I’m on audio channel 4 with this voice-over, as shown in the screenshot below.
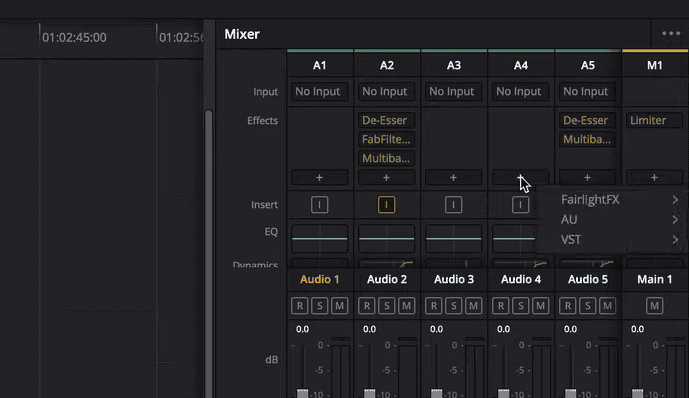
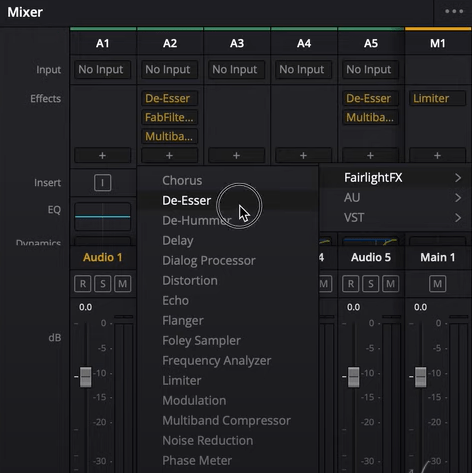
- Go over to the number 4 audio track in the mixer, and click on the plus sign as shown in the screenshot to add the Fairlight effect.
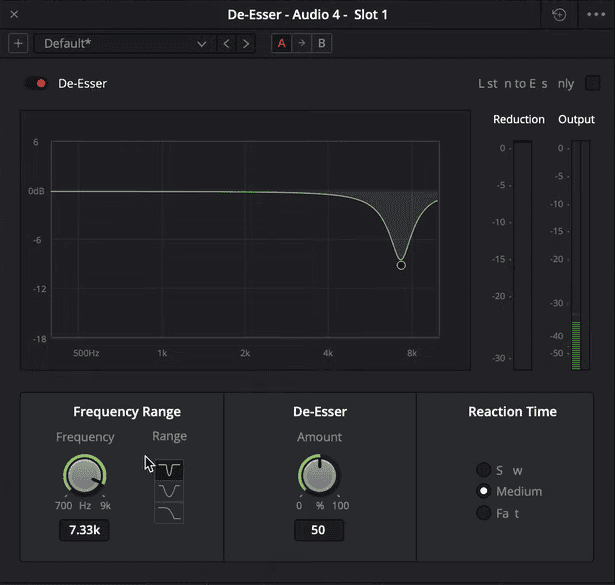
- Select FairlightFX and go down to the De-Esser, as shown in the screenshot. De-Essing reduces the loudness of frequencies in vocal recordings that cause spitting or piercing when an “ess or shh” sound is made.
When recording a voice-over, make sure to use it. The default settings work really well. When I speak, I know the “S” are around 7,000 or 7.3 thousand.
Add EQ in DaVinci Resolve
- The next thing we are going to do is add an EQ.
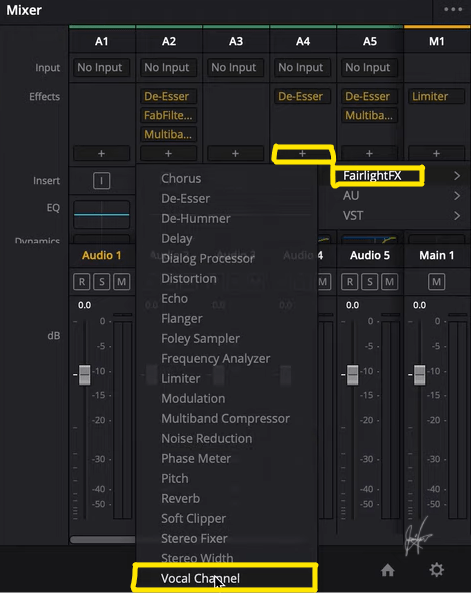
- Come back to the Fairlight effects by clicking on the plus sign.
- Come down to the bottom and click on the Vocal Channel, as shown in the screenshot.
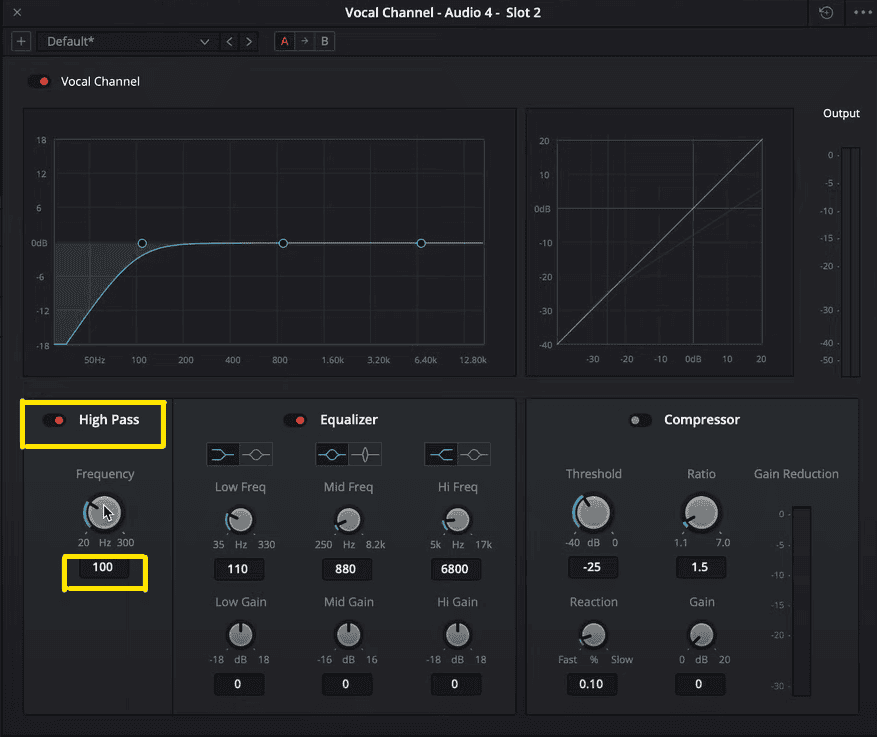
- We’re only going to use the EQ part of this.
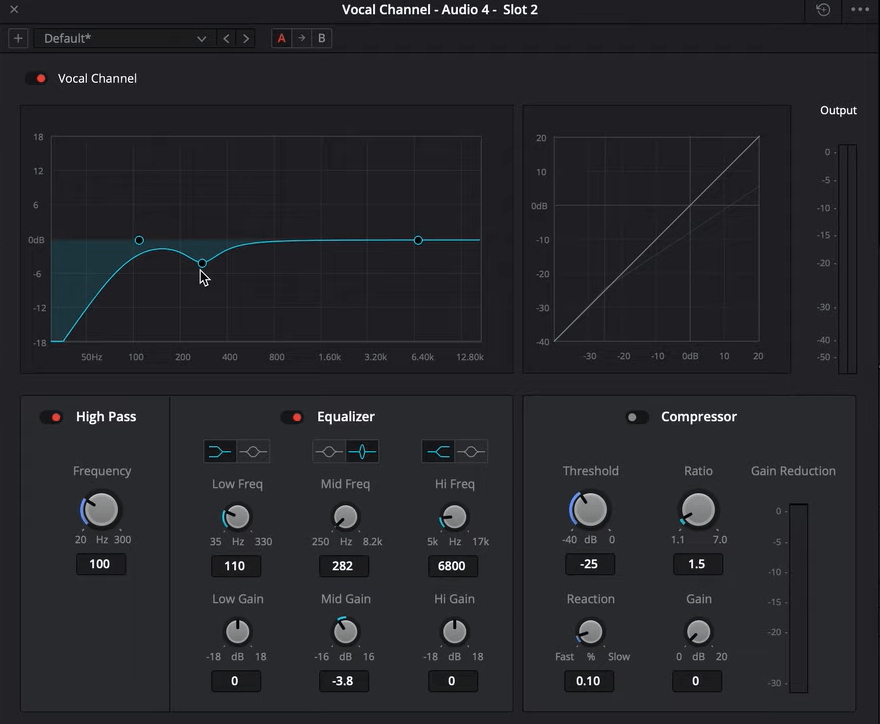
- Click on the high-pass, as shown in the screenshot. It essentially takes out all the low-end. You can probably bring this up a little higher if you are a female.
- But for my voice specifically, I like to go down to about a hundred. Anything underneath 100 is unnecessary and will make your voice not sound clear.
- Next, I like to take this middle Bell, as shown in the screenshot.
- We will change the equalizer type to more of a sharp shape, as shown in the screenshot.
- Then we will swipe back and forth in mid-frequency bell and listen to what frequencies don’t sound good with the voice.
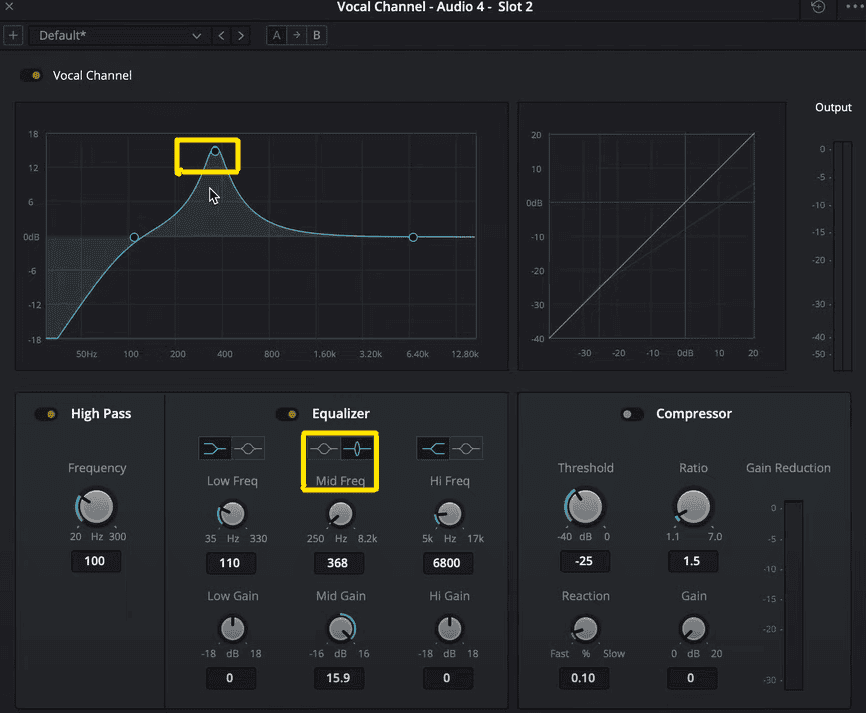
- Right about at 295-280 Hz sound harsh. So, I’m going to bring this down to between negative 3 and negative 6 dB, as shown in the screenshot. I want to kind of just remove those specific frequencies.
- Next is the high frequency. You can either turn this up a little bit if you want to get some more clarity towards the high end. But I leave this because I can EQ later down the vocal chain.
Add Multiband Compressor to Audio in DaVinci Resolve
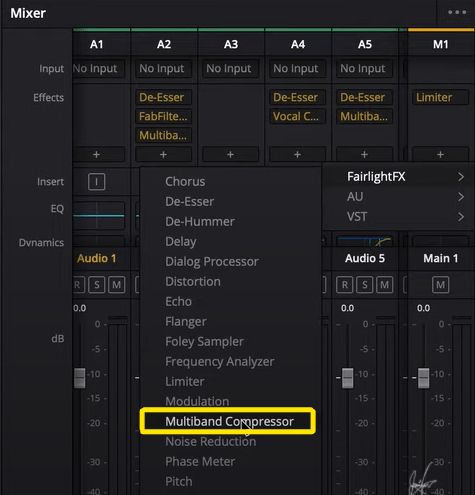
- Next, we’re going to add another effect, a stock plugin, which is the multiband compressor.
- It will compress all the hard transients that the vocal produces.
- When recording a voice-over, make sure to have the best audio possible before processing it.
- So, I leave this at default. It works well with these default settings.
All these Fairlight effects will help your recorded audio in DaVinci Resolve sound professional and spotless. To know all about improving audio quality in DaVinci Resolve, check out our latest article- Improve Audio Quality In Davinci Resolve (3 Easy Steps)
So, I hope you were able to find the answer to all of your questions regarding DaVinci Resolve, like How to Record Audio in DaVinci Resolve? and record voice-over in DaVinci Resolve ? And if you have any more doubt regarding DaVinci Resolve, make sure to check out our other articles. If you have any suggestions feel free to contact us.

