
Hi, I’m Salik, the author of FilmmakingElements.com. I have been a filmmaker for over 10 years. I am also a certified DaVinci Resolve Trainer and I have used DaVinci Resolve for many of my projects. If you’ve poured your creative energies into a project and you’re now on the brink of sharing it with the world, you’re in the right spot. This comprehensive guide on exporting in DaVinci Resolve is tailored for creators like you. The post-production journey, filled with intricate edits and precise color grading, culminates in one pivotal step: exporting.
This isn’t just a technical necessity; it’s the final touch, ensuring that our dedication and craftsmanship shine through in the delivered product. So let’s embark on this final, yet crucial step together, ensuring that when you present your work to clients, it’s a pristine reflection of your vision. Join me as we delve into the intricacies of exporting in DaVinci Resolve.
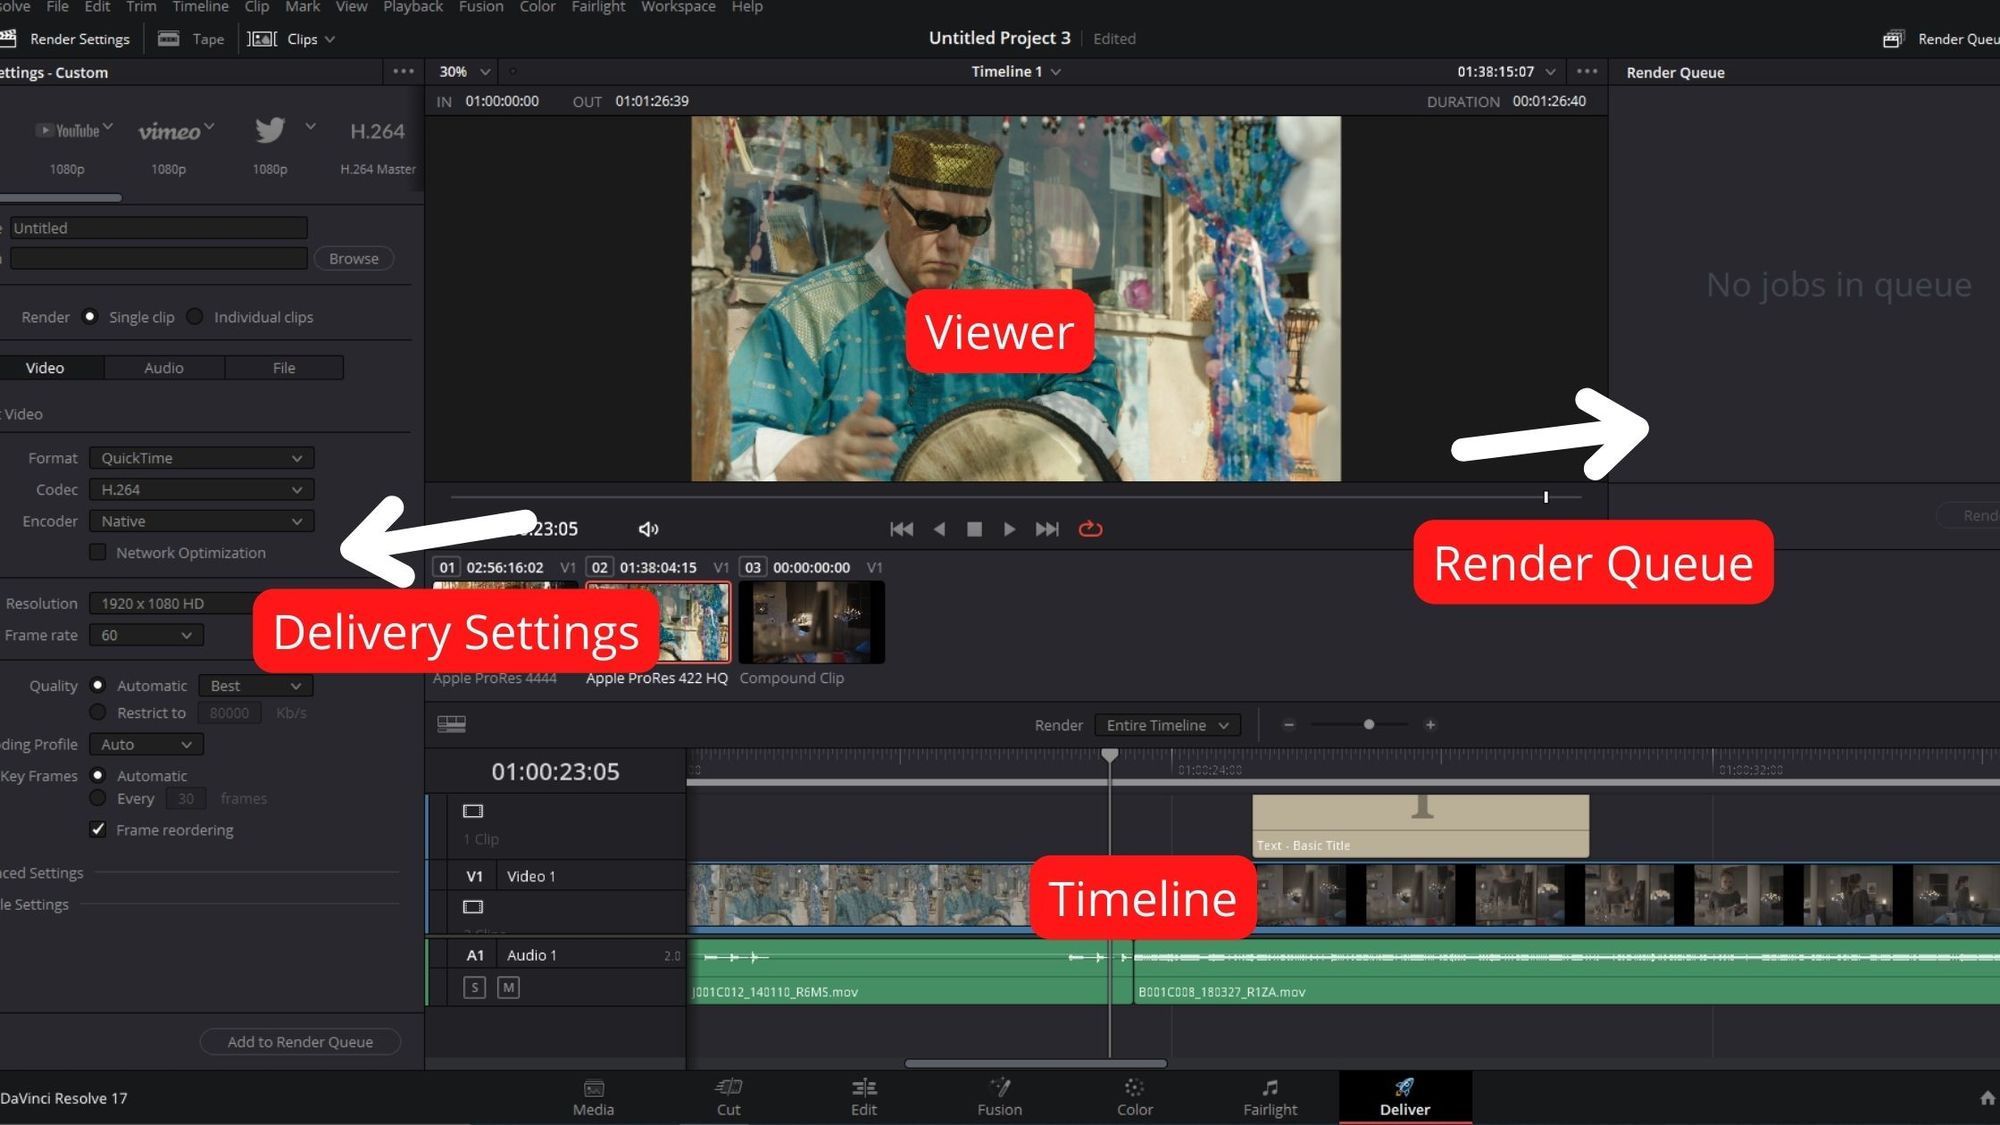
Overview of Delivery Panel In Davinci Resolve

When it comes to exporting in DaVinci Resolve, the Delivery panel is your mission control. You’ll find this vital panel by clicking on the rocket icon located at the bottom. It’s designed to offer a seamless blend of both functionality and overview, streamlining your exporting process. Let’s dissect its essential components:

- Enhanced Viewer: At first glance, you’ll notice an embedded viewer. This isn’t just any viewer; it showcases your fully graded and edited timeline, letting you preview the masterpiece you’ve curated. It serves as your last look before exporting, ensuring everything appears just as you envisioned.
- Review, Review, and Review: Before venturing further into the Delivery panel, ensure that you’ve reviewed your project multiple times. A pro tip, learned the hard way: always watch your grade at least twice, akin to vetting an offline edit. I recall an instance early in my career where I overlooked this, leading to an awkward moment with a feature film client. Lesson learned: never skimp on the review process.
- Delivery Settings Hub: To your left, the panel houses a suite of vital delivery settings. Here, you define the DNA of your export, selecting the appropriate containers, codecs, and establishing your naming conventions.
- Presets: Elevating the panel’s user-friendliness, you’ll discover a series of presets at the top left cornerr. While we’ll delve deeper into these in the next segment, they are designed to help you expedite the export process, tailored to various platforms and requirements.
- Timeline Overview: Situated at the panel’s base, the timeline provides an expansive view of your project. Although you can scrutinize every frame here, any modifications need you to return to the edit panel.
- Render Queue: Tucked in the top right corner, the render queue serves as your command station for all exports. It not only lists the tasks awaiting export but also keeps track of those you’ve completed.
How To Export In Davinci Resolve
A meticulously crafted project loses its essence if it’s delivered in an incompatible codec, an off-mark resolution, or an entirely mismatched color space. The final delivery is the culmination of all your hard work, and it’s pivotal to get it right.
Let’s navigate the intricacies of project delivery settings. You’ve poured hours into that color grade, tweaked it until perfection, and now, it’s showtime. It’s time to package that work for the world (or at least, your client). In doing so, you’re presented with two predominant methods:
- The Baked Master File:
- Here, you consolidate your entire project into a single, continuous clip. Think of it as the definitive master copy of your visuals.
- The subsequent challenge falls on your client. They’ll have the task of aligning this master file with their final sound mix within their preferred Non-Linear Editing software (NLE). This approach often works best when there’s a singular vision for the project’s flow and sequence.
- Individual Graded Clips with XML:
- Alternatively, you can venture down a path reminiscent of your initial steps. Here, you export each graded clip as separate entities, mirroring the segmented fashion of the rushes you initially began with.
- But there’s a catch – to maintain sequence integrity, you also provide an XML. This XML is the blueprint, guiding the reconstruction of your project.
- Whether it’s the client or you spearheading this phase, the XML is imported into the chosen NLE. It instructs the software on the sequence of the graded clips. Once this reconformation is complete, the final sound mix is synchronized with the reconstructed timeline.
- Voila! Your project stands primed and ready for the online edit phase.
Step-by-Step Guide to Exporting Baked Master File (Single Clip) From DaVinci Resolve
The Baked Master File is a singular, cohesive file that represents the entirety of your project. This consolidated file is perfect for projects where continuity and a seamless flow are pivotal. Imagine the viewing experience of a short film, corporate video, or a web advertisement – the audience should be ensnared by the narrative, not distracted by breaks or shifts.

Follow the steps to export Baked Master File (Single Clip) From DaVinci Resolve as we go through every option::
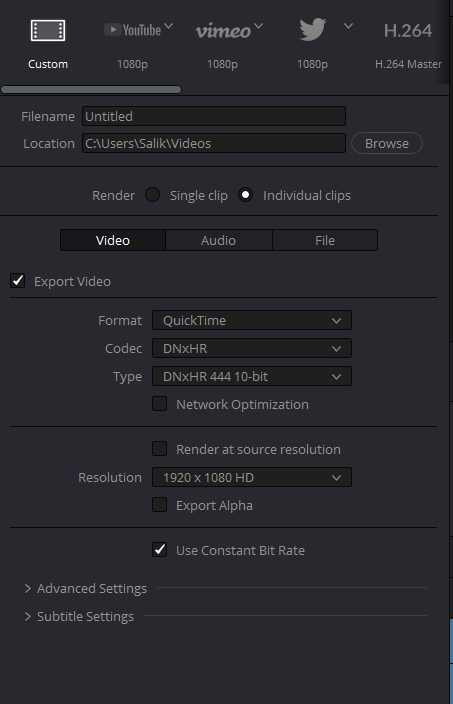
- Accessing Render Settings:
- Navigate to the
Delivertab (icon resembling a rocket) at the bottom. - Here, all export settings are found.
- Navigate to the
- Initiating Single Clip Render:
- In the Render Settings panel on the left side of the Delivery page, locate the “Single Clip” option.
- Ensuring this is selected guarantees that the exported output is one file rather than multiple clips.
- Delving into Codec Settings:
- Why it Matters: Codecs dictate the compression, quality, and size of your video.
- Ensure the ‘Video’ tab is highlighted.
- Setting the Right Format:
- Choose “QuickTime” in the “Format”. This format has wide compatibility and retains high quality.
- It acts as a wrapper, containing both audio and video data.
- Choose “MP4” for optimum compatibility and decent quality.
- Codec Choices & Considerations:
- For Windows Users:
- Opt for “DNxHR” for “Codec” and “DNxHR 444 10-bit” in the “Type” drop-down menu. It ensures a balance between file size and visual quality.
- For Mac Users:
- “Apple ProRes” for “Codec” and “Apple ProRes 422 HQ” in the “Type” drop-down menu is your friend. Apple’s codec maintains excellent quality, especially for high-end projects.
- For YouTube Exports:
- Utilize the “H.264” codec. It strikes a balance between quality and compression, ensuring quick uploads without significant quality loss.
- For Windows Users:
- Demystifying DNxHR:
- DNxHR vs. DNxHD: DNxHD is tailored for HD resolutions, while DNxHR can handle everything from standard HD up to ultra-high resolutions like 4K or even 8K.
- When to use which? For modern projects, DNxHR is more versatile due to its wide resolution range.
- The Significance of Bit-depth:
- With these codecs, you get higher bit-depth. Higher bit-depth, like 10-bit, allows for a broader spectrum of colors. This equates to more detailed and nuanced color adjustments in post-production.
- Syncing with Client Needs:
- Before starting, secure a ‘Delivery Specification Sheet’.
- It’s a blueprint, detailing export settings like resolution, bitrate, codec, and more.
- Aligning with these specifications guarantees client satisfaction.
- Resolution – A Pivotal Choice:
- Default to 1920×1080, an HD standard that offers clarity and detail.
- Adjust based on the project’s needs and the display medium.
- Frame Rate – Crafting Motion Smoothness:
- DaVinci’s project settings typically dictate the frame rate, but double-check for consistency.
- 24fps for a filmic look, 30fps for standard video, and 60fps for ultra-smooth motion are typical choices.
- Double-Checking for Mac Users:
- When using ProRes, occasionally, the software might default to 720p.
- Always validate resolution settings to prevent unwanted surprises.

When you deliver your media, you should have a delivery specification in place at the start of your grade. If not, the director should have a delivery specification at the start of their Project.
It’s very important to know what you have to deliver. I once had a client who wanted an entire feature film on a 200-gigabyte drive in uncompressed RGB, and that didn’t happen. So it’s very, very important to find out what you’re delivering.
Advanced Settings In Davinci Resolve

After making changes based on your desired export settings, scroll down and expand the option “Advanced Settings”. Follow the steps as we go through every option:
1. Pixel Aspect Ratio:
- What it is:
- The Pixel Aspect Ratio (PAR) dictates how pixels are displayed in terms of their width and height proportions. In other words, it’s the ratio between the width and height of a single pixel in your video.
- Application in DaVinci:
- For most general-purpose video projects, square pixels are the norm. This means a PAR of 1:1.
- However, special formats like CinemaScope or older standard-definition TVs may use non-square pixels. For these, you’d typically adjust the pixel aspect ratio in the ‘Project Master Settings’.
- Pro Tip:
- Always review and confirm the PAR, especially if the footage came from multiple sources, to ensure consistency and avoid distortions.
2. Data and Video Levels:
- Importance:
- Ensuring correct data and video levels is crucial to preserve the dynamic range and color fidelity of your project upon export.
- Understanding the Difference:
- ‘Data Levels’ refer to the full range of pixel values from 0-255 for 8-bit footage, whereas ‘Video Levels’ typically use a reduced range (e.g., 16-235 for 8-bit footage) to accommodate for broadcast standards.
- DaVinci’s Offering:
- While the exact setting can vary based on project needs and destinations, Davinci Resolve is by default set to Auto and that is the best option.
3. Enable Flat Pass:
- Function:
- This setting allows for the raw, ungraded version of clips to be rendered.
- Why it’s useful:
- In post-production workflows, especially with VFX, raw plates without any grading are often required. Additionally, showing clients a before-and-after comparison of the grading process can be insightful.
- Keep this on “Off”.
- Note:
- Its application is somewhat niche, mainly aligning with VFX-heavy projects or specific client requests.
4. Force Sizing to Highest Quality:
- The Promise:
- This ensures that any size adjustments to the footage retain the utmost quality upon rendering.
- When it’s Essential:
- Whenever you’ve altered the original frame of your clips, whether by zooming, panning, or any form of reframing, this option ensures that these adjustments don’t degrade quality.
- Keep this checked.
5. Force Debayer to Highest Quality:
- Relevance:
- Essential for projects utilizing RAW footage, like those shot on RED cameras.
- What Debayering is:
- It’s the process of converting RAW sensor data into a full-color image. Proper debayering ensures optimal image clarity and color accuracy.
- Why it’s Vital:
- For maintaining the pristine quality of RAW footage, ensuring it’s presented in its best possible light.
- Keep this checked.
6. Tone Mapping:
- Availability:
- This section might be inactive if you’re on a Standard Dynamic Range (SDR) project.
- Purpose:
- Tone mapping attempts to replicate the visual appearance of high-dynamic-range images on a display with a more limited dynamic range. It’s a way to make HDR content look correct on SDR displays.
Special Mention: Exporting for YouTube
- If your project’s final destination is YouTube, you might not need all the advanced settings listed above. Here’s a simplified guideline:
- Format: Choose MP4.
- Codec: Opt for H.264. This codec offers good quality and is widely accepted on the platform.
Visiting the Audio Tab
After we are done with the “Video tab”, scroll above and click on the button which says “Audio”.
Step 1: Accessing the Audio Tab Once you’ve finished with the Video tab, locate and click on the Audio tab. This will reveal all the audio-related settings.
Step 2: Exporting Audio
- Toggle the
Export audiocheckbox if you want your exported file to include audio. - You don’t have to make any changes as Davinci Resolve defaults it to the best audio settings.
Visiting the File Tab
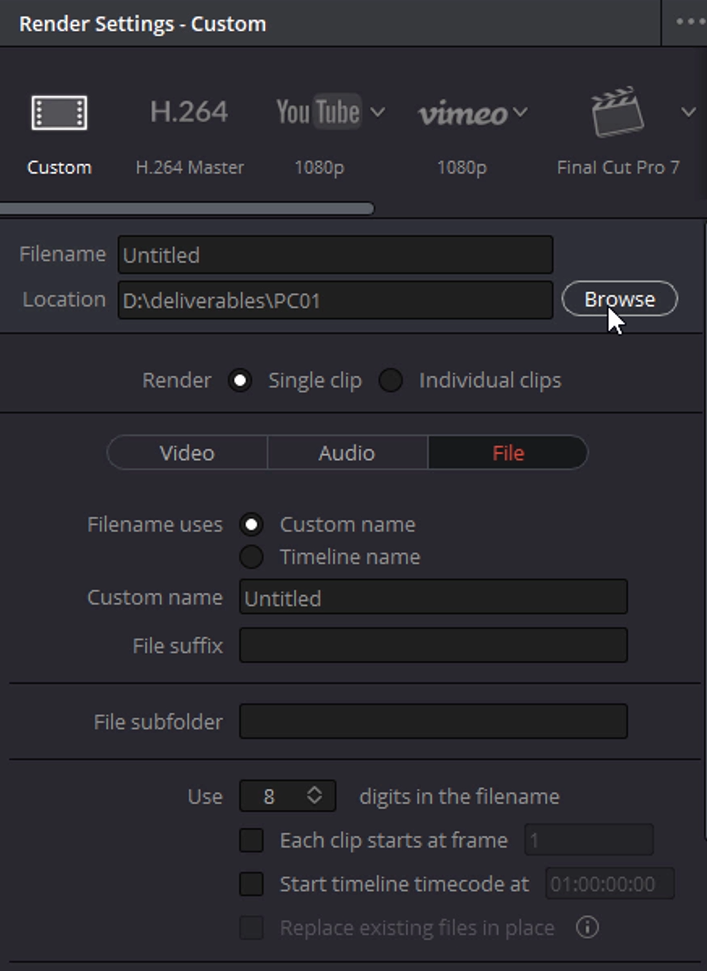
OK, so now we’re going to go into the file tab. We prepare our File for export here. To access it, scroll above to find the button which says “File”.

Step 1: Navigating to the File Tab
Begin by clicking on the File button which is located in the delivery page. This is the hub where you set up and initiate your exports.
Step 2: Set Your Export Destination
- Click on the ‘Browse’ or ‘Location’ option.
- Choose the appropriate folder or directory where you want your final export to be saved.
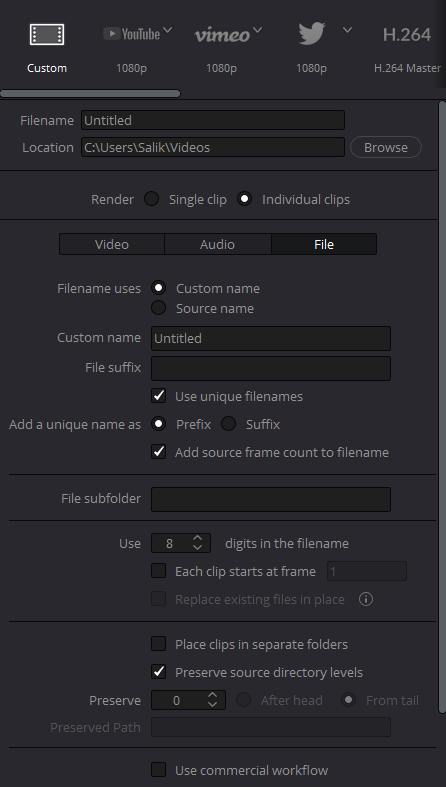
Step 3: Naming Your Export
- In the ‘File Name’ box, type in a descriptive name for your export.
- Tip: For basic projects, a simple name indicating the project’s content might suffice. For example: “Summer_Ad_2023”.
- If you’re managing multiple versions or edits, consider adding the date.
- Example: “Summer_Ad_2023_10_02”.
Note: Proper naming conventions become crucial for larger projects like feature films, ensuring clarity and efficient organization.
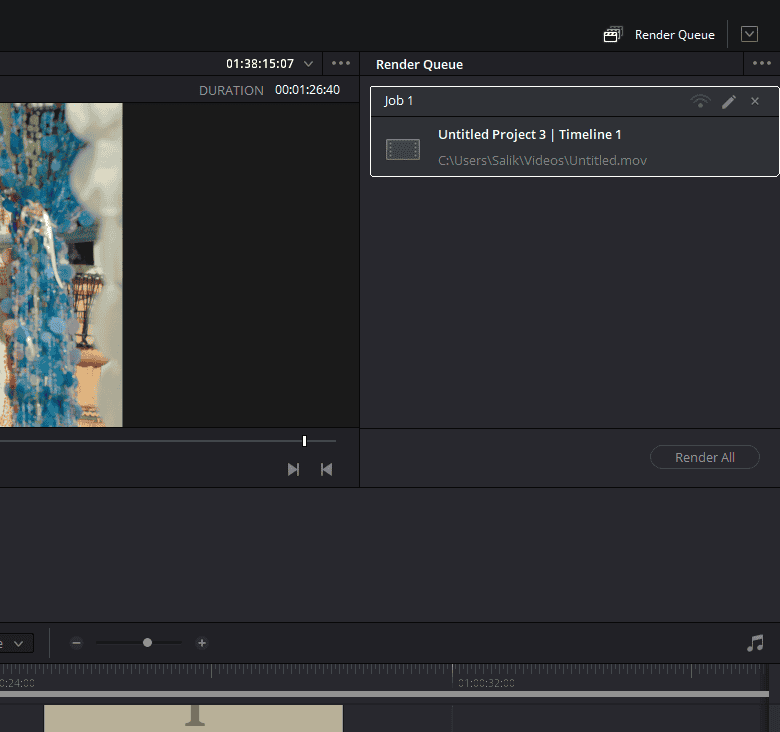
Step 4: Add to Render Queue
- Once you’re satisfied with your file naming and location settings, click the
Add to Render Queuebutton. - This action will queue your project for rendering but won’t start the process just yet.
Step 5: Activate the Job
- Shift your attention to the
Render Queuepanel, situated on the top right of the screen. - Here, you should see your project listed. Click on it to ensure it’s highlighted or has a white border.
- This indicates the job is active and ready for rendering.
Step 6: Initiate Rendering
- With the job active in the Render Queue, click on the
Start Renderbutton.- Alternatively, if you have multiple jobs in the queue, you can click
Render Allto execute them in sequence.
- Alternatively, if you have multiple jobs in the queue, you can click
- Sit back and observe the rendering progress. Once complete, your exported file will be saved in the location specified earlier.
Additional Notes:
This guide covers the basic steps for exporting a single project. When managing multiple projects or timelines, DaVinci Resolve has features that allow for batch rendering, which can be explored in more advanced tutorials.
Remember, while the process might seem repetitive for frequent users, each step ensures you’re maintaining a consistent workflow, maximizing efficiency, and reducing the chances of errors.
- Also Read- How To Nest In Davinci Resolve (Compound Clips)
- Also Read- Are Rokinon Lenses Worth Buying for Photography (Answered)
- Also Read- 7 Tips For Making The Best Colorist Showreel
Exporting Multiple Projects From Davinci Resolve

Exporting multiple projects is essential when you have a variety of timelines or specific sections of a timeline that need individual outputs. This can be for VFX plates, client reviews, or even scene spot-checks.
Step 1: Access the Delivery Tab
Navigate to the delivery tab of DaVinci Resolve to begin setting up your export jobs.
Step 2: Mark In and Out Points
- On your timeline, drag the playhead to your desired start point and mark an ‘In’ point (Shortcut: I).
- Move the playhead to your desired endpoint and mark an ‘Out’ point (Shortcut: O).
Step 3: Choosing Render Range
Above the timeline and below the viewer, there’s a “Render” drop-down. Two options will be present:
- “In/Out Range”
- “Entire Timeline”
Select the “In/Out Range” option.
Step 4: Naming and File Location
Name your export and specify the destination path where you want the file to be saved.
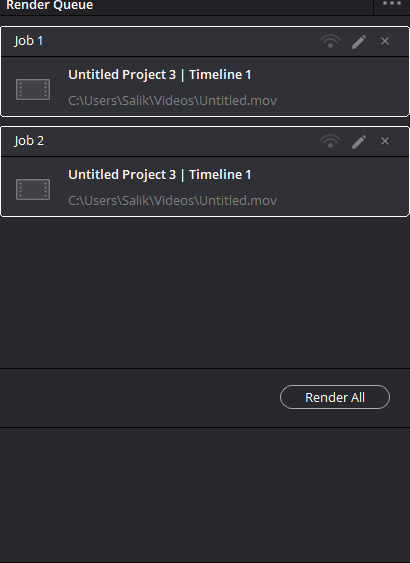
Step 5: Add to Render Queue
After setting the desired parameters, click on “Add to Render Queue”. You can set up and add multiple jobs by repeating Steps 2-5 for different sections of the timeline.
Step 6: Selecting Jobs to Render
In the Render Queue:
- Only the jobs with a white box around them are active for rendering.
- To select multiple jobs, use Ctrl+Click or Shift+Click.
- Once you’ve selected the jobs you want, click on “Start Render” or “Render All”.
Step 7: Working with Multiple Timelines
If you have several timelines:
- Go back to the edit panel.
- Navigate to the desired timeline.
- Set up the render job for that timeline using the delivery panel.
- Add it to the Render Queue.
- You can then render multiple jobs from different timelines sequentially.
How To Export XML and Individual Clips From Davinci Resolve
In this section, we will learn How To Export XML and Individual Clips from Davinci Resolve. This approach gives our client and the online editor much greater control at the end of the post-production process.
So it’s the preferred way to deliver our projects. The first thing we’re going to do is render all of our graded clips out.
Step 1: Setting Up Your Project for Export
- Ensure all edits, grades, and effects are finalized.
- Navigate to the
Deliverytab located at the bottom of the software.
Step 2: Rendering Individual Clips
- Selection: Within the
Deliverytab, locate theIndividual Clipscheckbox and ensure it is selected. - Understanding the Feature: The “Individual Clips” option ensures Resolve renders only the distinct cuts on the timeline, respecting their in and out points. This is analogous to media managing in other editing software.
Step 3: Configuring Delivery Settings
- Format and Codec Selection: In the settings panel, specify the format (e.g., MP4, MOV) and codec (e.g., H.264, ProRes) according to your delivery requirements.
- Designate Export Location: Choose a dedicated folder on your hard drive to store the exported clips, ensuring ease of access later.
Step 4: Naming Conventions and File Management
- Preventing Overwrites: To ensure each rendered clip maintains its uniqueness, check the
Use Unique File Namescheckbox in the “File” tab. - Customization: Customize the names of your clips, if necessary, to provide additional clarity. For example, including scene numbers or descriptions can be helpful.
Step 5: Initiating the Render
- Click
Add to Render Queueto queue your clips. - Navigate to the
Render Queuepanel, typically on the right side of the screen. - Hit
Start RenderorRender Allto commence the rendering process. Monitor the progress and ensure all clips are successfully rendered.
Step 6: Generating the XML File
Important: Regularly save your work to avoid any potential data loss.
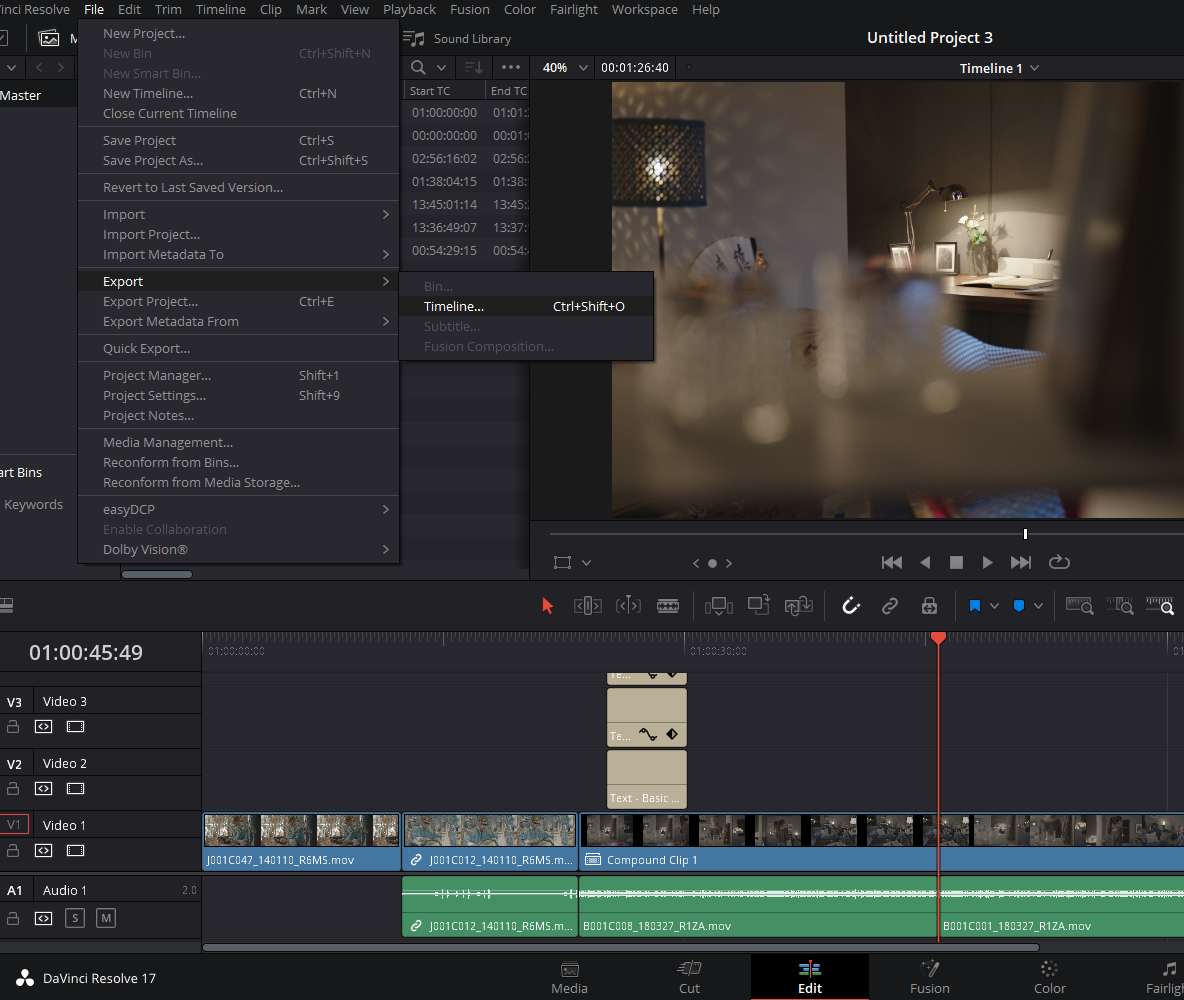
- Return to the
Editpanel within DaVinci Resolve. - Navigate to the top menu bar, selecting File > Export > Timeline.
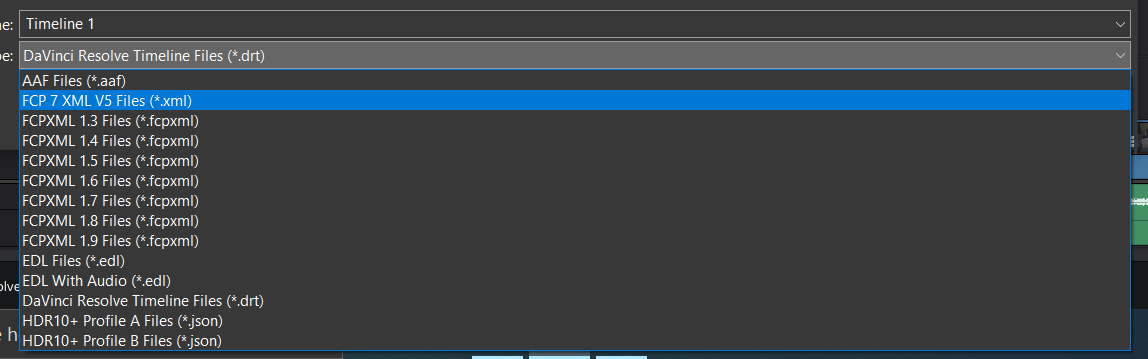
- A dialog box will appear. Based on your target editing software:
- Premiere Pro: Opt for the
FCP 7 XML V5option. - Final Cut Pro X: Choose the
FCPXMLoption.
- Premiere Pro: Opt for the
- Assign a descriptive name to your XML file and choose a location for saving.
Step 7: Final Considerations for Collaborators
Once you’ve exported the XML and individual clips, your client or fellow editor can:
- Launch their editing software (e.g., Premiere Pro).
- Import the XML file using the software’s import features.
- When prompted, direct the software to the location of the individual clips. This will allow the timeline to be reconstructed with the graded clips.
- Proceed to add any finishing touches, including the final audio mix, titles, and credits.
I hope this article was Super Helpful. I have tried to roundabout every instance on how to export in Davinci Resolve.
Happy Editing!