Hello, my dedicated readers. Let me share a piece of my personal expertise in video editing with you all today. I often receive questions on efficient methods for exporting content, and today, I’ll dive into the topic: How to Export Individual Clips in DaVinci Resolve.
I remember the time when I was juggling between various video editors, from Adobe Premiere Pro to Apple’s Final Cut Pro. Each has its merits, but when it comes to rendering multiple clips from a single timeline efficiently and professionally, DaVinci Resolve takes the cake.
If you’re anything like me, you’ve probably faced situations where you needed to provide curated shots to clients. Here’s a tip from my personal workflow: Edit, color grade, and line up all of your desired clips on a single timeline. This technique not only simplifies the export process but also ensures consistency in your output.
Now, you might wonder why DaVinci Resolve stands out? The reason is simple. This software offers a smooth process for multiple clip exports that can be a game-changer, particularly when you wish to color grade in DaVinci and edit in another NLE.
Step-by-Step Guide to Exporting Clips in DaVinci Resolve
Step 1. The Challenges and Ensuring Quality
Embarking on the journey of exporting individual clips, DaVinci Resolve truly differentiates itself from the rest. Those familiar with Non-Linear Editing Systems (NLEs), particularly Premiere Pro, are no strangers to the encumbrances it presents. In Premiere Pro, users are often limited to exporting the untouched clip as a newly trans-coded version. This essentially means your meticulously applied color correction or VFX doesn’t make it through the export, which can be immensely frustrating.
Now, DaVinci Resolve not only elevates the exporting process but also respects the artist’s touch.
Key steps to remember in DaVinci Resolve:
- Start by finalizing your edit on the Edit page of DaVinci Resolve.
- If color grading is necessary, perfect it on the Color page of DaVinci Resolve.
- Ensure your timeline is locked and set, ensuring the quality and consistency of your output.
- Remember, once exported, the color grading gets baked in, making subsequent alterations challenging.
With your timeline ready and refined, DaVinci Resolve empowers you to bid adieu to the tedious one-by-one export process. A few strategic mouse clicks and each clip is set for export, each boasting its unique identifier. With DaVinci Resolve, it’s not just about efficiency, but also about safeguarding the sanctity of your artistic vision.
Step 2. How to Export Individual Clips in DaVinci Resolve
Transitioning into the second phase of exporting individual clips in DaVinci Resolve can be both exhilarating and complex. But with a few steps broken down, you can streamline the process seamlessly.
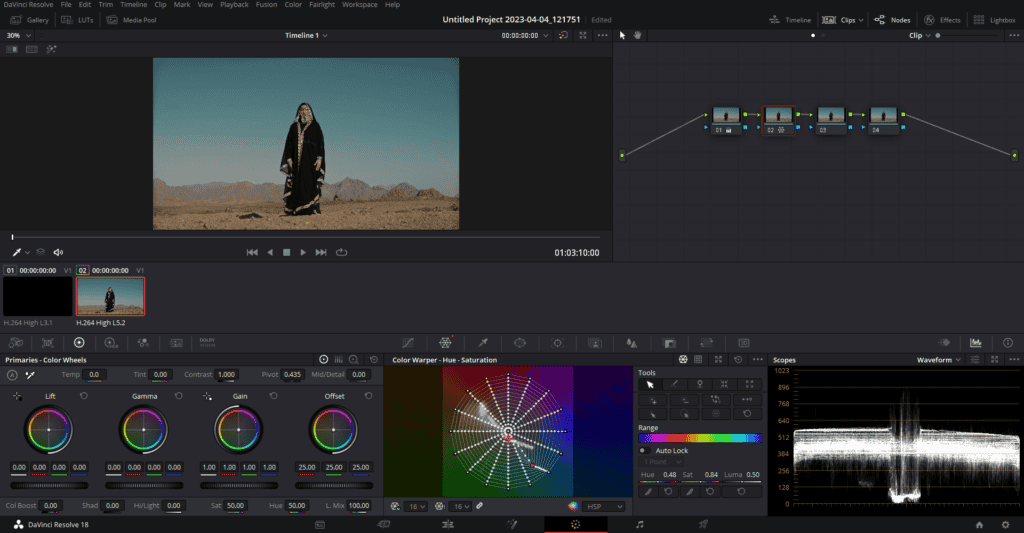
- Finalizing and Coloring: Before you delve into the export specifics, it’s imperative to ensure that all clips are polished to perfection. Once your clips are edited and your desired color grade is achieved, you’re set to move forward.
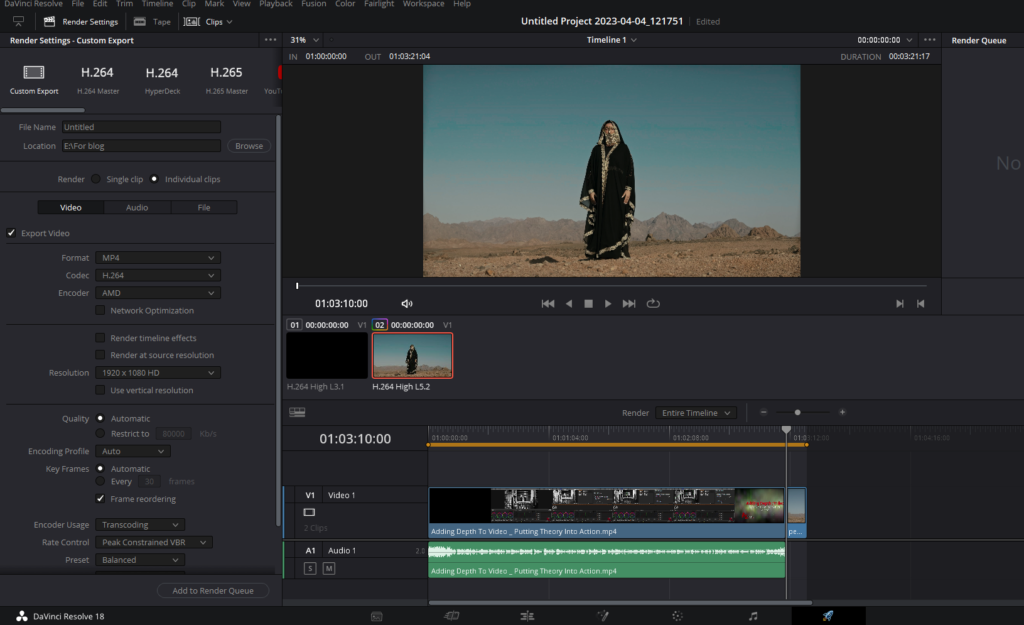
- Navigating to Deliver: Head to the ‘Deliver’ tab. Click on the rocket-looking icon at the button of Davinci Resolve UI. This is where the magic happens. Under the ‘Render Settings’ section on the left, you’ll have the freedom to set your desired settings and choose the appropriate codec.
- Client’s Editing Needs: If the exported clips are intended for further editing, maybe by a client, opt for an uncompressed codec. This could be something like QuickTime.
- Final Product Needs: If the clips are intended for final use without further edits, a compressed codec, such as H.264 or H.265, would be apt. This ensures good quality with reduced file sizes.
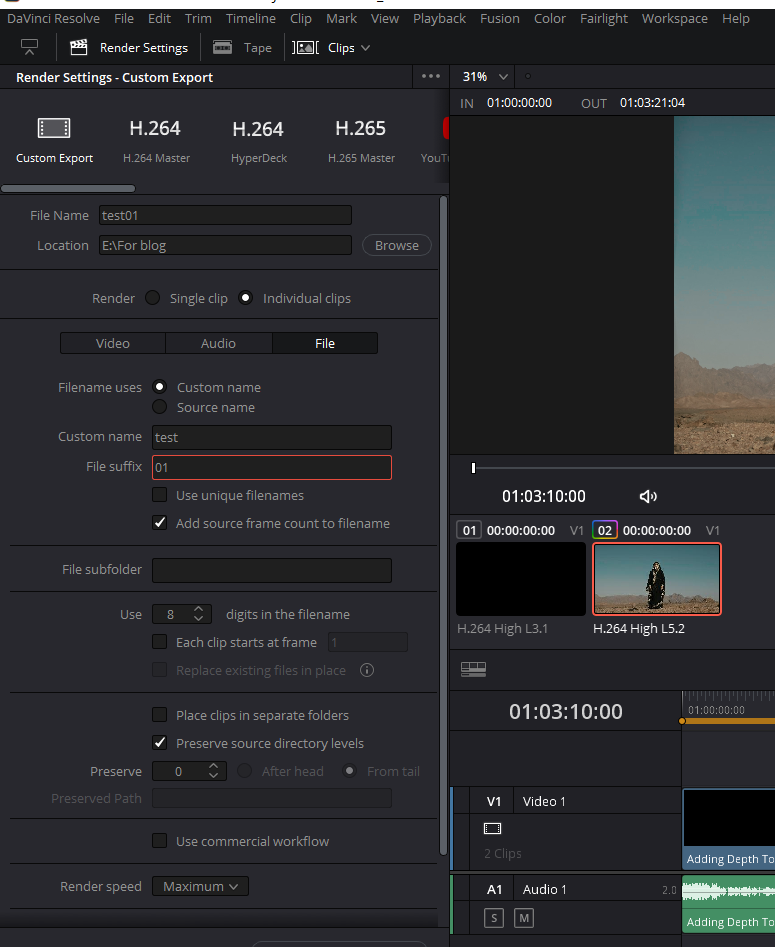
- Individual Clips Selection: Navigate to the top and select ‘Individual Clips.’ Following this, you’ll spot a tab labeled ‘File’. Clicking on it is crucial, as this is where you’ll assign custom identifiers.
- Naming Convention: Under the custom name section, assign a name that resonates with the project title you’re exporting. As a personal touch, I usually add a numerical suffix starting with ’01’ in the “File Suffix” box. This aids in easy identification and organization, especially when dealing with a plethora of clips.
Step 3. Exporting Clips in DaVinci Resolve
Venturing further into the world of exporting individual clips, the third step in DaVinci Resolve emphasizes the crucial aspect of file naming. It’s not just about what’s inside the clip; it’s about how you label it on the outside.
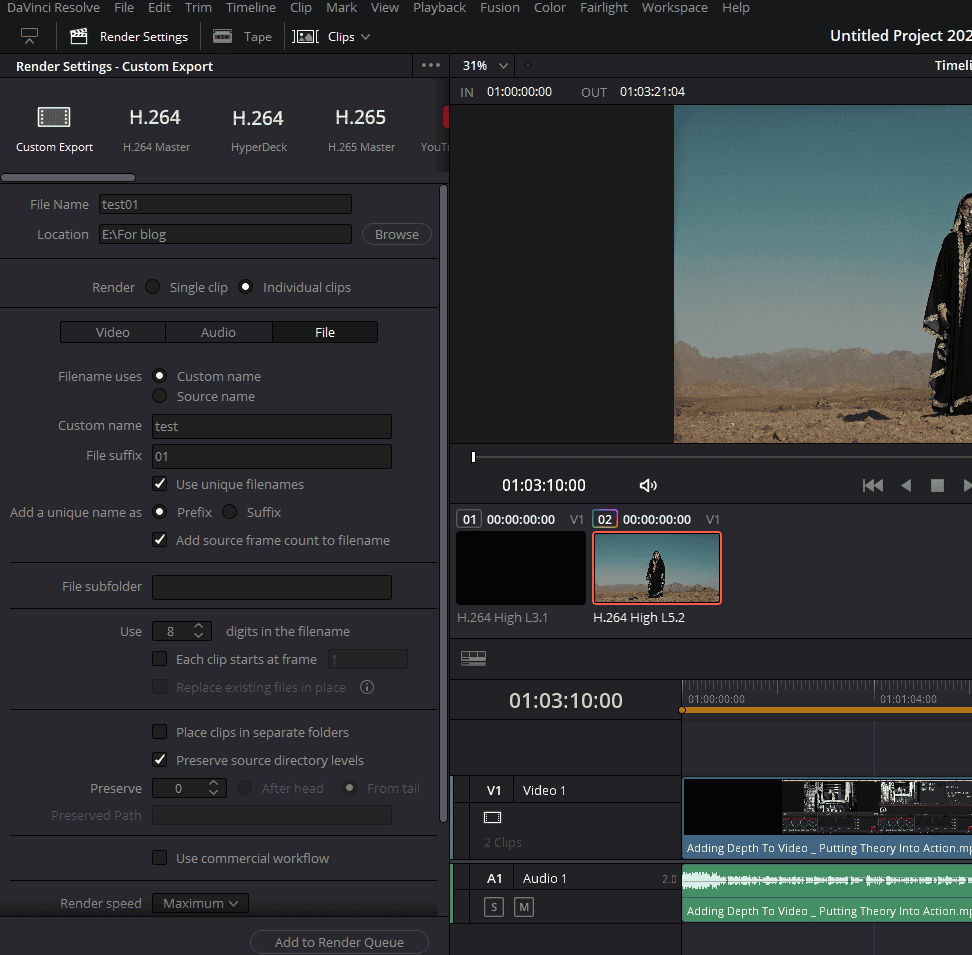
- The Essence of Unique File Names: The core tenet when exporting is ensuring that each clip boasts a unique file name. Checking the ‘unique file names’ option is non-negotiable, but that’s only half the battle won.
- Tapping into Source Frame Count: The ‘add source frame count to filename’ option is a lifesaver. Why? When activated, it empowers your system to append additional sequencing numbers post-export. Neglecting this step can be catastrophic. Without it, DaVinci Resolve might render every clip on your timeline under a singular, identical name. This misstep essentially leads to the system overwriting the same file repeatedly. In scenarios with multiple clips, say 50 for instance, it would rewrite the same file 50 times instead of producing 50 distinct clips.
- The Final Assurance: Always make it a point to engage the ‘add source frame count to filename’ option. This proactive measure not only bestows each clip with a distinct identifier but also ensures every clip is rendered correctly, retaining its individuality.
Step 4. Exporting Clips in DaVinci Resolve
As you journey deeper into the process of exporting individual clips in DaVinci Resolve, the importance of even the smallest details becomes evident. The fourth step further clarifies this process, ensuring you get the best out of your exporting endeavor.
- Digits in File Name: Once you delve into the settings, you’ll notice an option labeled ‘use digits in file name.’ This option allows you to select a range between 1 to 5. Here’s a pro tip: Always opt for 5. While you may not be exporting a monumental number of clips, it’s always prudent to leave some room. This is particularly beneficial if you’re working with formats like DPX that might involve a plethora of distinct file names. Safeguard your efforts and opt for the maximum.
- Maximizing Render Speed: Diving further into settings, ensure your “render speed” is cranked up to its “maximum” potential. Not only does this optimize the entire process, but it also solidifies your workflow’s efficiency, ensuring you spend less time waiting and more time creating.
- File Naming and Storage: After setting up the previous parameters, you’ll notice your file name appearing. The final step? Specifying the destination. Simply click on the “location” setting, select where you’d like your files saved, and you’re good to go.
Step 5. Exporting Clips in DaVinci Resolve: Finalizing Your Exports
Reaching the culmination of your exporting process is an exhilarating feeling, but ensuring it’s done right is the key. Let’s delve into the fifth step of exporting individual clips in DaVinci Resolve, sealing the deal.
- Commence the Rendering: Once you’ve meticulously set everything up, the next step is quite straightforward. Click on the ‘add to render queue’ option, which, as the name suggests, initiates your render queue. From here, it’s a simple press of the ‘render’ button. As this process initiates, you’ll visually witness the rendering progression.
- Duration Dynamics: A common query is the duration of the render. The answer? It varies. Factors like file size and resolution can dramatically influence render time. It could be a swift few minutes for some, while others might need to allocate a couple of hours.
- Post-Rendering Inspection: Once the rendering phase concludes (or even if you decide to halt it midway), navigate back to your saved location. This is where you can access and review the clips you’ve just exported. A quick glance will confirm that each clip stands distinct, showcasing unique identifiers and adhering to your specified settings.
- Wrapping It Up: DaVinci Resolve’s exporting tool is a powerhouse, streamlining a process that can often be tedious and cumbersome in other software. The ease with which you can render multiple individual clips, each maintaining its unique identity, makes it an invaluable tool for any filmmaker or editor.
Last Words
Taking a step back and reflecting on our journey together, we’ve ventured deep into the intricate world of exporting individual clips in DaVinci Resolve. From the early days of juggling multiple video editing platforms to mastering DaVinci Resolve’s unique capabilities, the road has been enlightening.
With this step-by-step guide, I’ve aimed to simplify and demystify the process, allowing you to harness the full power of DaVinci Resolve. These tips and strategies are gleaned from years of hands-on experience, and I genuinely hope they serve you as well as they have served me.
To my dedicated readers, I appreciate your continued support and trust. Whether you’re an amateur trying to find your footing or a seasoned professional, remember that every masterpiece begins with a single clip. Here’s to many more cinematic masterpieces from your end!
Until next time, keep creating and keep exporting!