
Hi, I’m Salik, the author of FilmmakingElements.com. I have been a filmmaker for over 10 years. I am also a certified DaVinci Resolve Trainer and I have used DaVinci Resolve for many of my projects. In this blog post, we delve into how to create the hologram effect in DaVinci Resolve, a powerful video editing software.
This fascinating hologram effect could be the very thing to elevate your video production, transporting your audience straight into the future with its captivating visuals. As we navigate through the creation process, we’ll be doing so step by step, ensuring that every aspect of this intriguing effect is well covered and easily understood.
Our approach to this guide is designed to provide you with clear, succinct instructions that are easy to follow. However, we understand that the process may be a little overwhelming, especially if this is your first time working with such effects. Therefore, feel free to pause and revisit any segment of the post if you need to reinforce your understanding or catch a breather.
Preliminary Steps for Creating a Hologram Effect in DaVinci Resolve
In this section of our blog at FilmmakingElements.com, we’re going to take you through a comprehensive, step-by-step guide to setting up your raw materials for creating a stunning hologram effect in DaVinci Resolve.
Step 1: Gather Your Raw Material
First, gather all the raw materials you’ll need for this project. This includes:
- A video recording of yourself or another individual pretending to interact with a hologram. This will serve as the base of your project.
- A screen recording, possibly of a YouTube page or similar, which you’ll edit to look like the hologram being interacted with in your video. Make sure the scrolling in this screen recording aligns with the mimed scrolling in your video.
- A video clip that will appear when the hologram is activated. This can be any video.
Step 2: Importing and Editing Clips in DaVinci Resolve
After gathering all your materials, open DaVinci Resolve and start the process of importing and editing your clips.
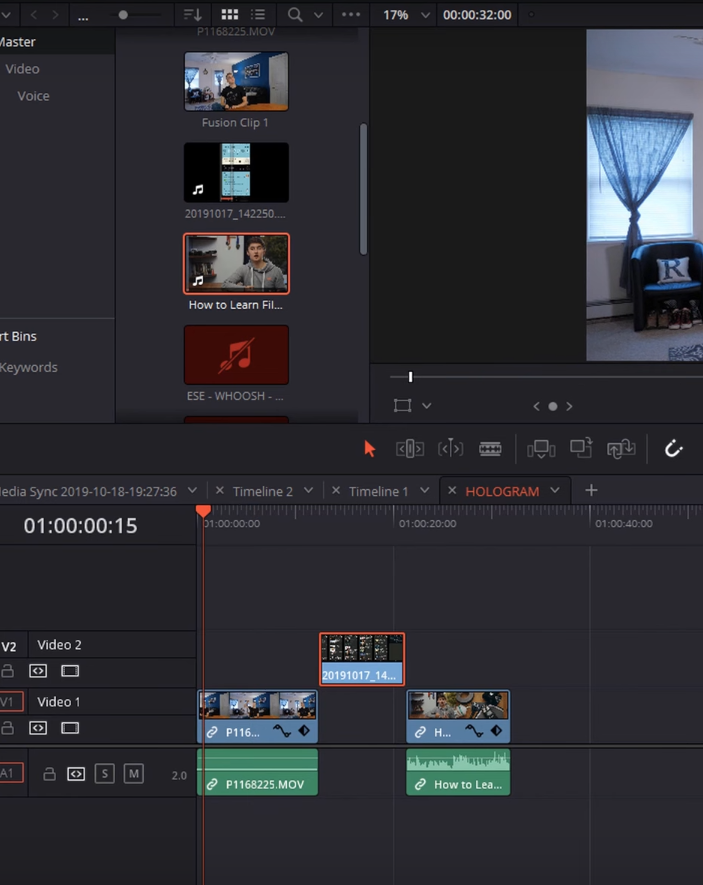
- Import all your clips into DaVinci Resolve, and drag and drop your clips in the Media Pool in the Edit Page. Add in (I) and out (O) points to each one. Drag them onto your timeline.
- When the video appears when the hologram is clicked, import only the video, omit the audio, and trim it down to the first few seconds.
Step 3: Building the Sequence
With your clips on the timeline, you can now begin building the sequence.
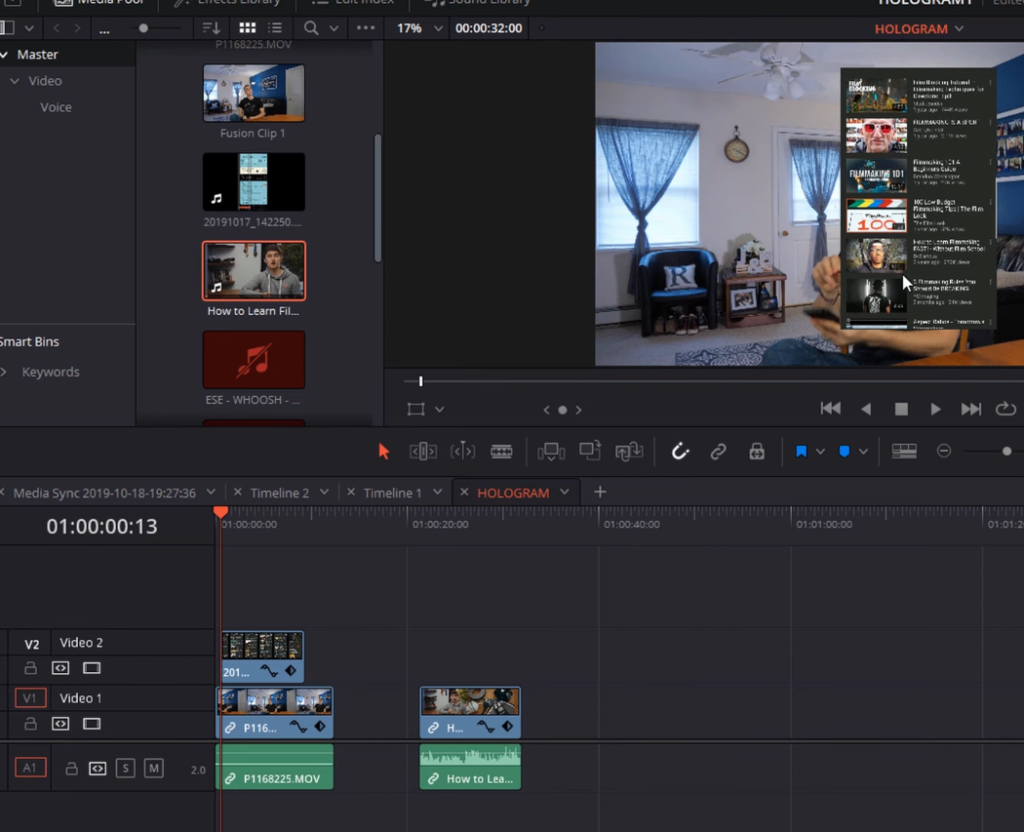
- Drag your screen recording (the hologram layer) into the timeline and crop it to fit your needs.
- Make sure to crop out any unwanted elements like black bars, navigation buttons, or notifications. You want only the content of the recording. Click on the hologram layer clip, click on the Inspector button from the top-right corner. Here you will find the option to crop.
- Once cropped, position the hologram layer at the point in the video where you want it to appear.
Step 4: Positioning the Elements
Positioning the hologram layer properly is crucial to make the effect look realistic.
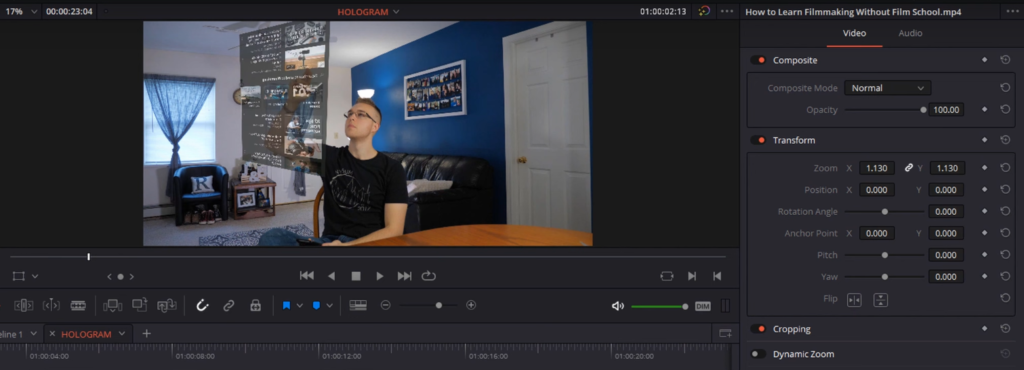
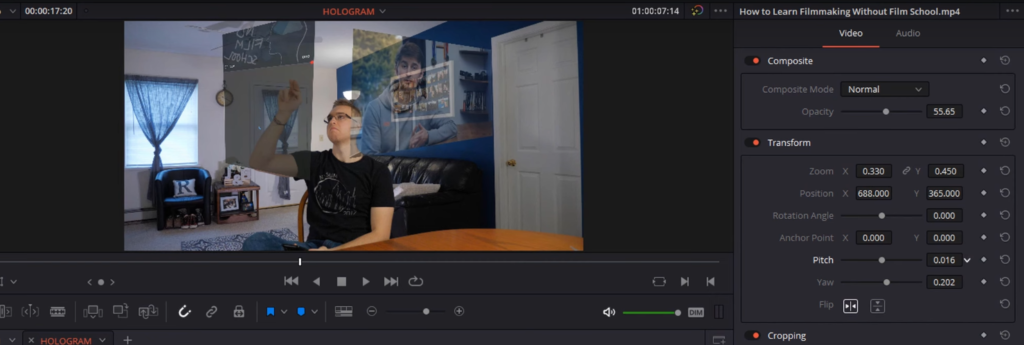
- Click on your hologram layer, head to the ‘Inspector’ panel from the top-right corner, flip it, drop the opacity, play around with ‘Pitch’ and ‘Yaw’, and move it around until it looks like it’s positioned correctly in relation to the actor.
- Repeat this process for any additional hologram layers you have in the timeline.
Step 5: Time Remapping
This step is essential to ensure that the actions in your video match with the hologram layer.
- Watch your video and pay attention to where the actions don’t align between the video and the hologram.
- For instance, if the hologram is scrolling without any corresponding action in the video, you’ll need to adjust this.
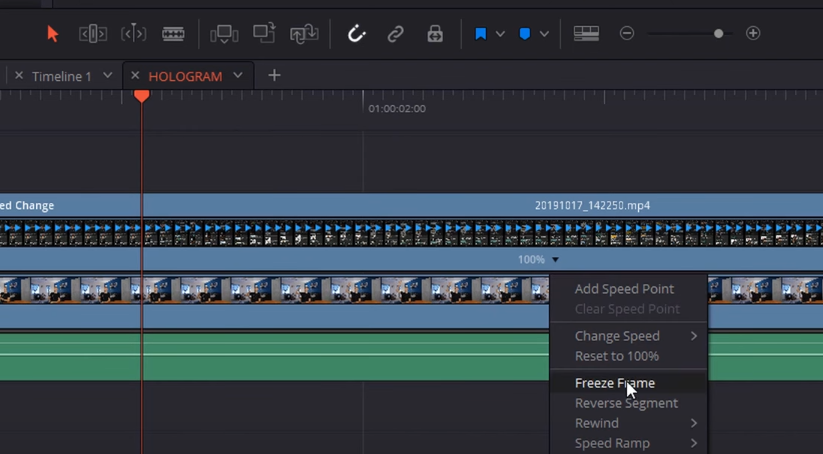
- Use the retime controls in DaVinci Resolve (accessed by right-clicking and selecting ‘Retime Controls’ or pressing ‘Control + R’) to create freeze frames and adjust the timing of the hologram layer to match the video.
- To use Freeze Frames, click on the arrow pointing down and click on Freeze Frame.
Step 6: Final Adjustments
Before you move on to creating the actual hologram effect in DaVinci Resolve, make some final adjustments to ensure everything aligns correctly.
- Add a final freeze frame at the end of the scrolling in your hologram, right before it transitions to the pop-up video. This will make the hologram stay on the last frame of the scroll.
- Trim your timeline to remove any unnecessary elements. Use the Ripple Edit tool or cut and delete to remove these sections.
Now that you have properly timed and positioned all your elements on the timeline, you are ready to jump into the next step – creating the actual hologram effect using Fusion in DaVinci Resolve.
Crafting the Hologram Effect in Fusion within DaVinci Resolve
In this part of our blog, we’ll dive deeper into the actual creation of the hologram effect in Fusion within DaVinci Resolve. By the end of these instructions, your video will feel like it’s been launched into the future.
Step 1: Importing the Project into Fusion
Fusion is a powerful compositing tool that will help you perfect the hologram effect. Begin by importing your clips into Fusion.
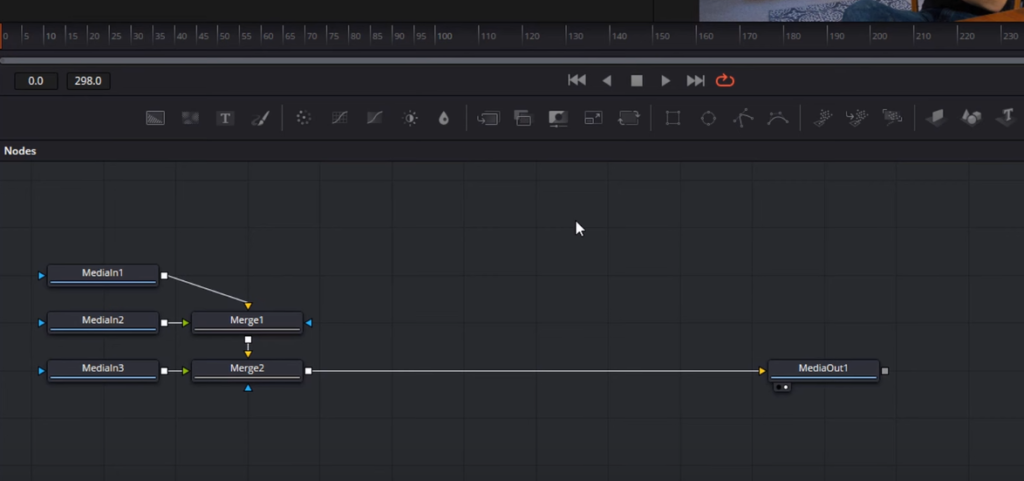
- Highlight all clips on your timeline, right-click, and select ‘New Fusion Clip’. You’ve now prepared your project for Fusion.
- Next, click on Fusion at the bottom of the screen. This will bring up the Fusion page with all your inputs and merge nodes connected, leading to ‘MediaOut’.
Step 2: Organizing your Workspace
Fusion can be intimidating with all its nodes and connections. But don’t worry, here’s how you can organize it:
- Right-click anywhere in the node editor, navigate to ‘Options’, and select ‘Orthogonal Pipes’. This ensures all connections (pipes) are right angles, making them easier to follow.
- Right-click again, go to ‘Arrange Tools’, and select ‘To Grid’. This allows your nodes to snap into place on an invisible grid, keeping everything neat.
Step 3: Adjusting Opacity
Your next step involves adjusting the opacity of your clips:
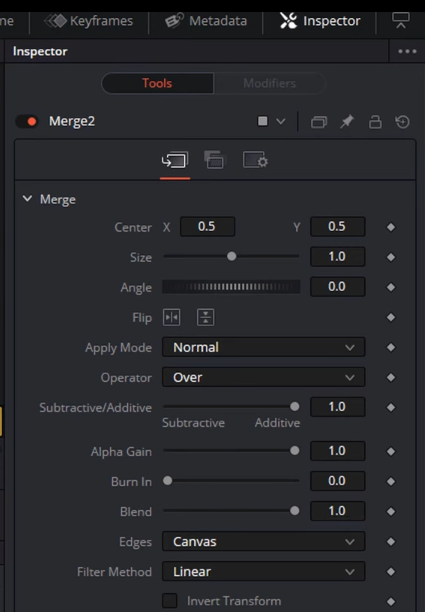
- Click on your ‘Merge1’ node, navigate to the Inspector window on the top-right corner, and lower the ‘Alpha Gain’. This reduces the opacity, making the clip more transparent. Be careful not to lower it too much, as your clip may turn white.
- If you need to further reduce the opacity, adjust the ‘Blend’ setting.
- At this point, on the select nodes, one by one and hit F2 to rename them.
Step 4: Adding Scan Lines
Now comes the exciting part. To give your clip the ‘hologram’ look, you need to add scan lines:
- With your ‘Screen’ node selected, press ‘Control + Space’ to open the ‘Select Tool’ dialog box.
- Type in ‘ScanLines’, hit enter and click on ‘Add’. You’ll now see horizontal lines running through your clip, simulating a computer projection look. You can adjust the setting in the inspector panel on the top-right corner.
- Adjust the ‘Line Frequency’ to about 360 for thinner lines. This step will likely involve some trial and error until you get the look you want.
- Using ‘Control + Scroll Wheel’, zoom in on your clip to ensure the lines are running horizontally along the bottom.
- Fine-tune the ‘Line Angle’ to align the scan lines perfectly with your clip.
- To finish the scan lines effect, change the color to a light teal or blue. This will add the final touch to your hologram effect.
Step 5: Adding Outer Glow
Your hologram needs a glow for that extra touch of authenticity:
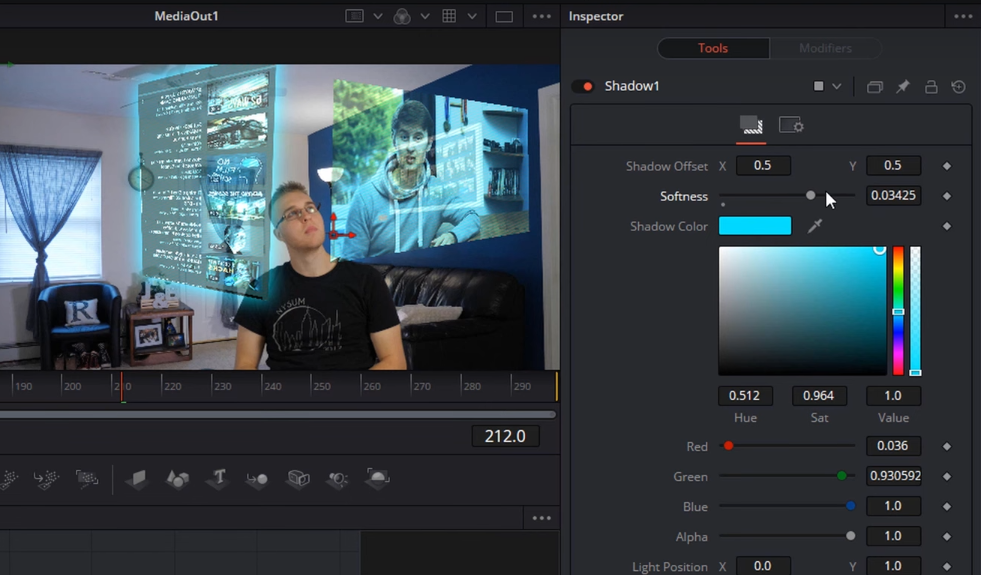
- Press ‘Control + Space’ and type in ‘Shadow’ while the ‘Scanlines’ node is selected. Click on ‘Add’ to apply the shadow effect, which you’ll use to create an outer glow.
- In the Inspector panel, adjust the ‘Softness’ setting to create a shadow that surrounds your hologram. You’ll notice it’s initially black, but you can change it to a blue similar to your scan lines color by clicking on the ‘shadow color’.
- You may find the glow to be too intense. If so, reduce the ‘Softness’ and ‘Alpha’ settings until you’re satisfied with the look.
Step 6: Copy and Paste Effects
With your hologram looking as you want, it’s time to apply the same effects to the video pop-up:
- Copy the ‘Scan Lines’ node (Control + C), then paste it into your workspace (Control + V). To add this node to your pop-up video clip, hold Shift, drag it to the correct position, and release it when the connecting line turns blue.
- Follow the same process for the ‘Shadow’ node. This gives your pop-up video the same outer glow as your hologram.

Step 7: Final Review
You’re almost done. All that’s left is to review your work:
- Scrub through your timeline, looking at both the Fusion and Edit pages.
- Check to ensure the hologram appears correctly, with the scan lines and outer glow visible.
Mastering Animations and Transitions for the Hologram Effect in DaVinci Resolve
In this part, we’ll delve into refining the hologram effect by adding animations and transitions. Get ready to perfect your hologram effect with these steps!
Step 1: Adding Transform Nodes
Let’s start by adding Transform nodes to create a dynamic animation:
- Select the ‘Shadow’ node and add a ‘Transform’ node from the toolbar. This will be referred to as ‘Transform1’.
- Navigate to the timeline and find the point where you hit the button on your phone, marking the start of the hologram animation.
- As you’ve already positioned your hologram, start from the end of the animation and work your way to the beginning.
- Under ‘Transform1’, adjust the ‘Center’ and ‘Size’ parameters to scale down the hologram and position it over the phone.
Step 2: Smoothing the Animation
Now let’s ensure the animation is smooth:
- Go to the ‘Spline’ tab and select ‘Transform1’. Highlight the curve and press ‘F’ to flatten the curve, smoothing the transition.
- Close the ‘Spline’ tab to return to the Node Editor.
Step 3: Creating the Swipe Animation
The swipe animation will give the illusion of the hologram being dismissed:
- Add another ‘Transform’ node, referred to as ‘Transform2’, at the point where the swipe action takes place.
- Under ‘Transform2’, hit ‘Size’, ‘Center’ to set the starting point of the swipe animation.
- Scroll forward in your timeline to the point where the swipe action ends (look for the flick of the wrist).
- Adjust ‘Size’ and ‘Center’ settings to create the swipe-away effect.
Step 4: Adding Transparency
Enhance the swipe-away effect by gradually reducing the hologram’s opacity:
- In ‘Transform2’, go to the first keyframe of the animation. This is where the swipe begins.
- Now, go to your ‘Merge1’ node and under ‘Blend’, add a keyframe.
- Move forward to the point where the swipe ends and add a second keyframe.
- Set the ‘Blend’ value to 0, so the hologram fully disappears by the end of the swipe.
Step 5: Adding Motion Blur
To further amplify the swipe-away effect, let’s add some motion blur:
- Under ‘Transform2’, navigate to the ‘Settings’ tab.
- Enable ‘Motion Blur’ and set ‘Quality’ to about 5.
- Reduce the ‘Angle’ value to avoid excessive blur. You just want it to hint at motion, not obscure the effect.
Step 6: Reviewing Your Effect
And finally, review your work:
- Go back to the beginning and watch the sequence through to ensure the animation and transition look as desired.
- Make any necessary adjustments, and then pat yourself on the back because you’ve just mastered the hologram effect!
Conclusion
We’ve successfully traversed the captivating journey of creating a hologram effect in DaVinci Resolve, a handy tool that can elevate your video production skills. From gathering the raw materials to refining the final effect with smooth animations and transitions, we’ve touched upon each step in detail, ensuring you have a clear roadmap to guide your creative endeavors.
Don’t be disheartened if you don’t get it perfect in the first attempt. Mastery comes with practice, and each try will get you closer to the desired outcome. Remember, it’s all about trial, error, and, most importantly, having fun during the process!
Thank you for choosing FilmmakingElements.com as your guide in this exciting filmmaking journey. We appreciate your time and dedication to learning. We hope this post has been informative and engaging. Stay tuned for more exciting, in-depth tutorials that will help transform your filmmaking dreams into reality.