Hi, Welcome Back! This article covers all the ways To Color Grade Arri Log C In Davinci Resolve.
Davinci Resolve is not just an epic video editing software. It is now getting used in Hollywood films and has started getting a standard because of its Color Grading capabilities.
Many indie filmmakers have started using Arri Cinema Cameras for their films, commercials, and music videos. No doubt the color science of Arri cinema camera is a pioneer in its industry. But due to significantly less information available on the internet.
Filmmakers cannot leverage that color science and data captured by the sensor. In this article, we have made sure you learn every way to tackle Arri LOG C.
At the end of this tutorial, you will learn how to color grade Arri Log C In Davinci Resolve and improve your pipeline and production quality.
1. Color Grade Arri Log C With Arri LUTs
The first and foremost way of Color Grading Arri Log C is to use the camera manufactured LUTs. Many professional colorists suggest not to use LUTs, but the ones made by the manufacturers themselves are a very accurate conversion.
The best part is Davinci Resolve comes preinstalled with LUTs made by Arri themselves, which will convert your LOG C footage to Rec.709. Should you use them? Why Not?
It is by far the best LUT you will find on the internet and is far better than the LUTs your purchase from so-called professional colorists, and what can be better when you hear they are provided by ARRI themselves and are free.
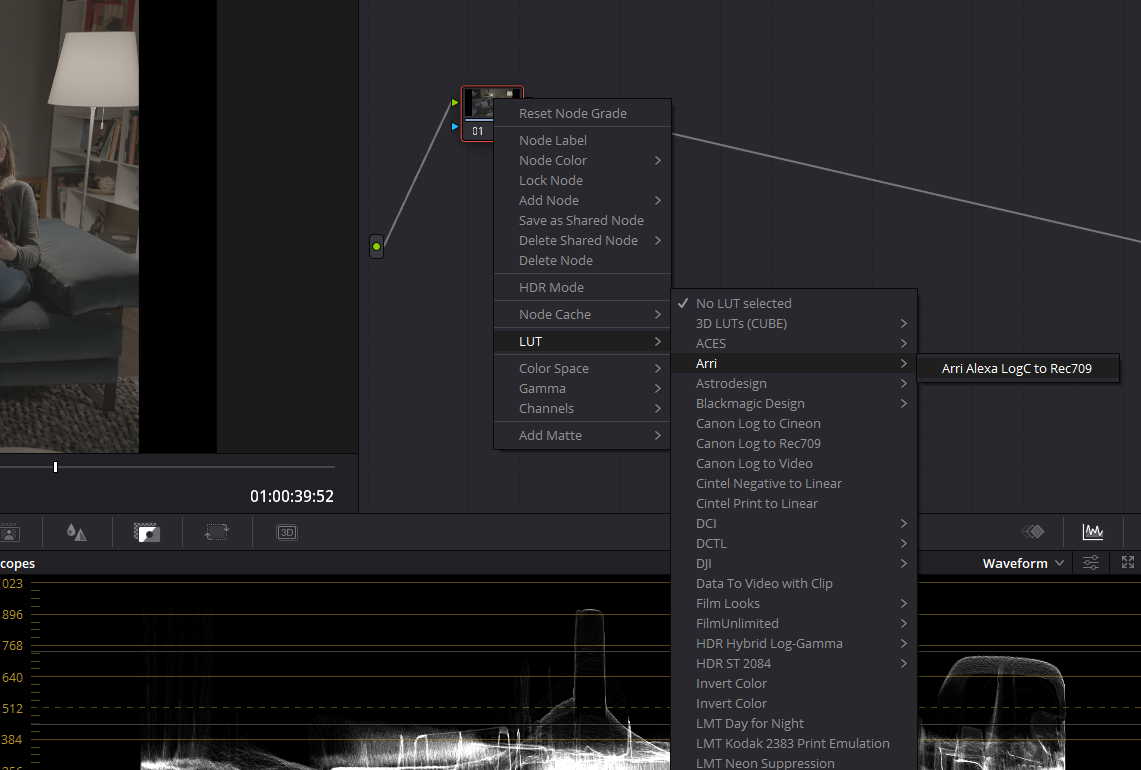
After editing your project, when you come to the color tab, right-click on the Node> Go to LUT> Arri> Choose, Arri Alexa Log C to Rec.709. We have written a detailed guide on Everything About Using LUTs In Davinci Resolve. We recommend you read it too to learn how to apply a LUT in Davinci Resolve.
After applying this LUT, your footage will automatically be graded to Rec.709. You can now go ahead and make another node and start doing your Primary and secondary corrections on it.
New Arri Luts
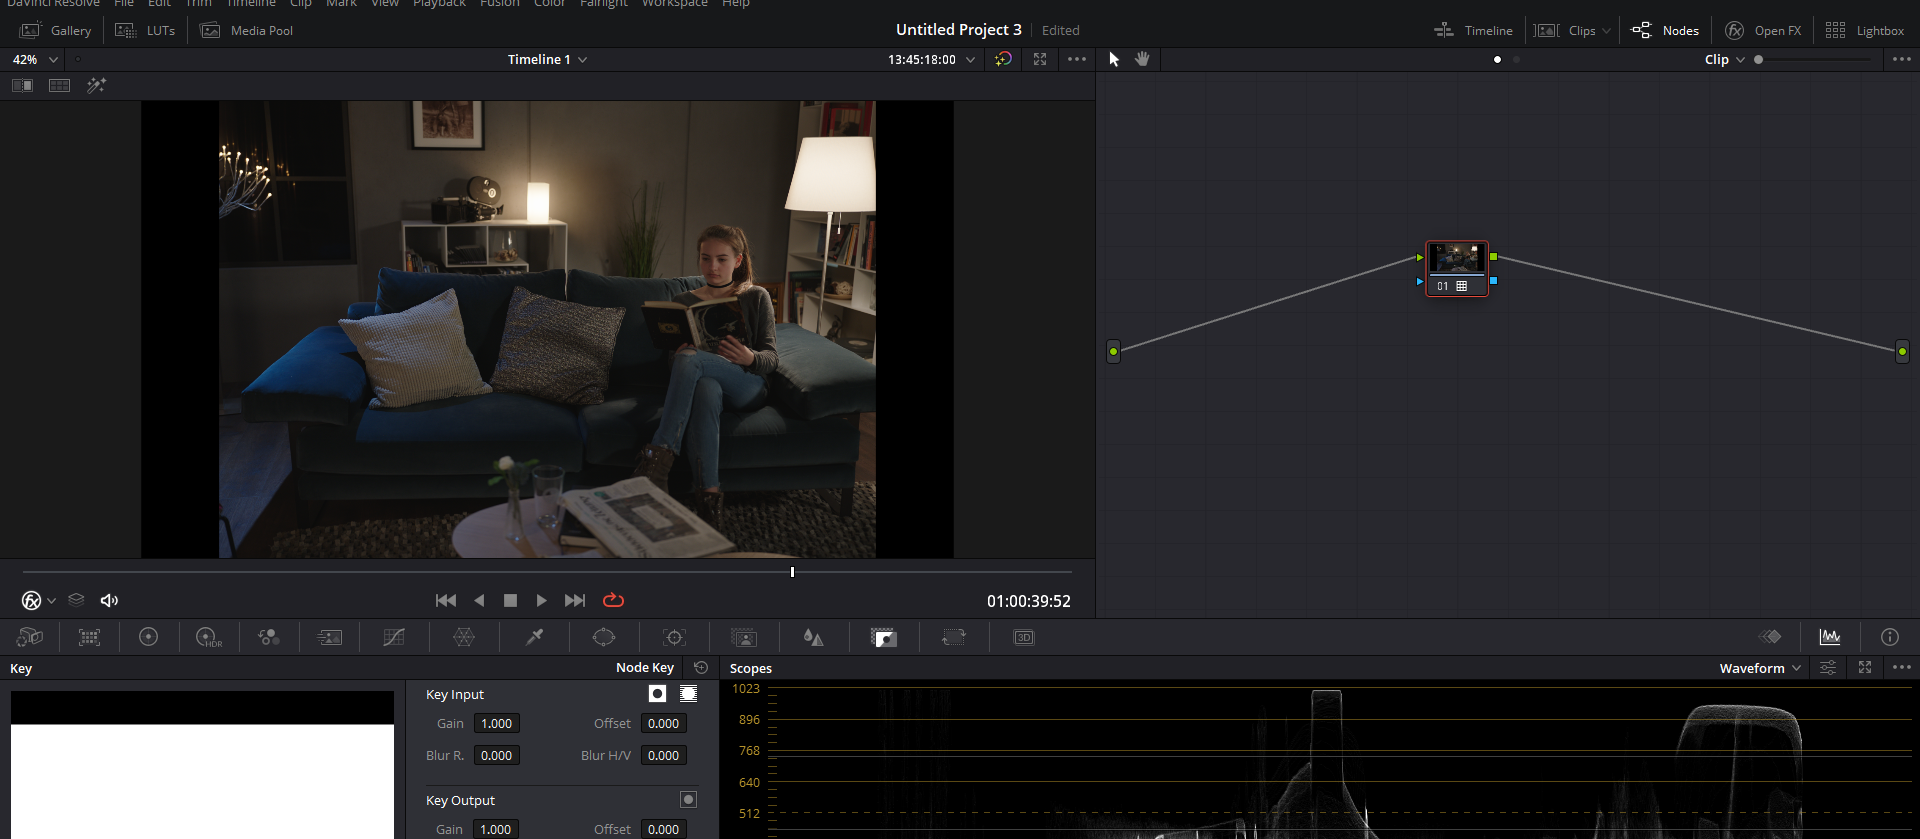
Arri has also made a new version of the LUT, which is not preinstalled in Davinci Resolve. This new version has better black levels and more definitive color rendering science.
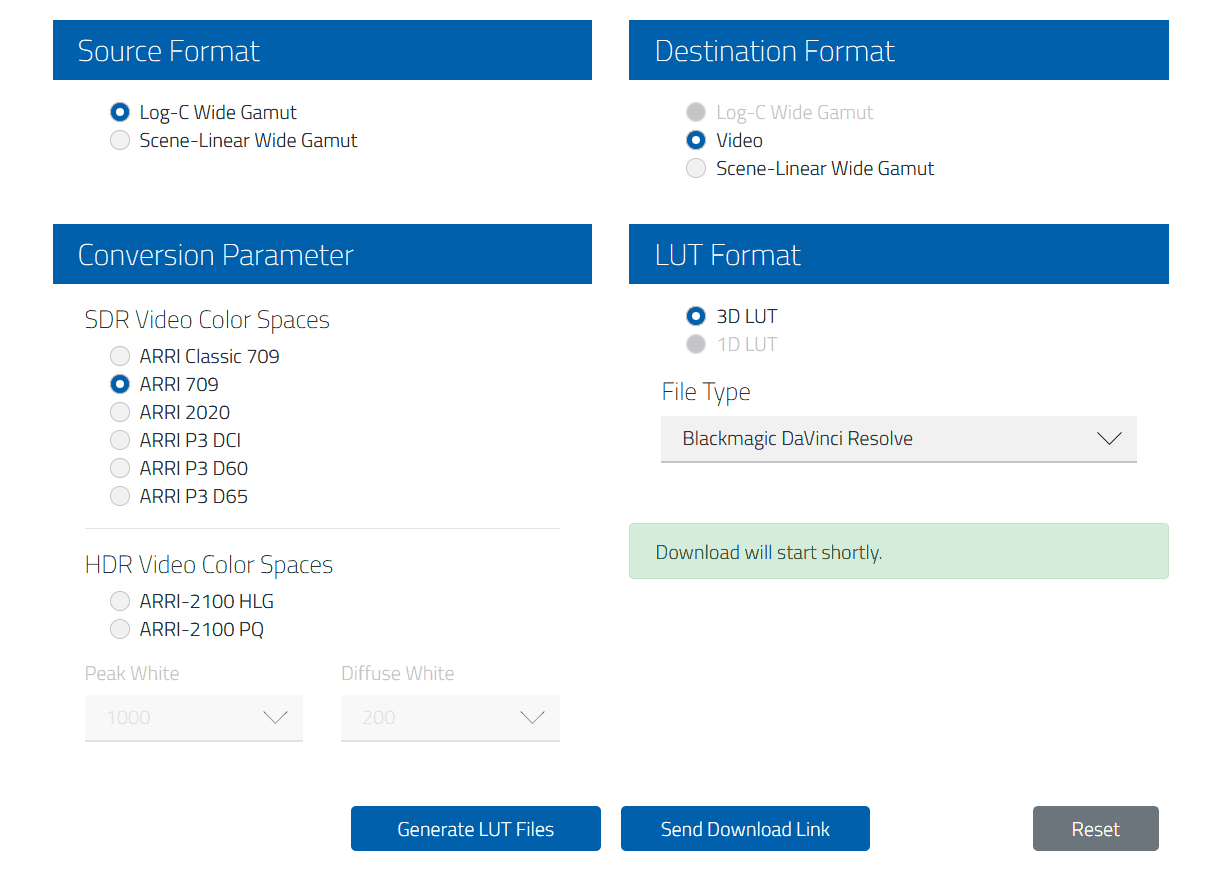
Do I recommend using it? It would be best if you gave it a try. You can use the Arri Lut Generator, download it on your PC, and import it into Davinci Resolve. Try to compare the LUTs and see which one suits you best for your future color grading projects. How to use Arri LUT Generator:
- Go to Arri LUT Generator
- Select Log C for Source Format Option
- Select “Video” in Destination Format
- Select Arri 709 in Conversion Parameter if you are delivering to broadcast standards
- You can select Arri 2020 for HDR projects or Arri P3 for OTT or theatrical projects.
- Select “3D LUT” in LUT format
- Select file type, “Blackmagic Davinci Resole.”
- Click on “Generate LUT files.”
- Extract the zip that gets downloaded, and you will get a “.cube” file.
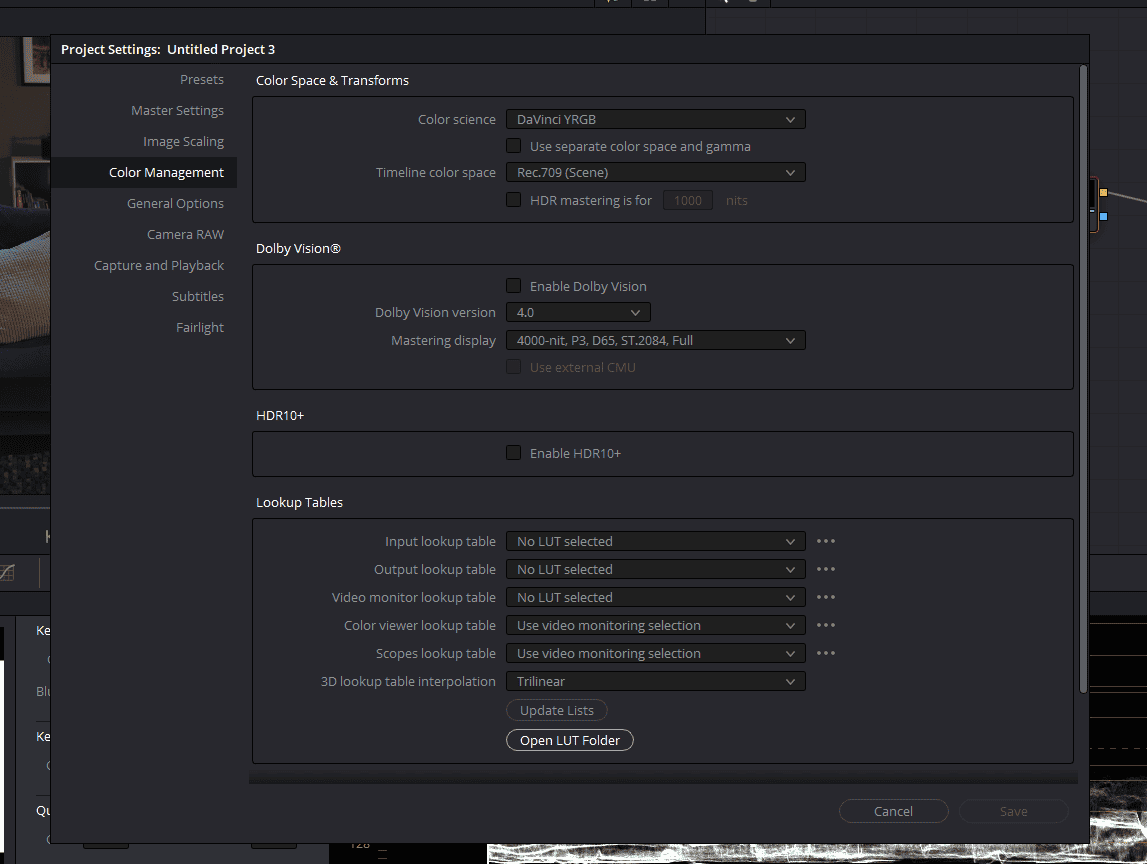
- Open DaVinci Resolve Project Settings from File>Project Settings.
- Go to the Color Management section and select “Open LUT Folder.”
- Copy the LUT in this folder that you just downloaded.
- Head back to Davinci Resolve click “Update Lists.”
- Your new Arri LUT will show up in your LUT list.
2. Color Grade Arri Log C With Color Space Transform
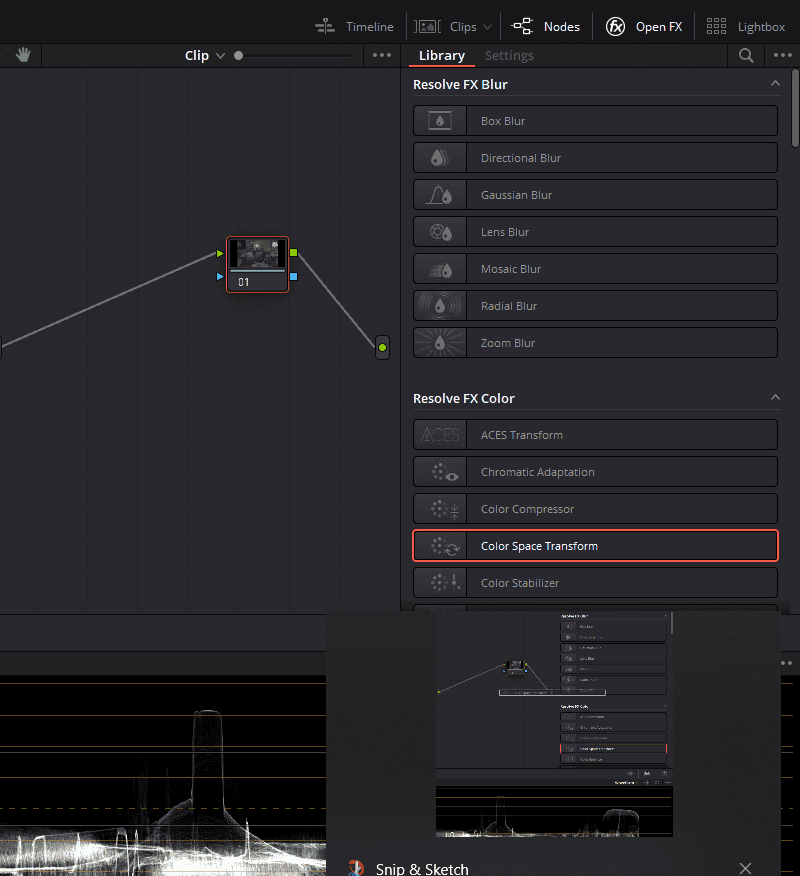
This is hands down my favorite way to Color Grade Arri LOG C. A lot of people are unsure about using LUTs. However, I am not one of them because even the best colorists use LUTs.
I use this method because that makes me not lenient on a LUT. Also, sometimes I get better results using a Color Space Transform OFX that comes with Davinci Resolve.
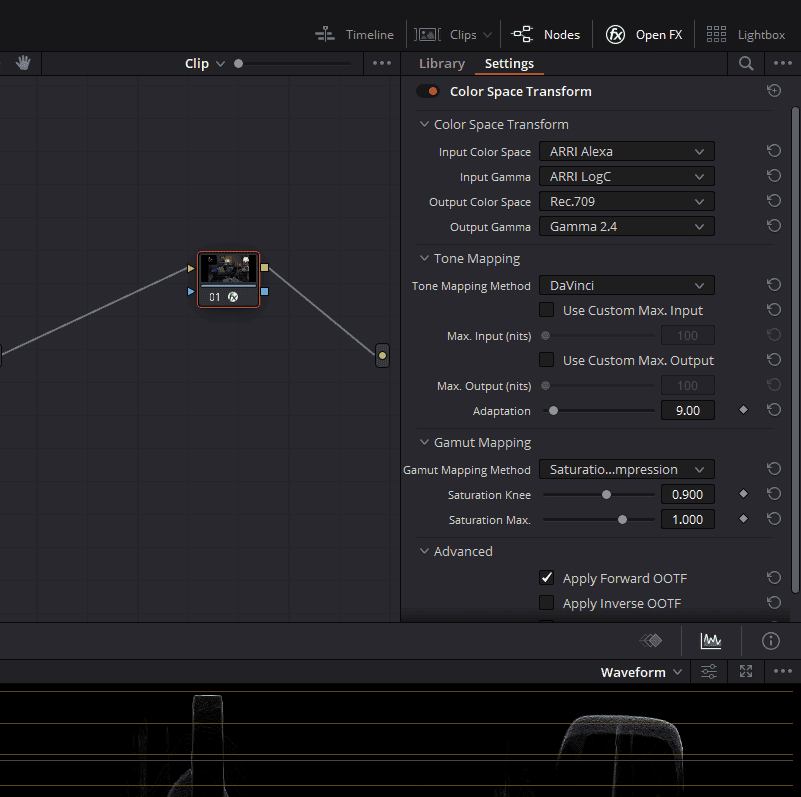
It’s a very advanced plugin that accurately converts your footage from a LOG color space to a delivery format like Rec.709, Rec.2020, or P3. Now, use Color Space Transform OFX to grade Arri LOG C.
- Select a Node and click on “Open FX” from the top right corner. You can use the search option or scroll down and find “Color Space Transform.” Just drag it onto your Node.
- In “Input Color Space,” select “ARRI Alexa.”
- In “Input Gamma,” select “ARRI LOG C.”
- In “Output Color Space” select Rec.709
- In “Output Gamma” select “Gamma 2.4.”
- You can select different Output color space and gamma if you deliver an HDR project.
- Make sure “Davinci” is selected in the “Tone Mapping Method.”
- Select “Saturation Compression” in “Gamut Mapping Method.”
You will now see your Arri LOG C is converted to Rec.709. This OFX converts your footage from one color space to another using advanced maths and processing.
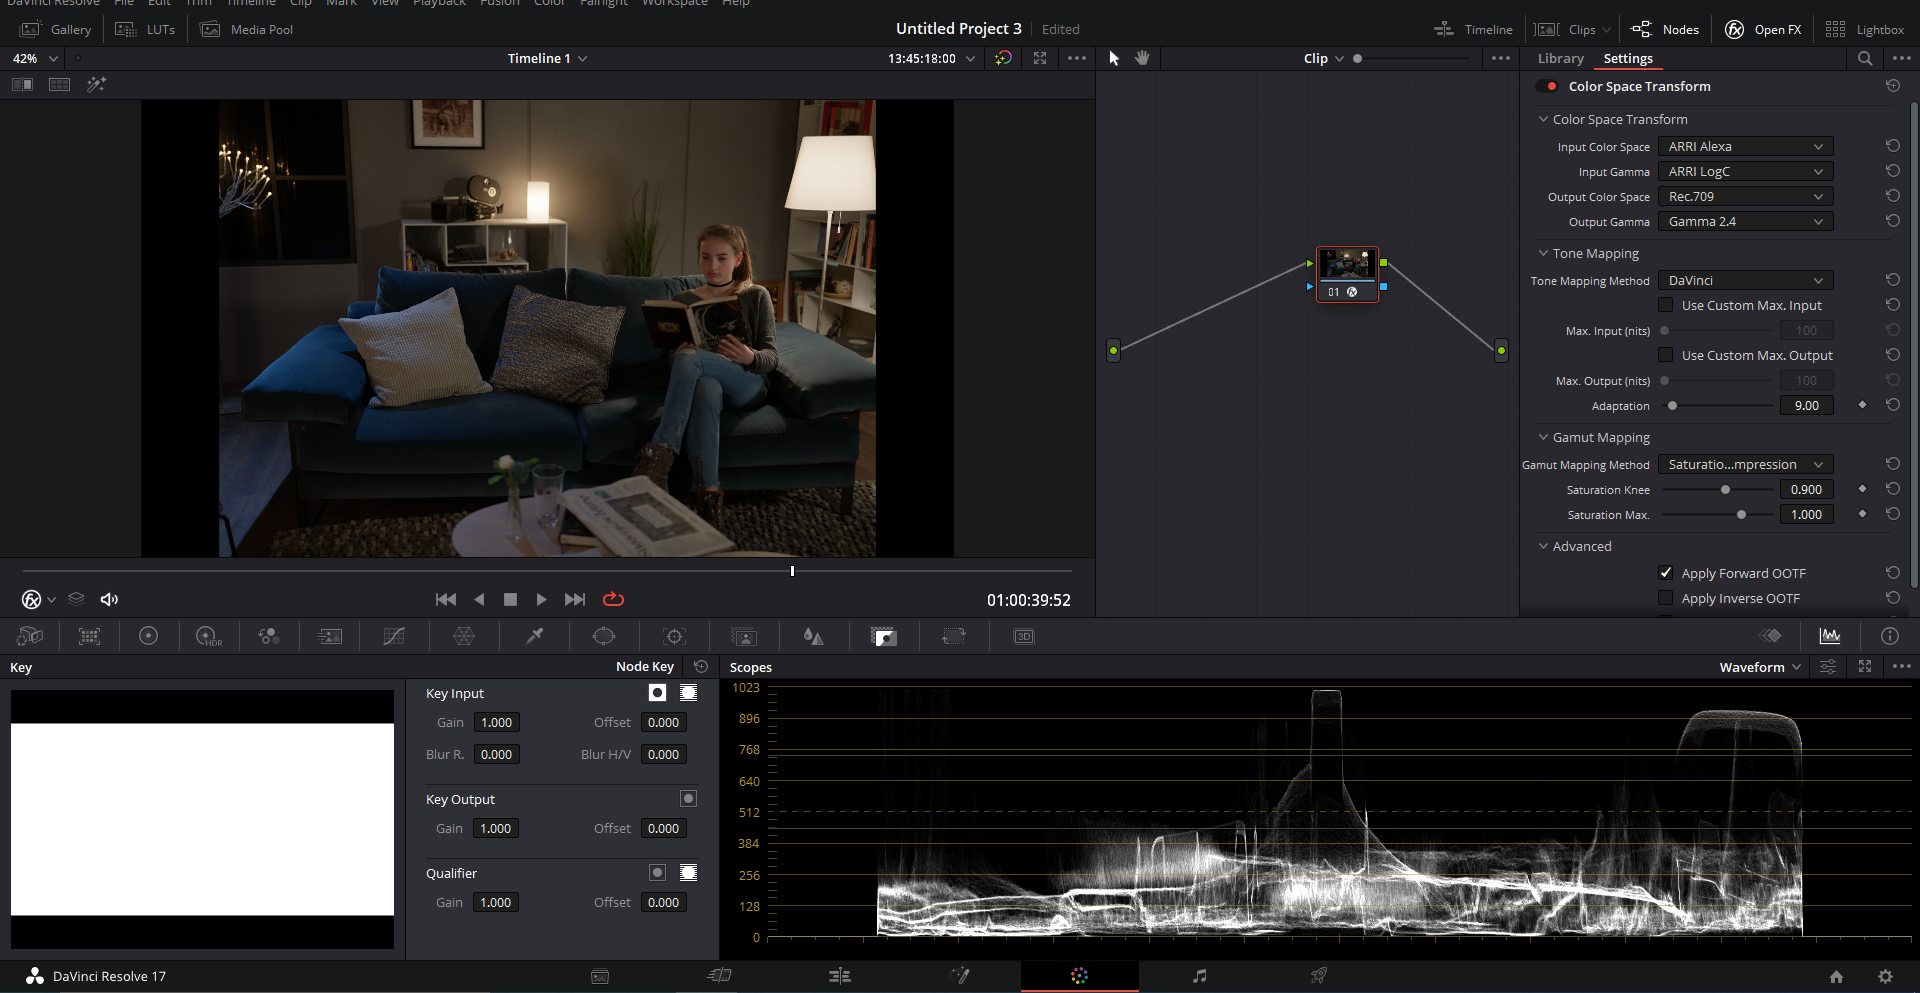
This method is also non-destructive, so you will not lose any data even if you have clipped it. Use your primary color grading tools like Lift, Gamma, and Gain wheel and pull back the image.
It must be evident that you cannot retrieve the data your camera never captured. So make sure you expose well on the set.
3. Color Grade Arri Log C Using ACES Pipeline

Now that we have covered two ways of color grading Arri LOG C, this third method is very advanced. Using this method, you color grade and keep your projects future-proof.
Supposedly your clients want a Rec.709 delivery now, and he comes to you after a year demanding an HDR version of the project. All you have to do is change a few settings, and you are good to go.
ACES, or Academy Color Encoding System, is a color management system made by Oscar to introduce a color standard throughout the film industry. It has a very filmic quality, especially the contrast.
Many professionals have started using an ACES workflow for all their projects and love it. But a lot of people hate it. They believe that the starting point is extreme, and their primary color grading tools behave strangely in ACES color space.
The best way to find out is to experiment with it and see by yourself if it fits your workflow. I am not a big fan of this workflow. So, how to color grade ARRI LOG C using ACES? It’s effortless indeed!
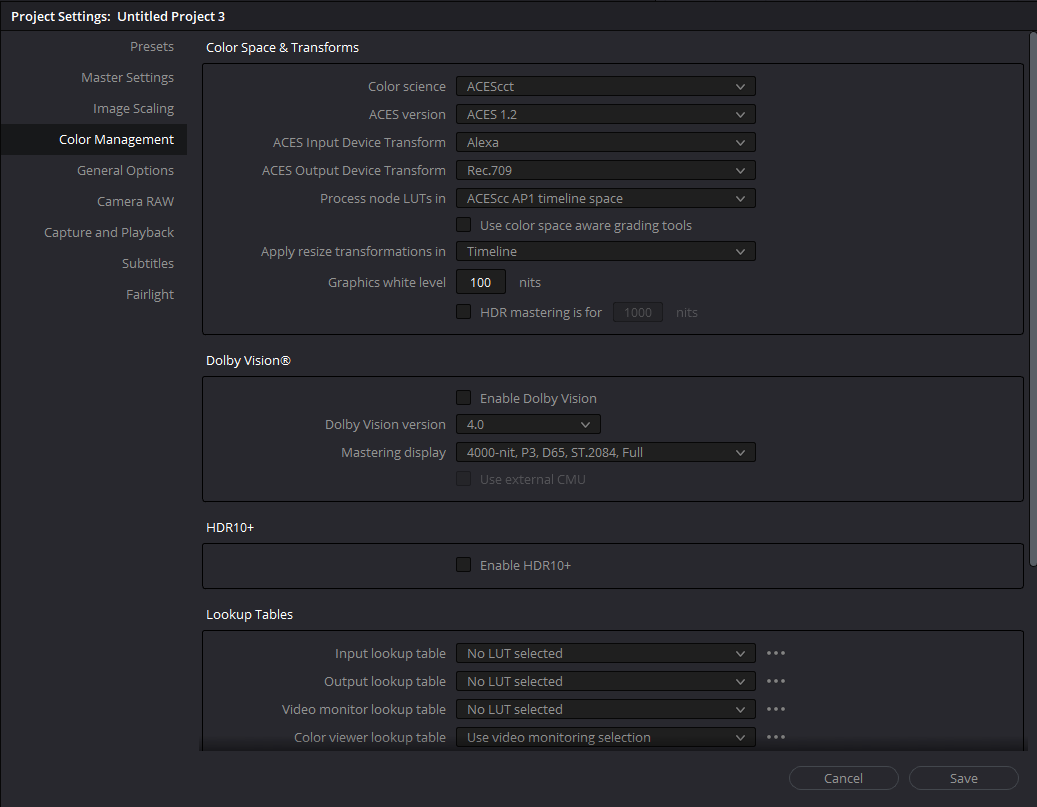
Keep in mind that this is a project-wide system once you correctly select your settings. It will affect all the clips present in the timeline. Using this method makes your whole color grading process more manageable, and that is why it is called a Color Grading Pipeline.
Follow these steps to Color Grade Arri Log C Using ACES Pipeline:
- Go to File>Project Settings and select “Color Management” from the menu on the left.
- Select “ACEScct” from the Color Science drop-down menu.
- In the ACES version option, select the latest version your Davinci Resolve has.
- In “ACES Input Device Transform,” select “Alexa” from the drop-down menu.
- In “ACES Output Device Transform,” select “Rec.709.” If you want to deliver HDR choose from the other options.
- Hit Save.
After clicking on the Save button, you will see all the footage present on your timeline will get converted to Rec.709, and you can start color grading it.
Your primary color grading tools like Lift, Gamma, Gain, and the Offset will behave a little differently. It will take some time to get used to it.
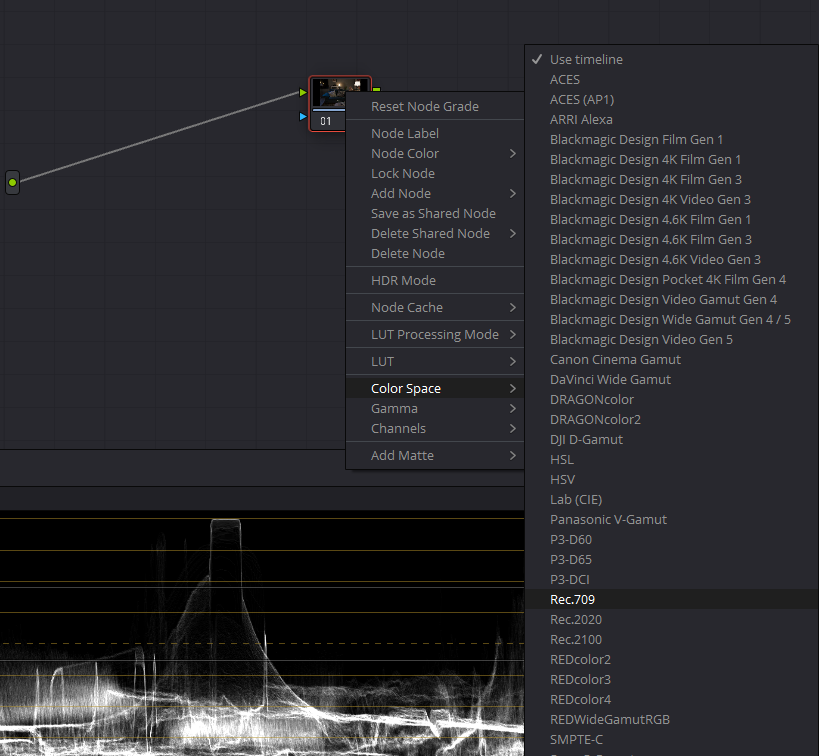
Many people don’t like using ACES color management because their primary wheels behave strangely. If you want your Primary Wheels to behave normally, you can change the color space of a node and work on it. To transform the color space of a node:
- Select a node and right-click on it
- Go down in the menu, hover over “Color Space,” and select Rec.709 from the options.
- Now hover over “Gamma” and select Rec.709.
- You have now changed the color space of a node, and this Node will behave commonly like it used to.
4. Color Grade Arri Log C with Davinci Resolve Color Management
This newer and most sophisticated workflow to color grade Arri Log C using the “Davinci YRGB Color Managed” workflow. There are multiple ways to utilize this method. The best part about using this method is that Davinci Resolve automatically recognizes if the footage is shot in Arri Log C and does a Rec.709 conversion.
This way, you get a good starting point and focus on the creative intent of your project. Follow the steps given below to setup the workflow:
- Click on the gear-looking icon in the bottom right corner to open “Project Settings”
- Head to “Color Management”
- In the “Color Science” dropdown menu, select “Davinci YRGB Color Managed”
- Keep the ‘Automatic color management’ box checked.
- In “Color Processing Mode”, choose “SDR”
- For “Output Color Space”, choose “Rec.709 Gamma 2.4”
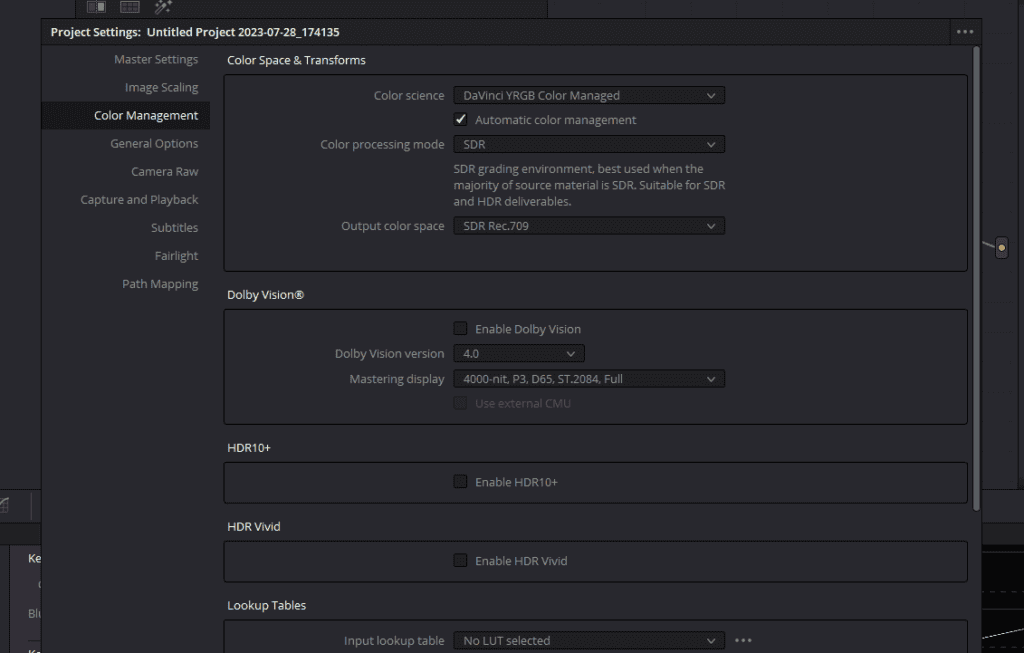
Of course, you can change the “Output Color Space” to whatever delivery platform color space requirement is. When you click on “Save”, Davinci Resolve will automatically recognize all the Arri Log C footage in the timeline and color grade for you.
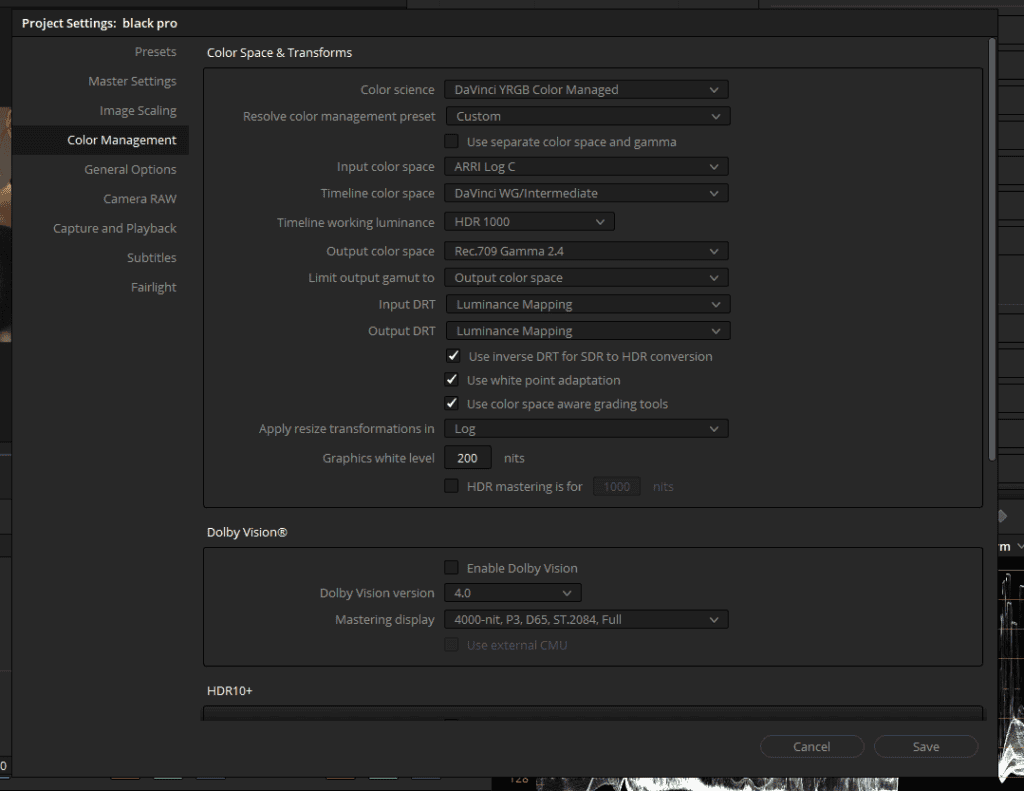
If you have transcoded your Arri Log C footage, chances are that Davinci will not be able to recognize the Log-C automatically. In that case, do the following:
- Head to Project Settings>Color Management.
- In the Color Science dropdown menu, choose Davinci YRGB Color Managed
- Untick ‘Automatic color management’
- In ‘Color Processing Mode’, choose “Custom”
- This will give you more advance options to control your workflow
- In the “Input Color Space” dropdown menu, choose “Arri Log C”
- In “Timeline Color Space”, choose “Davinci WG/Intermediate”
- In “Output Color Space”, choose “Rec.709 Gamma 2.4”
- Click on “Save”
Which is the best way of Color Garding Arri LOG C In Davinci Resolve
After reading it all the way, you must doubt which one can be the best way. Experimenting with all the methods is the best advice I will give.
Keep this mind that Filmmaking is an art form, and there are no hard-set rules to do a job. Try and see which one gives you the most optimal quality. After all, you are color grading Arri’s footage. Quality should always be your top priority.
I like the Color Space Transform method, it gives me more manual control over my footage, and I can color grade it with an artistic vision. But because I have been grading for many years now, I feel more comfortable with it.
The best option for you to master is to learn the ACES workflow. It is the most advanced step you can take as a colorist and a filmmaker.


