
Hi, I’m Salik, the author of FilmmakingElements.com. I have been a filmmaker for over 10 years. I am also a certified DaVinci Resolve Trainer and I have used DaVinci Resolve for many of my projects. Today, we’re taking a deep dive into the world of screen replacements within DaVinci Resolve, an essential and often underutilized post-production technique in film and television.
Despite the frequency of its usage in the industry, many filmmakers may be surprised by the relative simplicity of executing a believable screen replacement. The primary challenge lies not in the act itself, but in creating an authentic and immersive final product.
We’ll begin this tutorial by launching DaVinci Resolve and walking you through the process of replacing a screen on any device of your choosing – from televisions to tablets, and even mobile phones. Moreover, we’ll share some valuable insider tips on enhancing the realism of your scenes, such as the incorporation of artificial reflections.
Before we proceed, ensure that you have the following elements ready:
- Your plate, which is the shot containing the screen to be replaced.
- The media you intend to replace the original screen with, which could be another video or an image.
Step 1: Assembling and Editing Your Assets in DaVinci Resolve
Once you have collected all the necessary assets for your screen replacement project, the next step is to head to the Edit page and import them into DaVinci Resolve and commence the editing process. In this section, we’ll guide you through the process of assembling your timeline and getting your screen replacement footage ready.
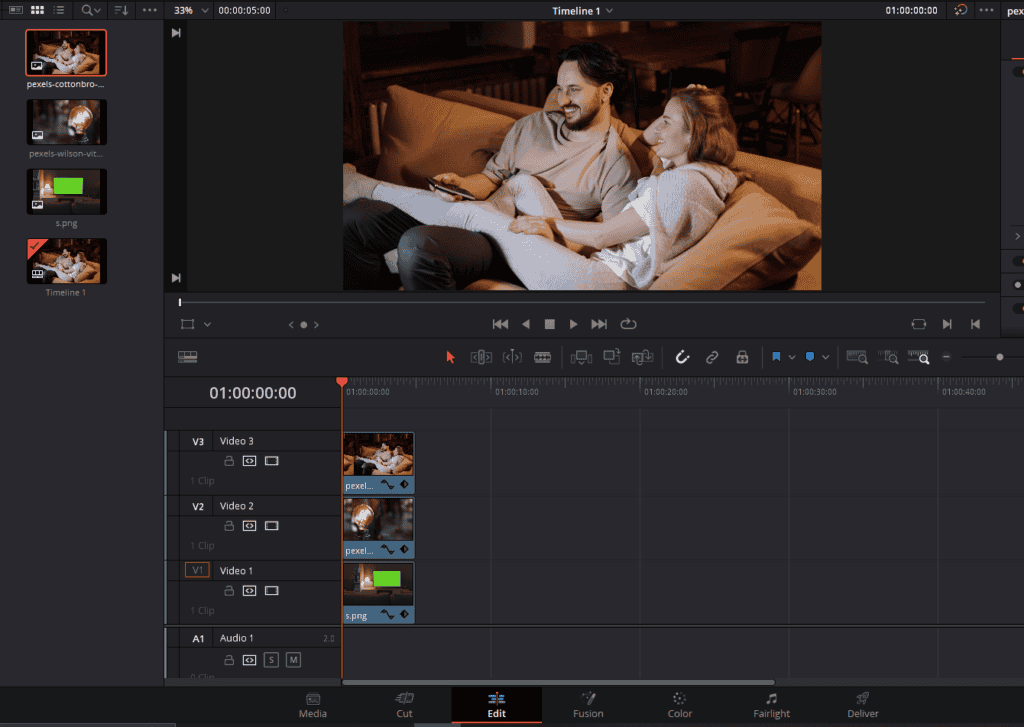
- Import the ‘plate’: Begin by importing your ‘plate’, the footage containing the screen you intend to replace on Video Track 1. While it’s not a strict requirement for these screens to be green screens adorned with tracking markers, it can simplify the process, especially for beginners.
- Import the replacement media: After importing the plate, bring in the media that you plan to use as the replacement for the original screen on Video Track 2.
- Adjust the lengths of your clips: After importing all the elements, you might notice a disparity in the lengths of your various video clips and photos. It’s crucial for the smooth flow of your video that all elements align in terms of duration. You can easily adjust the lengths of your clips within DaVinci Resolve by dragging the ends of the clips to your desired length.
Remember, the essence of screen replacement lies in meticulous planning and precision in editing. The objective is to maintain a seamless blend of all elements to produce a convincing end product. Stay tuned as we proceed to the next stage of the process.
Step 2: Navigating the Fusion Page: Organizing and Labeling Nodes in DaVinci Resolve
Once you’ve aligned and synchronized all your clips in the timeline, the next step involves creating a Fusion clip for the subsequent editing in DaVinci Resolve’s Fusion page. This page is a robust visual effects and motion graphics workspace within the software. Here’s a step-by-step guide on how to navigate this important phase:

- Creating a Fusion Clip: Select all your synchronized clips, right-click on them, and select ‘New Fusion Clip’ from the context menu. Make sure this newly created Fusion clip is selected and place your playhead at the beginning of your timeline.
- Accessing the Fusion Page: Navigate to the Fusion page by clicking on the ‘Fusion’ button, typically located in the middle of the toolbar at the bottom of the screen.
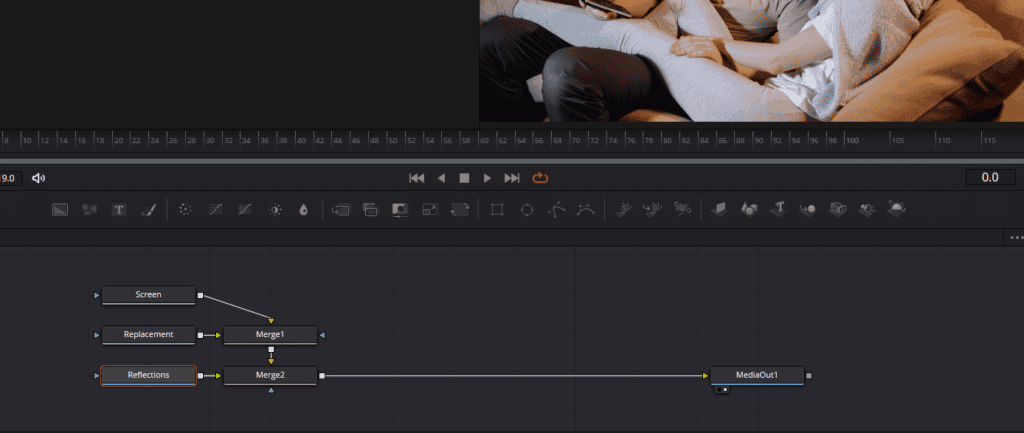
- Labeling Nodes: To maintain an organized workflow in the Fusion page, it’s crucial to label your nodes accurately. This labeling helps you to keep track of the components of your screen replacement project and prevents any confusion that may arise due to the complexity of the task.
- In Fusion, if multiple clips are combined into one Fusion clip, the ‘MediaIn’ number will correspond with the video track number in the edit page. Therefore, ‘MediaIn1’ would represent the clip on video track one, ‘MediaIn2’ would be the clip on video track two, and so forth.
- Assign appropriate names to each ‘MediaIn’ node. For instance, ‘MediaIn1’ might be the footage of the original screen to be replaced, so you could label it as ‘Screen’. To rename a node, select it, press ‘F2’ on your keyboard, type the new name, and hit enter.
- Similarly, rename the other ‘MediaIn’ nodes as per their content. For instance, ‘MediaIn2’ could be the screen replacement clip.
By keeping a clean and well-organized workspace, you can enhance your efficiency and minimize errors during the screen replacement process. Up next, we’ll delve deeper into the fusion workflow to give you a complete understanding of this creative process.
Step 3: Utilizing the Planar Tracker in DaVinci Resolve
After labeling and setting up the nodes on the Fusion page in DaVinci Resolve, the next stage of the screen replacement process involves modifying the layout of the nodes and leveraging the Planar Tracker feature. This sub-topic will provide a detailed walkthrough of these critical steps.
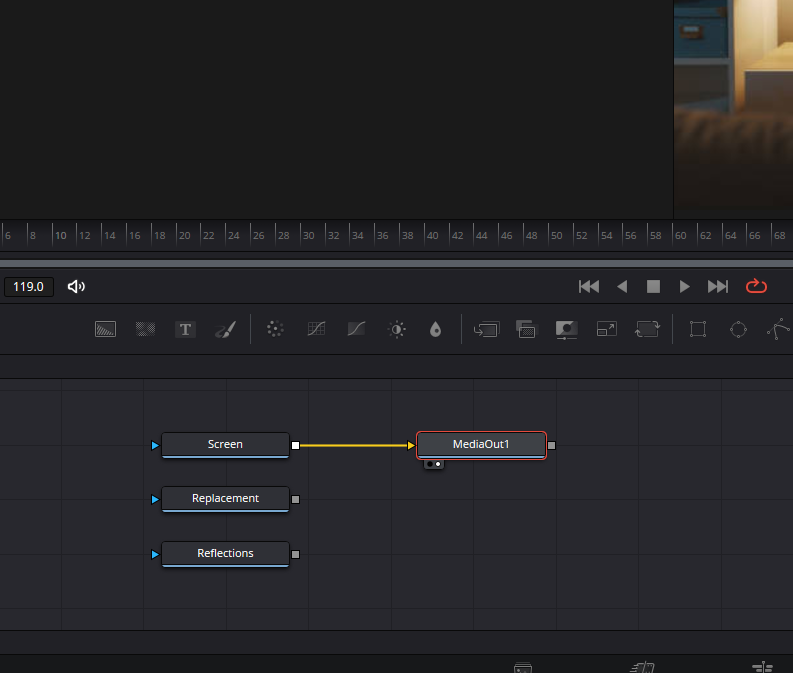
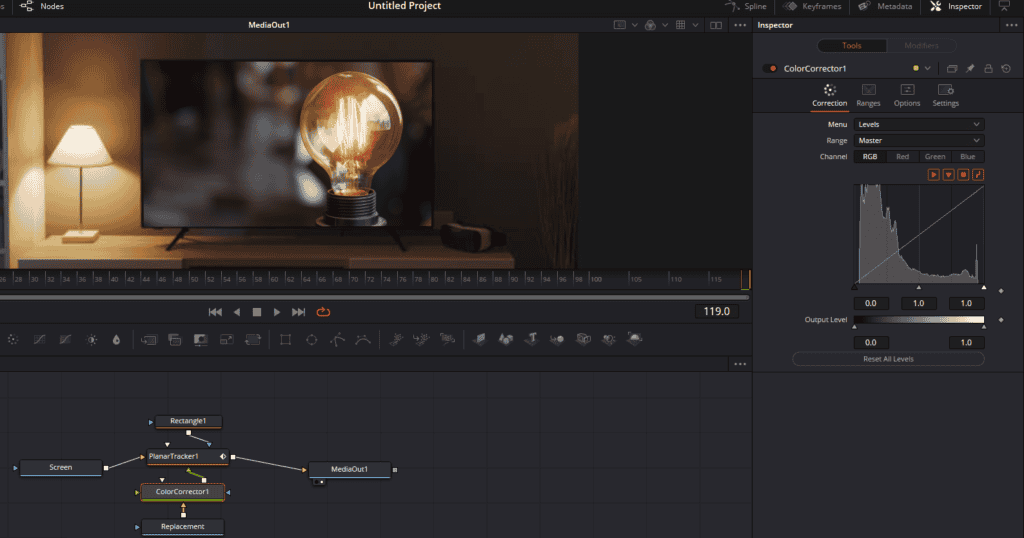
- Rearrange Nodes: The default layout will have all clips going into merge nodes and then into the media out node. This won’t suit our purposes, so the first step involves deleting all merge nodes and connecting the ‘Screen (MediaIn1)’ node directly to the ‘MediaOut’ node.
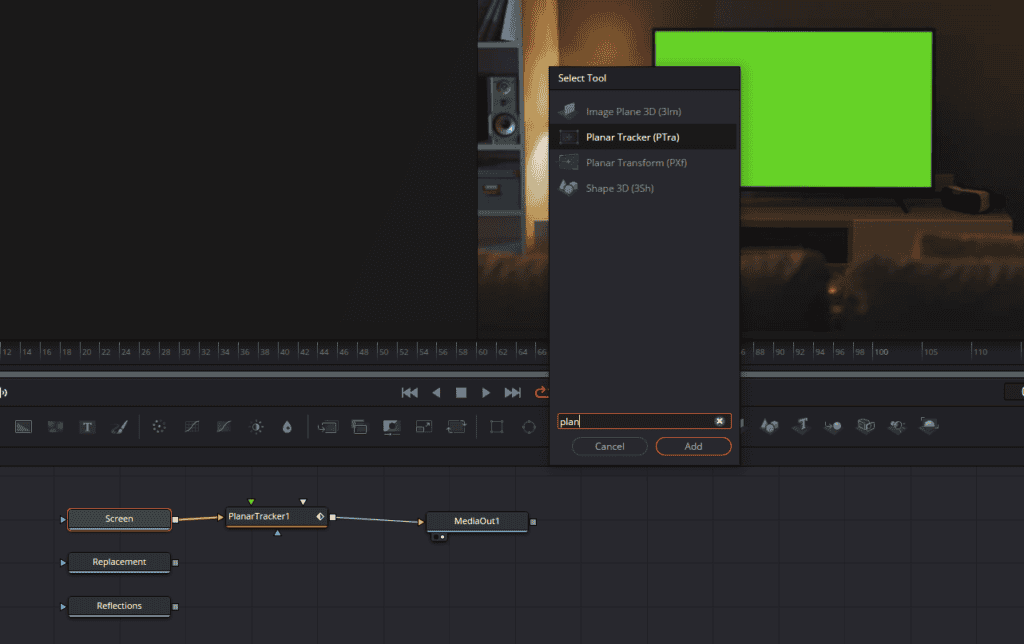
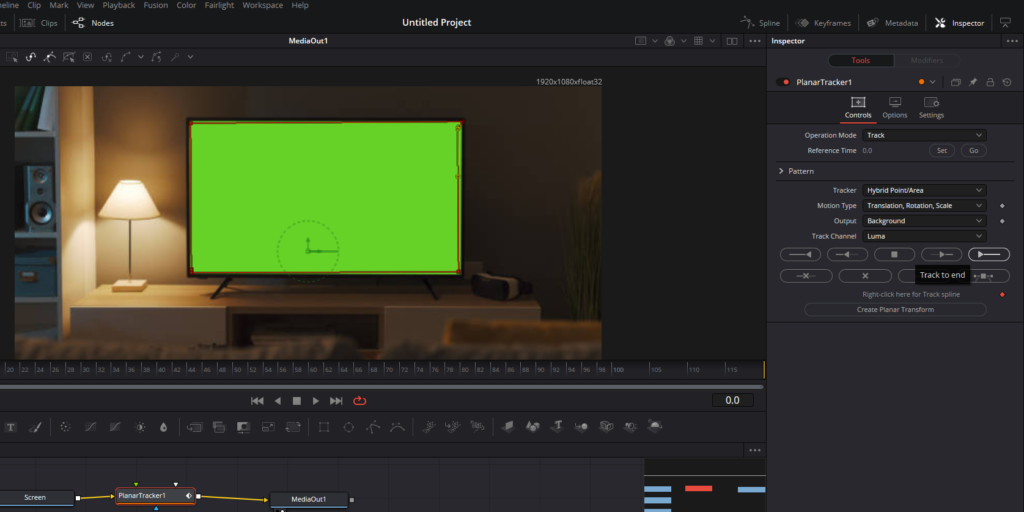
- Add a Planar Tracker: To add a Planar Tracker to the workflow, select the ‘Screen’ node, hit ‘Shift + Space’ on your keyboard to bring up the tool selection, type ‘PLAN’ to locate the Planar Tracker, select it, and press enter. This action will insert the Planar Tracker between the ‘Screen’ node and the ‘MediaOut’ node.
- Configure the Planar Tracker: With the Planar Tracker node selected, draw a box around the screen in your footage. It doesn’t have to be perfect. After that, head over to the ‘Inspector’ panel on the top-right corner and keep the ‘Operation Mode’ as ‘Track’. Change the ‘Tracker’ option from ‘Point’ to ‘Hybrid Point Area’ and modify the ‘Motion Type’ to track ‘Translation’, ‘Rotation’, and ‘Scale’. Keep the ‘Output’ as ‘Background’ and the ‘Track Channel’ as ‘Luma’. Make sure your playhead is at the beginning of your composition and then hit ‘Track To End’ button.
- Successful Tracking: After the tracking process, you should see a lot of keyframes appearing on your timeline. This is an indication that your screen has been successfully tracked.
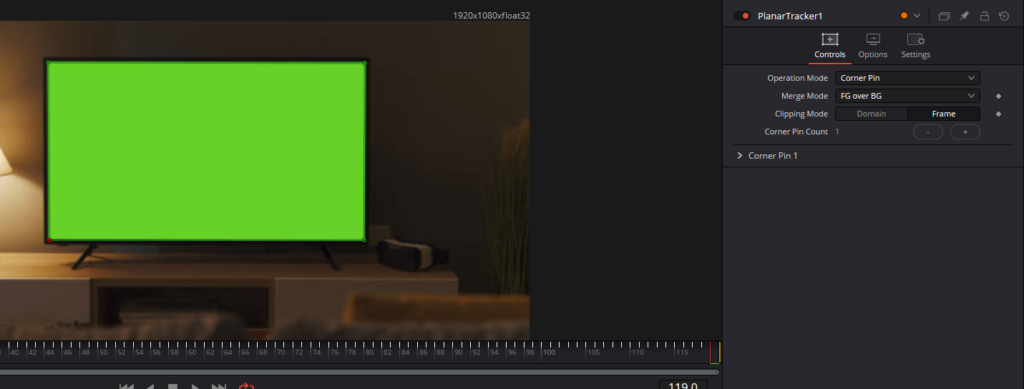
- Switching Operation Mode: Now, with the Planar Tracker selected, head back to the ‘Inspector’ panel and change the ‘Operation Mode’ from ‘Track’ to ‘Corner Pin’. Adjust the size of the box to align it with the corners of your screen as closely as possible. It doesn’t have to be perfect but try to get it as accurate as you can.
Step 4: Replacing the Screen and Refining the Track in DaVinci Resolve
Having successfully tracked the original screen in the previous steps, the next stage involves replacing the screen with the desired media and further refining the track for a more accurate result. Here’s a step-by-step guide to accomplishing these tasks:
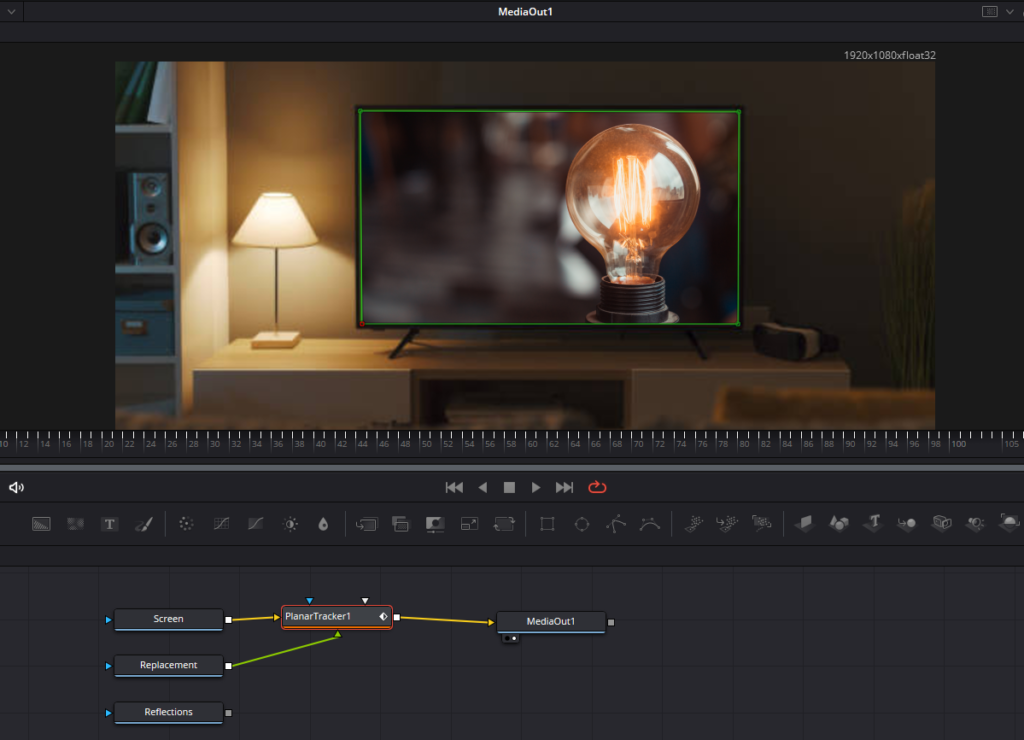
- Replace the Screen: First, you need to connect your screen replacement media (i.e., ‘MediaIn2’ containing the new content) to the Planar Tracker node. To do this, simply drag the output (square box on the right of the node) of the ‘Replacement’ node to the Planar Tracker. At this point, you should notice that your original screen has been replaced with the new content. However, it might not be perfect yet, as you may still observe some undesirable edges.
- Adjust the Planar Tracker: To rectify the green edges around your screen replacement, select the Planar Tracker node and adjust the corners as necessary. Take your time to finesse this until the screen replacement fits snugly within the boundaries of the original screen. Once you’re satisfied, play back the sequence to observe the replaced screen. If done correctly, you should have a smooth and accurate screen replacement.
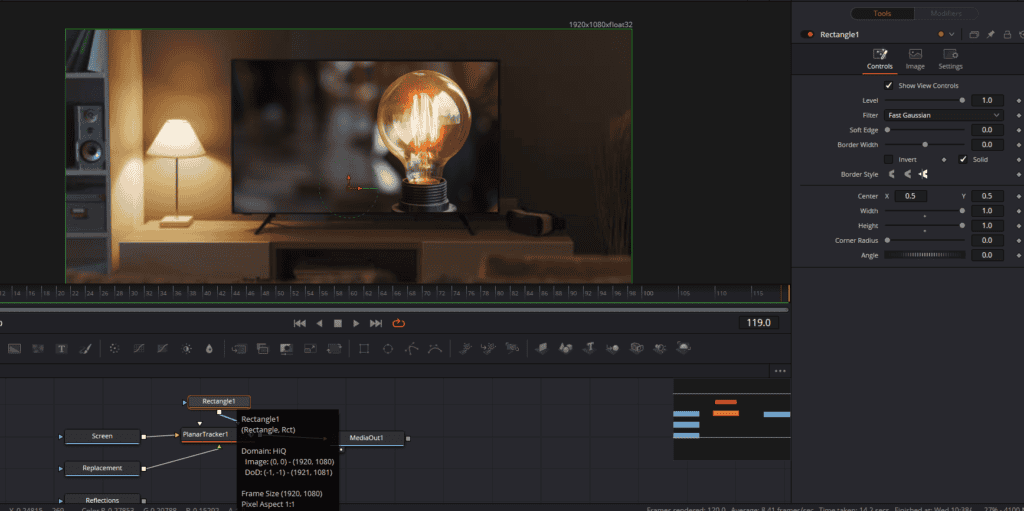
- Refine the Track with a Rectangle Mask: To ensure the screen replacement remains in its place throughout the sequence, add a rectangle mask to the Planar Tracker. After selecting the Planar Tracker, add a ‘Rectangle’ from the toolbar, or simply hit ‘Shift + Space’ and type ‘Rectangle’ to find it. Once added, go to the ‘Inspector’ panel and change the width and height parameters of the rectangle mask to ‘1’. This adjustment results in a refined, more accurate track, enhancing the overall quality of the screen replacement effect.
With these steps completed, you have successfully replaced the screen in your footage, ensuring a natural and convincing effect.
Step 5: Enhancing the Realism of Screen Replacement in DaVinci Resolve
After successfully replacing the screen, the next task is to enhance the realism of the new content. The goal is to seamlessly integrate the new screen into the existing scene. Here are the steps to accomplish this:
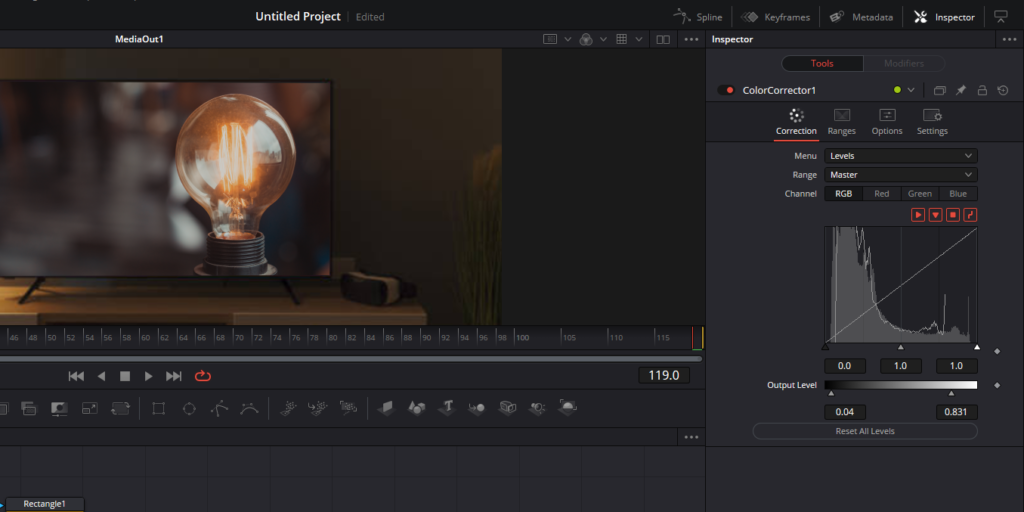
- Matching the Contrast: At this stage, the replaced screen content might look distinct from the rest of the image, giving it an unnatural ‘comped in’ look. The first step in rectifying this is to adjust the contrast of the screen content. To do this, add a ‘Color Correction’ node to the ‘Replacement’ node. Click on the ‘Replacement’ node, hit ‘Shift + Space’, and type ‘Color Corrector’ to find it. Switch to the ‘Levels’ option in the ‘Color Correction’ node’s Inspector settings from the top-right corner. Now, play around with the black and white points in the ‘Output Level’ until the replaced screen looks like an integral part of the overall image.
Conclusion
In conclusion, we want to extend our heartfelt gratitude to you for taking the time to read and engage with our comprehensive guide on screen replacements in DaVinci Resolve. We hope that these step-by-step instructions and tips prove to be valuable resources for your future projects. Remember, the art of screen replacement, like any other filmmaking skill, improves with practice and patience. Thank you once again for joining us in this deep dive into filmmaking techniques. We wish you the best in all your creative endeavors. Happy filmmaking!