Welcome back, in this article we are covering how to create a pro mist filter effect in Davinci Resolve. It can help you achieve that dreamy look as well. So let’s go.
Have you ever wondered how to achieve that dreamy, soft-focus look in your videos without breaking the bank on expensive filters? You’re in luck! Today, we’re diving into the world of the Pro-Mist filter effect within DaVinci Resolve’s color page. Stick around as we reveal the secret to getting this effect without attaching anything to your camera lens.
What is a Pro-Mist Filter?
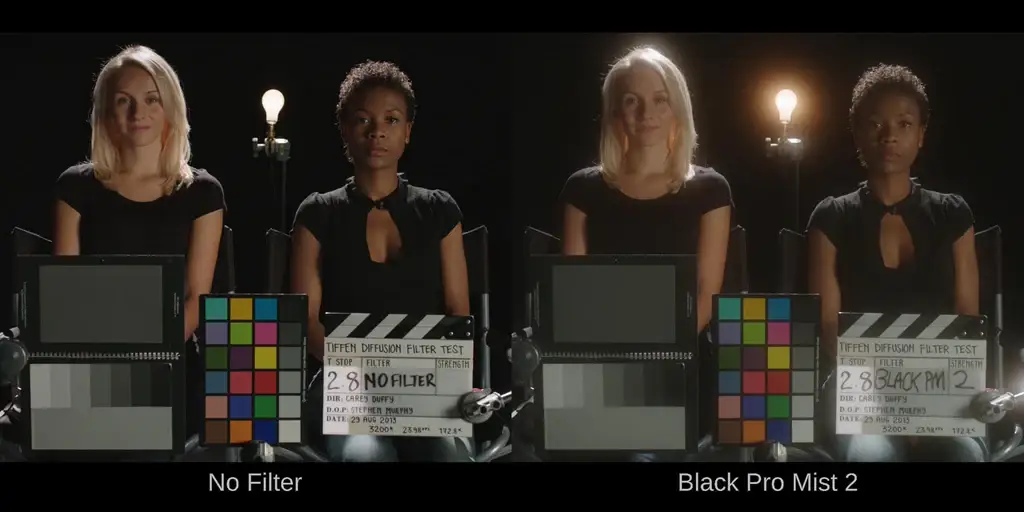
A Pro-Mist filter is like any other filter that you screw onto your camera lens, such as ND filters or polarizers. Its main purpose is to soften highlights and create a more dreamy, cinematic appearance in your footage. Sounds enticing, right? But before you reach for your wallet, let’s consider some potential drawbacks.
Drawbacks of Using a Physical Pro-Mist Filter:
- Permanent effect: Once you’ve shot your footage with a Pro-Mist filter, the effect is baked in, and there’s no going back. If you decide later on that you want a crisper, more defined look, you’re out of luck.
- Cost: High-quality Pro-Mist filters don’t come cheap. You’re looking at $200 or more per filter, which can quickly add up if you need various strengths or sizes.
5 Ways To Create Pro Mist Filter Effect In Davinci Resolve
1. Mist Effect With Gaussian Blur with Advanced Customization
- Begin by launching your project in DaVinci Resolve and heading to the color page containing the clip you want to enhance with the pro mist effect.
- If you have any LUTs applied to the clip, deactivate them to ensure you start with a clean and neutral base for your adjustments.
- Initiate the process by creating a serial node: select the first node, press “Alt + S,” and then generate a layer node and a layer mixer by hitting “Alt + L.”
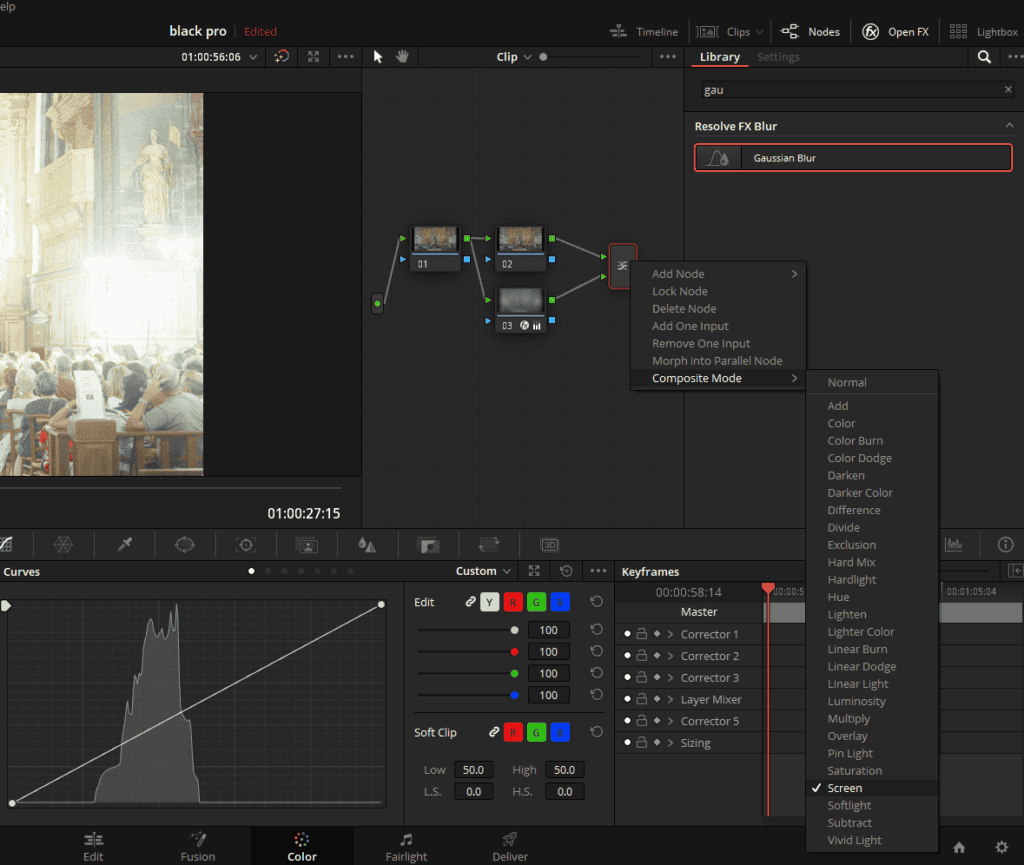
- Next, navigate to OpenFX, locate Gaussian Blur, and drag it onto node number three.
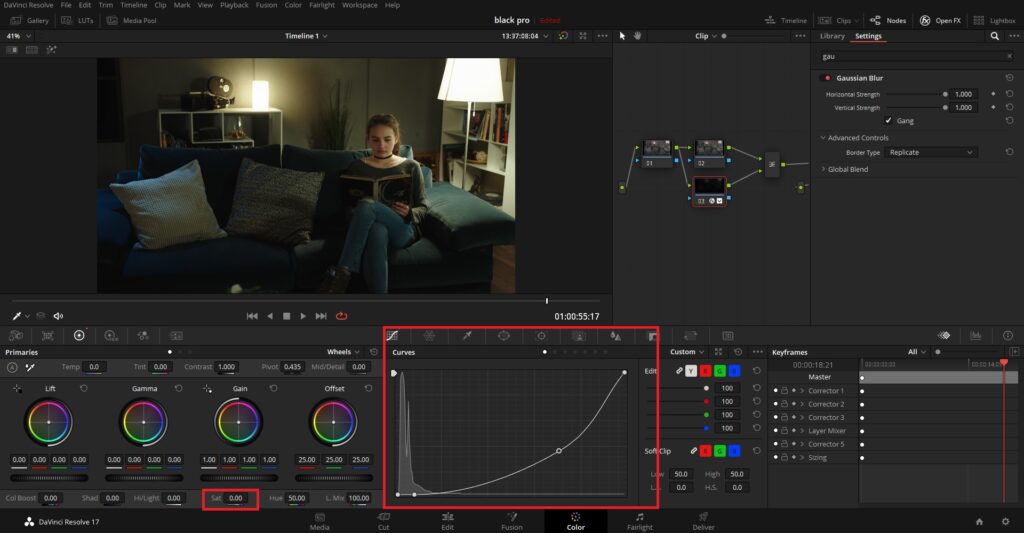
- Customize the Gaussian Blur settings by reducing the horizontal and vertical strength to their maximum. To prevent any unsightly black borders, switch to the advanced controls and alter the “border type” to “Replicate.”
- Keeping node three selected, access the Primaries tab and lower the saturation until your image transforms into black and white.
- Right-click the layer mixer, select “Composite Mode,” and modify it to “Screen.” Your image should now exhibit a blurry, dream-like appearance.
- Fine-tune the effect by visiting the Curves tab and manipulating the highlights and shadows using the white point and black point handles. Spend some time experimenting with these settings to achieve the desired level of dreaminess in your footage.
- To keep your project organized and efficient, select the serial node, layer node, and layer mixer you created earlier. Right-click on one of them, and choose “Create Compound Node.” This action will group the nodes together, making your node tree cleaner and more manageable.
- Lastly, preview your clip to ensure the Pro-Mist filter effect meets your expectations. If necessary, make further adjustments to perfect the look.
With this first method, you’ll have ample control over the intensity of the dreamy effect on your highlights and shadows, allowing for a truly customized result.
2. Creating a Pro-Mist Effect with the Glow OFX In Davinci Resolve
We will walk you through how to add a mist effect to your footage using DaVinci Resolve’s Glow effect. This technique works exceptionally well for scenes featuring sunlight, flares, or practical lights, giving your visuals a beautiful and cinematic touch. Let’s get started!
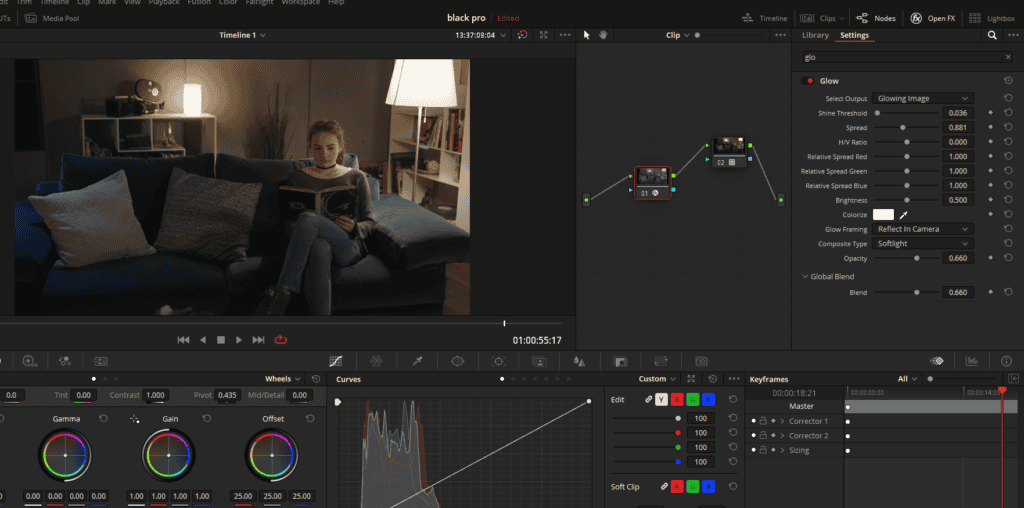
- First, select the clip you’d like to enhance with the mist effect. Apply a quick grade to your footage if needed, and then proceed to add the Glow effect.
- Press “Alt + S” to create a new node after your grade. Name this node “mist.”
- Drag the Glow effect from the OpenFX library onto the “mist” node.
- Change the Composite mode to “Soft Light.” You’ll notice the effect is a bit heavy at first, but we’ll fix that with a few adjustments.
- Lower the Threshold setting to a point where it adds beautiful colors to your footage without overpowering it. Feel free to experiment until you achieve the desired look.
- Adjust the Spread setting to control the range of the mist effect. A lower value will create a more subtle effect, while a higher value will produce a more pronounced bloom.
- Modify the Opacity setting to blend the mist effect with your footage. Start by bringing the opacity all the way down and then gradually increase it until you’re satisfied with the result.
- Finally, play with the Global Blend setting to fine-tune the overall impact of the mist effect. Again, start by bringing the value all the way down and slowly increase it to add just the right amount of mist to your footage.
- Preview your clip to see the difference between the original footage and the mist-enhanced version. You should notice a subtle yet effective addition of saturation, contrast, and a blooming effect throughout the image.
3. Second Method to create a mist effect with Glow OFX
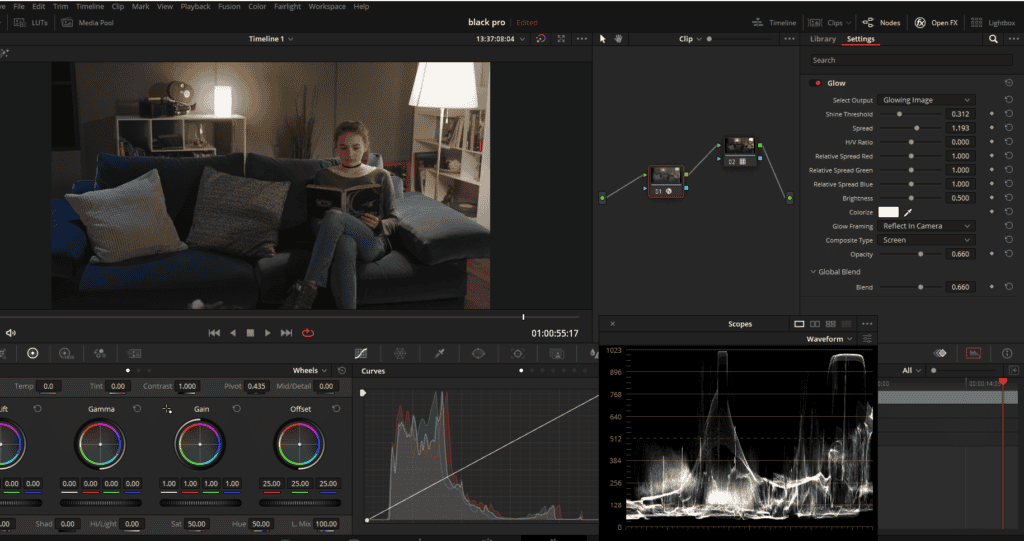
- Import your video clip into DaVinci Resolve and apply basic color correction using compound nodes, if necessary.
- Create a new node by holding Alt or Option and pressing ‘S’ on your keyboard. This new node will be used to apply the Glow effect.
- Navigate to the OpenFX library and scroll down to ‘Resolve FX Light.’ Select ‘Glow’ and drag it onto the new node you just created.
- As the clip may not have significant highlights, the Glow effect might not be visible initially. To see the areas affected by the Glow effect, go to the ‘Select Output’ dropdown menu and choose ‘Glow Alone.’
- Adjust the ‘Shine Threshold’ to control the intensity of the mist effect. Lower values will create a stronger effect, while higher values will make it more subtle.
- Modify the ‘Spread’ parameter to control the size of the mist effect. Higher values will create a more diffuse and blurry mist, while lower values will limit the effect to smaller areas.
- Increase the ‘Brightness’ to enhance the overall intensity of the mist effect.
- Return to the ‘Select Output’ dropdown menu and choose ‘Glowing Image’ to apply the Glow effect to your clip.
- The Glow effect might cause some highlights to be clipped or overexposed. To preserve the highlights and achieve a more balanced look, change the ‘Composite Type’ to ‘Screen.’
- The pro-mist effect should now be applied to your clip, giving it a dreamy and atmospheric appearance. You can toggle the effect on and off to compare the results.
- To fine-tune the mist effect further, go back to ‘Glow Alone’ and adjust the ‘Shine Threshold’ and ‘Spread’ parameters while paying attention to the brightest areas of your clip. Make sure you’re not clipping any highlights by monitoring your waveforms.
- Once you are satisfied with the mist effect’s appearance, switch back to ‘Glowing Image.’
4. Using the Blur Pallete
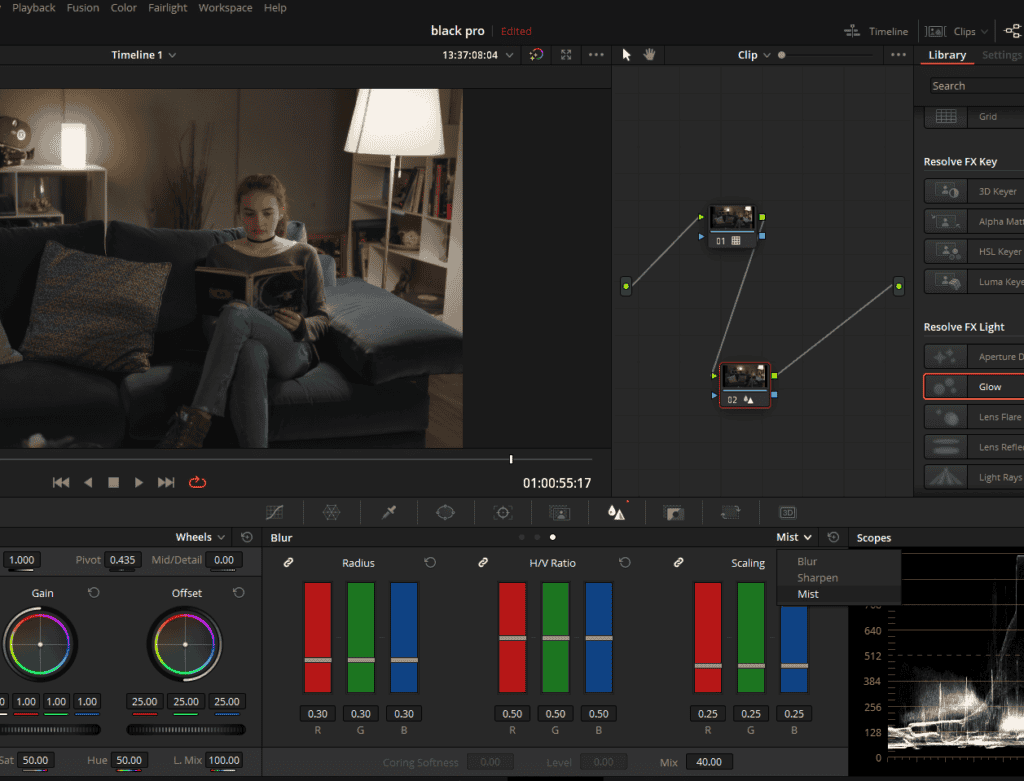
- First, open your project in DaVinci Resolve and navigate to the Color tab.
- Select the clip you’d like to apply the mist effect to, and create a new node by holding down “Alt” or “Option” on your keyboard and pressing “S”.
- With the new node selected, locate the Blur palette (represented by a teardrop and triangle icon). Click on “Blur” and choose “Mist” from the drop-down menu on the right.
- Adjust the “Radius” slider to control the strength of the mist effect. For a subtle look, we recommend setting the value around 30.
- To counteract the sharpness and contrast introduced by the mist effect, adjust the “Mix” slider. A value of 50 neutralizes the effect, so you can choose to go above or below this value to either sharpen or soften your footage.
- To find the perfect balance between dreamy and realistic, experiment with the “Radius” and “Mix” sliders. For a subtle mist effect, try setting the “Mix” value to around 46.
- Zoom in on your footage to observe the effect on highlights and textures, such as skin. Adjust the settings as needed until you achieve the desired look.
5. Pro-Mist effect Using the Dehancer Plugin in Davinci Resolve
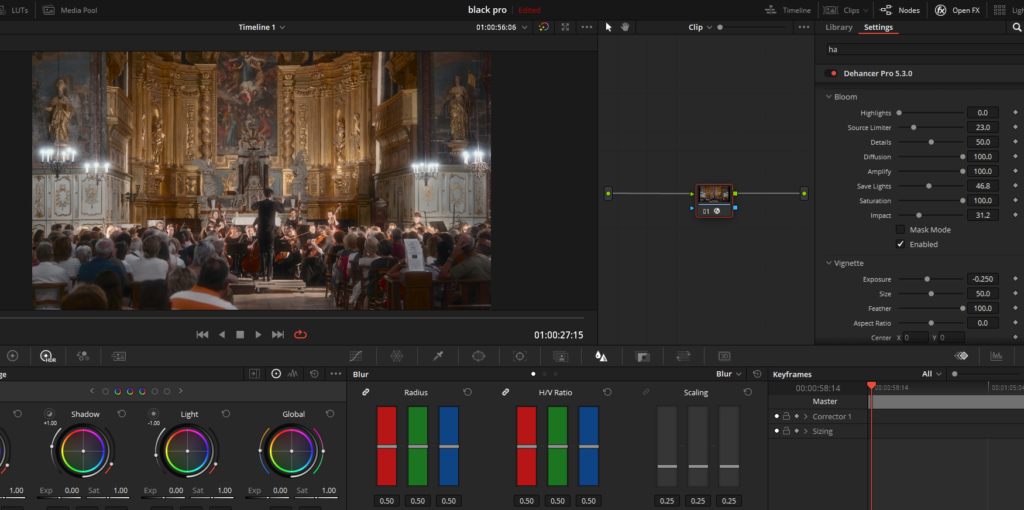
Now, this is a paid way to create a mist time effect in Davinci Resolve using Dehancer. Irrespective of just the mist-type effect Dehancer gives, you have access to far more controls for advanced look development using various film stock provided in the plugin. Follow the steps given below once you have downloaded the Dehancer plugin:
- Import your video footage into DaVinci Resolve and apply the Dehancer plugin to the desired clip.
- In the Dehancer settings panel, navigate to the Bloom section.
- Make sure the “Enabled” check box is ticked.
- Adjust the Highlights parameter to control the brightness threshold where the Bloom effect starts. For a subtle Pro-Mist Type Effect, use a lower value.
- Modify the Details setting to define the size of the area producing the Bloom effect. Smaller values will affect smaller objects, while larger values will affect larger objects.
- Increase or decrease the Diffusion value to control the extent of the Bloom effect relative to the boundary where it appears.
- Fine-tune the Amplify parameter to control the overall strength of the effect, taking into account the other Bloom settings.
- Adjust the Save Lights parameter to protect the brightness value of highlights affected by the Bloom effect, ensuring a balanced and visually appealing result.
- Use the Mask Mode checkbox to preview the complex bloom mask created with your current Bloom settings, allowing you to see which areas are affected by the effect and make any necessary adjustments.