Welcome back to FilmmakingElements.com. Today, we delve into a potent, yet often overlooked feature in DaVinci Resolve – the Power Bins. The utility of Power Bins becomes particularly apparent when working on a series, a YouTube channel, or any project where you frequently use the same assets.
What are Power Bins?
Power Bins are a unique feature of DaVinci Resolve, typically deactivated by default. These bins always keep your regularly used files, such as rendered elements, music, or logo stings, ready in your media pool. This eliminates the need to repeatedly import these assets into DaVinci Resolve for each project, saving you valuable time and streamlining your workflow.
Power Bins Vs. Power Grades
Power Bins might remind you of another similar feature – Power Grades. Power Grades allow you to store multiple grades on the color page in your database file. This means you have your preferred color grade readily available for application to any new project, similar to a LUT, but with the added flexibility of using different nodes on the color page.
Now, imagine being on the edit page and having all your essential assets – music, images, overlays – already in place without needing to import them each time. That’s the convenience it offers. You only need to import the specific assets unique to the particular episode or project you’re working on.
Activating Power Bins in DaVinci Resolve
From our previous discussion, we’ve learned about the potential of Power Bins in Da Vinci Resolve to boost productivity by providing quick access to frequently used assets. In this section, we go a step further and provide a detailed, step-by-step guide to activating this incredibly efficient feature.
Step-by-step Guide to Activating Power Bins
- Navigating to the Edit Page: To start off, ensure that you’re in the correct workspace within DaVinci Resolve. The Power Bins feature is accessible from the Edit Page, so make sure that you’ve navigated to this section of the software. You can do this by clicking on the ‘Edit’ button, located at the bottom of the interface.
- Selecting the Media Pool: Once you’ve navigated to the Edit Page, your next step is to select the Media Pool. The Media Pool stores all the media files you’re working within your project. You can select the Media Pool by clicking on it from the top left corner of the interface.
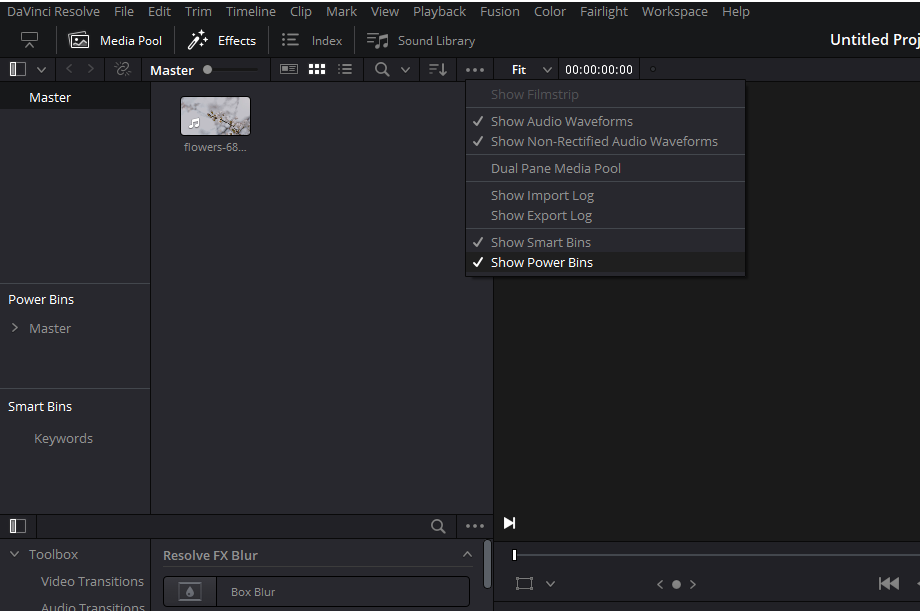
- Accessing the Media Pool Settings: With the Media Pool selected, you should now be able to see three little dots towards the right-hand side of the Media Pool pane. These dots signify additional settings or options. Click on these three dots to reveal a drop-down menu with various options.
- Showing Power Bins: In the drop-down menu that appears after clicking on the three dots, look for the option that says “Show Power Bins.” It’s usually located towards the bottom of the list. Clicking on “Show Power Bins” will activate the Power Bins feature.
- Reviewing your Power Bins: After you’ve activated the Power Bins feature, your Power Bins should now be visible on the left-hand side of the interface.
- Populating your Power Bins: If your Power Bins are empty, or if you want to add new assets to them, you can simply drag and drop files into the Power Bins. These files will now be readily available in your Power Bins for all future projects, saving you the time and hassle of importing them for each new project.
Unpacking the Concept of Power Bins
At its core, it is an asset management feature integral to DaVinci Resolve. It allows users to store and access frequently used assets, such as graphics, sound effects, overlays, and more. The key attribute of Power Bins is their universal availability across all your projects within a specific DaVinci Resolve database. This attribute reduces the repetitive task of importing these assets into each individual project, thereby saving substantial time and effort.
To illustrate this concept, let’s consider the production of a YouTube video series. In such a project, there are certain assets consistently utilized throughout the series, like a unique subscribe button graphic and its accompanying sound effect. In a typical workflow without Power Bins, these elements would need to be imported into DaVinci Resolve for each individual project—a potentially time-consuming process. With Power Bins, however, you can store these frequently used assets, making them readily available across all your projects, thereby enhancing workflow efficiency.
The Power Bins Workflow: A Detailed Step-by-Step Guide
1. Creating and Organizing Power Bins
The first step in leveraging this feature is the organization of your frequently used assets. This might involve classifying your assets based on their type or usage. For instance, you may have a bin for graphics, another for sound effects, and yet another for overlays.
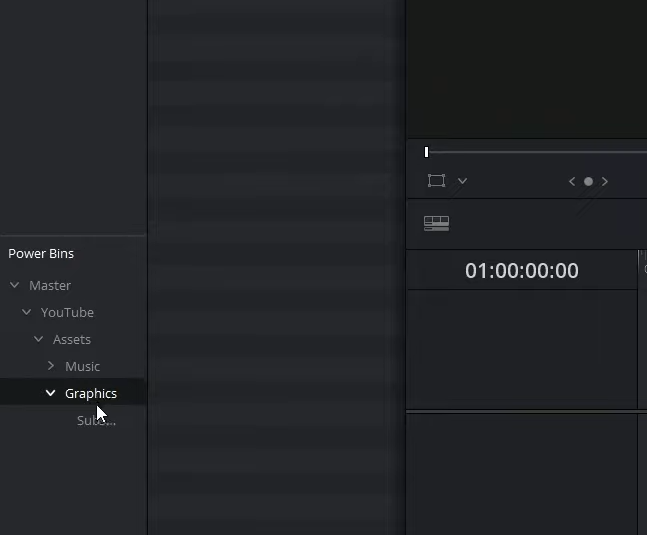
Once your categories are defined, you can add your assets to the respective Power Bins. Whether it’s your signature subscribe button, a favorite sound effect, or a specific overlay you use often, having these elements in your Power Bins means they’re always ready for use, thus streamlining your workflow.
2. Linking Power Bins to Your Database
Unlike regular bins, the assets stored in your Power Bins are linked to your DaVinci Resolve database and not tied to a specific project. This means these assets are universally accessible for all your projects within the linked database, thereby eliminating the need to import these assets for each project.
While this might seem like a subtle distinction, it has profound implications for your workflow efficiency. With your frequently used assets readily available, you can focus more on the creative aspects of your project rather than the technicalities of asset import and organization.
3. Starting a New Project
Upon initiating a new project in DaVinci Resolve and navigating to your project workspace, your Power Bins, complete with your standard assets, are already in place. This feature eliminates the need for the repetitive process of importing these assets for each project, thus saving considerable time and effort.
4. Navigating Between Databases
One of the key features of DaVinci Resolve is the flexibility it provides in managing multiple databases. Each database can have its unique set of Power Bins, which means you could have different Power Bins for different projects or even different clients.
Switching between these databases is a straightforward process, providing flexibility in managing your assets. This allows you to have separate databases for personal projects, client projects, and so on, each with its unique set of it. This level of organization not only streamlines your work process but also ensures that you maintain a clean, structured approach to asset management.
Moreover, having separate databases for different types of projects or clients can also help in maintaining professional boundaries and ensure that there’s no overlap or confusion between assets from different projects.
5. Managing Media Storage
While Power Bins significantly enhance efficiency, it’s crucial to understand their functionality to avoid potential pitfalls. They store links to your assets, not the actual media files. This means that the files remain stored in their original location on your system. As such, it’s essential to ensure that DaVinci Resolve always has access to these locations.
For instance, if you store your assets on an external storage device and this device is disconnected, DaVinci Resolve would be unable to access these assets even though they appear in your Power Bins. This could potentially disrupt your workflow and lead to unnecessary delays. Therefore, it’s crucial to ensure that your assets are stored in a location that DaVinci Resolve can consistently access.
6. Adding Media

Adding media to Power Bins is as straightforward as adding media to any other bin. You simply create a new bin within the Power Bins by right-clicking in the Power Bin in the Media Pool and drag the desired media into it. DaVinci Resolve then creates a link in the Power Bin to the media’s storage location.
This straightforward process means that you can easily add, remove, or rearrange assets, allowing you to keep your asset library up-to-date and relevant to your current projects.
7. Workflow Efficiency
Ultimately, the value of Power Bins lies in the efficiency they bring to your editing workflow. By storing frequently used assets and making them readily available across all your projects, it saves significant time that would otherwise be spent on importing and organizing these assets for each project.
This saved time can then be redirected towards the more creative aspects of your project, allowing you to focus on storytelling, visual effects, color grading, and other artistic elements of video editing. After all, as a video editor, your primary role is to use your creativity and technical skills to bring a vision to life.
In summary, it is an invaluable tool for any video editor using DaVinci Resolve. By providing a practical solution to the often tedious process of managing frequently used assets, they free up time and mental space, allowing you to focus more on the creative aspects of your project.