Welcome to FilmmakingElements.com! Today, we’re delving into the realm of camera settings, focusing specifically on the renowned Nikon Z9. I will be showing you the best video settings for your Nikon Z9. As a filmmaker who recently acquired this powerhouse of a camera, I’m thrilled to share my insights and experiences in optimizing its video capabilities.
First and foremost, I must express my gratitude to my supportive wife, who gifted me this invaluable tool. Behind every successful filmmaker lies a supportive partner, and I cannot overstate the importance of having that unwavering support.
Despite owning a range of Nikon cameras suited for various professional endeavors like wedding videography and corporate projects, the allure of the Z9 was undeniable. Its unparalleled features compelled me to explore its potential fully.
In this article, I’ll walk you through the essential video settings that I’ve discovered to make the most of the Nikon Z9. Whether you’re a seasoned videographer or an aspiring filmmaker, these adjustments will undoubtedly enhance your shooting experience and elevate the quality of your footage.
Let’s dive right in and unlock the secrets to harnessing the full potential of the Nikon Z9 for your videography needs.
Nikon Z9: Best Settings For Video
Mastering Audio Settings for Crystal Clear Sound on the Nikon Z9
We’re diving deep into the realm of audio settings, focusing specifically on optimizing sound quality on the Nikon Z9. As any filmmaker knows, pristine audio is just as crucial as stunning visuals in creating a captivating cinematic experience.

Step 1: Adjusting Audio Settings
Out of the box, the Nikon Z9 typically comes with automatic audio levels, which may not always yield optimal results, especially when using external microphones like wireless mics.
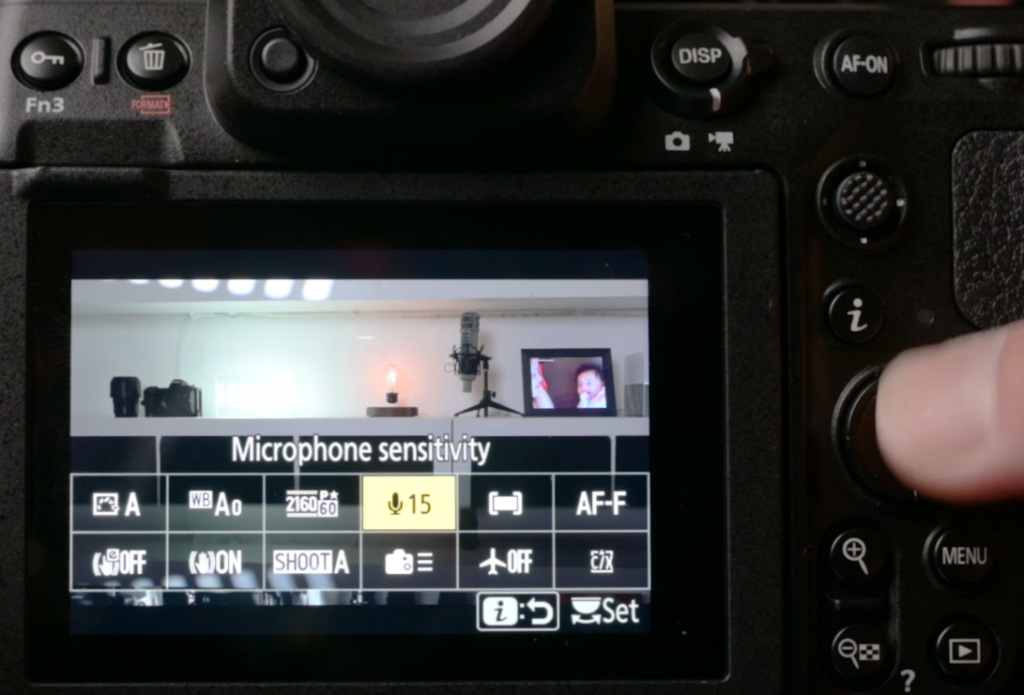
- Navigate to the microphone sensitivity setting by pressing the “I” button.
- Select manual mode to gain full control over audio levels.
- Fine-tune the audio levels according to your specific setup, considering factors such as microphone strength and ambient noise levels.
Step 2: Leveraging Intuitive Controls
One standout feature of the Nikon Z9 is its dedicated dial for switching between photographer and video modes. This intuitive design element streamlines the process of transitioning between photo and video shooting, allowing for seamless adjustments tailored to your filmmaking needs.
Step 3: Exploring Video Settings
With your Z9 set to video mode, you’re ready to explore and optimize the plethora of video settings available.
- Begin by adjusting audio settings as outlined in Step 1.
- Experiment with other video settings to customize your shooting experience further.
By taking control of your audio settings and fine-tuning them to perfection, you’ll elevate the quality of your productions and ensure that every frame is accompanied by crystal-clear sound.
Preventing Audio Distortion: Using the Attenuator Feature on the Nikon Z9
In this segment, we’re tackling another crucial aspect of optimizing audio quality on the Nikon Z9: utilizing the attenuator feature. Ensuring clear and distortion-free audio is essential for any filmmaker, especially in environments with varying sound levels.
Understanding the Attenuator Feature
Similar to the function found in smartphones like the iPhone, the attenuator on the Nikon Z9 serves to limit audio recording, preventing distortion caused by excessively loud sounds. While it may not possess the automatic adjustment capabilities of smartphones, the attenuator is a valuable tool for maintaining audio integrity in challenging recording conditions.

How It Works
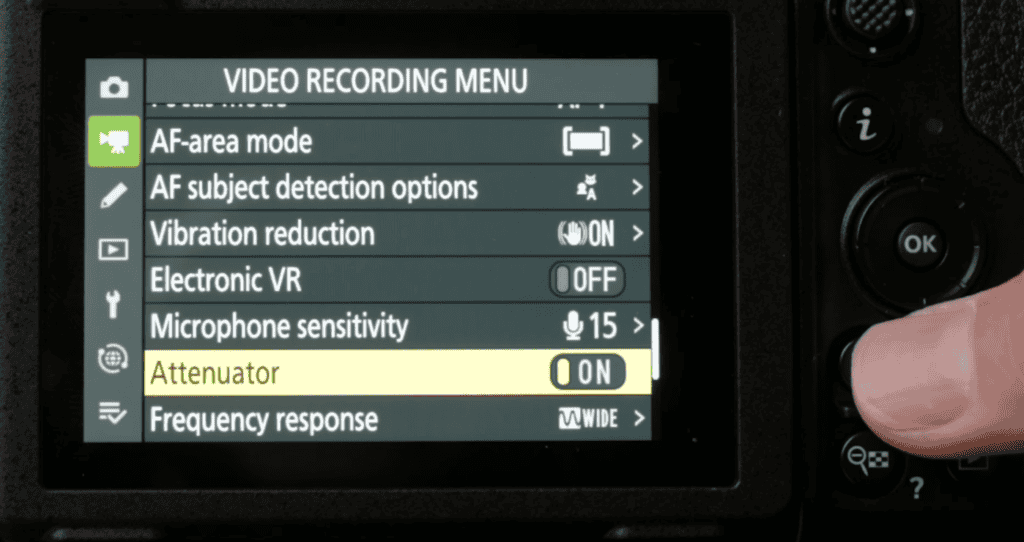
- Activation: Access the camera’s settings menu to locate the attenuator feature.
- Enabling: Toggle the attenuator on to activate its function.
- Limiting Audio Levels: Once activated, the attenuator works to limit audio recording levels, preventing peaking and distortion, particularly in high-volume environments such as concerts.
Benefits and Limitations
While the attenuator feature on the Nikon Z9 may not offer the same seamless audio adjustment as smartphones like the iPhone, it still provides significant benefits in reducing audio distortion. However, it’s essential to note that it may not entirely eliminate distortion in extremely loud scenarios, but it does mitigate it effectively.
Mastering Exposure: Taking Control of ISO Settings on the Nikon Z9
In this section we’re delving into a critical aspect of achieving optimal exposure in your videos: taking control of ISO settings on the Nikon Z9. While automatic ISO can be convenient, manual adjustment provides filmmakers with greater creative control over their footage’s brightness and overall aesthetic.
Disabling Auto ISO
Out of the box, the Nikon Z9 is typically set to automatic ISO, where the camera dynamically adjusts ISO levels to maintain a balanced exposure. While this can be useful in some situations, it may not always align with your creative vision.


Manual ISO Adjustment
- Access the camera’s ‘Video Recording Menu’ and navigate to the ISO sensitivity setting.
- Disable auto ISO to gain manual control over ISO levels.
- Manually adjust ISO settings based on your desired exposure preferences.
Benefits of Manual ISO Control
By disabling auto ISO and manually adjusting ISO settings on the Nikon Z9, filmmakers gain greater flexibility and control over exposure levels. This allows for creative experimentation and the ability to achieve specific visual aesthetics tailored to each project’s requirements.
Advancements in ISO Performance
Modern full-frame mirrorless cameras, including the Nikon Z9, boast impressive ISO performance, allowing for clean and detailed footage even at higher ISO values. With advancements in sensor technology, shooting at ISOs of 5,000 or even 10,000 and above is now feasible without sacrificing image quality.
Unleashing Creative Potential: Exploring Log Recording on the Nikon Z9
In this section, we’re delving into the advanced recording capabilities of the Nikon Z9, specifically focusing on shooting in log formats. Understanding these features opens up a world of creative possibilities for filmmakers looking to maximize the quality of their footage.
Exploring N-Log
The Nikon Z9 comes equipped with built-in log recording known as N-Log. Shooting in log preserves the most dynamic range, allowing for greater flexibility in post-production color grading. While footage shot in log may appear flat initially, it offers the highest video quality and allows for extensive color correction during the editing process.
Accessing Log Recording
- Navigate to the camera’s Video recording menu.
- Scroll down to the ‘Video file type’ setting.
- Select N-Log to enable log recording.
Understanding Video Codecs
The Nikon Z9 offers various video codecs, including H.264 and RAW formats like Nikon N RAW and ProRes RAW. While H.264 is suitable for general purposes and online streaming, shooting in RAW delivers unparalleled image quality and flexibility in post-production.
Unlocking Cinematic Brilliance: Harnessing 8K RAW Recording on the Nikon Z9
In this section, we’re delving into the groundbreaking capabilities of the Nikon Z9, specifically focusing on its ability to shoot in stunning 8K RAW. This feature opens up a realm of possibilities for filmmakers looking to capture uncompromised image quality and achieve cinematic brilliance in their productions.
Understanding the Power of RAW
Shooting in RAW format provides filmmakers with the highest level of image quality and flexibility in post-production. Whether you’re working on a high-budget short film or an extravagant music video, shooting in RAW ensures that you have the necessary tools to make precise and impactful post-corrections.
Activating RAW Recording
Accessing RAW recording on the Nikon Z9 is a straightforward process. Simply navigate to the camera’s menu, scroll down to the video file type setting, and select the desired RAW format. Options include H.265 8-bit, 10-bit with Log activation, and the esteemed ProRes RAW.
Simplified Color Correction with Log
One of the key advantages of shooting in log is the ease of color correction in post-production. By simply applying a curve adjustment in editing software like Premiere Pro, filmmakers can bring out the full dynamic range of their footage and achieve a cinematic look effortlessly.
Enhancing Footage with LUTs
LUTs (Look-Up Tables) are powerful tools for enhancing the color and mood of your footage. Nikon provides free LUTs specifically designed for their cameras, making it easy for filmmakers to achieve professional-grade color grading with minimal effort.
Embracing Creativity
Don’t be intimidated by the prospect of working with RAW footage and applying LUTs. Instead, embrace the creative opportunities they offer. Experimentation is key to discovering unique looks and styles that elevate your work to new heights of cinematic excellence.
Enhancing Focus Accuracy: Utilizing Focus Peaking on the Nikon Z9
In this section we’re diving into a must-have feature for videographers using the Nikon Z9: focus peaking. This invaluable tool aids in achieving precise focus, ensuring that your subjects are sharp and clear in every shot.
Activating Focus Peaking
Accessing focus peaking on the Nikon Z9 is simple. Follow these steps to enable it in your camera settings:
- Navigate to the menu by selecting the pencil icon.
- Scroll down to find the A13 focus peaking option and turn it on.
- For added convenience, customize your eye menu to include focus peaking:
- Go to the controls section in the menu.
- Customize the eye menu by replacing unused functions with focus peaking.
Benefits of Focus Peaking
- Enhanced Focus Accuracy: Focus peaking provides visual cues, such as colored outlines around in-focus areas, making it easier to achieve precise focus, especially when using manual focus lenses or shooting in challenging conditions.
- Improved Workflow: Having focus peaking readily accessible in the eye menu streamlines your workflow, allowing you to toggle it on and off quickly as needed during shooting sessions.
- Increased Confidence: Whether you’re capturing interviews, cinematic sequences, or any other type of footage, having the assurance that your subject is in focus boosts your confidence and eliminates the risk of out-of-focus shots.
Maximizing Lens Versatility: Leveraging Digital Zoom on the Nikon Z9
Now we’re uncovering a handy feature available on the Nikon Z9 camera that enhances lens versatility and provides filmmakers with additional zoom capabilities: digital zoom.
Activating Digital Zoom
- By default, press the FN2 button on your Nikon Z camera.
- Navigate to the “Choose image area” option and select DX mode.
- Your camera will now digitally zoom in, providing you with an extended focal length without the need to physically change lenses.
Benefits of Digital Zoom
- Enhanced Focal Length: Digital zoom allows you to achieve an extended zoom range, especially useful when shooting with prime lenses or when physical constraints limit your ability to adjust your position.
- Increased Flexibility: With digital zoom, you can adapt to various shooting scenarios on the fly, allowing you to capture different perspectives without the need to switch lenses.
- Minimal Quality Loss: While digital zoom technically utilizes less of the sensor, the high-quality video output of Nikon Z cameras ensures minimal perceptible loss in image quality. The difference between FX and DX crop factor modes is virtually indistinguishable in most cases.
Utilizing Digital Zoom in Practice
Experiment with digital zoom during your filming sessions to discover its practical applications and how it can enhance your footage. Whether you need to zoom in slightly for a tighter shot or adapt to shooting conditions that restrict your movement, digital zoom provides a convenient solution.
Mastering Manual White Balance: Achieving Perfect Color Accuracy with Your Nikon Z9
In this section we are diving into the essential skill of manually white balancing your Nikon Z9 camera and how it is one of the best settings for video, ensuring that your footage captures accurate colors regardless of lighting conditions.
Why Manual White Balance Matters
While automatic white balance can be convenient, it doesn’t always deliver the precise color accuracy needed for professional-quality footage. Manual white balancing allows you to calibrate your camera’s color settings to accurately represent the true colors of your scene.
Step-by-Step Guide to Manual White Balance
- Access the eye menu on your Nikon Z9 camera.
- Navigate to the white balance settings.
- Scroll to “pre one” and select it.
- Hold down the OK button for a few seconds to initiate manual white balance.
- Aim your camera at a white object—a white card, paper, shirt, or any other white surface.
- Press the OK button to set the white balance based on the white reference.
Benefits of Manual White Balance
- Color Accuracy: Manually white balancing ensures that your whites appear pure white and that colors are faithfully reproduced, resulting in visually pleasing and true-to-life footage.
- Consistency: By setting white balance manually, you maintain consistent color tones across your footage, even when shooting in different lighting environments.
- Creative Control: Manual white balance gives you greater control over the color temperature and mood of your footage, allowing you to achieve specific aesthetic effects.
Harnessing the Power of In-Body Image Stabilization on Your Nikon Z9 Camera
We’re exploring the remarkable feature of in-body image stabilization (IBIS) on the Nikon Z9 camera and how it is one of the best settings for video, revolutionizing the way filmmakers capture smooth and stable footage without the need for additional stabilization equipment.
The Evolution of Image Stabilization
In recent years, image stabilization technology has made significant advancements, with Nikon Z cameras leading the charge in delivering exceptional stabilization capabilities directly within the camera body. This feature eliminates the need for lens-based stabilization systems, offering filmmakers greater flexibility and convenience.
Unlocking In-Body Image Stabilization
- Access the camera’s menu and navigate to the vibration reduction settings in the eye menu.
- Toggle the vibration reduction function on or off as needed.
- Explore additional settings, such as sport mode, which optimizes stabilization for dynamic shooting scenarios like walking or panning.
Compatibility with Non-Stabilized Lenses
One of the standout advantages of in-body image stabilization on Nikon Z cameras is its compatibility with lenses that lack built-in VR (vibration reduction). This means that even when using lenses without stabilization features, filmmakers can still enjoy smooth and steady footage thanks to the camera’s IBIS technology.
Integration with Stabilized Lenses
For lenses equipped with built-in VR, the camera seamlessly integrates with the lens’s stabilization system. This ensures optimal performance and allows users to control VR settings directly from the lens, further enhancing stabilization capabilities.
- Also Read: Nikon Z9 Autofocus Settings: Comprehensive Guide
- Also Read: LUTs For Nikon Z9: Free Download


