
Welcome back to FilmmakingElements.com, in this article I’ll be explaining how to use contrast and pivot controls in Davinci Resolve. Let’s get started.
Understanding these controls can drastically improve the visual quality of your project, so let’s dive in.
Understanding Contrast In Davinci Resolve
Contrast refers to the difference in luminance or brightness between colors in an image. By adjusting the contrast, we can either make the bright elements of the footage brighter and the dark elements darker (adding contrast) or bring the brightness levels closer together (reducing contrast). This process is often referred to as “expanding” or “flattening” the contrast, respectively.
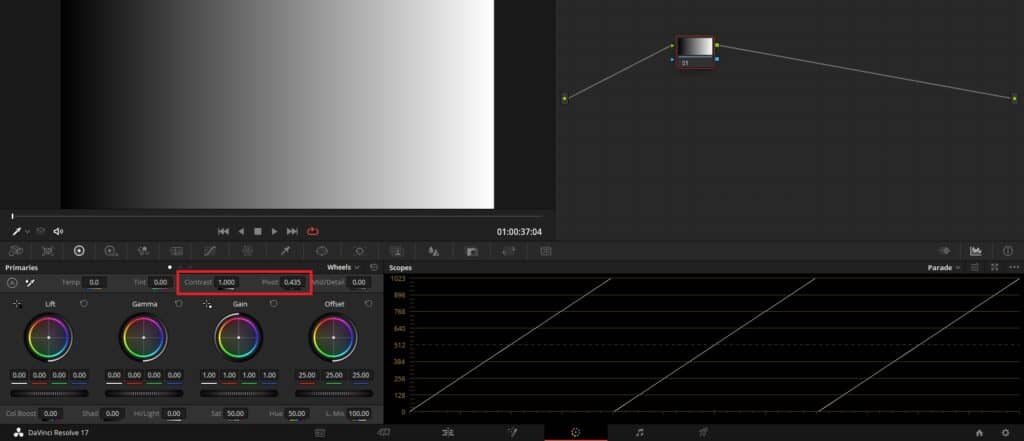
To adjust contrast in DaVinci Resolve, locate the contrast control on the color page of the toolbar at the bottom of the screen. Increasing the value will add contrast to the shot, while decreasing it will reduce the contrast. To reset the control to its default value, double-click the control’s name.
When you adjust the contrast, you’ll notice that the highlights and shadows on the waveform move accordingly. Increasing the contrast pushes highlights up and shadows down, while decreasing it brings the brightness levels closer together.
Understanding Pivot In Davinci Resolve
The pivot control in DaVinci Resolve determines where the contrast adjustments will be centered in the image. When adding contrast, anything above the pivot point will be pushed up, while anything below it will be pushed down. The pivot point itself will remain unchanged.
Adjusting the pivot point allows you to control the specific area of the image where contrast will be added. A low pivot point expands the contrast from a low point in the shadows, pushing down the darkest shadows and lifting the rest of the image. On the other hand, a high pivot point affects the brightest highlights, pushing them up while lowering the rest of the image. By setting the pivot point in the middle, you can achieve a more balanced contrast adjustment.
Practical Applications of Contrast and Pivot Controls
Mastering the contrast and pivot controls in DaVinci Resolve can significantly enhance the visual quality of your footage. By expanding or flattening the contrast, you can bring out the best aspects of your shots, making them more visually appealing and engaging. The pivot control allows you to fine-tune your adjustments, ensuring that your footage looks its best.
For example, if you’re working on a dramatic scene that requires emphasis on shadows, you can use a low pivot point to expand the contrast in the darker areas of the image. Conversely, if you’re editing a bright outdoor scene, a higher pivot point can help bring out the vibrancy of the highlights.
Two methods of adjusting Pivot in Davinci Resolve
In this section, we’ll be discussing how to set the pivot point to maintain the overall exposure of a shot, especially on your subject, while adjusting contrast. By using the pivot control effectively, you can create more visually captivating footage without compromising the exposure. Let’s dive into the two methods to achieve the desired result.
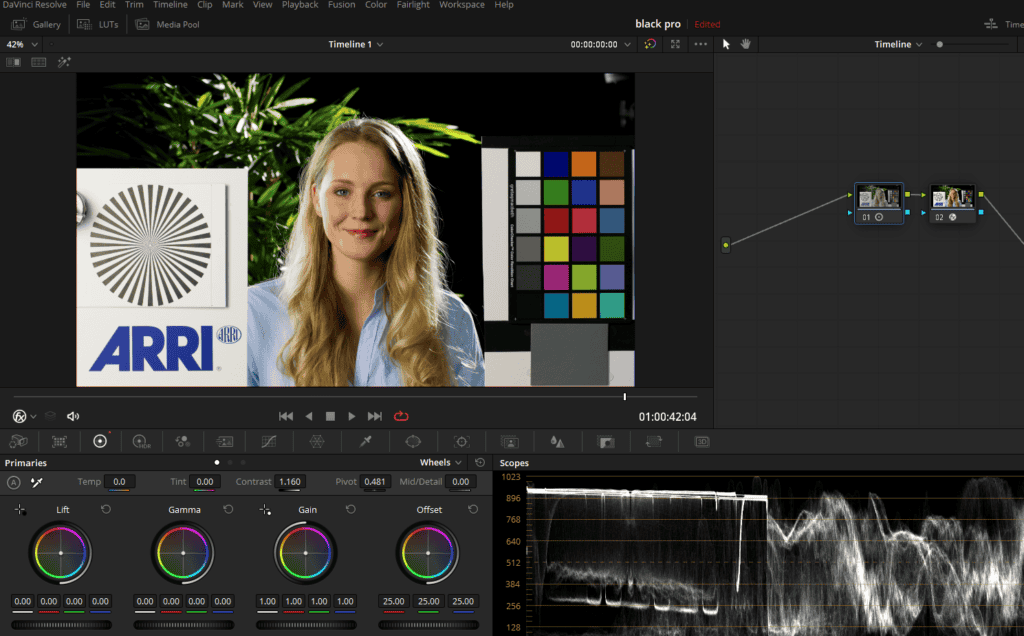
Method 1: Adjusting Pivot by Eye
The first method to set the pivot point while maintaining the overall exposure of the shot is to do it by eye. Begin by introducing a bit of contrast and adjusting the pivot control. To see the effect of your adjustments, use Ctrl+D or Command+D to toggle the node on and off, giving you a before and after view of the footage. This will allow you to check if the exposure on your subject’s face remains the same as before while making the image punchier.
While this method relies on your visual judgment, it can be an effective way to set the pivot point quickly and achieve the desired effect.
Method 2: Using Scopes for Precision
For a more precise approach, you can use the scopes in DaVinci Resolve. The numbers displayed on the side of the scope (10-bit values) closely correlate with the decimal value in the pivot control, although they’re not exactly the same. This method allows you to set the pivot point more accurately, based on the exposure values of your subject’s face.
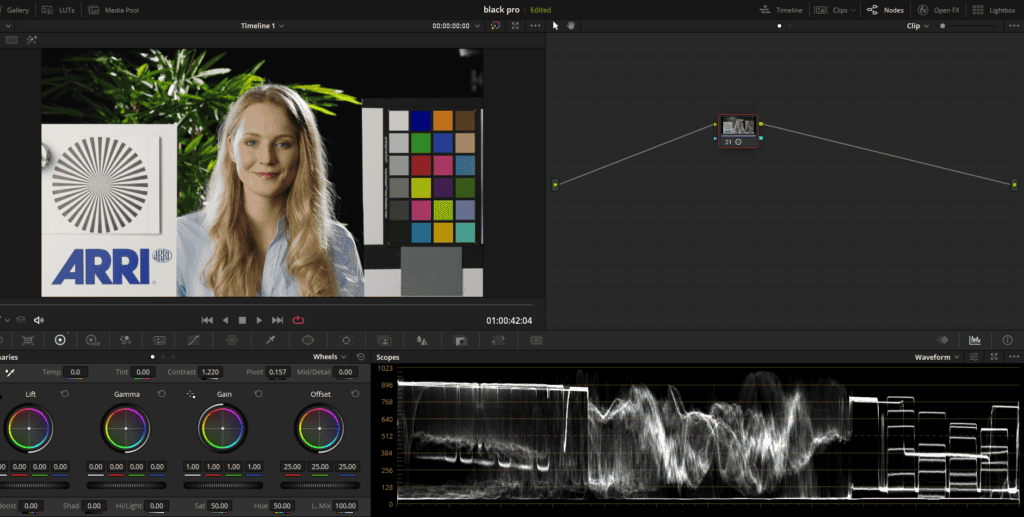
For example, if the exposure on your subject’s face is around 384, set the pivot control to 0.384. This should give you a close approximation of the correct pivot point. Once you have set the pivot point using the scopes, you can make any additional tweaks necessary to perfect the exposure and contrast.
Tips for a Balanced and Engaging Image
When working with contrast and pivot controls, keep these tips in mind for the best results:
- Always check the overall exposure of the shot and your subject before and after adjustments to ensure consistency.
- Use the toggle node (Ctrl+D or Command+D) frequently to compare the before and after footage, allowing you to make more accurate adjustments.
- Don’t be afraid to make minor tweaks to achieve the desired effect. Every shot is unique, and finding the perfect balance may require some experimentation.
Understanding the Impact of Contrast and Pivot on Tonal Regions and Grayscale Ramps
In this section of our blog post, we’ll explore the impact of adjusting the contrast and pivot controls on tonal regions and grayscale ramps in DaVinci Resolve. By understanding how these controls affect the highlights, shadows, and midtones, you can further refine your footage and create a visually pleasing image.
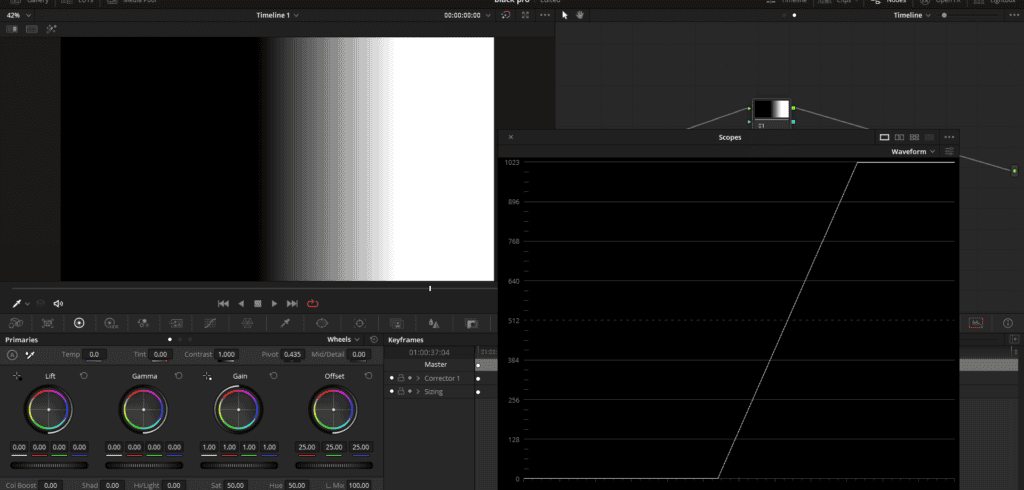
Grayscale Ramps and S-Curve Shapes
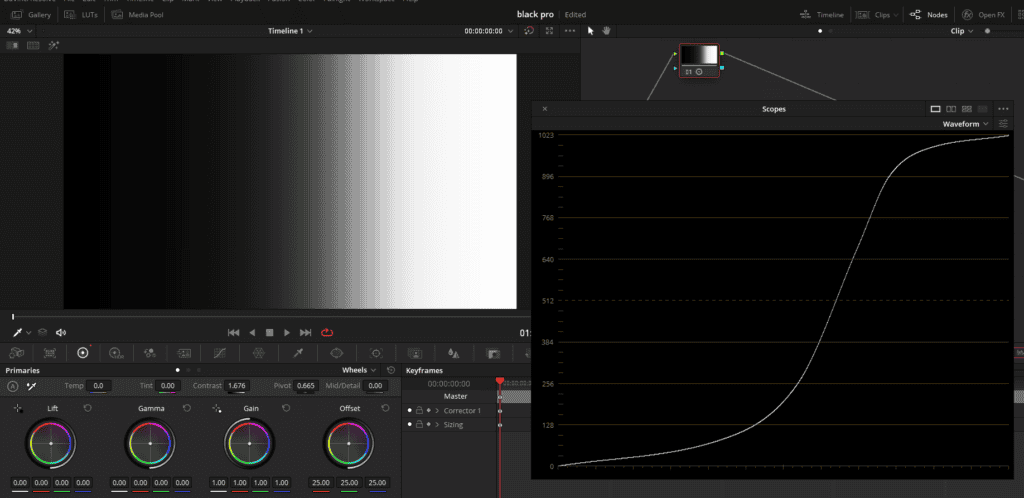
When working with grayscale ramps and adjusting contrast, you can observe the impact on the waveform monitor. Increasing the contrast creates an S-curve shape, which represents the expansion of contrast around the pivot point. This S-curve provides a smooth roll-off in highlights and shadows, preventing clipping and ensuring a visually pleasing image.
The shoulder and toe of the S-curve represent the roll-offs in the highlights and shadows, respectively. These roll-offs help maintain detail in the bright and dark areas of the image, even as the contrast is expanded.
Adjusting the Pivot to Control Tonal Regions
By adjusting the pivot control, you can change the shape of the S-curve and control the expansion of contrast in different tonal regions. A higher pivot point will create a shorter shoulder (roll-off in highlights) and a broader toe (roll-off in shadows), allowing you to expand contrast in the highlights without clipping. Conversely, a lower pivot point will result in a shorter toe and a more gradual roll-off in the highlights.
Changing Contrast Behavior in Project Settings: S-Curve vs Linear
In this section, we will discuss how to change the contrast behavior in DaVinci Resolve project settings and the implications of using S-curve versus linear contrast on a project-wide basis.
Use S-curve for contrast
DaVinci Resolve allows you to change the default behavior of contrast control in your project settings. To do this, follow these steps:
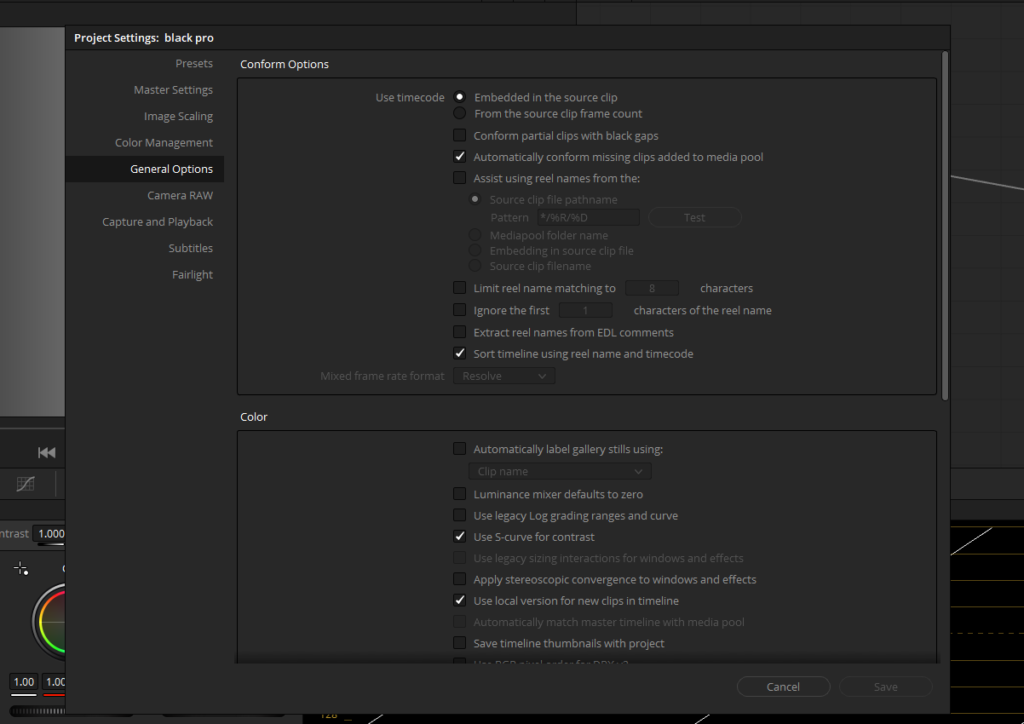
- Open your project settings by clicking on the gear icon in the lower-right corner of the interface.
- Navigate to the ‘General Options’ tab.
- Scroll down until you find the ‘Use S-curve for contrast’ setting.
- By default, this setting will be enabled. To switch to linear contrast, simply disable the setting.
- Click ‘Save’ to apply the changes.
Please note that this change will affect the entire project, as it is a global setting. You cannot adjust the contrast behavior on a per-shot basis. Now when you change contrast or pivot you will see that there is no S-Curve forming, rather it is linear.
Choosing the Right Contrast Control: S-Curve vs Linear Expansion
When it comes to color grading in DaVinci Resolve, the choice between using S-curve or linear expansion for contrast control can significantly impact the look and feel of your video project. In this section, we’ll delve into the advantages and disadvantages of each method, which will help you make an informed decision when adjusting the contrast in your footage.
S-Curve Contrast
Advantages:
- Smooth roll-off in highlights and shadows: The S-curve allows you to introduce contrast without worrying about clipping information. This is particularly useful for shots with bright highlights and dark shadows. When you increase contrast, the image becomes punchier without clipping any values in the scopes.
Disadvantages:
- Non-uniform expansion: S-curves don’t expand the entire tonal range of the shot in the same way. While contrast is expanded around the pivot point, it flattens and reduces contrast in highlights and shadows. This can mess with the tonality of the image, especially when adjusting the pivot or using different pivot points for various shots.
Linear Contrast
Advantages:
- Uniform expansion: Linear contrast expands contrast across the full tonal range of the shot in a consistent and uniform fashion. Highlights, midtones, and shadows all receive the same amount of contrast, making this method predictable and consistent.
- Pivot agnostic: Changing the pivot point doesn’t affect how contrast is expanded with linear contrast. Unlike S-curves, where changing the pivot alters the curve’s shape, linear contrast remains consistent regardless of the pivot point.
- Better preservation of the original image: Many colorists believe that linear contrast maintains the original image’s integrity more effectively. Lighting ratios established on set are preserved, and the relationship between highlights, midtones, and shadows remains equidistant.
Disadvantages:
- Lack of roll-off: Linear contrast doesn’t provide a smooth roll-off in highlights and shadows, making it easy to clip values. This can be problematic in shots with bright highlights and dark shadows.
Making the Right Choice
When choosing between S-curve and linear contrast, consider the look you want to achieve and the type of footage you’re working with. S-curves might be more suitable for projects where you want to enhance contrast without worrying about clipping, while linear contrast could be ideal for preserving the original image’s tonality and consistency.
Balancing Contrast and Pivot with Linear and S-Curve Techniques
When color grading your footage, the question often arises: when should you opt for linear contrast, and when should you go for the S-curve approach? In this section, we’ll discuss a general strategy that combines both techniques, allowing you to achieve consistent and uniform contrast while also benefiting from the smooth roll-off of the S-curve.
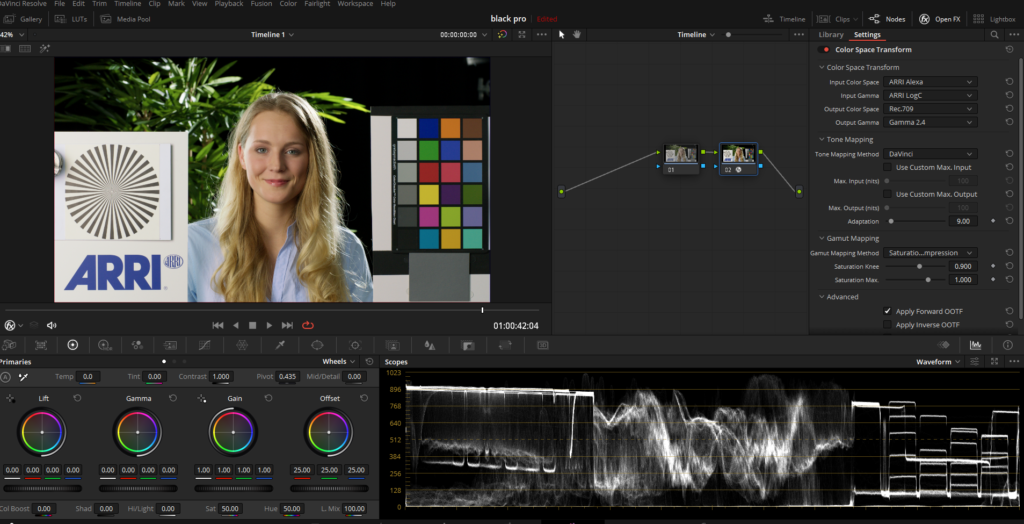
A Two-Node Strategy
A common approach when working with DaVinci Resolve is to create a global S-curve for all shots in your project, followed by balancing and shot matching using linear contrast before applying the S-curve. This strategy can be implemented using a two-node setup:
- Node 1 – Balancing: In the first node, you’ll perform shot balancing using linear contrast. This helps maintain the consistency and uniformity of the footage, preserving the original image’s tonality.
- Node 2 – Display Transform: In the second node, you’ll apply a display transform that includes an S-curve. This could be a custom-drawn S-curve, one embedded within a LUT, or even a curve applied through color management systems like Color Space Transform or ACES. The key is to use the same S-curve for every shot in the project, ensuring uniformity.
By separating the processes into two nodes, you can take advantage of the benefits of both linear contrast and S-curve techniques. This approach offers the consistency and predictability of linear contrast, while also providing the smooth roll-off in highlights and shadows characteristic of the S-curve.
Why This Strategy Works
This two-node strategy works because it combines the best aspects of both contrast control techniques. By applying linear contrast in the first node, you ensure that the original lighting ratios and the relationships between highlights, midtones, and shadows are preserved. This consistency is crucial when balancing shots and maintaining a cohesive look throughout your project.
Then, by applying a global S-curve in the second node, you introduce a smooth roll-off in highlights and shadows that helps prevent clipping. The S-curve is applied consistently to every shot in the project, creating a uniform look and making it easier to match shots.
Final Thoughts
In conclusion, understanding and effectively utilizing contrast and pivot controls in DaVinci Resolve can significantly enhance the visual quality of your video projects. By mastering these controls, you can create a balanced and engaging image that highlights the best aspects of your footage, ensuring a visually appealing and captivating result.