Hello and welcome this is FilmmakingElements.com and we are going to get back to basics in this one. We’ve gotten this question several times over the past few months. I figured it was time to create a kind of fundamental insight that answers this question and is easy to find and it’s the question of, Gamma 2.2 vs Gamma 2.4 Which To Choose In Davinci Resolve.
How do I color correct for the Web? What gamma setting do I set? Gamma 2.2 or gamma 2.4? And this is especially confusing to people who are working in round-trip workflows.
Say they’re working in Final Cut or Premiere Pro or even Avid and they’re coming into DaVinci Resolve and all of a sudden in DaVinci Resolve, there’s a setting for Rec 709 and your gamma 2.4, 2.2, and it kind of feels like you need to get that right.
Gamma 2.2 vs Gamma 2.4 Which To Choose In Davinci Resolve
In this insight, we’re going to explore why in many workflows it’s just meaningless. The gamma setting you set in your preferences or project settings doesn’t have any effect on your image.
Now, don’t get me wrong, In color-managed workflows it does and so we’ll talk about why you might want to use a color-managed workflow and how do you set your gamma settings when you’re color correcting.
And really there are two use scenarios.
- One use scenario is you’ve got a calibrated reference display like a Flanders Scientific or an Eizo monitor that I use and for me, I work in Gamma 2.4. It’s how most of my clients want me to deliver. Even if I’m going to the Internet/web I’ll keep it set at Gamma 2.4 and then do a Gamma 2.2 conversion and I’ll show you how to do that in DaVinci Resolve if that’s how you’re working.
- Now if you’re not using a calibrated display, let’s say you’re using a computer display. Computer displays tend to be set for gamma 2.2 for a variety of reasons. Most computer displays are used in brighter environments than where we watch television.
Television is assumed by the industry that when you’re watching television you’re watching it in a darkened environment except for maybe daytime TV you know soap operas and whatnot.
Busting the myth of Gamma 2.4 vs Gamma 2.2 In Timeline Color Space
But if for the most part, you’re gonna have curtains drawn you’re gonna be controlling lights somewhat so it’s a slightly darkened environment so we go with the 2.4 gamma.
In cinema, we use a 2.6 gamma why is that, because we know we’re in a black box environment. if you’re watching in the cinema, the lights are off and so if you were to use gamma 2.4 or 2.2 the image would look too contrasty and it would just be an unpleasant image to look at.
Whereas in a super bright environment, let’s say when you’re working on your computer in an office environment the image at Gamma 2.6 gets washed out.
You can’t really see it so you really need to manage how you’re coming out of black and how you’re going into pure white. So you know the curve that they use for the gamma curves the power function you’re better off with the 2.2 you end up with better-looking images.
The truth is the industry has sort of standardized on Gamma 2.4 for Rec.709 which is HD video. You still have this difference in viewing environments and there’s a lot of discussion among professional colorists and professional color scientists about do we really want to standardize on a single gamma.
Shouldn’t we use a gamma setting that best reflects the viewing environment, not the mastering environment there’s something to be said for that I mean I’m in a dark room that’s one reason why I go with 2.4.
If I go to 2.2 I’m gonna push my images in a way that I may not want to. Why I go with 2.4 is because I’m in an environment designed for that 2.4 gamma.
Gamma 2.4 vs Gamma 2.2 In Timeline Color Space
Right, so let’s imagine you’ve started working and you’re gonna be finishing in Final Cut or Premiere Pro maybe even you’ve been editing in DaVinci Resolve and now it’s time to color correct and you’ve got this choice about your gamma setting. Where are we gonna find it what choice are we gonna make?
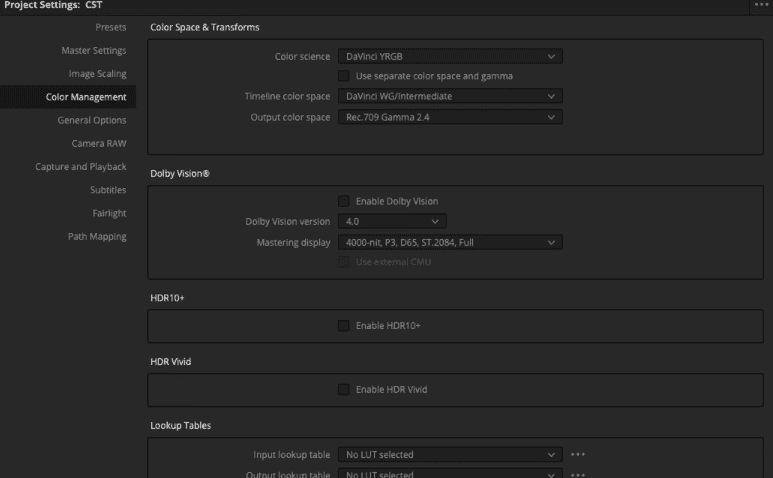
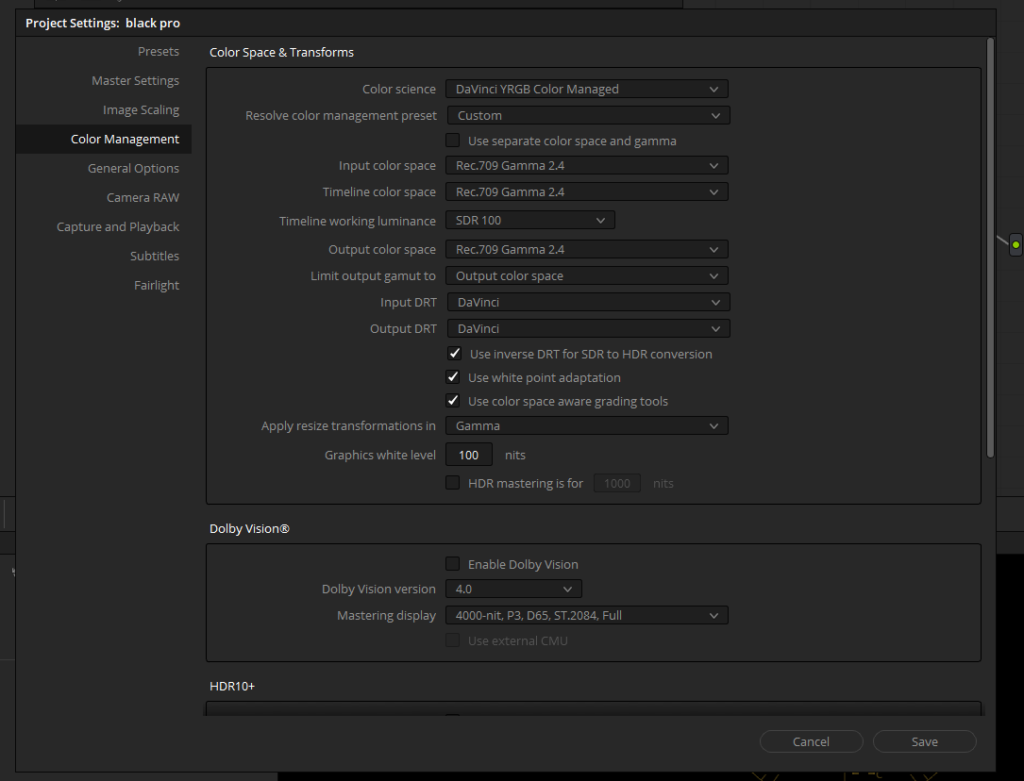
- Select the gear-looking icon in the bottom right corner, to open your project settings, and Go to “Color Management”
- You will see a drop-down menu option called “timeline color space”
- This is the place where you can find both, Gamma Rec.709 2.4 and Gamma Rec.709 2.2.
- This is where people get confused they don’t know what to choose but you know here’s the funny little thing.
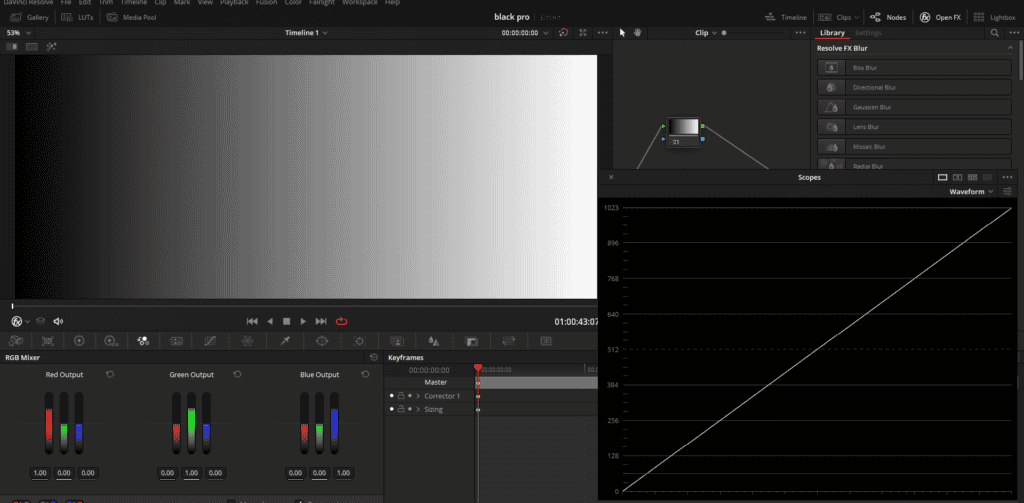
- If you switch over here to a grace scale and open up your waveform scope make sure it’s in Y-only (Luma) mode.
- Now, change the settings again in your “Timeline Color Space” and see if it has any effect on your waveforms.
- For example, you set it for Rec 709 gamma 2.4.
- You will see your waveform completely unaffected.
- It will be in a perfectly linear slope as it was before.
- If you go ahead and select gamma 2.2 and hit save, nothing will happen.
- The waveform will look exactly the same.
Even if you go more extreme for example go with Rec.2100 ST2084 in your “Timeline Color Space”, we should see a big change there except we don’t. Why is this?
Because in our particular workflow right now, what we’re doing is controlling the timeline color space, not the output color space.
So really, if you’re working in the default DaVinci Resolve setup, what you’re going to want to set this for doesn’t matter. Just leave it at Rec.709 gamma 2.4 or gamma 2.2.
So what this really means is you’re color-correcting to the gamma of your reference display.
Whether that reference display is something like an FSI or a Sony or Panasonic or your reference display is a computer display that kind of determines what gamma you’re grading at.
You’re just grading visually to your eye to make it look good. So if my display is set for gamma 2.4 and I’m color correcting to my display, I’m color correcting at gamma 2.4.
If I’m color correcting to my computer display and I’m happy with how it looks in the viewer on my computer display, I’m color correcting to gamma 2.2.
This means if I’m on my computer display and I’m color correcting to gamma 2.2 and I want to deliver for broadcast, I need to make a slight gamma adjustment on the back end when I render out for it to look about the same on a display set to gamma 2.4 as it does on gamma 2.2 display.
Preadjusting to the right gamma according to the delivery platform

Also, If I’m color correcting to 2.4 on a display and now I want to create a render for Vimeo or YouTube, well I’ve been at 2.4, I want to make a slight adjustment to 2.2 so it looks the same.
How do I do that? Let’s find out. So let’s imagine for a moment on grayscale that I’ve done some color correcting and I end up at the straight linear ramp and it looks good on my 2.4 display. It is ready to be exported but for the web and we have to change the gamma to 2.2. Also, my timeline color space in the project settings was set to Rec.709 2.4.
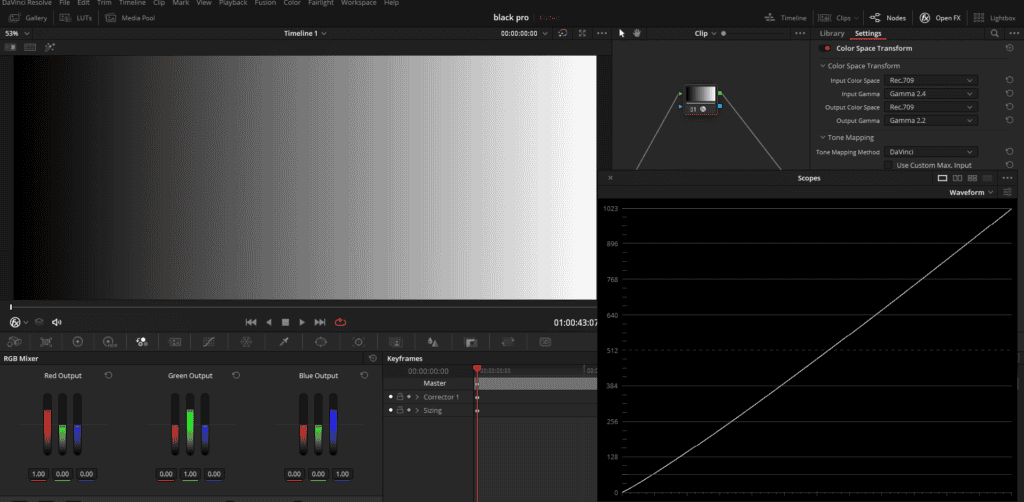
- What I’m going to do is open up my OpenFX.
- Select “color space transform”, and drop that into my node tree.
- Make sure that’s the last node in the order.
- Now you will notice “input color space” and “input gamma” are set for “Use Timeline”. We have to go more specific on this.
- Now if in “Input Color Space” I choose “Rec.709” and in “Input Gamma” I choose “Gamma 2.4”
- I am telling Davinci Resolve that this was the color space I color-graded in.
- But, now in “Output Color Space” I choose “Rec.709” and in “Output Gamma” I choose “Gamma 2.2”.
- I am telling Davinci Resolve to change my gamma.
- Now if I turn this node on and off I can see there’s a very subtle adjustment being made in my scopes.
Alright, so what I’m doing is I am now adjusting my output gamma to 2.2. That’s because the timeline gamma is set to be 2.4 in the project settings.
If I select “Gamma 2.6” in the “Output Gamma” it will go in the inverse direction as I go for cinema.
Alright so if I am working in 2.4 and want to deliver it for the web, what I would do is apply this color space transform at the timeline level.
So, every single shot that gets rendered out will have this adjustment, the slight gamma adjustment from 2.4 to 2.2.
Pre-adjusting in Color Managed workflow
Now there’s another way of doing this, which is in a color-managed workflow. This is a more advanced workflow. But I’ll give you a quick walkthrough as to how this changes when we are in a color-managed workflow.
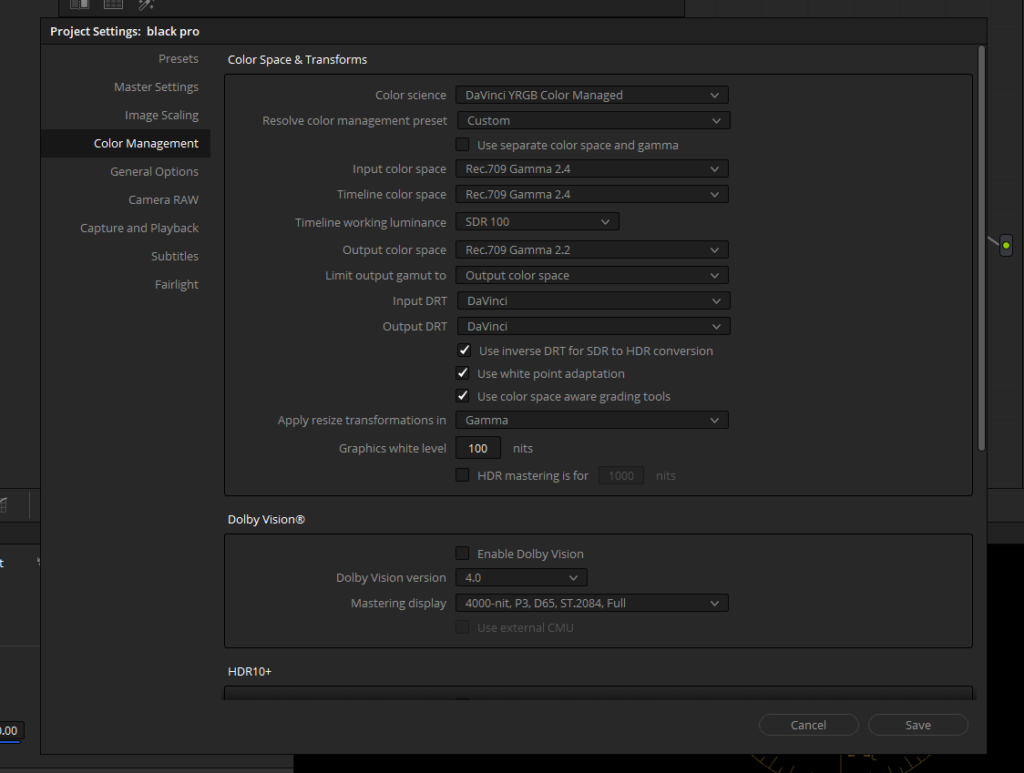
- Select the gear-looking icon on the right bottom corner to open up the “Project Settings”
- Go to “Color Management”
- In the “Color Science” dropdown menu, switch from “DaVinci YRGB” to “YRGB Color Managed”.
- Choose “Custom” in “Resolve Color Management Preset”
- Now we will see more advanced options.
- We’ve got input color space, timeline color space, and output color space.
- In my case if I’m going to set my input color space, output color space, and timeline color space to Rec.709 2.4.
- Technically, nothing will really change.
So let’s suppose, you color grade the entire time using these basic settings on a reference monitor that is calibrated for Rec.709 gamma 2.4. Now you are ready to deliver the project. All you do is switch your “output color space” to Rec 2.2 for a Vimeo output or a YouTube output.
You’ll notice now your project will look slightly darker. What we did was, pre-adjusted the Gamma from 2.4 to Gamma 2.2. This is one of the reasons why the color-managed workflow is so powerful.
it allows you to do these kinds of changes at the project level. So you don’t have to remember necessarily to add that node at the timeline level.
You can just go ahead and when you’re ready to render, you go back into your project settings, change your output gamma setting, and away you go.
The same thing can happen if you’re color correcting to 2.2 on your computer display and you want to render out to 2.4. Well you’d have everything set up in a color managed workflow for 2.2 and then on your final output switch it to 2.4 and let it go.
Conclusion
So that’s the basics of this 2.2 vs 2.4. How to make that choice? Why you don’t necessarily need to make that choice in a non-managed workflow and you just have to understand the environment in which you’re currently working.
Then decide if that environment is a mismatch for what I’m delivering then I’m going to go ahead and do that gamma adjustment from 2.2 to 2.4 or 2.4 to 2.2.
Make sense? This is a very kind of fundamental topic and a must-know for a professional colorist. Also if you are thinking of becoming a full-time colorist, you should definitely start thinking of creating the right color grading suite and controlled environment.
So I hope I have ended this Gamma 2.4 vs Gamma 2.2 debate once and for all. Definitely a tricky one but a mandatory knowledge. We really hope you guys are enjoying our davinci resolve course. Much Love!
- Also Read- Video Vs Full Data Levels In Davinci Resolve
- Also Read- Stop DaVinci Resolve from Lagging (8 Fixes)
- Also Read- Making DCP In Davinci Resolve (Updated)
- Also Read- Export 5.1 Audio From Davinci Resolve (2 Ways)