Hi, I’m Salik, the author of FilmmakingElements.com. I have been a filmmaker for over 10 years. I am also a certified DaVinci Resolve Trainer and I have used DaVinci Resolve for many of my projects. Welcome back to FilmmakingElements.com. In this article, I’ll be focusing on the option Encoding Profile in DaVinci Resolve while exporting H.264 or H.265 codec.
I remember when I first embarked on my filmmaking journey, terms like ‘bit rate’, ‘codec’, and ‘frame rate’ seemed like foreign languages, reserved for the elite few who had mastered the intricacies of post-production. However, as I delved deeper into the art of filmmaking and post-production, it became evident that understanding these technical terms was crucial. They form the very foundation upon which our projects stand. I want to demystify one such term that is pivotal in DaVinci Resolve: the Encoding Profile.
At its essence, the Encoding Profile in DaVinci Resolve dictates the guidelines for exporting video files. It lays down the blueprint for the format, quality, size, and various other parameters, ensuring that the video is perfectly tuned for its intended viewing platform.
What is the Encoding Profile option in Davinci Resolve?
DaVinci Resolve is a top-notch video editing software. After you’ve finished editing your video, the next step is to get it ready for viewing. This is where the Delivery page comes in.
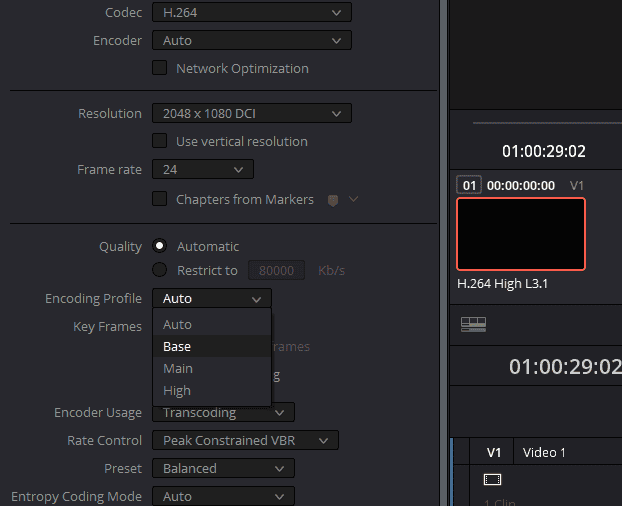
When you go ahead and choose, ‘MP4’ in the ‘Format’ drop-down menu, and ‘H.264’ or ‘H.265’ in ‘Codec’ drop-down menu. You then get the option to choose ‘Encoding Profile’.
Now, here’s the interesting part: the ‘Encoding Profile’ option.
Think of the ‘Encoding Profile’ like a menu at a restaurant. Each choice on the menu is a preset setting. These settings are designed for different purposes. Some are for high-quality videos that look great on big screens. Others are for videos that play easily on phones without any hiccups.
Why is this important? Because high-quality videos can be big and might not play smoothly everywhere. On the other hand, videos made for easy playback might not have the best quality. The ‘Encoding Profile’ helps you find the right balance.

Various Options In Encoding Profile of Davinci Resolve- Explained
There are several options to choose from in the Encoding Profile drop-down list, here is a thorough explanation to all of them and which one is the best pick for you. With that goal in mind, let’s delve into the various selections available and discern which might be the best pick for your requirements. The available options are:
Davinci Resolve, with its plethora of features, has stood out in the field of video editing and post-production for years. One feature that often gets overlooked but is incredibly vital to the final output quality is the Encoding Profile. This drop-down option offers an array of choices, each fine-tuned for different needs. But what do they all mean? Let’s delve deeper.

1. Auto
Starting with the simplest, the ‘Auto’ option does what it says on the tin. If you’re unsure about the technicalities, or you’re in a hurry, this setting lets DaVinci Resolve decide the best profile based on your project and output parameters. It takes into account factors like resolution, frame rate, and target medium to select a profile that’s a good fit. However, while convenient, it might not always provide the maximum optimization you could achieve manually.
Practical Uses:
- Beginners: For those new to video editing or unfamiliar with encoding nuances, this option simplifies the export process.
- Quick Exports: If you’re in a rush or if the video isn’t for a critical audience, ‘Auto’ can be a timesaver.
- General Viewing: For videos intended for casual viewing or non-professional platforms, allowing the software to decide can be efficient.
2. Base (H.264)
This is a highly compressed profile. If you’re familiar with video formats, you’ll know that compression is a balancing act. The ‘Base’ profile is optimized for scenarios like video conferencing and mobile phone use, where file size and speed are more critical than premium quality. If you’re creating content that will be predominantly viewed on smaller screens or over potentially unstable internet connections, this is a safe bet. But remember, due to the high compression rate, it may not retain all the fine details of your video.
Practical Uses:
- Video Conferencing: Ideal for applications like Zoom or Skype, where video quality isn’t the primary concern but smooth playback is.
- Mobile Viewing: For videos mainly viewed on mobile devices with smaller screens where minor quality drops might not be noticeable.
- Web Embeds: Useful for embedding videos on websites where quick loading times are prioritized over high resolution.
3. Main (H.264 & H.265)
The ‘Main’ profile is a versatile one. For H.264, it’s designed with SD analog transmission in mind. However, when you switch to the H.265 codec, the game changes. H.265’s ‘Main’ profile focuses on compressing 4:2:0 video up to 4K at 60fps with an 8-bit depth per channel. This is a good middle-ground for many users, offering decent compression without sacrificing too much quality. It’s especially suitable for content that will be viewed on diverse platforms, from tablets to TVs.
Practical Uses:
- Streaming Platforms: Perfect for platforms like YouTube or Twitch, where a balance between quality and smooth streaming is needed.
- Diverse Viewership: If you’re unsure where your video will be viewed (phones, tablets, desktops), this offers a balanced output.
- Home Videos: For personal content like home movies, where quality is essential but without going overboard.
4. Main10 (H.265 only)
Getting into the more advanced territory, the ‘Main10’ profile exclusively exists for the H.265 codec. The standout feature here is its ability to compress 4:2:0 video at up to 4K 60fps but with a higher bit-depth of 10-bits per channel. The increased bit-depth allows for finer gradations in color, making this profile ideal for content where color accuracy and richness are paramount. Whether you’re showcasing scenic shots, intricate designs, or just want your content to pop with vibrant colors, ‘Main10’ is a reliable choice.
Practical Uses:
- Nature & Travel Videos: Scenes with vibrant landscapes or colorful subjects benefit from the enhanced color range.
- Professional Content: Ideal for videographers and filmmakers who want their content to be both high quality and compatible with a range of devices.
- High-End Streaming: Platforms catering to a discerning audience expecting enhanced visual quality can benefit from videos encoded with this profile.
5. Main 4:2:2 10 (H.265 only)
Another exclusive for H.265, the ‘Main 4:2:2 10’ profile, is a step up. It offers compression for 4:2:2 video up to 4K at 60fps, with a bit depth of 10-bits per channel. The 4:2:2 color sampling provides more color information than 4:2:0, making this profile perfect for projects that will undergo post-production color grading or those where color fidelity is critical. The ‘Main 4:2:2 10’ profile is invaluable for professionals who prioritize color fidelity.
Practical Uses:
- Color Grading: This profile is a gem for post-production. The richer color information ensures more flexibility in color grading, allowing for nuanced adjustments without degrading the quality.
- Professional Broadcasts: Content intended for professional broadcasts or high-end streaming platforms can benefit from this profile, ensuring viewers get the best color experience.
- Archival Footage: For content creators who archive raw footage for future use, this profile ensures maximum preservation of color detail.
6. High (H.264)
If you’re aiming for platforms like Blu-Ray or HD transmissions, the ‘High’ profile for H.264 is your go-to. It provides less compression than the profiles discussed earlier, ensuring a higher-quality output suitable for larger screens and professional setups.
Practical Uses:
- Blu-Ray: This is the standard profile for Blu-Ray discs, ensuring that movies and series retain cinematic quality when played on home theater systems.
- HD Transmission: For TV broadcasters sending out HD signals or for live events streamed in HD, this profile ensures the audience receives top-notch quality.
- High-End Online Platforms: For platforms like Vimeo Pro or other professional video hosting services where viewers expect premium quality, the ‘High’ profile is a fitting choice.
- Film Festivals and Screenings: If you’re an independent filmmaker submitting your work to festivals or organizing private screenings, using the ‘High’ profile ensures your film is viewed in all its intended glory.
Choosing the Right Profile

While we’ve broken down what each profile does, the choice ultimately depends on your project’s nature and where it will be showcased. Always consider:
- Viewing Medium: Will it be viewed on mobiles, laptops, large screens, or a mix?
- Connection Stability: If streaming, will the audience have stable high-speed internet?
- Post-production: Will the video undergo further editing or color grading?
Understanding these profiles can make a noticeable difference in your output’s quality and optimization. DaVinci Resolve’s Encoding Profile offers a nuanced approach to cater to varied user requirements. Whether you’re a novice looking for a quick export or a seasoned professional aiming for the highest quality, understanding these options ensures that your content always looks its best.


