
As a seasoned filmmaker, I’ve had the pleasure of diving deep into many software tools. One that stands out for its versatility is DaVinci Resolve. If you’ve been following me on FilmmakingElements.com, you’d know how enthusiastic I am about this tool. Today, let’s explore the intricacies of Dolby Atmos Audio Mix in DaVinci Resolve Fairlight.
A Closer Look at DaVinci Resolve
DaVinci Resolve is no ordinary video editing software. It packs a punch with its myriad of features, and Fairlight is just one of its many shining facets. While I always advocate for constant learning, I must correct a past oversight. In my previous videos, I mentioned that DaVinci Resolve is free, implying that Dolby Atmos was accessible in the free version. However, that’s not entirely accurate.
The Dolby Atmos functionality comes with the paid version of DaVinci Resolve. But here’s the silver lining – if you invest in the DaVinci Resolve speed editor, the Blackmagic speed editor to be precise, you get access to the studio version. This controller, priced at $299 US, has been a game-changer for me. Having tried numerous controllers before, this was the first that truly resonated with my needs. It’s a regular feature in my editing routine. Essentially, if you opt for the speed editor, you’re also getting the studio version of DaVinci Resolve. Alternatively, purchasing the DaVinci Resolve Studio also bags you the speed editor, making it a win-win!
Fairlight’s Unique Workflow
It’s imperative to note that DaVinci Resolve is quintessentially a video editing software. Fairlight, while an integral part of it, still leans into video editing workflows. If you’ve primarily been working with digital audio workstations (DAWs), Fairlight’s approach might seem distinct. A particular divergence is the lack of MIDI support in DaVinci Resolve.
Now, I know some creators who use Fairlight as their primary DAW. But without MIDI, adjustments can get challenging. While there are workarounds involving VST plugins to infuse MIDI functionality into DaVinci Resolve Studio, my personal experience suggests a different route. My advice? Retain a secondary DAW for your music production. Once you’ve nailed the basic mix, transition the individual stems or tracks to the Fairlight page in DaVinci Resolve. This method allows for a smoother final DaVinci Resolve panel and rendering process within Fairlight.
Dolby Atmos Audio Mix in Davinci Resolve Fairlight
Step 1. Setting Up Your Audio Project
Initiating an audio project typically involves importing multiple audio clips that will serve different functions. For instance, consider the scenario where you have a primary audio track that sets the mood or tone – referred to as the ‘audio bed’. Additionally, you might have secondary tracks or ‘objects’ that are maneuverable and can be placed at various points for dynamic effects.
A real-world example: Imagine using a serene instrumental track as your audio bed for a visual project. This track might be something you’ve created, discovered online, or even sourced from dedicated audio bundles such as the ones released annually at major developer conferences.
However, while using specific sounds can be exciting, the primary goal should always be to master the software and techniques. Whether you’re using DaVinci Resolve or any other advanced tool, the art lies in how you manipulate and integrate various audio sources.
Step 2. Accessing the Fairlight Page
To initiate your journey, start by navigating to the Fairlight page:
- Launch DaVinci Resolve and open your project.
- On the bottom toolbar, find the ‘Fairlight’ tab, represented by a musical note icon. Clicking on this will transition you to the dedicated audio production environment.
While DaVinci Resolve offers multiple pages for different tasks, the Fairlight page is tailor-made for in-depth audio work. And that’s precisely where our focus will remain.
Activating Dolby Atmos

Dolby Atmos, a premium audio feature, isn’t enabled by default. To awaken its capabilities:
- Within the Fairlight page, head to ‘File’ from the menu on top, and then proceed to ‘Project Settings’.
- From here, select ‘Fairlight’ settings.
- Among the immersive audio options listed, check the box ‘Enable Dolby Atmos’.
- Confirm and save these changes.
By enabling Dolby Atmos, you’re essentially priming DaVinci Resolve to handle intricate audio tasks with this technology.
Customizing Your Audio Setup
For audio enthusiasts equipped with specific systems like 5.1 or 7.1 surround sound, DaVinci Resolve offers personalized configurations.
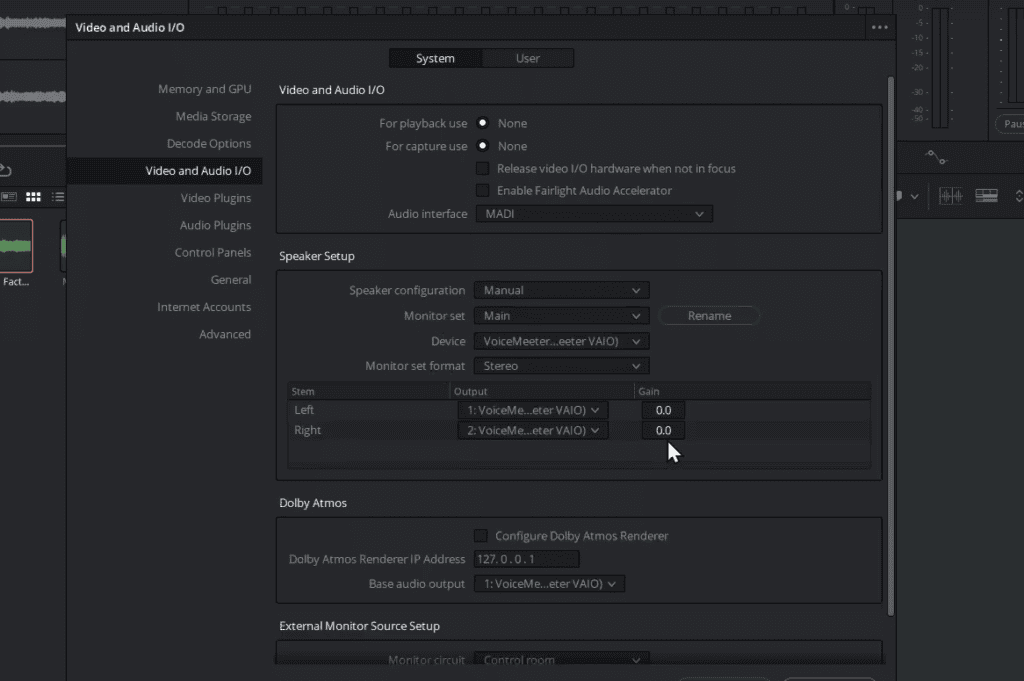
- While still in the Fairlight page, click on the ‘Davinci Resolve’ button from the menu on top and navigate to ‘Preferences’.
- Under the ‘Video and Audio I/O’ category, go to ‘Speaker Configuration’.
- Opt for the ‘Manual’ setting, granting you the liberty to modify various output and monitoring configurations.
Step 3. Kickstarting with a Timeline
Your first step in this audioscape is to establish a clear video foundation:
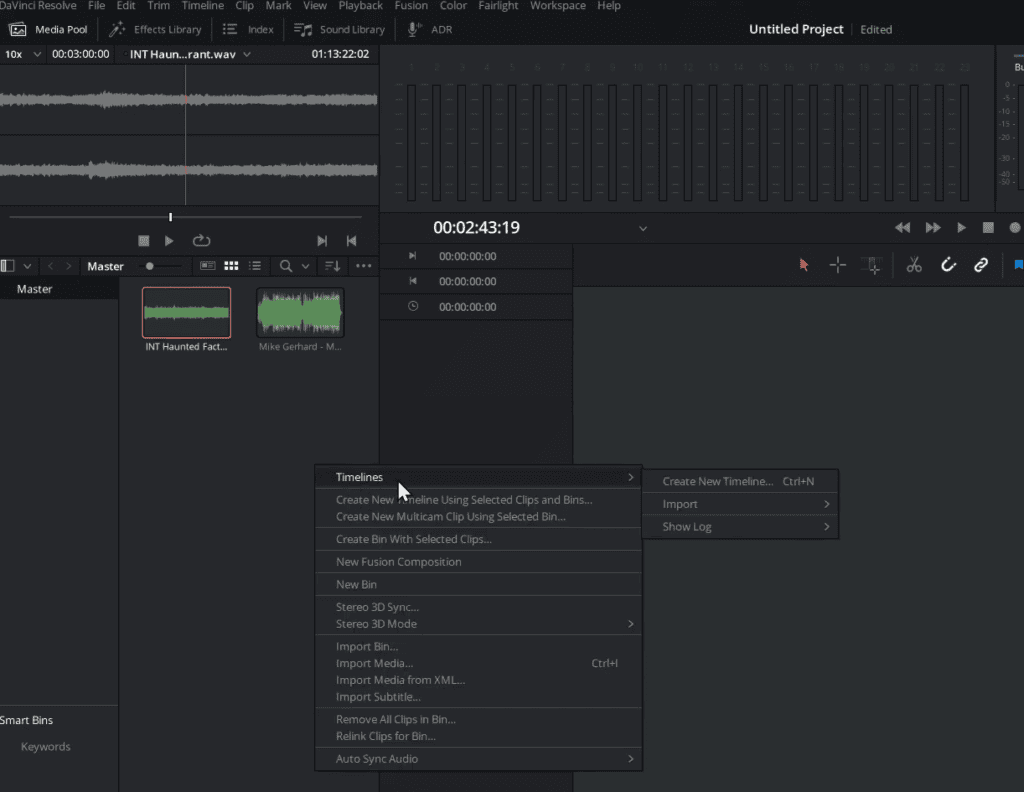
- Right-click within your ‘Media Pool’ workspace on the left side. A context menu will appear.
- Choose ‘Create New Timeline’, and select ‘Create’. Instantly, an empty audio track will materialize, destined to become your Dolby Atmos bed.
Step 4. The Art of Using Buses
A bus in audio jargon is a conduit through which your audio flows:
- Every audio clip you introduce gets filtered through the main bus, which eventually funnels the sound towards the stereo out. It’s a vital step ensuring your audio elements communicate correctly.
Step 5. Layering Audio Elements with Precision
Blending multiple audio elements can either craft harmony or wreak havoc:
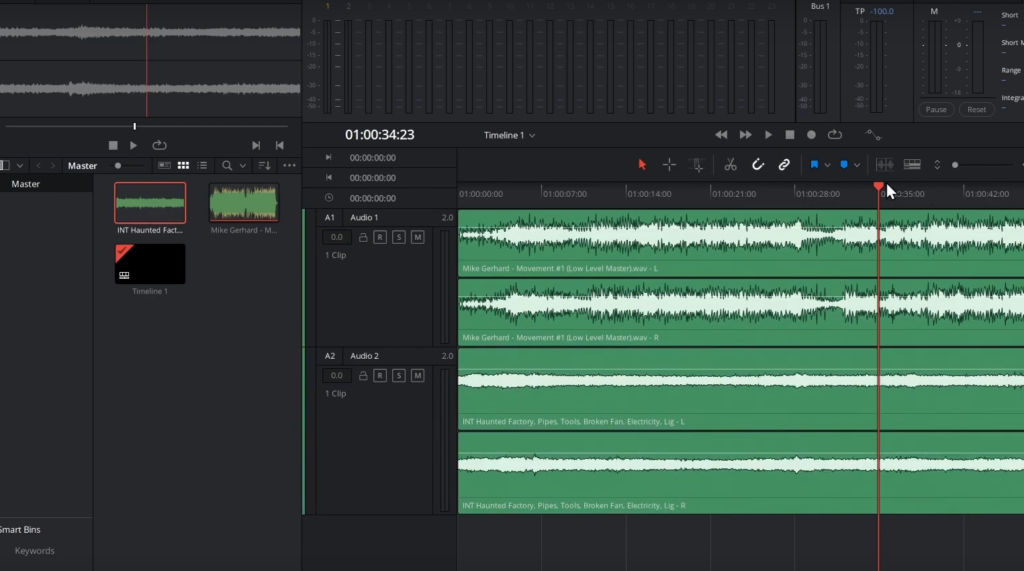
- Lay down the primary audio track (or the bed) on Audio Track 1.
- Drag and drop the object sound on the Audio Track 2. For instance,if you have a ‘drone’ sound. Drag and drop this sound on the Audio Track 2 to infuse it into your mix. Immediately, a second audio track emerges, cradling your drone sound.
- A crucial nuance: audio layers, when played together, can lead to sonic chaos. It’s essential to toggle individual layers on or off, ensuring each element finds its rightful space in the mix.
Step 6. Dynamic Automation & Dolby Atmos Fine-tuning
The zenith of audio mixing is when layers evolve and interact dynamically:
- Beyond merely stacking tracks, consider automation. It infuses life into your soundscape, ensuring each segment moves and breathes organically.
- As you get cozy with your base tracks, turn your attention to Dolby Atmos. Start by transforming your primary audio track (or the bed) to embrace a 7.1.2 configuration. This isn’t just a routine step. Adjusting the bus route from the default stereo output to direct it towards the Dolby Atmos render sets the stage for a sonic masterpiece.
Step 7. Accessing the Bus Format
- Start by heading to the Fairlight menu from top. This is where you’ll be making essential changes to your audio setup.
- Look for the ‘Bus Format’ option. Clicking on it will show you the current format (often set to ‘stereo’ by default).
Step 8. Switching to Dolby Atmos
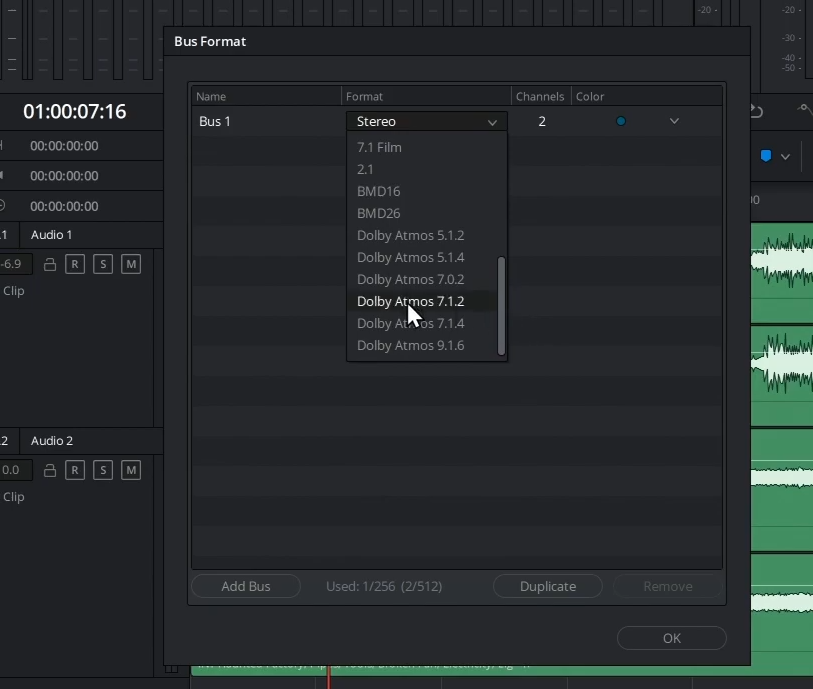
- To shift into the immersive world of Dolby Atmos, in the ‘Format’ drop-down menu, change the bus format to ‘Dolby Atmos 7.1.2’.
- An essential nuance to note: these 7.1.2 options (among others) will only appear if you’ve already activated Dolby Atmos within the project settings. If you haven’t done so, you won’t see these options.
Step 9. Exploring Advanced Panning
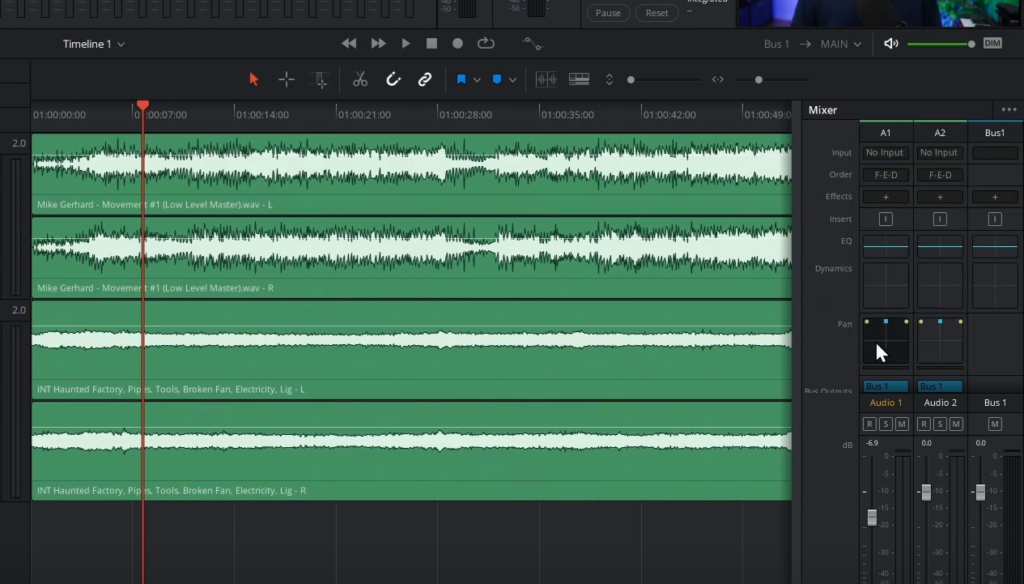
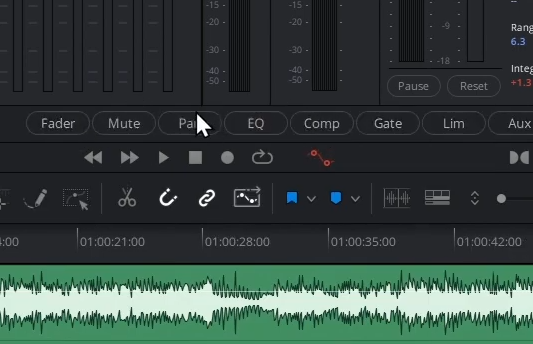
- With your audio now set for Dolby Atmos, you’ll observe a dramatic transformation in your panning controls in the mixer that is on the right of the timeline.
- If you don’t immediately see the panning option, don’t fret. Click on the ‘Mixer’ button from the top-right corner. Click on the three-dot icon (often located at a corner or edge of the pane) and ensure ‘Pan’ is enabled.
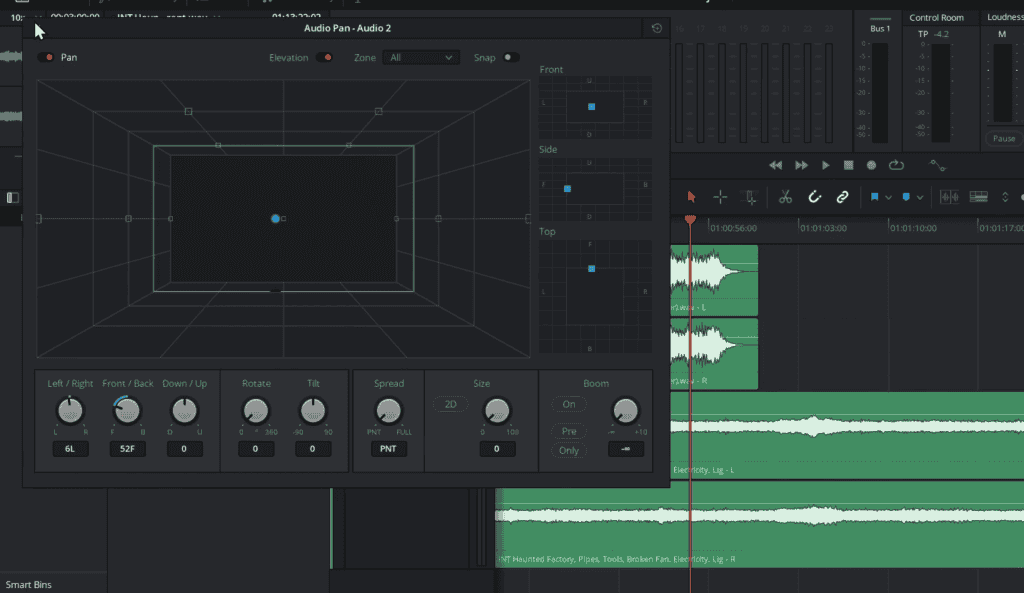
- The beauty of Dolby Atmos becomes apparent here. The panning now offers a 3D interface. Double-clicking the ‘Pan’ box on it will open up a three-dimensional view showcasing the object’s spatial positioning. For instance, green spheres indicate the positions of a stereo object.
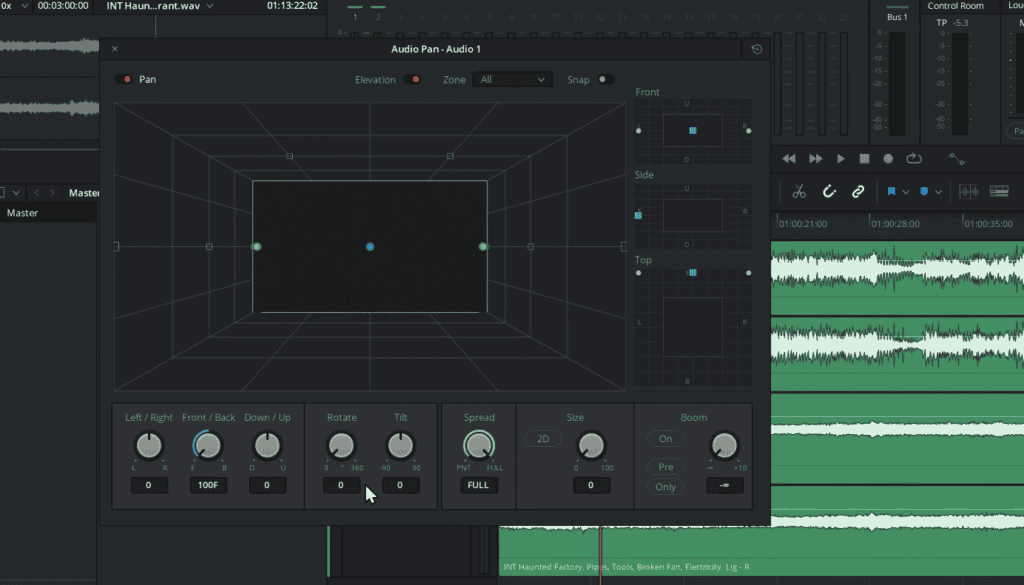
Step 10. Adjusting Objects in 3D Space
- Within this 3D view, you can freely move your audio objects, determining how they’ll sound in relation to other objects and the listener’s position.
- Though it’s tempting to tweak endlessly, remember that sometimes less is more. While you can adjust the position of these audio objects, it might be wise to stick close to their original position, especially if you’re new to this format.
Step 11. Automation Magic
- The final flourish in this audio odyssey is automation. Instead of static audio objects, automation lets you choreograph how they move and evolve over time, adding layers of depth and realism to your soundscape. We will get on it too further in this article.
Step 12. Optimizing Audio Routing in DaVinci Resolve
DaVinci Resolve offers an array of audio possibilities, especially when working with cutting-edge formats like Adobe Atmos. However, the strength of your audio mix lies not just in quality sound bites, but in how these sounds travel through the software – essentially, how they’re routed. Let’s delve into the intricacies of managing this in DaVinci Resolve.
1. The Significance of Correct Routing
- Begin by ensuring the routes between tracks and buses are correctly mapped. This is crucial, as the flow determines the final audio output.
2. Understanding Bus Assignments
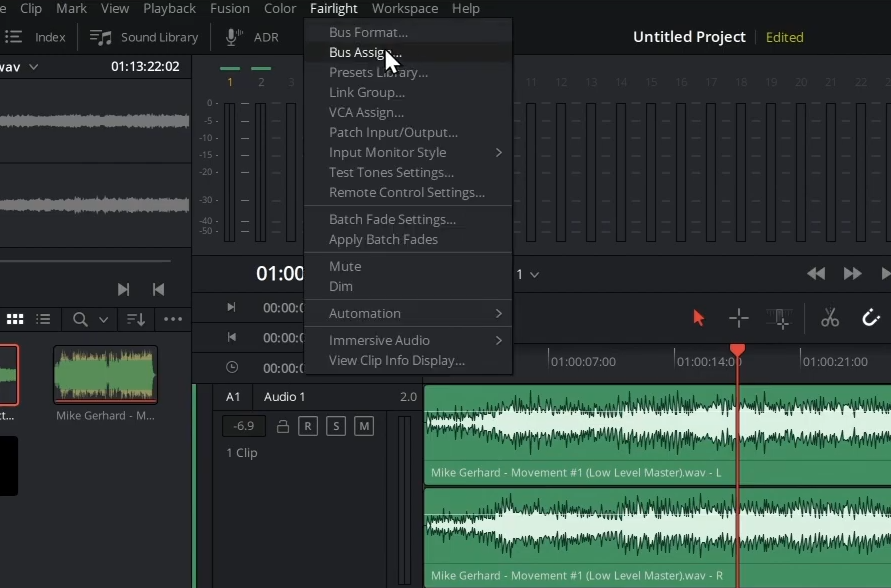
- When working with Adobe Atmos, one often uses multiple audio tracks and buses. For example, we are dealing with two tracks: ‘Audio 1’ and ‘Audio 2’.
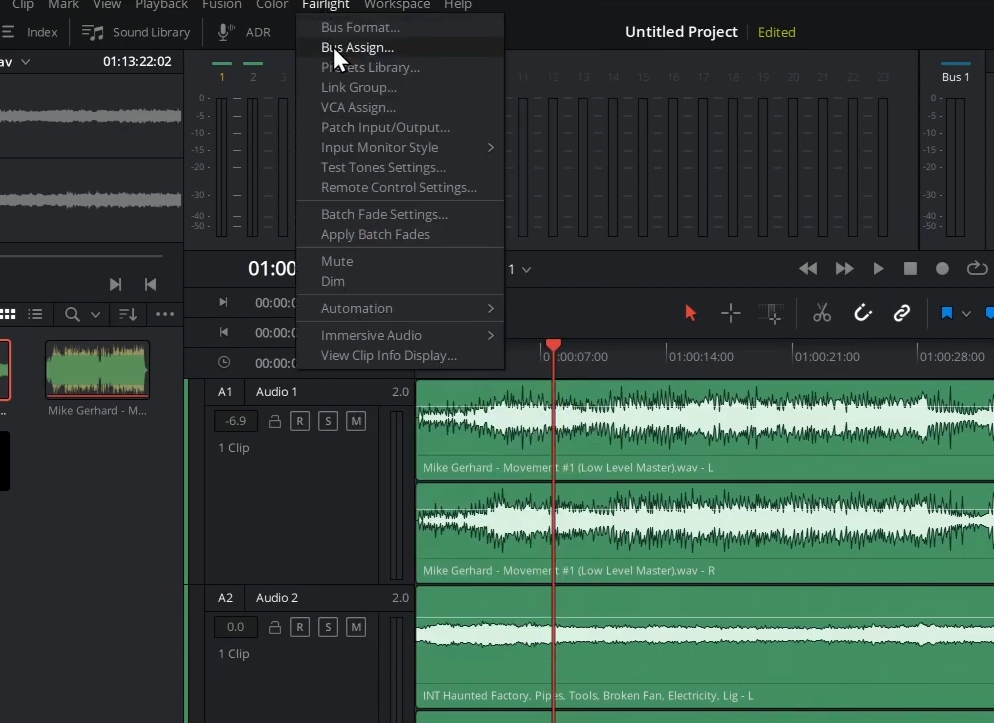
- Click on the ‘Fairlight’ button from the menu on top and select ‘Bus Assign’. The ‘Bus Assign’ menu item is where you define these connections. Admittedly, while powerful, the interface could be more intuitive.
3. Visualizing Hardware Patching

- By default, both ‘Audio 1’ and ‘Audio 2’ might be linked to ‘Bus 1’, but we need a change.
4. Redefining Connections for Adobe Atmos

- The goal is to have ‘Audio 1’ connected to ‘Bus 1’, which serves as the Adobe Atmos bed. However, ‘Audio 2’ should be directly routed to the Adobe Atmos renderer, acting as an Atmos object.
- To achieve this, access the ‘Bus Assign’ menu. Here, select ‘Bus 1 Out’ and simply deselect ‘Audio 2’. This ensures only ‘Audio 1’ feeds into ‘Bus 1’.
5. Understanding the Consequences of Incorrect Routing
- With ‘Audio 2’ disconnected from ‘Bus 1’ and not linked elsewhere, it essentially floats in limbo. Although its signal might appear active, no sound from this track will be audible in the output as it’s not leading anywhere.
6. Final Checkpoint
- Ensure that ‘Bus 1’ is the only entity currently feeding into ‘Stereo Out’. Any deviation might result in unwanted audio outcomes.
Step 13. Linking Audio Tracks to the Adobe Atmos Render in DaVinci Resolve
Let’s break down the steps on how to connect your audio tracks to the Adobe Atmos render efficiently.
1. Understanding the Fairlight Patch System
Fairlight operates on a patching principle reminiscent of classic audio setups. Imagine a physical patch bay, where audio channels can be connected from one point to another. This is the foundation of routing tracks to the Adobe Atmos render.
2. Accessing the Patch Input/Output
Begin by navigating to the ‘Patch Input/Output’ from the ‘Fairlight’ menu on top. This is your digital patch bay, facilitating the connections between different tracks and outputs.
3. Routing the Bed to the Adobe Atmos Render
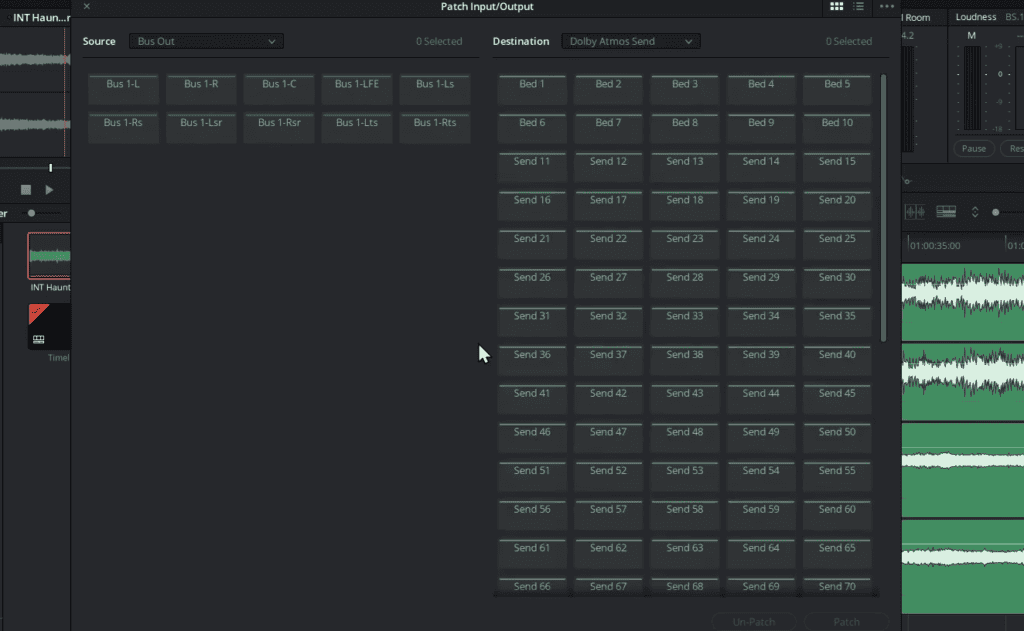
- From the ‘Source’ drop-down menu, select ‘Bus Out’.
- From the channels emerging from ‘Bus 1’, you will identify 10 distinct channels. This will be your bed.
- From the ‘Destination’ drop-down menu, select ‘Adobe Atmos Send’. Upon selecting it, you’ll see the entirety of channels within the Adobe Atmos environment – all 128 of them.
- The primary 10 channels function as the bed, while subsequent channels, from the 11th onward, serve as objects.
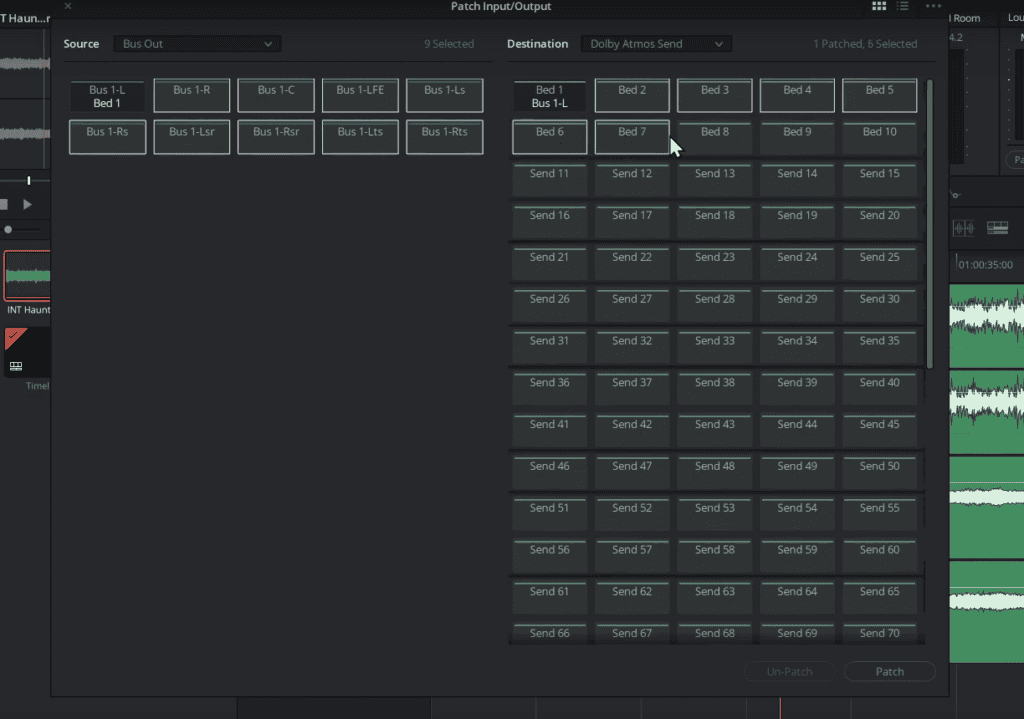
- Your task is to link the 10 channels from ‘Bus 1’ to the corresponding initial 10 channels of the Adobe Atmos render.
- To do this, for example, select ‘Bus 1-L’ on the ‘Source’ side select ‘Bed 1’ on the ‘Destination’ side, and click on the ‘Patch’ button. This can be done individually or by selecting all channels simultaneously and patching them to their Atmos counterparts.
4. Verifying the Connection
Once successfully patched, playing the audio should now route it through the Adobe Atmos render. This implies that your bed is correctly linked, ensuring the richness and depth of the Atmos environment in your audio mix.
Step 14. Routing Audio Tracks as Objects in DaVinci Resolve’s Dolby Atmos
After establishing the foundational connection for audio tracks within DaVinci Resolve, let’s delve deeper into the nuances of routing secondary audio tracks as objects in the Dolby Atmos environment. This adds layers to your soundscape, creating a truly immersive audio experience.
1. Returning to the Patch Input/Output
Your journey starts by revisiting the ‘Patch Input/Output’ from the ‘Fairlight’ menu on top. This will be the central hub for most of your routing requirements.
2. Patching Audio Track 2 as an Object
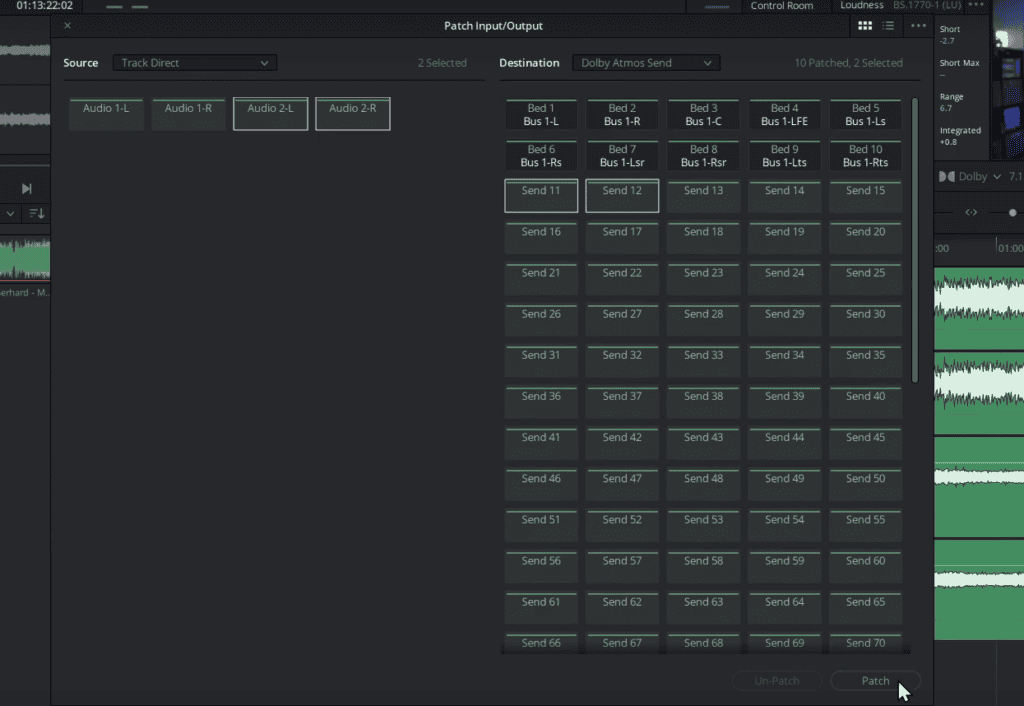
- Your aim is to channel ‘Audio 2’ into an object within the Dolby Atmos environment.
- Begin by selecting ‘track direct’ from the ‘Source’ drop-down menu. Select ‘Dolby Atmos Send’ from the ‘Destination’ drop-down menu.
- Now, patch ‘Audio 2-L’ to ‘Send 11’ and ‘Audio 2-R’ to ‘Send 12’ and click on ‘Patch’. Consider these as the primary channels you want to connect.
- Once patched, you’ve successfully integrated Audio 2 as an object.
3. Auditory Verification
Upon executing the above, play the audio. If done correctly, you’ll discern both the foundational bed and the object layer, enriching the overall audio profile.
4. Diving into Panning Functions
DaVinci Resolve’s Fairlight offers a dynamic panning function.
- Navigate back to the panning section by clicking on the ‘Pan’ box which is on the right of the timeline in ‘Mixer’.
- Within the panning function, you have the flexibility to spatially move the object sound, offering a dynamic audio placement and opening up possibilities for future objects.
Step 15. Mastering Automation in DaVinci Resolve’s Fairlight
Let’s deep dive into the process of automating panning, giving your sounds motion and depth within the Dolby Atmos environment.
1. Setting the Stage for Automation
To kick off the automation process:
- Engage the automation by tapping on the automation button which is above the timeline. This action reveals your automation options.
- Select the ‘Pan’ function.
2. Targeting the Desired Audio Track
Delve into the audio specifics.
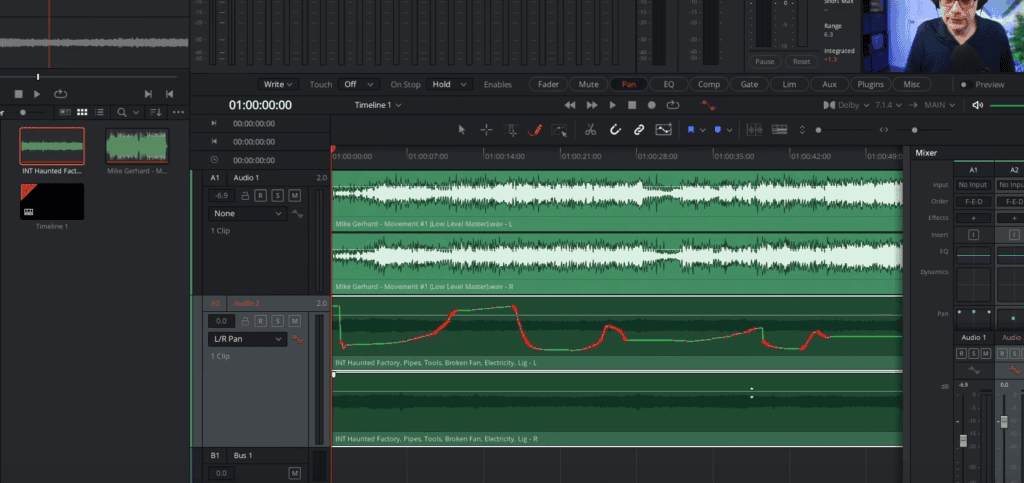
- Your attention should be on automating the panner in the secondary audio track.
- Go to ‘Audio Track 2’ and click on the drop-down menu which says ‘None’.
- Select Pan> L/R Pan
3. Embracing the Automation Tools
Fairlight provides a versatile toolkit for automation.
- Activate the automation lane by clicking on the automation button just on the right of the same drop-down menu, ensuring you have control over the automation parameters.
- Select the ‘Pencil’ tool from the menu above the timeline. Transition to a tool that permits you to sketch or draw out the automation. For instance, decide on a movement trajectory for the object.
- Dive into the preview mode by clicking on the ‘Pan’ box from the ‘Mixer’. This lets you audit your automation in real-time, offering a sonic understanding of the movements you’ve sketched.
4. Hearing the Automation in Action
Mute extraneous tracks to focus solely on your automated object. As you listen, you’ll discern the orchestrated movement, akin to an object shifting across the soundscape. Remember, this is just a rudimentary example. The real power of automation is unlocked when applied thoughtfully across multiple parameters, crafting an intricate and immersive audio landscape.
Step 16. Outputting Dolby Atmos Audio in DaVinci Resolve
Venturing into the final phase of your Dolby Atmos project in DaVinci Resolve? You’re ready to export, but unsure of the best way to proceed? Here’s a guide tailored for you:
1. Deciding on the Export Strategy
With Dolby Atmos music, you have the flexibility to choose your export method based on the project’s requirements:
- For integrations within video production: Navigate to the deliver page for rendering.
- For a standalone Dolby Atmos music track: Focus solely on the Dolby Atmos segment, ensuring purity in audio output.
2. Mastering the Export Process
Fairlight, embedded within DaVinci Resolve, offers an uncomplicated export journey:
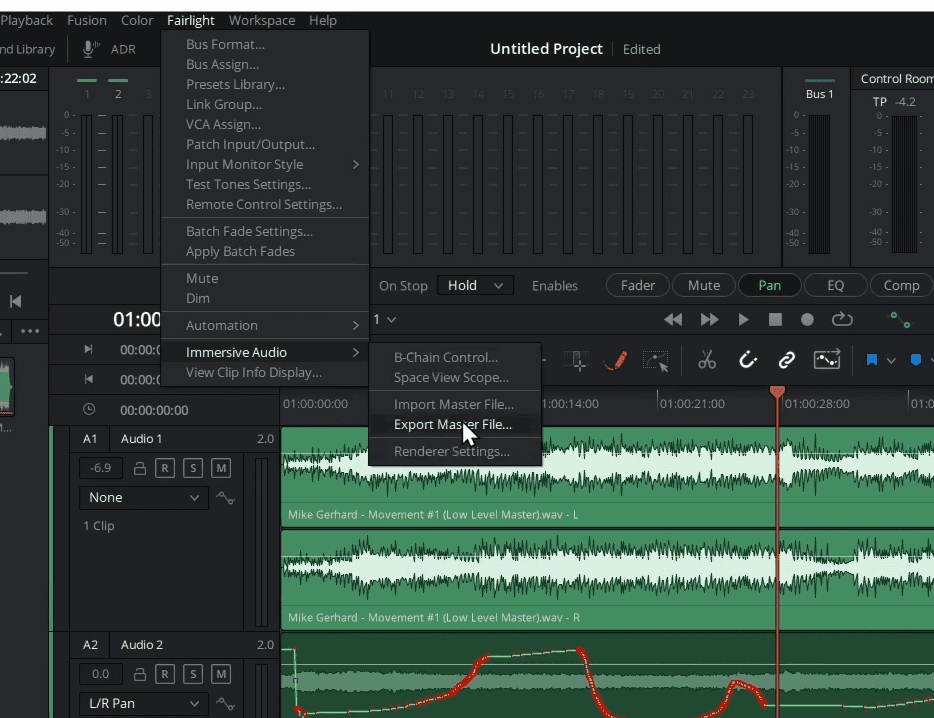
- Go to the ‘Fairlight’ menu from the top and select ‘immersive audio’.
- Choose the ‘export master file’ option.
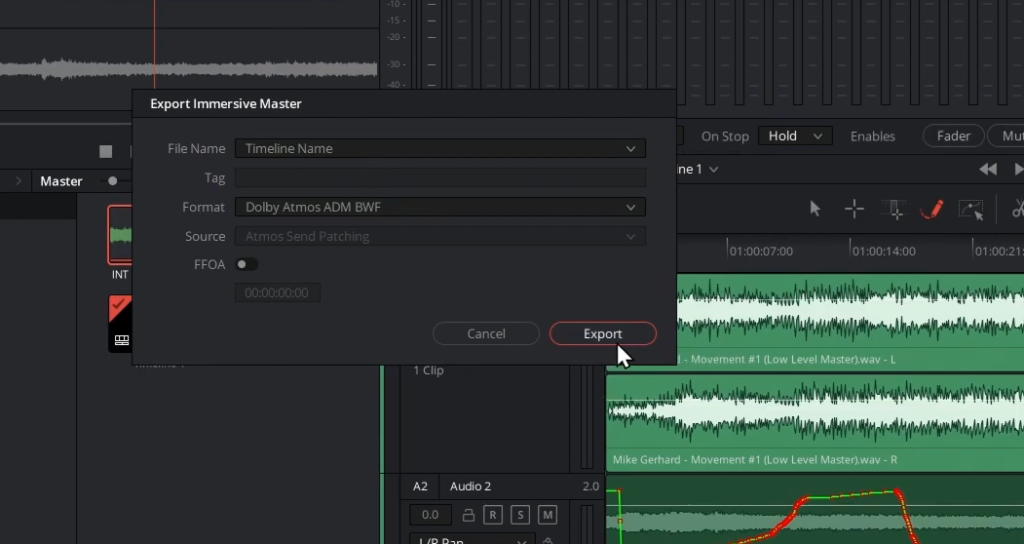
- You’re met with diverse Dolby Atmos formats. A prevalent choice is ADM BWF, drawing on its reliability.
- Name your file and proceed with the export. This action crafts a Dolby Atmos file, preserving all the intricate audio designs you’ve stitched together.
3. Closing Thoughts
The process is intuitive, ensuring a smooth transition for users across varied expertise levels. However, keep in mind, to fully access these features, you require the studio version of DaVinci Resolve. As an asset, not only for Dolby Atmos but also for video editing endeavors, it’s a worthy investment. Partner it with the speed editor for optimal results.
In summary, DaVinci Resolve’s capabilities in managing and exporting Dolby Atmos projects stand out, providing an end-to-end solution for audio aficionados. Dive in and experience it for yourself!