Hi, I’m Salik, the author of FilmmakingElements.com. I have been a filmmaker for over 10 years. I am also a certified DaVinci Resolve Trainer and I have used DaVinci Resolve for many of my projects. DaVinci Wide Gamut (DaVinci WG) and DaVinci Intermediate are cutting-edge Timeline Color Space and Gamma settings created by Blackmagic Design.
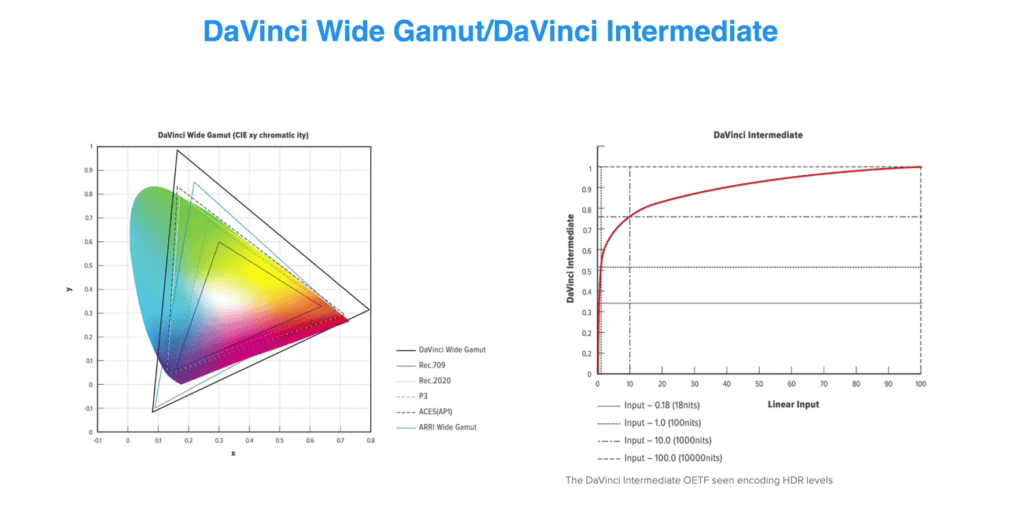
They offer a dependable and comprehensive internal working color space, capturing the largest possible range of image data from any camera. With a color space that exceeds BT.2020, ARRI Wide Gamut, and even ACES, you can be confident that no image data will be lost, regardless of the media source.
DaVinci WG’s primary color values are meticulously designed to facilitate highly accurate automatic mapping of source media from diverse cameras. This precision is maintained during the Input to Timeline Color Space conversion, enabling greater consistency when manually grading media from various cameras (although some variations due to camera and lens system differences may persist).
Moreover, DaVinci WG delivers increased accuracy in tone and saturation mapping throughout the Timeline to Output Color Space conversion. The enhanced accuracy and consistency offered by DaVinci Wide Gamut and DaVinci Intermediate make them indispensable assets for colorists and video editors aiming to refine their color grading workflow.
Understanding Davinci Wide Gamut In Layman’s Language
DaVinci Wide Gamut, in layman’s terms, is a vast color space that goes beyond the visible range of the human vision system. This colossal gamut encompasses all delivery gamuts you might need, making it easier for Resolve Color Management (RCM) to convert from one gamut to another. The flexibility of Resolve Color Management allows you to choose whether or not to use DaVinci Wide Gamut and DaVinci Intermediate as your Timeline color space. Although optional, these settings offer numerous advantages and can enhance your workflow.
DaVinci Intermediate, an OETF gamma setting, is designed to work seamlessly with DaVinci Wide Gamut. This combination provides a suitable internal luminance mapping of high precision image data, preparing your content for mastering to HDR or SDR standards without losing any image data.
Before the advent of DaVinci Wide Gamut, colorists and video editors relied on various camera gamuts for a wide gamut workspace. However, DaVinci Wide Gamut eliminates the need for that by offering a robust, no-compromise color space that accommodates all the content you may encounter, whether you’re making adjustments as a colorist or working with the math of color management.
Two Methods of Using Davinci Wide Gamut In Davinci Resolve
Setting Up DaVinci Wide Gamut Workflow in DaVinci Resolve: Project Level Method
Incorporating DaVinci Wide Gamut into your DaVinci Resolve workflow provides a broader color space, allowing for increased flexibility and precision in color grading. To set up DaVinci Wide Gamut at the project level, follow these detailed steps:
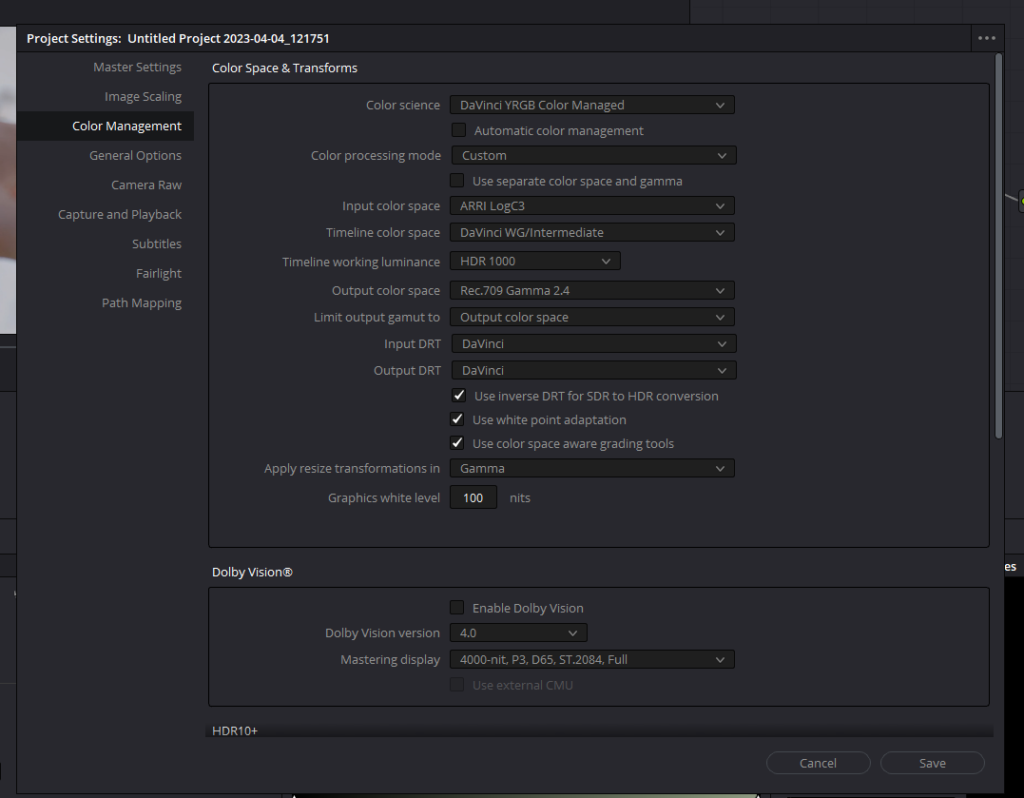
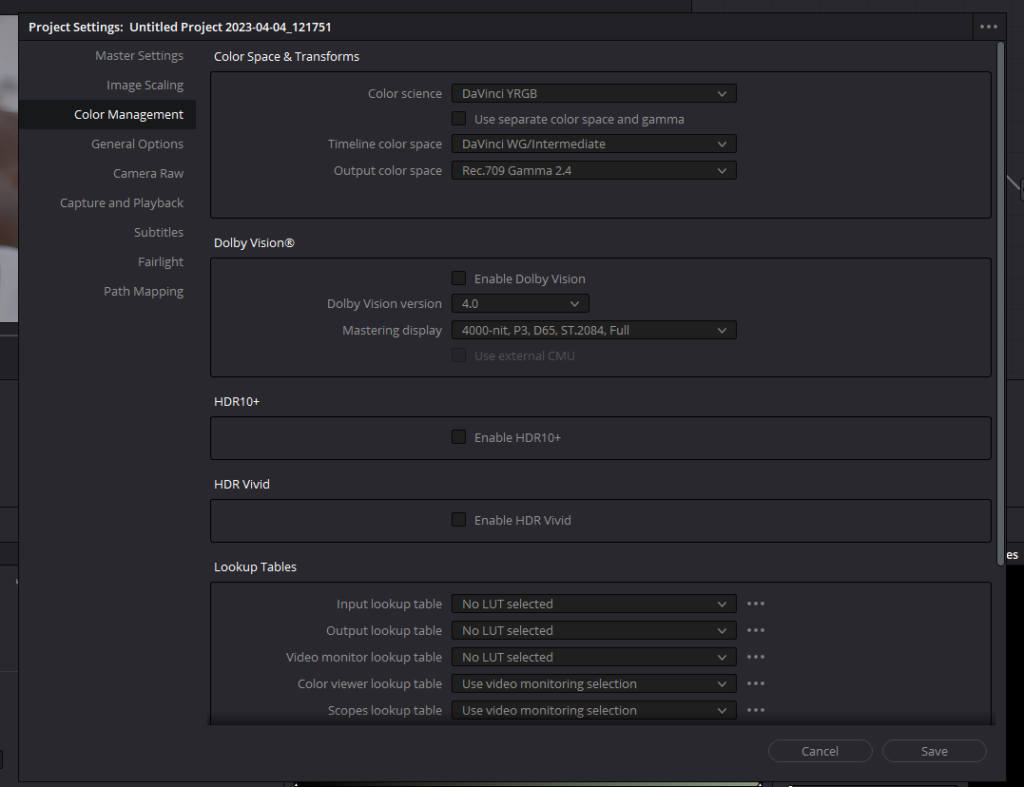
- Access project settings: In DaVinci Resolve, click on the gear icon located in the bottom right corner to open the project settings window.
- Navigate to color management: Within the project settings window, click on the “Color Management” tab on the left side to access color management settings.
- Select DaVinci YRGB Color Managed: In the “Color Science” section, choose “DaVinci YRGB Color Managed” from the drop-down menu. This selection enables advanced color management features in DaVinci Resolve.
- Customize color management: Uncheck the “Automatic Color Managment”, and in Color Processing mode, choose “Custom” from the drop-down menu. This allows you to access and customize advanced color management settings.
- Set input color space: Identify the camera used for the project and set the “Input Color Space” accordingly. For example, if the project was shot on an Arri camera, select “Arri LogC3.”
- Set timeline color space: Change the “Timeline Color Space” to “DaVinci WG/Intermediate.” This setting allows you to work with a broader color space, providing more room for color grading adjustments and better color management.
- Adjust output color space: Set the “Output Color Space” to “Rec. 709 Gamma 2.4.” This ensures that your output color space matches the most common display standard.
- Save project settings: Click “Save” to apply the changes and establish a color-managed workflow in DaVinci Resolve. As the clips undergo transformation, you’ll notice a dramatic change in their appearance. Colors will display with a natural saturation, and the contrast will be noticeably elevated. This enhancement leads to a more visually appealing and captivating viewing experience.
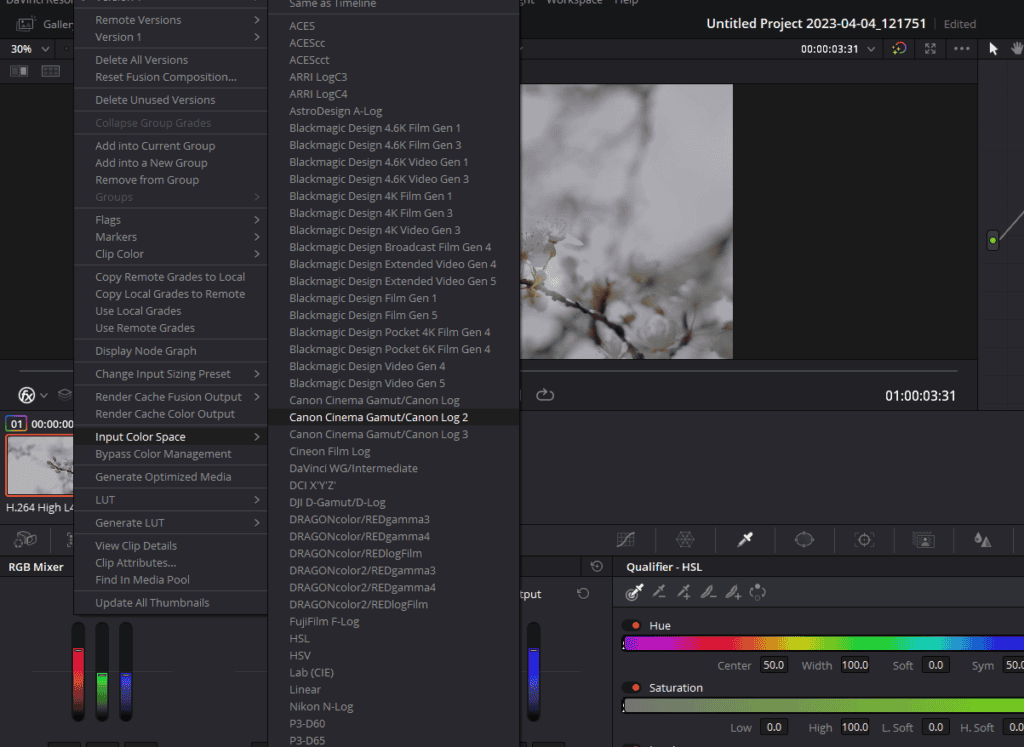
- Working with mixed cameras: If you have footage from multiple different cameras from different camera manufactures in the timeline, which means you’ll need to adjust the input color space to match the current project settings. In the clip thumbnail viewer, select all the clips from different cameras. Right-click on the selected clips, and choose ‘Input Color Space’. From the options, select the appropriate color space that corresponds to the footage.
Scene Referred Workflow
By implementing the project level method for the DaVinci Wide Gamut workflow, you can take advantage of a broader color space in your timeline, leading to more accurate color grading and better overall image quality. This setup ensures that your output color space remains compatible with standard displays, while still providing the benefits of working within the DaVinci Wide Gamut color space. This scene referred workflow is not just efficient but gives the best color rendition.
When working with DaVinci Wide Gamut, you can utilize color space-aware tools such as curves, HDR wheels, color warper, and keys for more precise adjustments. By using these tools in combination with the project level method for the DaVinci Wide Gamut workflow, you can achieve professional results in color grading while maintaining compatibility with standard display formats.
Setting Up DaVinci Wide Gamut Workflow in DaVinci Resolve: Node Level Method
In this section, we’ll dive deeper into the process of applying the DaVinci Wide Gamut workflow at the node level in DaVinci Resolve. This method offers more flexibility and control over the color space, making it ideal for various grading scenarios.
Setting Up Node-Level DaVinci Wide Gamut Workflow

- Configure project settings: Start by opening your project settings and navigating to the Color Management tab. Change the Color Science to Davinci YRGB, timeline color space to DaVinci WG/Intermediate and output color space to Rec. 709 Gamma 2.4 and click on Save.
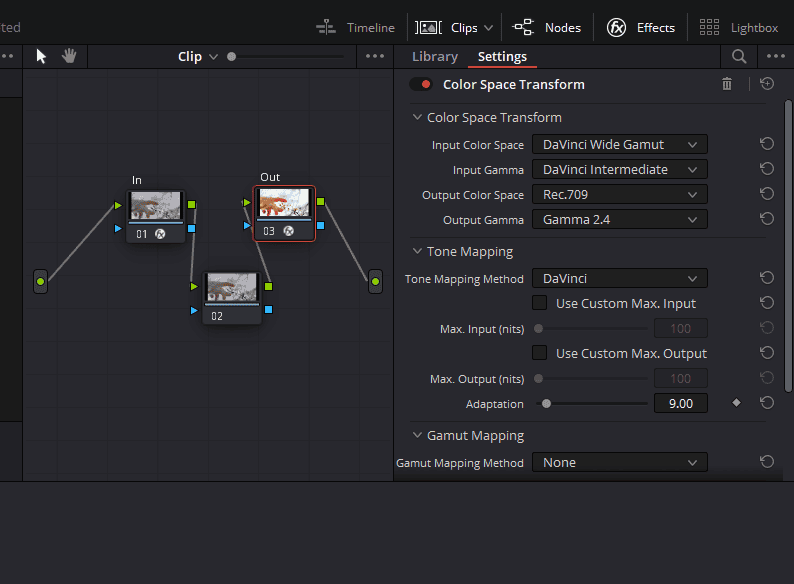
- Prepare nodes in the node editor: In the node editor, create two nodes labeled “In” and “Out.” By right-clicking on a node and selecting Node Label, you can rename it. These nodes will handle the color space transformations for your footage.
- Add Color Space Transform effect: Click on the Effects button from the top right corner. Locate the Color Space Transform effect in the effects library and add it to both the In and Out nodes.
- Configure the In node: For the In node, set the input color space to match your camera’s color space, for example, Arri Wide Gamut 3 for Input Color Space and Arri LogC3 for Input Gamma. Set the Output Color Space to DaVinci Wide Gamut and DaVinci Intermediate for Output Gamma. This node is responsible for transforming the camera color space to the DaVinci Wide Gamut color space.
- Configure the Out node: In the Out node, in the Color Space Transform, set the Input color space to DaVinci Wide Gamut and DaVinci Intermediate for Input Gamma, and the Output Color Space to Rec. 709 and Gamma 2.4 for Output Gamma. The Out node will handle the transformation from DaVinci Wide Gamut color space to the final output color space, which is typically Rec. 709 for most displays.
Grading Within the DaVinci Wide Gamut Color Space
With the node-level DaVinci Wide Gamut workflow set up, you can now start grading your footage. Perform your color grading adjustments between the In and Out nodes, as this is where you will be working within the DaVinci Wide Gamut color space.
- Primary adjustments: Begin with primary adjustments using Lift, Gamma, and Gain controls. You can also use HDR wheels, as they are color space-aware and work well within the DaVinci Wide Gamut color space.
- Secondary adjustments: Proceed to secondary adjustments such as the Color Warper for skin tones, temperature adjustments for color balance, or other tools as needed for your specific grading requirements.
- Additional grading nodes: You can add more nodes between the In and Out nodes to perform more complex grading tasks, such as isolating specific colors, creating masks or windows, or adding special effects.
The node-level DaVinci Wide Gamut workflow provides more flexibility and control when working with different color spaces, making it an excellent choice for a range of grading scenarios. By following the steps outlined above, you can efficiently utilize the benefits of working within the DaVinci Wide Gamut color space in DaVinci Resolve.
Conclusion
In conclusion, we would like to thank all our readers for taking the time to explore the DaVinci Wide Gamut workflow in DaVinci Resolve. We hope this article has provided valuable insights and practical tips for implementing this powerful color management tool in your projects. By harnessing the benefits of the DaVinci Wide Gamut color space, you can elevate your color grading skills and achieve stunning results. Happy grading!
- Also Read-ACES Workflow In Davinci Resolve: 2 Methods
- Also Read-Color Management In Davinci Resolve
- Also Read- Dehancer vs Filmbox
- Also Read- Film Look In Davinci Resolve (Full Guide)+ Free Powergrade
- Also Read- How to use Face Refinement In Davinci Resolve (Complete Guide!)