Hi, I’m Salik, the author of FilmmakingElements.com. I have been a filmmaker for over 10 years. I am also a certified DaVinci Resolve Trainer and I have used DaVinci Resolve for many of my projects. Capturing the perfect shot is just the start when it comes to videography. In the world of post-production, a multitude of creative possibilities emerge, one of which is the intriguing ‘mirror effect’. This cinematic trick, when executed correctly, can add an element of surrealism, symmetry, and aesthetics to your videos.
DaVinci Resolve, a robust post-production software, has some excellent tools for achieving this effect. In this article, we’ll guide you through three different methods for creating a mirror effect in DaVinci Resolve. Whether you are a seasoned professional or a video-editing novice, these straightforward steps will help you transform your footage into mesmerizing mirrored masterpieces. Let’s dive in and start reflecting the potential of your creativity!
DaVinci Resolve, a comprehensive video editing software, offers a plethora of unique effects to spice up your video content. One such intriguing feature is the ‘Mirrors’ effect. Although a niche tool not commonly used in everyday editing, it has the power to bring a fresh and mesmerizing twist to your visuals. In this detailed tutorial, we’ll learn how to effectively apply and manipulate this effect to transform a simple cityscape time-lapse into a stunning mirrored masterpiece.
Method 1: Using the Mirrors Effect in DaVinci Resolve
Step 1: Setting Up Your Workspace
Kick off the process by launching the DaVinci Resolve software on your system. Once the software is up and running, direct your attention to the editing workspace. Here, you’ll find multiple tabs for different tasks, such as ‘Media’, ‘Cut’, ‘Edit’, ‘Fusion’, and so on. For this method, focus on the ‘Edit’ tab, as it’s where we will be performing most of our actions.
Step 2: Adding Your Clip
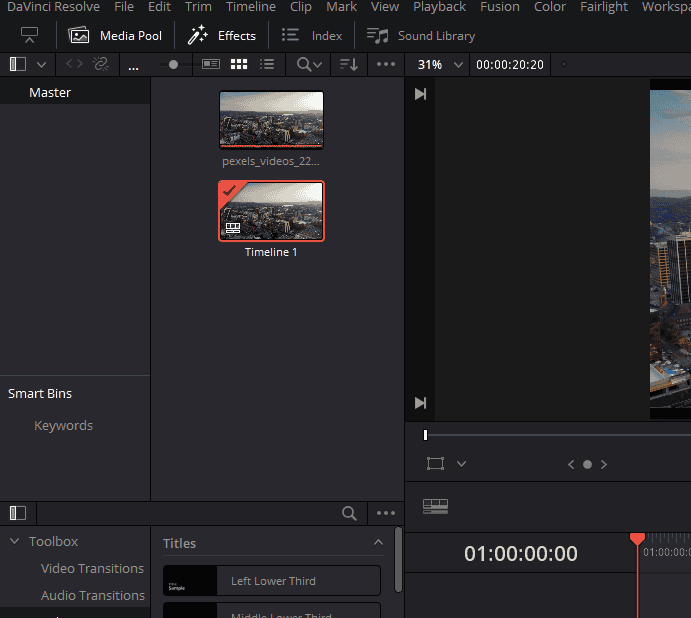
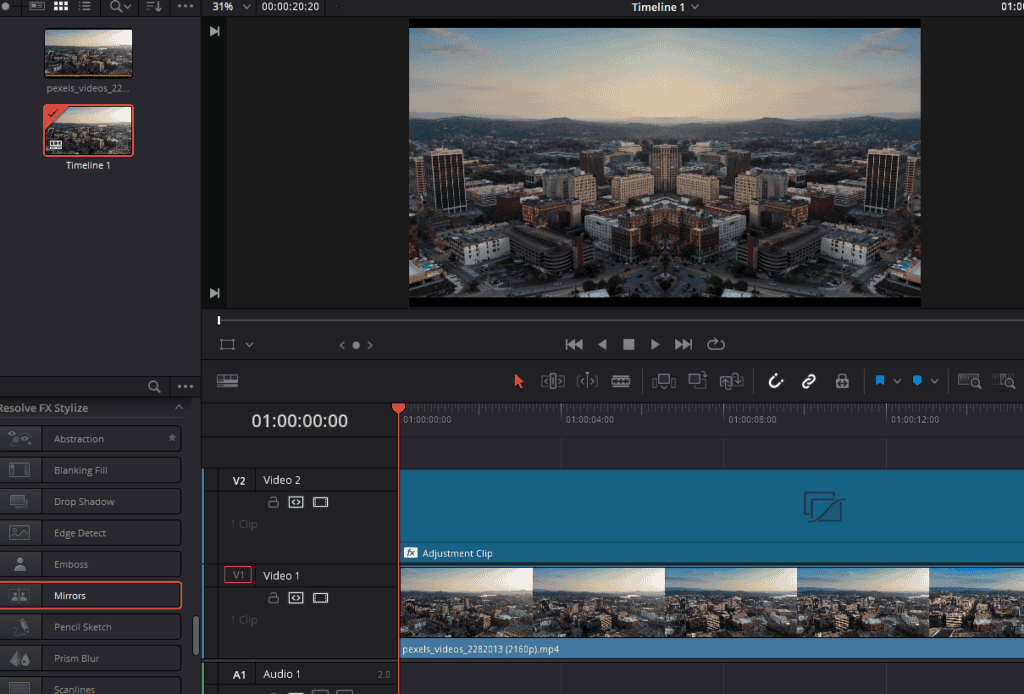
Now that we’re all set with the software, the next step is to choose the video clip you want to work on. In the ‘Media Pool’, that is on the left corner of the screen, drag and drop your selected clip in which you want the mirror effect.
Select your desired video file and drag it onto your timeline. For example uses a time-lapse of a cityscape, a creative choice that makes for an interesting visual when subjected to the mirror effect.
Step 3: Exploring the Effects Library
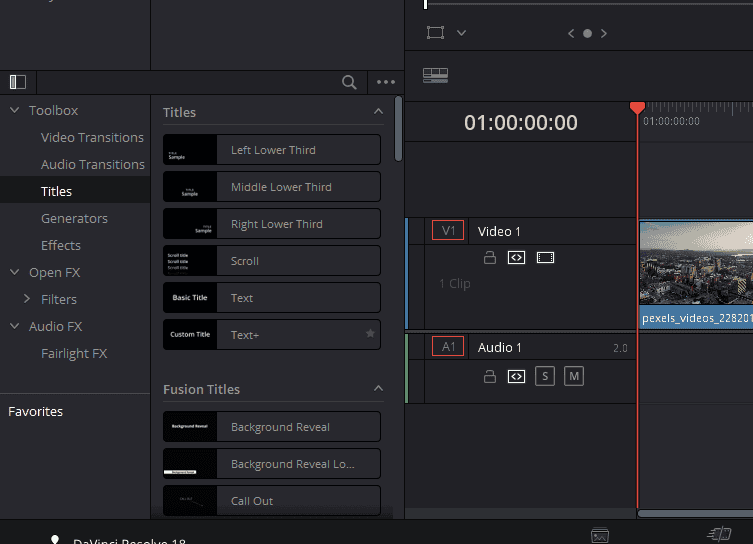
At this point, we’ve arranged our workspace and set up our video clip in the timeline. The next step involves familiarizing ourselves with the ‘Effects Library’. Located in the top left-hand corner of the workspace, the ‘Effects’ button holds an assortment of tools that can enhance your video editing process. Once you click to open it, you’ll discover a ‘Toolbox’ containing an array of effects, transitions, titles, and generators that you can apply to your clips.
Step 4: Employing an Adjustment Clip
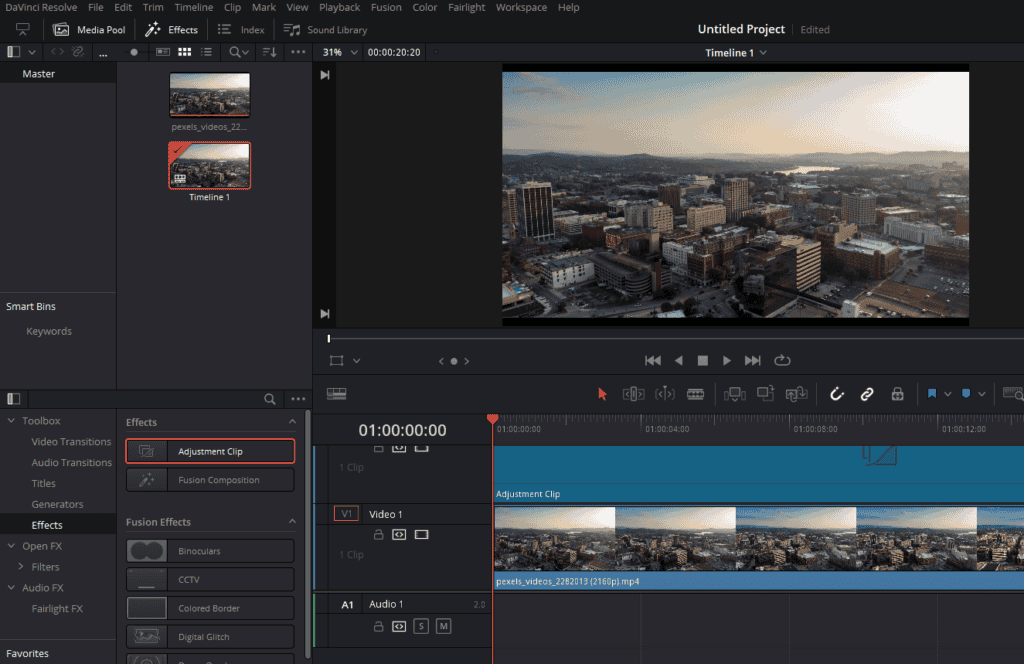
Within the effects library, you have the choice to either apply the mirror effect directly to your clip or use an adjustment clip. Applying the effect directly on the clip alters the original file, whereas an adjustment clip lets you add effects non-destructively, i.e., without tampering with the original clip. Using an adjustment clip offers more control and flexibility, making it a popular choice among seasoned video editors.
To use an adjustment clip, click on the ‘Effects’ option in the ‘Toolbox’, drag an ‘Adjustment Clip’ onto the timeline, and place it above your footage. Remember to adjust its length to match the duration of your video clip.
Step 5: Applying the Mirrors Effect
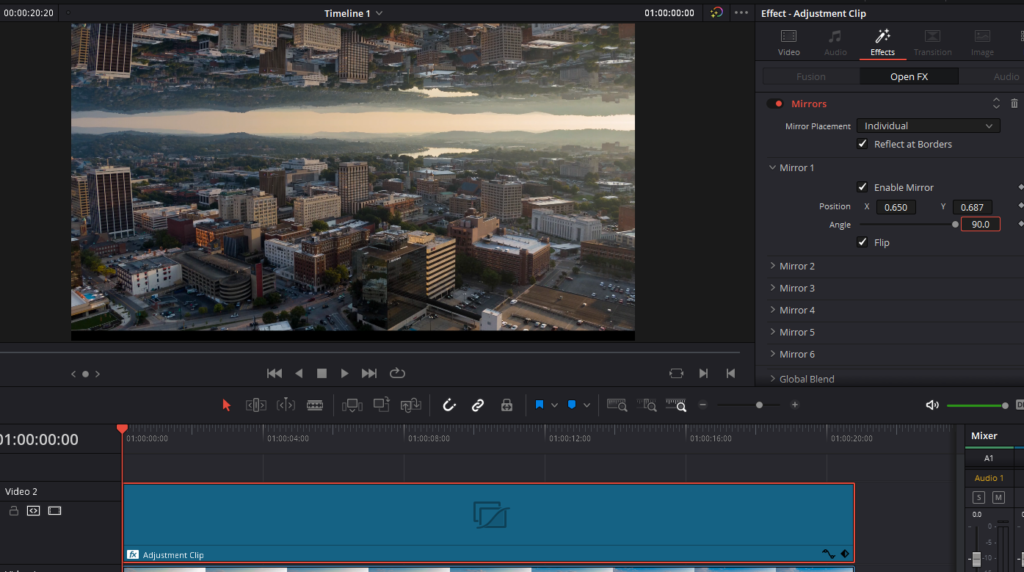
Now comes the exciting part – adding the ‘Mirrors’ effect to our video. In the ‘Open FX’ section within the effects library, here, you’ll find the ‘Mirrors’ effect waiting for you. Click on ‘Mirrors’, drag it, and drop it onto your adjustment clip. As soon as you do this, you’ll notice a dramatic transformation in your video clip.
The ‘Mirrors’ effect creates a line down the center of the screen, reflecting the left side of the video onto the right. It’s an initial setup that’s ripe for customization. The symmetry of the scene has changed, and your ordinary cityscape now boasts a duplicated, mirrored look.
Step 6: Diving into Customization
Once the ‘Mirrors’ effect is in place, it’s time to put your creativity into gear. Click on the adjustment clip and then open the ‘Inspector’ found in the top right-hand corner of the workspace. The ‘Inspector’ is where you control all the adjustments and effects applied to your clip. Under the ‘Effects’ tab within the ‘Inspector’, you’ll find the ‘Mirrors’ effect settings. Double-click to expand the menu, and you’ll be presented with numerous customization options.
Step 7: Understanding Mirror Placement
In the ‘Mirrors’ settings, you’ll find the first option called ‘Mirror Placement’. This control allows you to define how and where the mirrors are placed. Choosing ‘Individual’ allows you to create up to six individual mirrors that you can manipulate and combine to achieve various effects.
Step 8: Delving into Individual Mirror Controls
In this method, we’ll focus on the ‘Individual’ mirror setting, which offers a lot of flexibility. Here, you can enable or disable mirrors and adjust their X and Y positions, as well as their angle. For example, setting the angle to 90 degrees significantly alters the scene, giving the cityscape a mesmerizing mirrored lake effect.
Step 9: Adding More Mirrors
If a single mirror doesn’t satiate your creative hunger, you can always add more. Expand ‘Mirror 2’, enable it, and you’ll find another mirror at your disposal. This new mirror creates a vertical reflection, adding to the horizontal reflection from ‘Mirror 1’. Adjust the placement of these mirrors to conjure up a variety of unique effects.
Step 10: Utilizing the Flip Option
The last stop in our exploration of the ‘Mirrors’ effect is the ‘Flip’ checkbox. By default, the effect reflects the top half of your video onto the bottom half. However, if you want to flip this around and reflect the bottom half onto the top, simply check the ‘Flip’ box.
Method 2: Creating a Mirror World Bend Effect with DaVinci Resolve
This method is relatively easy to implement and can be completed in a short time frame.
Step 1: Setting Up the Workspace
To begin with, select the desired clip on which you want the mirror world bend effect and drag and drop the clip onto the timeline. Select the clip and navigate to the ‘Effects (on the top-right corner)’ on your DaVinci Resolve Edit page. Here, you will find ‘Open FX’, which houses the tools we need for this method.
Step 2: Finding the Mirrors Effect
Within the ‘Open FX’ tab in the effects library, make use of the search bar at the top. By typing in ‘MIRR’, the software will present you with the ‘Mirrors’ effect. All you have to do is drag and drop this effect onto the clip you wish to edit.
Step 3: Altering the Effect Settings
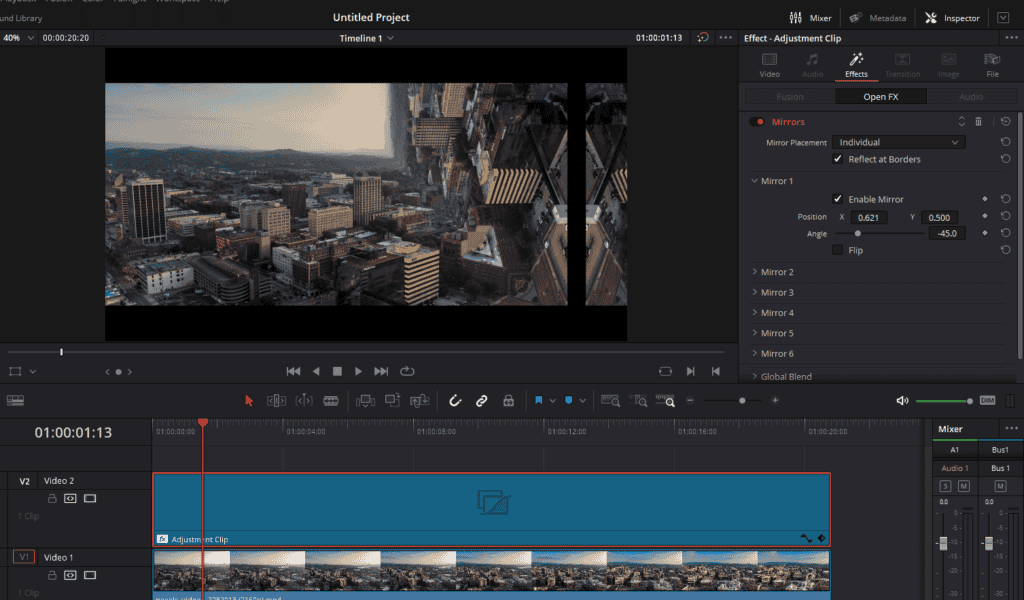
Having added the ‘Mirrors’ effect to your clip, select that clip (if it isn’t selected already) and head over to the ‘Inspector’ panel by clicking on the ‘Inspector’ button on the top-right corner. Here, under the ‘Effects’ section, input ‘-45’ into the ‘Angle’ value field. This alteration will create a vertical mirror line in your footage, adding a neat visual twist to the scene.
Step 4: Adjusting the Mirror Position
With the vertical mirror line in place, it’s time to adjust its position. Shift the position ‘X’ to the right-hand side to position the mirror effect according to your creative vision.
Step 5: Adding Variation to the Effect
In some scenarios, you might have elements in your footage, that you want to be unaffected by the mirror effect. To achieve this, you can use the ‘Flip’ checkbox found in the same ‘Effects’ section of the ‘Inspector’ panel. After enabling the ‘Flip’ option, adjust the ‘Position X’ to place the mirror effect on the other side of your chosen element.
Step 6: Creating the Inception World Bend Effect
The combination of the ‘Mirror’ effect, angle alteration, and position adjustment results in an ‘Inception World Bend Effect’. This effect is reminiscent of the visual distortions seen in the film Inception, and it can add a significant impact to your video content.
Method 3: The Mirror Kaleidoscope Rosette Effect in DaVinci Resolve
Dive into the mesmerizing world of mirrored visuals with our third method – the ‘Mirror Kaleidoscope Rosette Effect’ in DaVinci Resolve. This particular effect is a unique blend of color, motion, and abstract symmetry that is guaranteed to grab attention. It’s especially useful in music videos or in any video content paired with a compelling soundtrack.
Step 1: Starting With the Right Footage
After opening DaVinci Resolve and heading to the ‘Edit’ tab, import your desired footage into your media pool. For this effect, vibrant clips with lots of color, contrast, and movement are your best bet.
Step 2: Preparing the Footage
Once you’ve selected your footage, add it to the timeline. This timeline will be the stage where your mirror kaleidoscope effect will come alive.
Step 3: Accessing the Mirrors Effect
Next, open the ‘Effects’ located in the top left corner. Navigate to ‘Toolbox’, then ‘Open FX’. Here, you will find the ‘Mirrors’ effect that you can apply directly to your footage.
Step 4: Applying the Mirrors Effect
To apply the ‘Mirrors’ effect, simply drag and drop it onto your footage on the timeline. After a couple of seconds, you’ll notice that your footage is mirrored from left to right.
Step 5: Modifying the Mirrors Effect
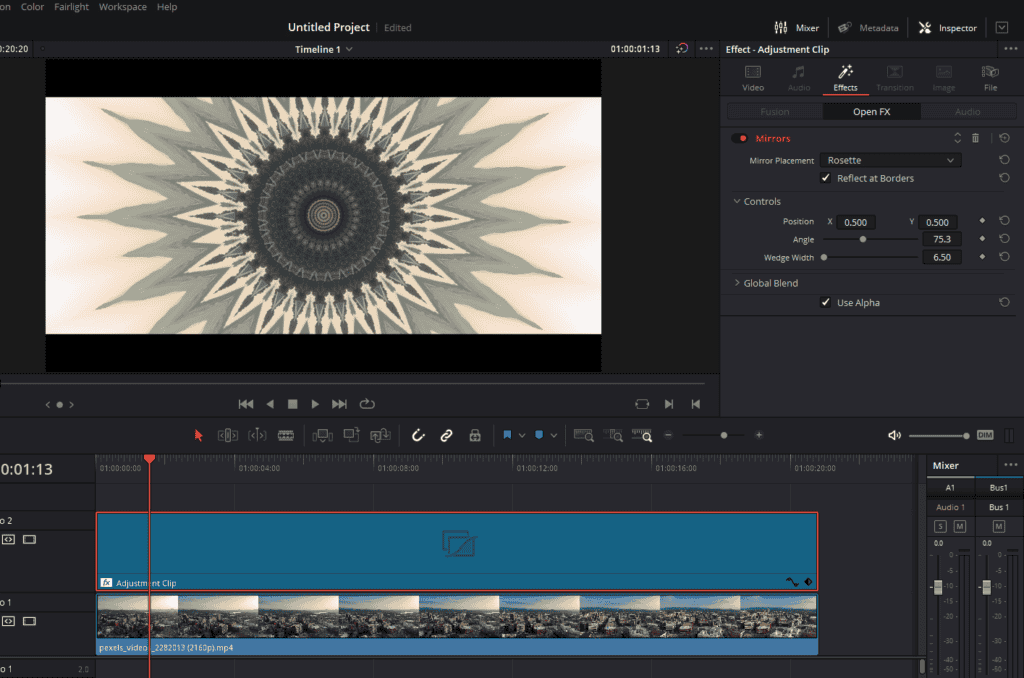
Next, to transform the simple mirrored effect into the ‘Mirror Rosette Effect’, select your footage on the timeline, open the ‘Inspector’ in the top right-hand corner, and click on the ‘Effects’ tab. Here, you’ll see ‘Mirrors’.
In the ‘Mirror’ settings, alter the ‘Mirror Placement’ from ‘Individual’ to ‘Rosette’. Immediately, your footage will morph into a colorful, psychedelic experience.
Step 6: Customizing Your Rosette
Under the ‘Mirrors’ settings, you’ll find several controls such as ‘Position’, ‘Angle’, and ‘Wedge Width’ that allow you to customize your rosette effect. You can adjust the center of the rosette by dragging the ‘Position’ control, change the angle of the mirrors with the ‘Angle’ control, and increase or decrease the number of reflections by tweaking the ‘Wedge Width’.
Wrapping Up
Creating stunning visual effects with DaVinci Resolve doesn’t have to be a daunting task. By utilizing the Mirror Effect through different methods, you can significantly enhance the overall aesthetics of your video project. We’ve explored three ways to create the Mirror Effect – the basic Mirror Effect, the Mirror World Bend Effect, and the captivating Mirror Kaleidoscope Rosette Effect.
Remember, the best way to master these techniques is through practice and experimentation. Take these methods and make them your own. Experiment with different types of footage and various settings until you create a result that perfectly aligns with your vision.
Thank you for taking the time to read this article. We hope you found it helpful and that it inspires you to dive deeper into the endless possibilities of DaVinci Resolve. Your journey towards creating amazing visual effects has just begun. Keep exploring, keep learning, and above all, keep creating!