At FilmmakingElements.com, we’re always on the lookout for techniques that combine efficiency with excellence. Today, we’re unveiling a method that promises just that—a way to create mesmerizing photo slideshows in DaVinci Resolve in no time and for free. Whether you’re a beginner looking for quick results or a seasoned editor aiming to speed up your workflow, this tutorial will prove invaluable. Dive in to discover how you can craft visually appealing slideshows, irrespective of whether you’re working with five or 500 images.
Step By Step Guide To Create Photo Slideshow in DaVinci Resolve
Step 1. Optimizing Images for DaVinci Resolve: A Deep Dive into Resizing Techniques
DaVinci Resolve, a powerful video editing software, performs optimally when fed with correctly sized images. While modern cameras offer impeccable resolution, these high-res photos can occasionally act as speed bumps, slowing down the software. Here’s a detailed look at why and how to resize your images for a fluid editing experience.
Understanding the Intricacies of Resolution:
- The 4K vs. Megapixels Dilemma: To those unfamiliar with video, a 4K resolution might seem abstract. However, to break it down, 4K in video is the counterpart to 8 megapixels in photography. As many standard cameras today offer a whopping 24 megapixels, it means the images they produce are three times the size of what’s optimal for video. Such large images can place undue stress on DaVinci Resolve, leading to lag and slower performance.
- Why Resize?: Oversized images not only strain the software but can also consume unnecessary storage space and extend rendering times. Resizing helps in streamlining the editing process, speeding up renders, and ensuring smooth playback.
The Ideal Image Size for Video Editing:
- 1080p as the Sweet Spot: While there might be a temptation to retain the original size, 1080p (or Full HD) usually strikes the right balance. This resolution is large enough to maintain clarity and detail, but not so large that it hinders performance.
Handy Resizing Tools for Different Platforms:
- For Windows Aficionados: ‘Power Toys‘ is a gem provided by Microsoft. It’s user-friendly, efficient, and the best part – it’s free!
- Mac Enthusiasts Rejoice: The built-in image previewer on Mac is more than just a viewer. It comes equipped with resizing functionalities, making the process hassle-free for Mac users.
With your images now resized and ready, you can smoothly transition into DaVinci Resolve for the actual Photo Slideshow part.
Step 2. Configuring Standard Still Duration in DaVinci Resolve
Before creating a photo slideshow in Davinci Resolve, one often overlooked yet pivotal aspect is setting the standard duration for your still images. This dictates how long each photo will be displayed when placed on your video timeline. Here’s a detailed walkthrough:
Setting Up Your Preferred Image Duration:
- Launching the DaVinci Resolve Interface:
- Start by opening your DaVinci Resolve software.
- Upon opening, navigate to the top left-hand corner of the screen where you’ll find the DaVinci Resolve written, click on it.
- Diving into the Preferences Section:
- From the dropdown menu associated with the DaVinci Resolve icon, select and click on “Preferences.” This section houses a myriad of settings, allowing you to customize your editing experience.
- Selecting the Right Tabs and Menus:
- Inside the Preferences window, Click on the “User” tab situated at the top to proceed.
- With the “User” tab active, a list of options will appear on the left-hand side. Here, find and select the “Editing” option.
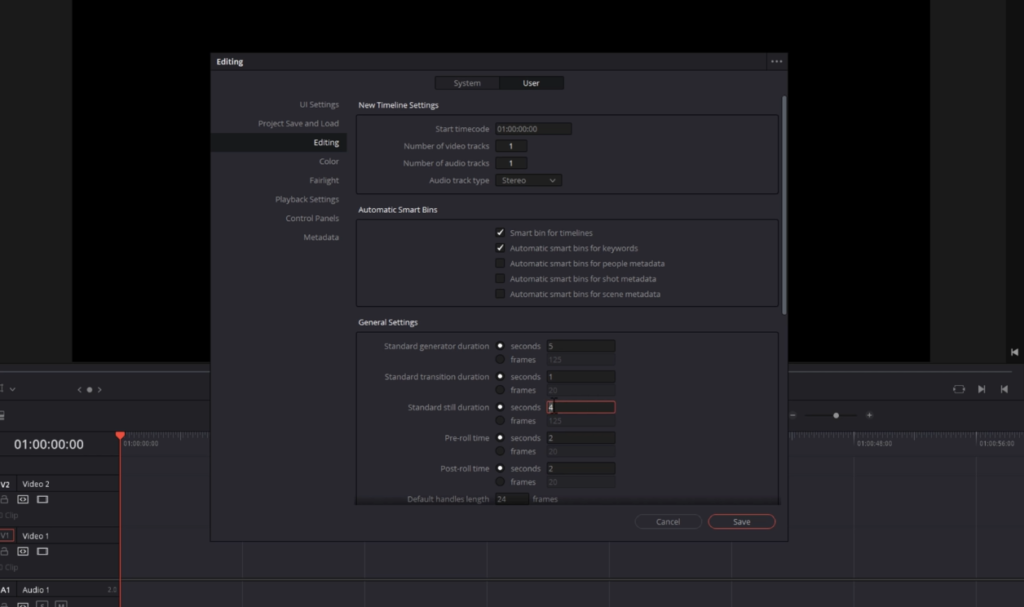
- Adjusting the Image Display Duration:
- Scroll within this section until you encounter the “Standard Still Duration” setting. This is the control point for the default duration of images in your projects.
- Ensure that the “seconds” radio button is selected, allowing you to set the duration in seconds.
- Now, you can input the time you’d like each image to display. Based on general observations and the pacing of most projects, a duration of approximately four seconds per image seems to strike a good balance. However, this can vary based on the nature of your video or personal taste.
- Finalizing and Saving Your Setting:
- Once satisfied with the set duration, make sure to save your changes. You’ll find a “Save” button usually at the bottom of the Preferences window. Clicking this ensures your changes are applied.
Expert Tip: While four seconds is a good starting point, always remember that the rhythm and flow of your photo slideshow video might necessitate changes. This setting isn’t set in stone! Depending on the project’s context or the story you’re trying to convey, you might return here to adjust the duration.
Step 3. Efficient Bulk Resizing in DaVinci Resolve
Optimizing your photos for a slideshow in DaVinci Resolve often involves resizing multiple images simultaneously. This ensures uniformity across all your images, providing a consistent viewing experience for your audience. Let’s delve into the convenient process of bulk resizing images within DaVinci Resolve:
Previewing Your Image:
- Accessing the Media Pool: Navigate to the Media Pool on the left side on the Edit page, within DaVinci Resolve.
- Selecting Your Image: Double-click on the image you wish to preview. This displays the image in its current size and allows you to gauge how much resizing it might need.
The Power of Bulk Resizing:
- Maintaining Preview: Even after double-clicking and opening one image, DaVinci Resolve retains its preview. This is helpful as the image won’t disappear when you select other images.
- Selecting Multiple Images: To apply resizing to several images at once:
- Use the “Control + A” shortcut after clicking in an empty space anywhere in the Media Pool, which highlights all the images present.
- Alternatively, use your mouse to click and drag across the images you want to select.
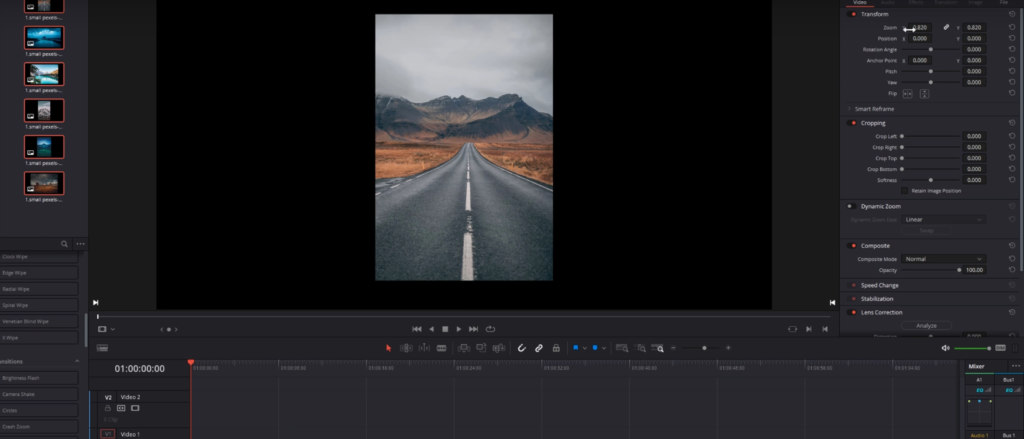
- Resizing in the Inspector:
- With the desired images highlighted, direct your attention to the “Inspector” located in the top right-hand corner of the screen.
- Here, you’ll find the “Zoom” option. Clicking on it allows you to adjust the size of your images.
- By zooming out slightly, you can make all the selected images appear a bit smaller within their frame.
Placing Resized Images on the Timeline:
- Dragging to the Timeline: Once resized, select all your images (they’ll retain the consistent size you’ve just set) and drag them onto your timeline.
- Consistent Duration: If you’ve previously set a standard image duration, as discussed in a previous section of this blog, all images will adhere to this duration.
Step 4. Adding a White Border to Your Slideshow Images in DaVinci Resolve
A great way to enhance the aesthetics of your photo slideshow in DaVinci Resolve is by adding a neat white border around each image. This addition can make your images stand out, giving a polished and professional touch to your slideshow. Let’s delve into the seamless process of adding this elegant touch:
Selecting Your Image:
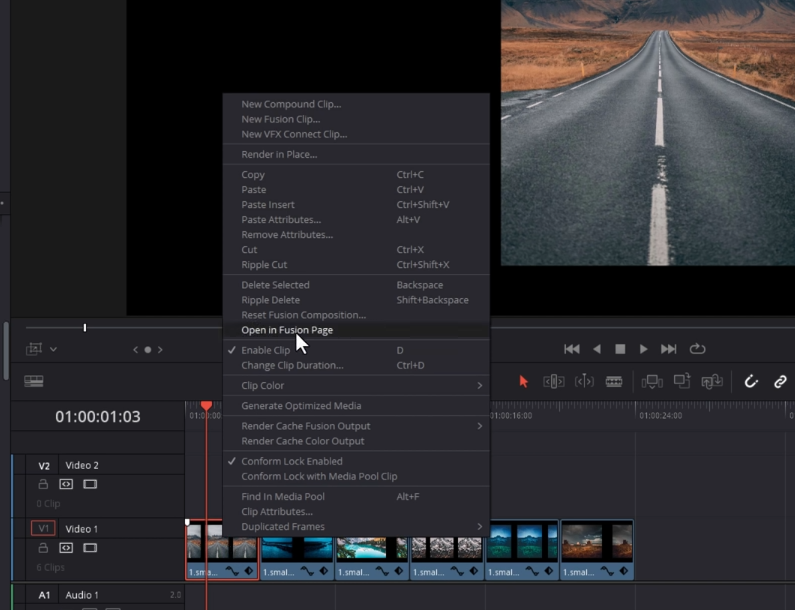
- Navigating the Timeline: Go to your timeline and select the first image you want to work on.
- Entering Fusion Page: Right-click the image and choose “Open in Fusion Page.” If you’ve not worked with the Fusion page before, don’t be daunted. We’re keeping things straightforward here.
Accessing the Right Border Effect:
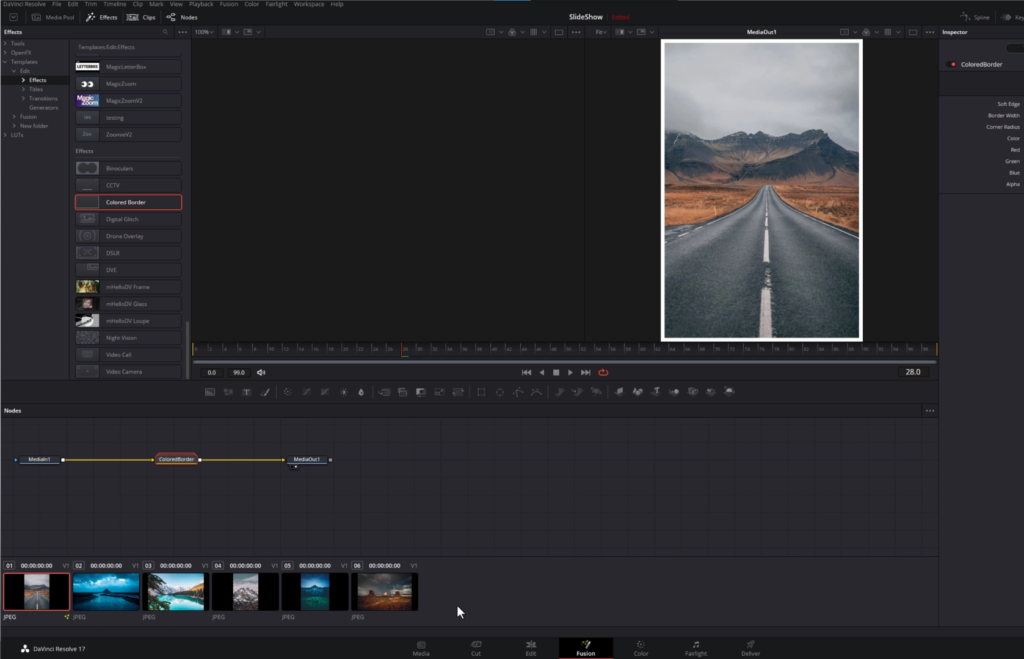
- Exploring the Effects Library: In the Fusion page, in the top left-hand corner click on “Effects.”
- Locating the Coloured Border Effect: Within the Effects Library, navigate and find an effect named “Colored Border.”
- Applying the Border Effect: Click on “Coloured Border,” hold your mouse button, and drag it to the designated line between MediaIn1 and MediaOut2 in the Fusion interface. Once this line turns yellow and blue, release your mouse. You’ll immediately see the white border appear around your selected image in the preview window.
Replicating the Border Across All Images:
- Viewing All Clips: At the bottom of the Fusion page, you’ll see thumbnails of all your images. If these aren’t visible, click on “Clips” in the top left corner.
- Selecting Multiple Images: Click on the next image from the clip thumbnail at the bottom to select it. Holding down the “Shift” key on your keyboard, select the final image. This action will highlight all your images.
- Copying the Border Effect: Using the middle mouse button, click on the image (with the applied border effect) to copy the effect. This action will replicate the border across all your selected images.
Final Check on the Edit Page:
- Once you’ve applied the border to all images, return to the Edit page to review your work. Each image in your slideshow will now sport a consistent, clean white border.
Step 5. Adding a Background to Your Slideshow Images in DaVinci Resolve
Want to give your photo slideshow a professional and engaging look? Using the Resolve FX Stylize in DaVinci Resolve, you can jazz up your slides with a distinctive background and drop shadows. Here’s a step-by-step guide to achieve this:

- Setting the Background:
- Navigate to the Edit page.
- Open the Effects from the top left corner.
- Click on Open FX and scroll down to Resolve FX Stylize.
- Select ‘Blanking Fill‘, available in both free and studio versions.
- Drag and drop it onto your first image.
- Position the playhead over the image for a preview.
- Click on the image, open the inspector tab from the top-right corner, and go to the effects tab.
- Expand the blanking fill options.
- Adjusting the Background:
- To remove unwanted borders from the blurry background:
- Under Source, change ‘crop left’ and ‘crop right’ to ‘0’.
- Change the zoom mode to manual.
- Max out the expand option. If it doesn’t fill the frame, hover over the number, click, and drag past its limit until the entire frame is filled.
- To remove unwanted borders from the blurry background:
- Adding a Drop Shadow:
- Below the previously used settings, you’ll find the drop shadow option.
- Increase the shadow strength and adjust the angle, distance, and blur according to your preference.
- Applying Effects to All Images:
- Click on the clip you’ve edited.
- Use Ctrl + C (or Cmd + C for Mac users) to copy its attributes.
- Highlight all other clips in the timeline.
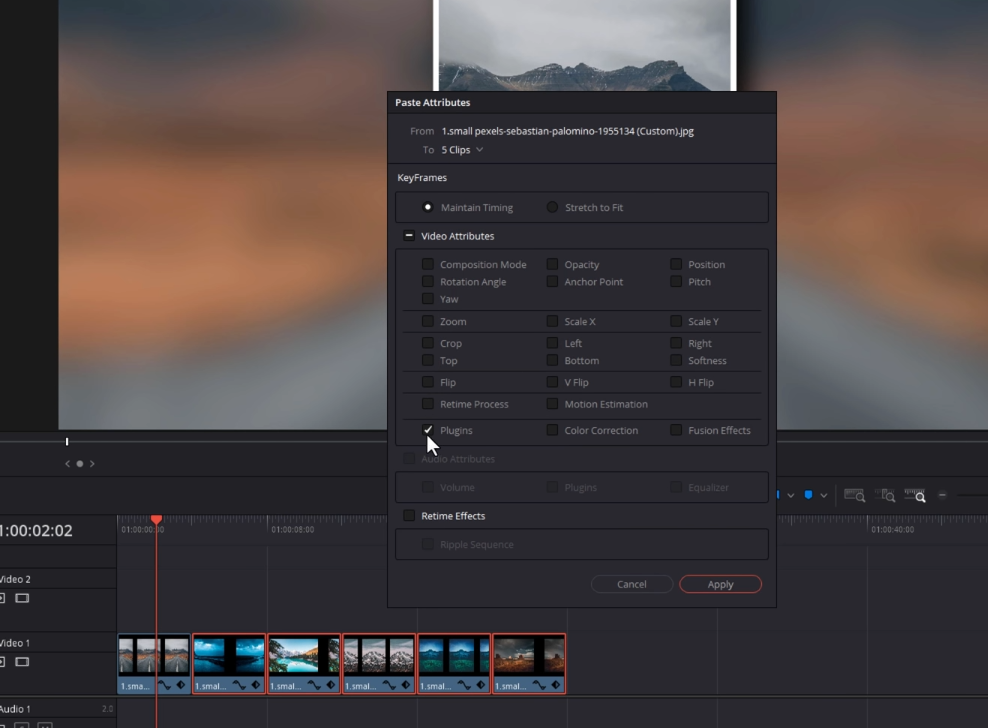
- Use Alt + V (or Option + V for Mac) to open the paste attributes dialog.
- Ensure the plugins box is ticked and click apply to extend the effects to all images.
Step 6. Enhancing Your Photo Slideshow with Custom Transitions in DaVinci Resolve
The right transition can elevate the flow of a slideshow, turning a simple sequence of images into a storytelling masterpiece. DaVinci Resolve offers a broad array of transitions, and the beauty is in the details. Here’s a more detailed guide on how to customize and apply transitions:
- Starting with a Default Transition:
- Selection: Begin by highlighting all images on your timeline to prepare them for transition application.
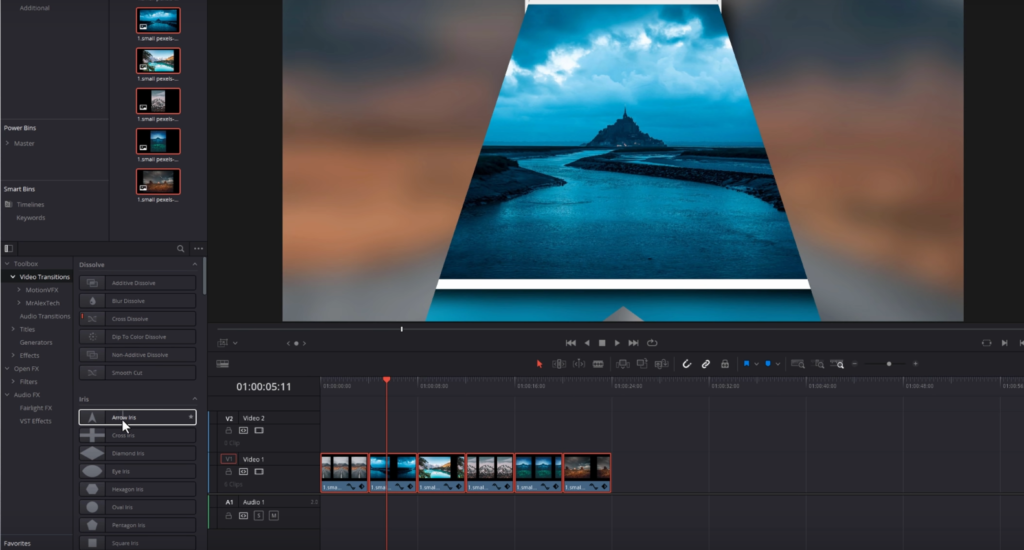
- Navigation: Open the effects library by clicking on the ‘Effects’ button in the top-left corner. Under this, locate the video transitions section.
- Choice and Application: Pick a transition, like arrow iris. Right-click it, and from the dropdown, choose add to selected edit points and clips. This action applies the chosen transition uniformly across all the selected images.
- The Cherry on Top:
- Music adds another dimension to your slideshow. Layer in a track that complements the mood of your slideshow for a richer viewing experience.
The mastery of transitions, especially when tailored to fit the slideshow’s narrative, can transform the viewing experience from ordinary to mesmerizing. Dive into DaVinci Resolve and unleash your creativity!