Hi, Welcome Back! This article covers all the ways To Color Grade DJI D-Log In Davinci Resolve.
Davinci Resolve is not just an epic video editing software. It is now getting used in Hollywood films and has started getting a standard because of its Color Grading capabilities.
Many indie filmmakers have started using DJI Drone Cameras for their films, commercials, and music videos.
Filmmakers cannot leverage that color science and data captured by the sensor. In this article, we have made sure you learn every way to tackle DJI D-Log.
At the end of this tutorial, you will learn how to color grade D-Log In Davinci Resolve and improve your pipeline and production quality.
1. Color Grade DJI D-Log With Color Space Transform
This is hands down my favorite way to Color Grade DJI D-Log. A lot of people are unsure about using LUTs. However, I am not one of them because even the best colorists use LUTs.
I use this method because that makes me not lenient on a LUT. Also, sometimes I get better results using a Color Space Transform OFX that comes with Davinci Resolve.
Grading DJI D-Log Using Color Space Transform OFX in DaVinci Resolve:
1. Access the Open FX Library:
- Within DaVinci Resolve’s ‘Color’ workspace, select a node where you want to apply the transformation. If you don’t have one, create a new node.
- Look towards the top right corner of the interface to find the ‘Open FX’ library icon, represented by a magic wand or sparkle symbol. Click on it to open the library of effects.
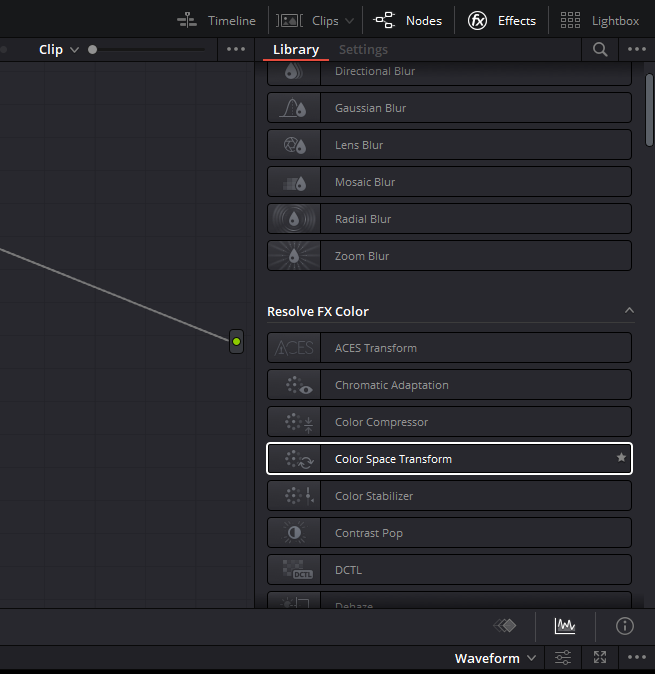
2. Locate the Color Space Transform Effect:
- Within the Open FX library, you can either use the search bar to type in ‘Color Space Transform’ or scroll through the list of effects until you locate it.
3. Apply the Effect to the Node:
- Once you find the ‘Color Space Transform’ effect, click and drag it onto the node where you want to apply the color space conversion.
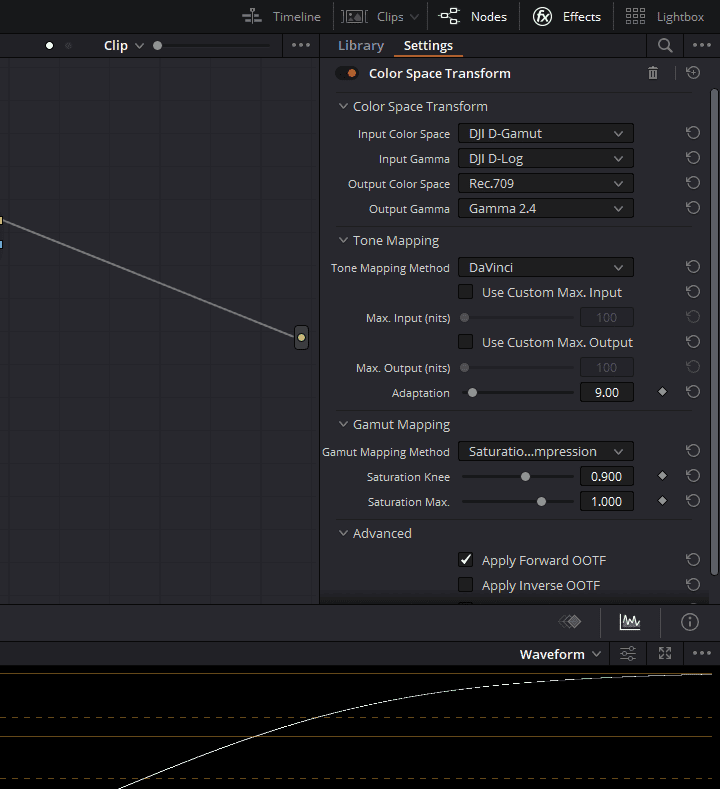
4. Configure the Transform Settings:
- With the node selected, you’ll see the parameters of the Color Space Transform effect appear in the inspector or control panel.
- For the ‘Input Color Space’ dropdown, choose ‘DJI D-Gamut’. This acknowledges that the source footage is in DJI’s proprietary color space.
- In the next dropdown labeled ‘Input Gamma’, select ‘DJI D-Log’. This confirms the gamma curve of the original footage.
5. Define the Desired Output Settings:
- For ‘Output Color Space’, select ‘Rec.709’. This will transform the footage to the standard color space used for most HD content.
- In ‘Output Gamma’, select ‘Gamma 2.4’. This sets the desired gamma curve for your final output.
6. Consider Your Delivery Format:
- If you’re working on an HDR (High Dynamic Range) project, remember that you might need different output color space and gamma settings to cater to the HDR specifications. Always ensure your settings align with the delivery requirements of your project.
7. Adjust Advanced Settings:
- Within the Color Space Transform effect controls, ensure that ‘Davinci’ is selected from the ‘Tone Mapping Method’ dropdown. This uses DaVinci Resolve’s own algorithms for handling highlights and shadows when transforming between different gammas.
- Also, from the ‘Gamut Mapping Method’ dropdown, choose ‘Saturation Compression’. This method will gracefully compress colors that fall outside of your chosen output gamut, ensuring that they remain within the viewable range without clipping or artifacting.
You will now see your DJI D-Log is converted to Rec.709. This OFX converts your footage from one color space to another using advanced maths and processing.
This method is also non-destructive, so you will not lose any data even if you have clipped it. Use your primary color grading tools like Lift, Gamma, and Gain wheel and pull back the image.
It must be evident that you cannot retrieve the data your camera never captured. So make sure you expose well on the set.
2. Color Grade DJI D-Log with Davinci Resolve Color Management
This newer and most sophisticated workflow to color grade DJI D-Log using the “Davinci YRGB Color Managed” workflow. There are multiple ways to utilize this method. The best part about using this method is that Davinci Resolve recognizes if the footage is shot in DJI D-Log and does a Rec.709 conversion.
Using Davinci Resolve Color Management to Color Grade DJI D-Log Footage:
1. Open DaVinci Resolve Project Settings:
- Launch DaVinci Resolve and ensure that you are in the project where you want to work on your DJI D-Log footage.
- Navigate to the bottom right corner of the screen and click on the gear icon, which represents ‘Project Settings’.
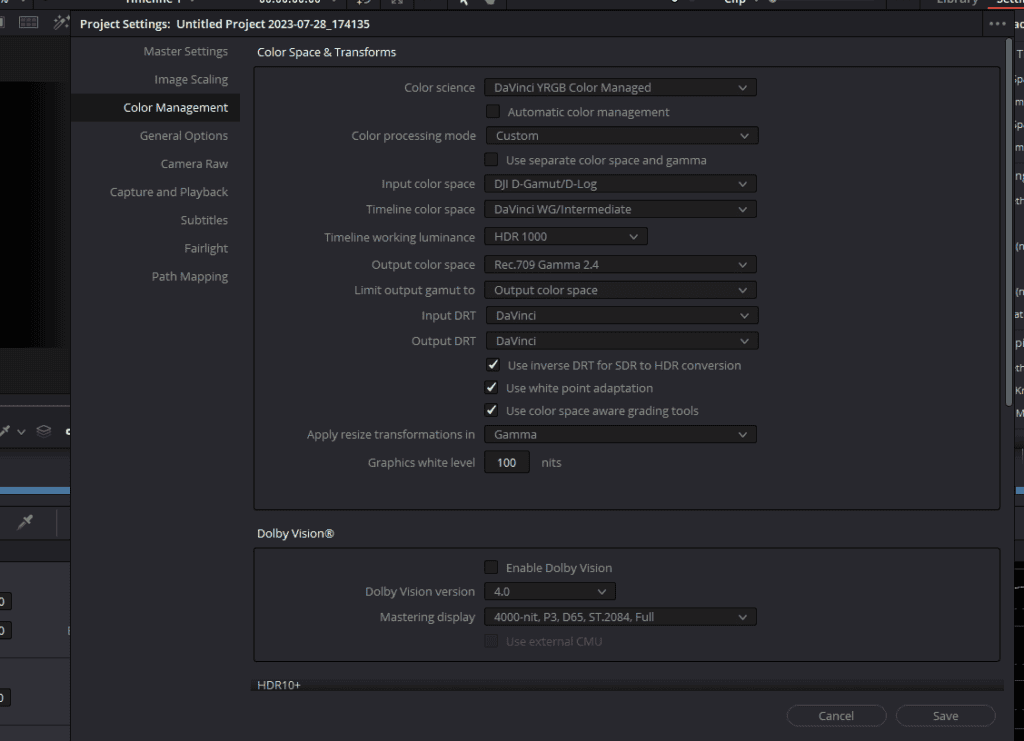
2. Access Color Management Settings:
- Inside the Project Settings window, find the left sidebar. Here, you’ll see several categories. Click on the ‘Color Management’ option.
3. Set the Color Science:
- You will see the ‘Color Science’ dropdown menu. Click on it and select ‘DaVinci YRGB Color Managed’ from the list. This will enable you to work within a managed color space that’s optimal for grading.
4. Disable Automatic Color Management:
- Below the Color Science dropdown, you’ll see an option labeled ‘Use Automatic Color Management’. Ensure this box is unchecked (or ‘unticked’). By doing this, you are taking manual control over your color settings.
5. Choose Custom Color Processing Mode:
- Below the automatic color management checkbox, locate the ‘Color Processing Mode’ dropdown. Select ‘Custom’ from the list. This enables more advanced settings for a tailored color grading experience.
6. Define the Input Color Space:
- Once in custom mode, a few more dropdown menus will appear. Locate the one labeled ‘Input Color Space’.
- Click on it and select ‘DJI D-Gamut/D-Log’ from the options. This setting tells DaVinci Resolve that the footage you’re working on was shot in DJI’s D-Log color profile, which requires specific handling to look its best.
7. Set the Timeline Color Space:
- Navigate to the ‘Timeline Color Space’ dropdown menu.
- Select ‘DaVinci WG/Intermediate’. This ensures that while working on your project, you’re viewing colors in a wide-gamut, intermediate color space, which is flexible for grading.
8. Define the Output Color Space:
- Lastly, set your ‘Output Color Space’ by selecting the ‘Rec.709 Gamma 2.4’ option from the dropdown. Rec.709 is a widely-used standard for HD content, and Gamma 2.4 is a common gamma setting that looks great on most displays.
9. Save Your Settings:
- After setting all the necessary options, click on the ‘Save’ button at the bottom right corner of the Project Settings window. This will apply all your color settings to the project.
Which is the best way of Color Garding DJI D-Log In Davinci Resolve
After reading it all the way, you must doubt which one can be the best way. Experimenting with all the methods is the best advice I will give.
Keep this mind that Filmmaking is an art form, and there are no hard-set rules to do a job. Try and see which one gives you the most optimal quality. After all, you are color-grading DJI’s footage. Quality should always be your top priority.
I like the Color Space Transform method, it gives me more manual control over my footage, and I can color grade it with an artistic vision. But because I have been grading for many years now, I feel more comfortable with it.
- Also Read: Stop DaVinci Resolve from Lagging (8 Fixes)
- Also Read: Sky Replacement In Davinci Resolve- Easiest Guide
- Also Read: Davinci Resolve HDR Workflow- Easiest Guide