
There has been a lot of debate regarding RAW, uncompressed, and Log video workflows over the last several years; however, because many people use the terms “RAW” and “uncompressed” indiscriminately, there has also been a lot of misinformation. If we look at the essential attributes for each format one at a time, we should be able to obtain a better picture. We’ve looked at how a conventional video image is created in-depth in this article:
- Light reflects from a scene and reaches the lens;
- The light strikes the sensor pixels, generating an analog signal that is then converted to a digital signal.
- The ADC (analog-to-digital converter) converts analog data into digital data, which is then:
- The DSP (digital signal processing) combines color data, adds codecs to sample color information, integrates camera settings i.e frame rate, white balance, gamma, ISO, etc. and compresses the image file size before converting it to a video signal.
- The video signal is transmitted for the purposes of monitoring and recording. However, some cameras provide considerable workflow options, such as RAW, uncompressed, or log recording. Please remember that not all cameras have these features, so double-check your equipment’s capabilities.
What is RAW Video?
All visual data captured directly from the image sensor follows digital conversion but before being processed and compressed by the digital signal processing, is known as RAW video footage. The files are not accessible as-is because what is captured in the raw Bayer pattern data readout, even before demosaicing; you must use postproduction converting software (such as Arriraw converter, Rawanizer, Rawmagic, and so on) to convert the RAW data into video in order to watch, edit it or color it. However, before compression, chroma subsampling, and video processing, RAW footage has all of the color and exposure data (4:4:4) as well as resolution detail.
RAW video files can be recorded completely uncompressed or with a tiny amount of compression added to help manage file sizes—but remember, we’re talking about uncompressed raw data, not uncompressed video—depending on the camera manufacturer. Because camera parameters like white balance and gamma response still have not been “baked in” to the image, RAW files can be converted into a broad range of compressed and/or uncompressed formats (like DPX) and can cover a variety of extended or custom color schemes.

So, what exactly is the meaning of RAW? Surprisingly, there is considerable disagreement, especially when it comes to particular cameras and how they operate. The important thing to know is that ‘raw’ denotes that the real RGB values from the photosites are retained: they aren’t transformed into pixels, deBayered, or demosaiced, as they would be if the video was saved as ProRes.
The core concept behind RAW is to just record all of the data that comes in from the sensors, generally unaltered. Metadata is captured at the same time as the image, and it can record creative objectives such as color, tonal range, and so on, although metadata can be modified or disregarded afterward. A RAW digital image, like a photographic negative, may have a broader dynamic range or color gamut than the final image format can reproduce since it keeps the majority of the information in the taken image.
The goal of RAW data formats is to store data sent directly from the sensor, as well as the conditions of the image capture—metadata, which can include a broad array of information such as white balance, ISO, gamma, matrix, color saturation, and so on—with little loss of information.

RAW video files can, in effect, perform the same function as film negatives in traditional film photography: the negative is not directly useful as an image, but it contains all of the information necessary to make a final, visible image. In that it is akin to the motion picture film process of transforming exposed negative film into a projectable print, the process of converting a RAW image file into a viewable format is frequently referred to as developing the image.
You can always go back to the original with a motion picture negative. You can make significant modifications to the image now or in the future if you shot the negative correctly from the start. You can change the look of the image in five years if you want to.
You can do the same thing with RAW; it’s archival and non-destructive, and you can edit it later. Adjustments made at the time of processing, color correction, or anytime else along the line result in fewer artifacts and image deprivations; this includes correcting for under or overexposure. One disadvantage is that RAW files are typically significantly bigger than most other file types, necessitating lossy or lossless compression by cameras to avoid unreasonably enormous captured files.
Compressed vs. Uncompressed RAW Files: Does It Matter?
In the world of photography, there’s been a growing debate surrounding the use of uncompressed or compressed RAW files. With new camera models offering various frame rates depending on the RAW format, it’s time to explore the actual differences and if they truly matter for your work.
Understanding RAW: At its core, a RAW file is data straight from the camera sensor. When we talk about uncompressed RAW, it means all of this data is saved untouched. On the other hand, compressed RAW is a condensed version of this data, primarily to save space. For instance, some cameras save uncompressed files that are twice as large as their compressed counterparts. This smaller size allows for more photos to be saved and transferred efficiently.
However, it’s essential to note that not all compressed RAWs are created equal. Some camera brands and models compress data in a way that isn’t entirely lossless.
The Real-World Differences: Upon testing various shooting conditions and post-processing requirements, several insights emerged:
- In Good Conditions: Under well-lit, standard shooting conditions, the difference between uncompressed and compressed RAW files is almost negligible.
- Highlight and Shadow Recovery: For pictures requiring significant post-processing, especially shadow recovery, uncompressed RAWs might offer slightly more accurate colors in certain scenarios.
- Bit Depth: The difference between lower and higher bit-depth can affect the image quality, especially in post-processing. For instance, RAW files with lower bit depth displayed noticeably more noise than higher-bit counterparts, especially when dealing with underexposed shots.
Personal Preference and Real-World Scenarios: Ultimately, the choice comes down to individual preferences and the specific shooting scenario. For challenging lighting conditions or instances where post-processing might be intensive, using uncompressed files could be beneficial. Conversely, during well-lit shoots, compressed files might suffice and even be more efficient.
One crucial insight from this exploration is the variance in bit-depth when switching modes in some cameras. This detail might influence photographers to adjust settings based on the situation.
- Also Read- How To Make Youtube Shorts In Davinci Resolve- Detailed Guide
- Also Read- How to Use Dual Screens in DaVinci Resolve 17? ( Easy 2 Screens Workflow)
- Also Read- How To Put GIFs in Davinci Resolve (2 Easy Ways)
What is Uncompressed Video?
Uncompressed video is a signal that has gone through the digital signal processing process of interpolating picture data into a true video signal (covering demosaicing, frame rate, and other camera settings), but hasn’t been compressed yet. Uncompressed video output is typically sent out via an HDMI or SDI connector on cameras that provide it.
Uncompressed video is utilized for the same reasons as RAW footage: it allows for greater color grading and visual effects freedom in postproduction. And, like with RAW footage, the data rate and files are enormous, necessitating the usage of an external record drive for media storage and the creation of smaller proxy files for editing efficiency. Uncompressed video, on the other hand, is actual video and may be viewed without the need for transcoding.
What is Log Video?

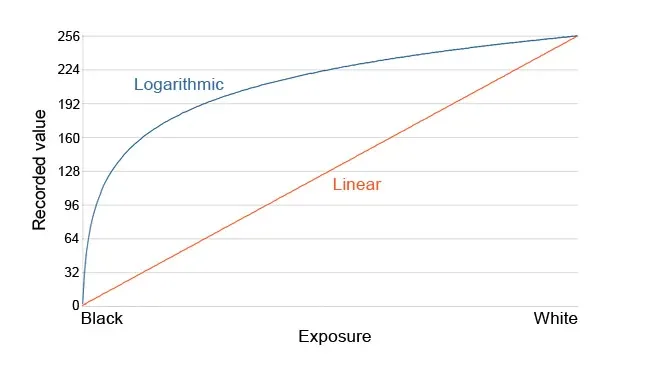
Although log video (short for logarithmic encoded gamma) is essentially distinct from RAW and uncompressed video, it is frequently confused with the latter two because the goal is the same: to create footage that allows for more color grading and exposure manipulation in postproduction than standard footage. While Log video accomplishes the same goal as RAW and uncompressed video, it does it at a significantly lower data rate and with far smaller files.
The video process for log video is quite standard: from the sensor to the ADC, and then to the DSP for video processing and compression. The color encoding procedure, on the other hand, characterizes the Log video format. The REC 709 color space is used to encode and record standard video (gamma). When seen on a normal monitor, this gamma setting limits both brightness (dynamic range) and chrominance to provide an acceptable image.

However, all video sensors can display far more visual information than REC 709 can, and Log gamma encoding is designed to collect as much of the sensor’s available color and brightness response as possible, particularly in the highlights and shadows. The advantages of shooting Log over the normal video are similar to those of shooting RAW. The Log format gives the cinematographer more exposure latitude and produces video with a lot more visual freedom for color grading, enabling the filmmaker to dial in very exact looks (contrast, color hue, and saturation, and so on).
However, when compared to RAW and uncompressed video, the Log format data rate and file size are considerably reduced due to codec compression. The disadvantage of Log is that recording the widest range of color and exposure values results in an initial image with a “flat color profile,” which looks boring and gray—but this is not your final image. To achieve an acceptable image in the Log format workflow, you must either undertake substantial color grading in postproduction or use a small piece of a file called a LUT.
One of the most essential characteristics of log-encoded video is that it does not accurately depict the scene when viewed on a monitor—this is both a strength and a weakness. A log-encoded image on a monitor will appear washed out, pale, and in low contrast, because it is effectively compressing scene values in order to fit them into the recorded file structure. Making judgments on the visual is hard, if not impossible. It also tends to frighten directors and is useless for other crew members. It can also complicate lighting decisions and have an impact on other areas.
Of course, because the log-encoded shots aren’t yet “ready for release,” they’ll need to be color adjusted at a later stage, most likely during final grading. For viewing purposes, having some type of interim adjustment is typically useful. There are several reasons why having an accurate view on the set monitors—or at least one that is near to how the scenario will appear—is important.
Rec.709 is output for use on the set since it is display referenced, which means it is set up to work with most monitors and projectors. As a result, rapid, non-permanent conversion to Rec.709 is output for usage on the set. A Rec.709 monitor viewing output is available on some cameras specifically for this purpose.
The terms LOG and RAW are not interchangeable.
Although log and RAW are two separate concepts, many cameras that shoot RAW actually record data that has been log-encoded—in most high-end cameras, the sensor outputs more data i.e higher bit depth than can be recorded with present technology. Keep in mind that you might record RAW that isn’t log or log that isn’t RAW, although they usually go together. Keep in mind that, like RAW video, log-encoded video is solely intended for storage and not for viewing.
It is the job of a colorist to change the footage to a display referred color space. A display referred color space can vary from Rec. 709, DCI P3, and Rec. 2020.

Use of LUTs for LOG video
A LUT short form of Look-Up Table is a set of customized color calibration instructions in a file that can be downloaded or installed into your camera or field monitor (along with editing software) and applied to the footage to give you more accurate depiction of the image. A LUT merely alters the appearance of an image; it has no effect on what is being captured.
Basic LUTs are frequently built into hardware cameras and monitors, or you can download specific LUTs that emulate specific film emulations or unique visual looks, or you can create your own LUTs by shooting test footage and saving your color grading settings into a LUT file before beginning production. Keep in mind that each camera manufacturer has its own set of Log formats.
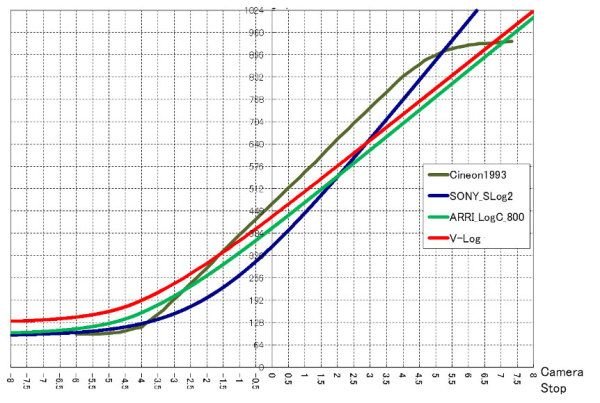
Sony cameras shoot S-Log, Panasonic cameras shoot V-Log, Canon Log, REDLog, and Log-C (Arri) are all variations of the same principle, albeit with slightly different technical approaches and LOG curves. Shooting in the log format is a popular choice among independent filmmakers, and once you’ve mastered it, you’ll discover that it’s a very potent creative visual tool.