
Why am I struggling with DaVinci Resolve lagging? This is a very common question that keeps on coming every single day and in this article, we’re going to tackle the issue and Stop DaVinci Resolve from Lagging.
So what could be the reason why your timeline is playing back so poorly or lagging? Well, there are actually a few reasons and some of them are easier to solve than others.
8 Reasons and fixes on how to stop Davinci Resolve from lagging
1) Codecs
When it comes to digital media, codecs are essential. These compression technologies help manage data streams into more manageable packages, either at a software or hardware level. While we could write an entire article about codecs and how they work, let’s keep it simple.
Essentially, codecs are computer code that allows us to store and transmit digital media efficiently.
Some codecs, like H.264 and HEVC, use temporal compression to reduce the file size by only storing the changes between frames. This makes them ideal for capturing a lot of footage in a limited space. However, these codecs are not optimized for editing because they require more processing power and can cause glitches or artifacts.
Codecs play a vital role in digital media, impacting both recording and playback. Some codecs require intense computing to decode, making smooth playback or scrubbing difficult without a powerful computer or hardware decoder. In contrast, cine cameras prioritize high bitrate, raw recording, or in-camera proxies, which are more editing-friendly.
Choosing the right codec is crucial, taking into account storage space, editing requirements, and playback needs.
2) Free vs Studio Difference When Davinci Resolve is Lagging
The free version of DaVinci Resolve utilizes the GPU for image processing, which can even handle multiple GPUs on Mac.
However, only the studio version offers hardware acceleration for decoding H.264 and H.265 media on compatible hardware.
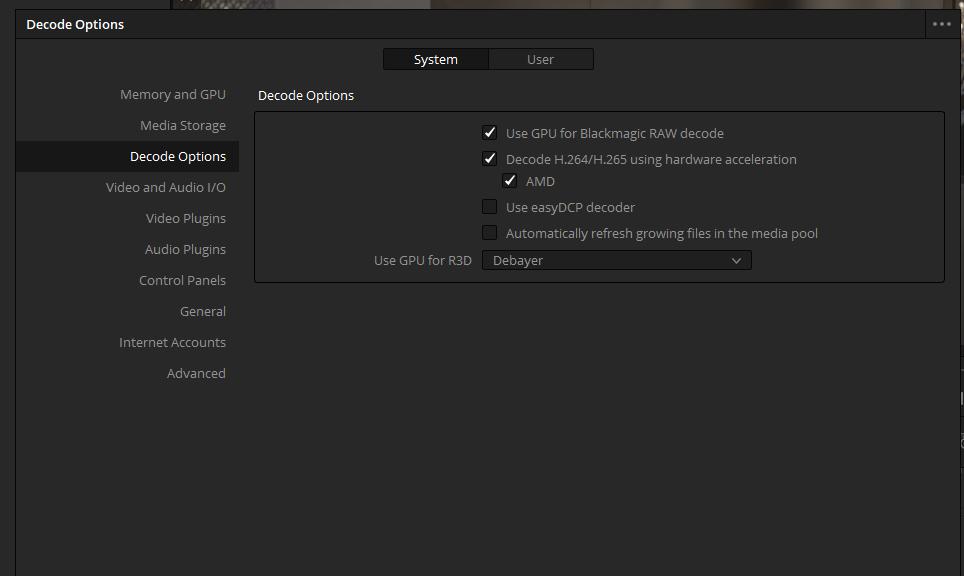
To see if this option is activated, go to the
- “DaVinci Resolve” menu on the top left corner
- Select “Preferences”
- In Decode Options, make sure that the “Decode H.264/H.265 using hardware acceleration” feature is checked.
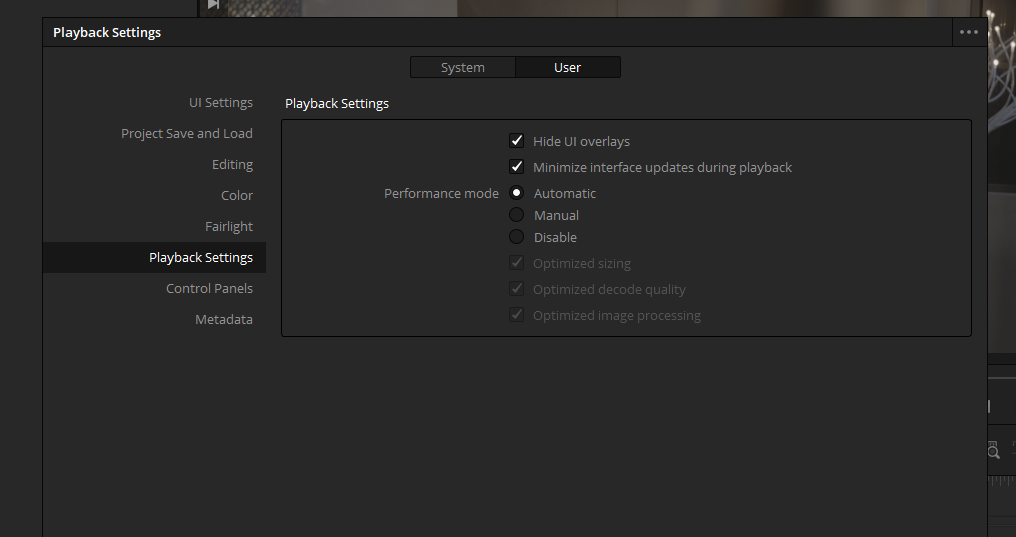
- Switch to the User tab, and select “Playback Settings”
- Set “performance mode” to “Automatic” or “Manual” if you want to fine-tune how the machine resolves to optimize your experience.
- You can also check the two options above the “Performance Mode”, “Hide UI Overlays” and “Minimize Interface Updates” if you need to optimize even further playback performance.
3) HDD vs SSD
In an experiment, I conducted comparing the playback performance of two instances of the same 4K 50fps video clip encoded in H.265 with 422 chroma sub-sampling and 10bit on both a mechanical hard drive and an SSD, I found that storage speed did not make a difference.
We then also played the same clips at 25fps or 50% of the original frame rate. The CPU maxed out while the GPU was barely used in both cases, indicating that modern GPUs like the RTX 2000 and RTX 3000 series are not capable of decoding 10bit 422. To achieve real-time playback and prevent lagging in Davinci Resolve when using H.265 as a recording codec, a powerful CPU is necessary.
One solution to achieve better performance and prevent Davinci Resolve from lagging when playing back high frame rate video clips encoded in H.265 with 422 chroma sub-sampling and 10bit is to shoot at lower frame rates such as 24, 25 or even 30fps.
This reduces the number of frames that need to be processed and can improve playback performance even on a mechanical hard drive. Another benefit of shooting at a lower frame rate is the cinematic feel and motion blur it can provide.
But that of course is not a solution so how do we achieve better performance at all times without the Davinci Resolve lagging?
4) Render Cache
First step is to understand and master the render cache. Caching is the process of rendering your clips including any color grade or effects into a more friendly format.
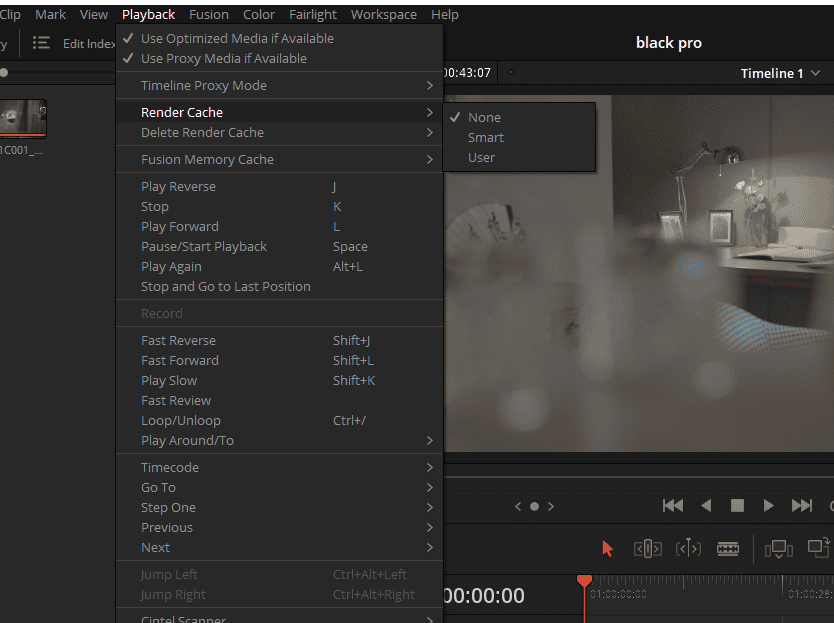
- You can control this by going to the “playback” dropdown menu on top
- Hovering on “render cache” and choosing either “Smart” or “User”
- Smart will let Davinci Resolve automatically choose which clip will be cached.
- While the “user” mode will let you have full control over which clip should be cached and rendered and this can save both time and storage space.
- It’s best to choose user mode as this will be perfect to test out different performance scenarios.
- In user mode to cache a clip, you need to right-click on it and choose “render cache codec output”
- Immediately you notice a red bar above your clip that will slowly change to blue as your cache is being rendered.
When using Davinci Resolve, rendering is done in the background when the program is inactive and both the CPU and GPU are utilized when rendering the cache.
However, even after rendering the cache, you may still experience lag during playback as if there was no cache at all. One possible cause of this issue is that you may be bypassing all your color grades and effects.
To check if this is the case, make sure that the small wheel-looking icon on the top right corner is not crossed. This feature not only bypasses color grades and effects but also bypasses the entire render cache.
The render cache is a great feature but as we’re still working with the h.265 codec the smallest edit will drive your CPU usage through the roof as your render cache is being recreated.
5) Timeline Resolution
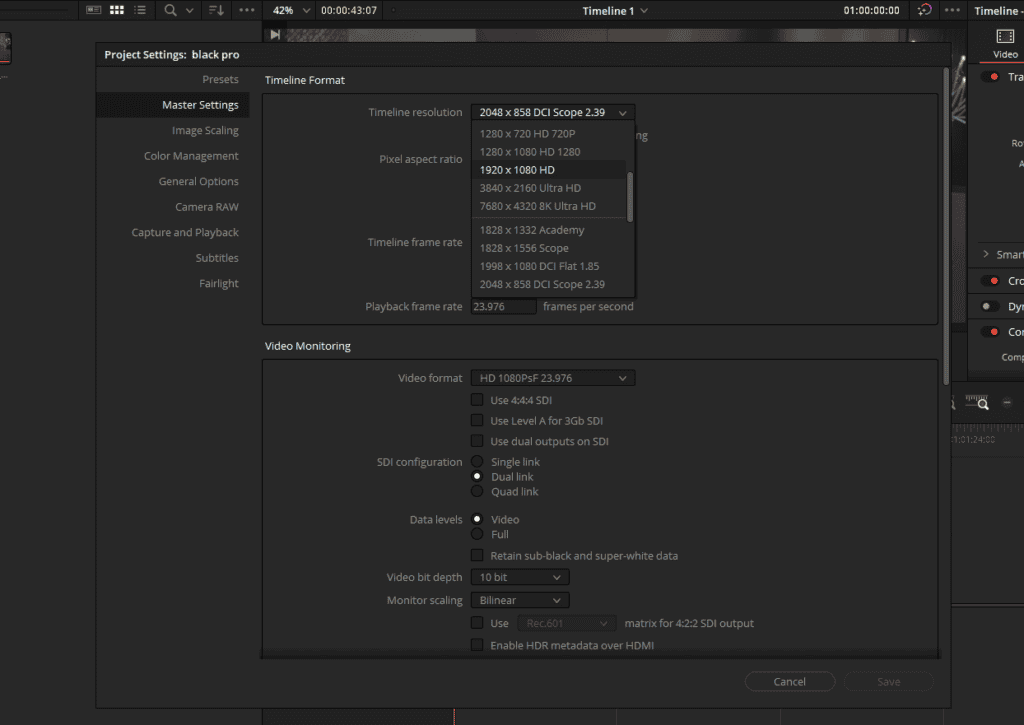
One way to prevent lagging in Davinci Resolve is to lower your timeline resolution to HD. Even if your source media is 4K and you plan to export at that resolution, it’s not necessary to edit on a 4K timeline. This can significantly decrease the amount of data that needs to be rendered.
However, if you’re working with H.265 encoded media, this may not make much difference. H.265 can be difficult for video editors to work with.
Now seriously, h.265 is a nightmare for video editors. So what do we do now?
6) Proxies
Many creators try to avoid using proxies because they require extra processing time. However, using proxies can greatly improve your editing workflow. Proxies are lower-resolution versions of your media that are easier for your computer to process.
By using proxies during editing and then switching back to the original high-resolution media for final export, you can achieve smooth playback and faster editing.
The good news is that Davinci Resolve is making dealing with proxies really simple.
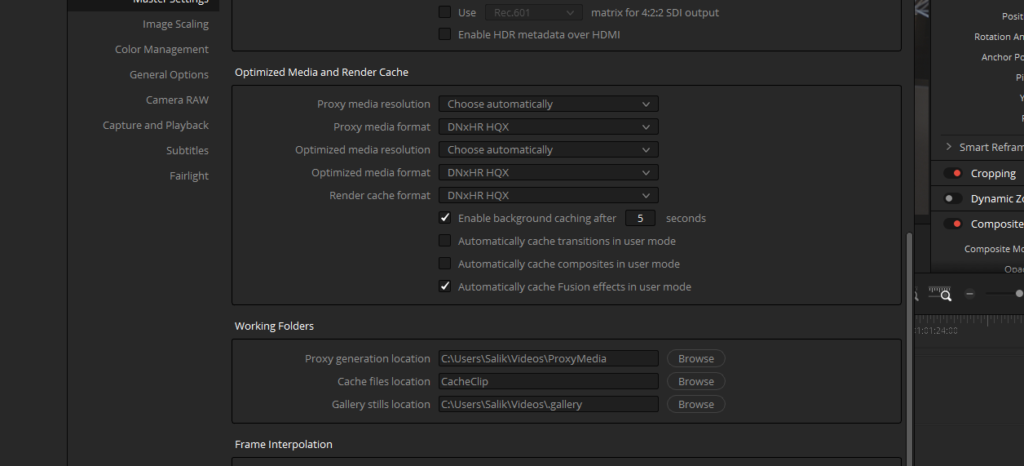
- Go to the “project settings”, by clicking the gear-looking icon on the bottom right corner.
- In “Optimize Media and Render Cache”, you will find plenty of options to fine-tune the way that Davinci Resolve is handling videos.
- The “Proxy media resolution” option will let you choose if your media is transcoded at full resolution, half, quarter, etc.
- This alone can make editing super high-resolution footage feel like a breath even on a lower-spec computer.
- In “Proxy Media Format”, the choice of the transcoding codec will depend on your platform. Windows and Linux users can use different varieties of DNx codec, while Mac users also have access to ProRes.
- The type you choose will impact the bitrate, chroma, bit depth, and size of your proxies.
The clips created are only accessible within your project and can’t be used to easily share with others like you can with proxies.
You can also change the “render cache format” to speed up rendering time and reduce the size of your render cache. Within the master settings, you can optimize your “working folders” by changing the “Proxy Generation Location”, “Cache Files Location”, and “Gallery Stills Location”.
By setting them to separate fast drives, you can dramatically improve DaVinci Resolve’s performance and prevent lagging issues. Once you’ve made these changes, simply click “Save” and you’ll immediately notice that the cache is being rendered with updated settings.
Blackmagic Design itself is recommending using proxies over Optimize Media.
How to create proxies
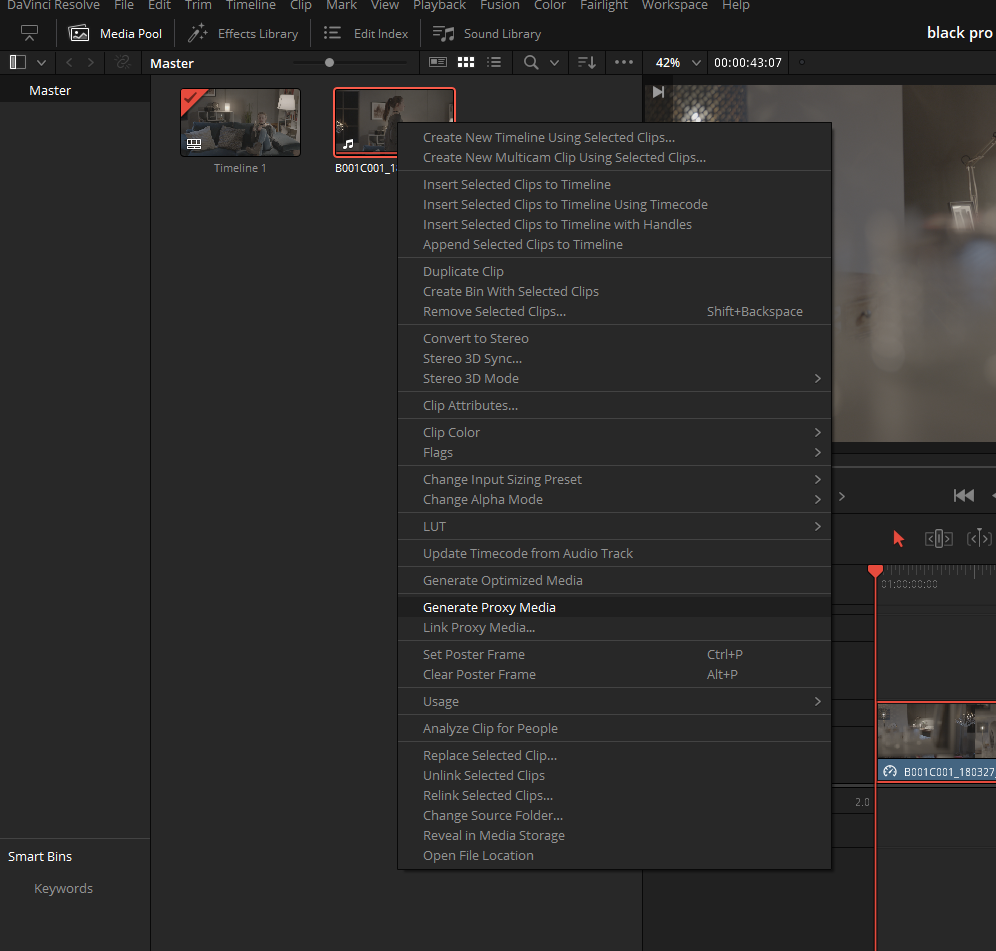
Now that everything is set, let’s see how to make those proxies.
- Right-click on the clip in the media pool and simply choose “generate proxies media”.
- This will transcode the entire source video into an editing-friendly format.
Once completed, playback will be completely smooth even though the clip isn’t rendered in cache.
7) Timeline Proxy Mode
When editing a project in DaVinci Resolve, you may encounter situations where your system struggles to keep up with the demands of your timeline. To help in these situations, there’s a feature called “Timeline Proxy Mode” that can provide a quick boost.
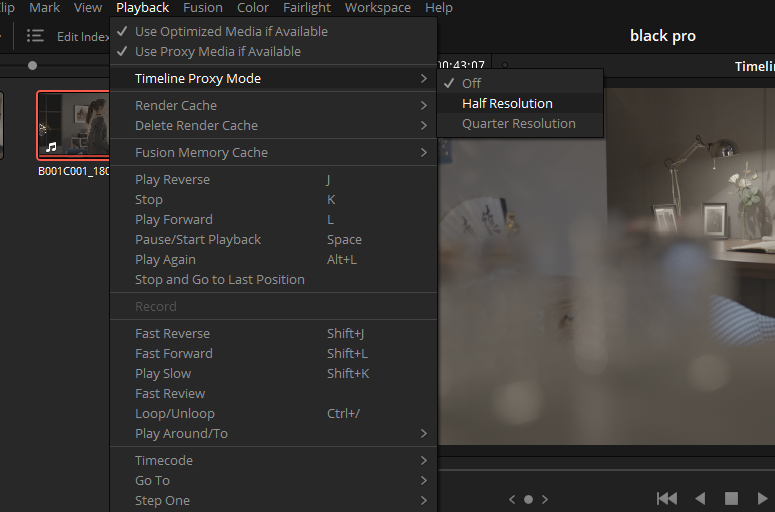
This feature allows you to render your timeline at half or quarter resolution without changing your project settings.
- Select the Playback dropdown menu from the menu at the top
- Hover over “Timelne Proxy Mode”
- Select either “Half Resolution” or “Quarter Resolution”
However, this feature requires the media to be decoded before it can kick in, so it wouldn’t have helped with the struggles we faced earlier with the H.265 codec.
8) Render In Place
When editing a video, you may encounter situations where you need to apply intensive effects such as noise reduction or fusion effects. In such cases, using the “Render in Place” feature can be extremely useful.
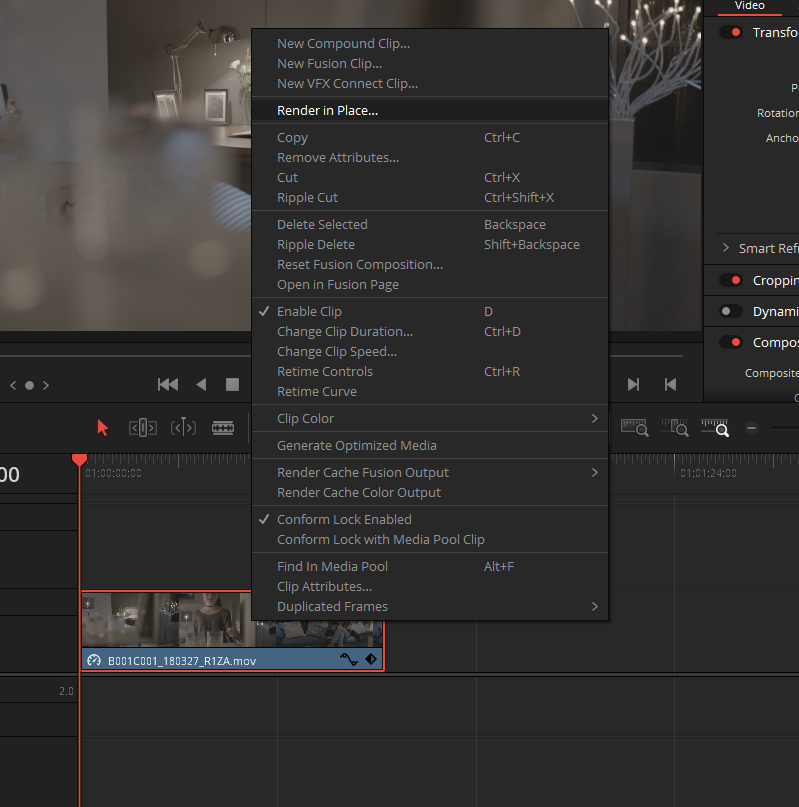
This feature allows you to render a clip with its applied effects and replace it in the timeline, freeing up resources and improving performance.
It can also be used to export individual clips with specific effects, without having to export the entire timeline. By using this feature, you can streamline your editing workflow and ensure smooth playback of your video project.
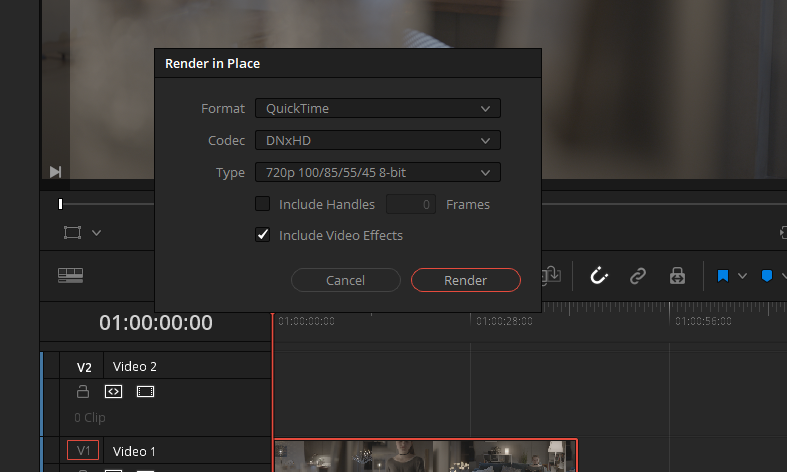
- In the edit tab
- Select your clip, and choose Render in place.
- This will let you render a proxy-like version of your clip in the “format”, “codec”, and “type” of your choice.
- And if you need to keep some editing flexibility, you can even select the check box “Include Handels”
- Click render, and the clip will be replaced in the timeline by a flattened version of itself.
Conclusion
These are several features in DaVinci Resolve that can help achieve smooth playback and prevent Davinci Resolve from lagging. You can use them individually or in combination to achieve better performance, which is particularly useful when editing on a laptop while on set or on the go.
However, you might be concerned that using these features could negatively impact the quality of your export. Rest assured, rendering will be done using the source media by default, so you don’t have to worry about any loss of quality.
When you’re up against a deadline, every second counts. That’s why DaVinci Resolve has a feature that can dramatically speed up your exports. When you’re on the delivery page, simply check the boxes which say “Use Proxy Media” and “Use render cache images” under “Advanced Settings”.
That’s it, now you know everything about how to stop Davinci Resolve from lagging.
- Also Read- Making DCP In Davinci Resolve
- Also Read- Export 5.1 Audio From Davinci Resolve
- Also Read- Is FUJIFILM X-T3 Worth It In 2023? Review