Hi, I’m Salik, the author of FilmmakingElements.com. I have been a filmmaker for over 10 years. I am also a certified DaVinci Resolve Trainer and I have used DaVinci Resolve for many of my projects. We’re excited to delve into an enlightening tutorial that’s going to significantly enhance your video editing skills – specifically, we’re going to learn about sky replacement using DaVinci Resolve.
By the end of this guide, you’ll have the skills and knowledge to replace a dull, gray sky in your footage with a breathtaking, vibrant one, drastically improving the visual appeal of your videos.
The best part is that this sky replacement technique isn’t limited to any specific type of video. Whether you’re working on a short film, a travel vlog, or a wedding video, this sky replacement method will give your work an extra special touch, impressing your audience and potentially elevating your video production to the next level.
Removing the Orignal Sky in DaVinci Resolve Before Sky Replacement
As we venture into the realm of advanced video editing, our focus in this section will be on how to effectively remove the old sky from your footage using DaVinci Resolve. We will walk through two practical methods to accomplish this task. The tools and techniques we’re going to use may initially seem complex, but with the following detailed step-by-step guide, you’ll be able to master them with ease.
Step 1: Accessing the Color Page
Begin by opening your video in DaVinci Resolve. Once you’re inside, your first stop is the Color page. To access this, look for the colorful icon that looks like a color wheel, typically located at the bottom of your workspace. Click on it to enter the Color module.
Step 2: Selecting an Unused Node
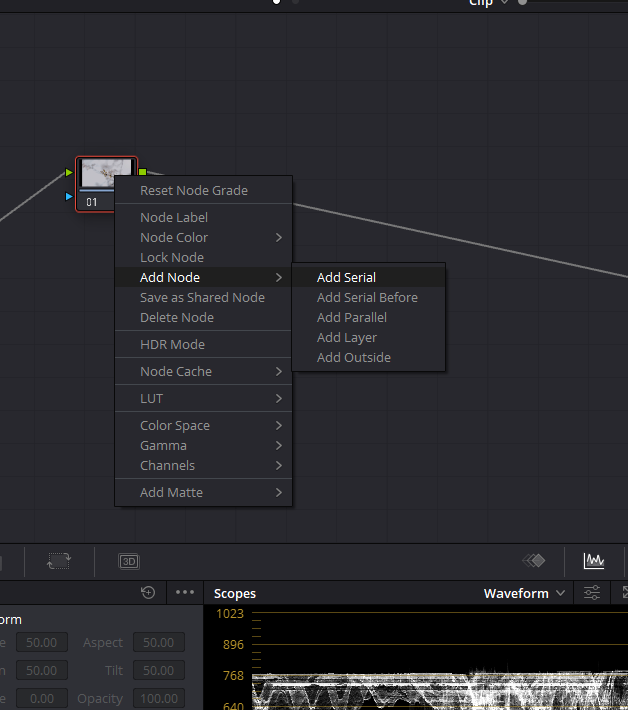
Within the Color module, your attention should now be on the Nodes panel. This is where you’ll perform most of your tasks for sky replacement. Look for an unused node and select it. If all nodes are used, you can create a new one by right-clicking within the Nodes panel and selecting Add Node > Add Serial.
Step 3: Applying the Sky Replacement Effect
Next, navigate to the Effects menu, located in the upper right corner of your screen. Here, you’ll find a multitude of effects that can be applied to your video. Scroll down or use the search function to find the Sky Replacement effect. To apply this effect, simply click, hold, and drag the effect to your selected node. You’ve now successfully applied the Sky Replacement effect to your node.
Step 4: Opening the Sky Mask Adjustments Menu
The Sky Mask Adjustments menu will now become your primary workspace. You can open this menu by clicking on the small arrow icon next to ‘Sky Mask Adjustments’.
From here, you have two paths to remove the old sky: the Qualifier Option and the Magic Mask method.
Option 1: Using the Qualifier Option
Step 5A: Selecting the Sky with the Qualifier

The Qualifier method is a powerful feature in DaVinci Resolve. To use it, click on the Qualifier icon (eye-dropper-looking icon) to bring up the Qualifier panel. This panel offers different selection modes: HSL, RGB, LUM, and 3D.
Among these, the 3D mode is often the most effective. To select the sky in the video, click on the sky in the Viewer pane, hold down the mouse button, and then drag across the entire sky until it’s completely white.

Step 6A: Refining the Sky Selection
In case you miss any part of the sky, simply click on the Qualifier icon with the plus symbol in the 3D qualifier settings. This allows you to add more areas to your initial selection. This method works particularly well when there is a clear color and luminosity contrast between the sky and the ground.
Option 2: Using the Magic Mask Method
Step 5B: Selecting the Sky with the Magic Mask

For videos where the sky and ground share similar colors or luminosity, the Magic Mask method is ideal. Click on the Magic Mask icon in the menu below the viewer (human in a window-looking icon) to open the Magic Mask panel. Here, select the selector icon with the plus symbol.
Step 6B: Using the Magic Mask
Just like with the Qualifier, you select the sky by left-clicking and dragging. But with the Magic Mask, you’ll also need to perform motion tracking. This can be done by clicking on the icon that displays two arrows in the Magic Mask section.
Correcting Edges Before Sky Replacement
Now that we’ve successfully removed the old sky from our footage using either the Qualifier or Magic Mask feature, it’s time to turn our attention to fine-tuning our work. This involves correcting any edge imperfections that remain within our selection. Following these instructions will ensure a polished and professional-looking result.
Step 1: Return to the Inspector Panel
Ensure your Sky Replacement node is still selected, and then direct your focus back to the Inspector Panel. This panel serves as the control center for fine-tuning various aspects of your video editing in DaVinci Resolve.
Step 2: Revisit the Sky Mask Adjustments Menu
In the Inspector Panel, navigate your way back to the Sky Mask Adjustments Menu. This is the same menu that we previously opened during the process of removing the sky.
Step 3: Correct Border Errors
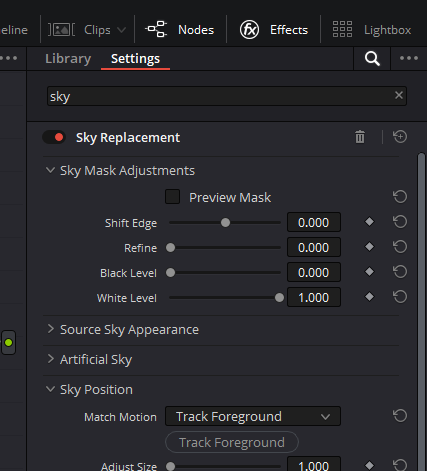
Within the Sky Mask Adjustments Menu, you’ll find several tools to help you fix border errors. These imperfections might show up as rough edges along building roofs or as stark white borders in your sky selection. Two particularly useful tools here are the Refine option and the White Level option.
- Refine Option: By increasing the value in the Refine option, you can effectively blur or hide any rough edges that appear along building roofs or any other structures in your video. This results in a smoother transition between the sky and the rest of your video.
- White Level Option: Adjusting the white level helps to eliminate any stark white borders that appear in your sky selection. By decreasing the white level, you can fade these white borders into the rest of the sky, resulting in a more natural-looking sky replacement.
By tweaking these parameters, we’ve significantly reduced any noticeable imperfections in our selection.
Creating an Artificial Sky in DaVinci Resolve: Customizing Color and Adding Elements
One of the most powerful features of DaVinci Resolve is its ability to create and fully customize an artificial sky within your video. From manipulating the sky’s opacity to adding elements such as clouds and sun, the sky is literally the limit with what you can achieve. Let’s break down these steps in detail.
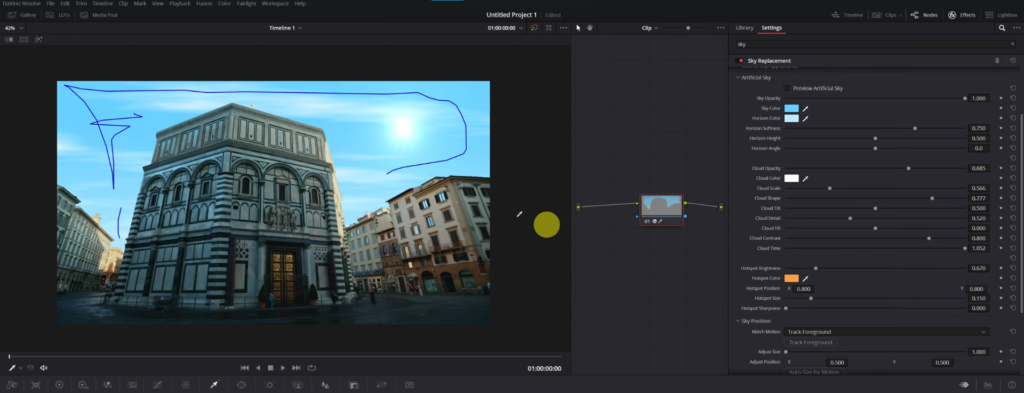
Step 1: Access the Artificial Sky Option
Within the Sky Replacement effect in DaVinci Resolve, navigate to the Artificial Sky option. This is the control center for your sky creation.
Step 2: Manipulate Sky Opacity
The first step to creating your artificial sky is to adjust the sky’s opacity. Look for the Sky Opacity bar and adjust its value. Drag the bar to the right until it reaches the maximum value of 1.0. This action effectively brings the sky to the forefront of your video, ready for further customization.
Step 3: Personalize Your Sky Color
A sky’s color can dramatically impact the overall mood of a video. DaVinci Resolve allows you to choose whatever color you think best complements your footage. To do this, locate the color control within the Artificial Sky option. Adjust this until you achieve your desired sky hue, whether it’s a soothing blue, a romantic pink, or an otherworldly green. This feature allows you to have complete creative control over your sky’s aesthetic.
Step 4: Modify the Color of the Lower Sky
To further enhance the depth and realism of your sky, you can adjust the color of the sky’s lower section. This part of the sky defaults to white in the software. Look for the control to adjust this color and manipulate it to your liking. Choosing a less intense shade of your main sky color often results in a more natural gradient effect.
Step 5: Introduce Clouds and Adjust Their Appearance
Clouds can add a dynamic touch to your artificial sky. To introduce clouds, locate the Cloud Opacity control within the Artificial Sky option and adjust it to your liking. Higher values will result in denser clouds, while lower values will give a clearer sky.
DaVinci Resolve doesn’t just let you add clouds; it allows you to modify their appearance. You can adjust their size, shape, detail, and sharpness to create a unique cloud formation for your sky. Remember, it’s essential to strike a balance with the detail parameter – a high level of detail might make the clouds appear synthetic, disrupting the overall realism of your video.
Step 6: Modify Cloud Positions with the Cloud Time Option
Another fantastic feature is the Cloud Time control. This option allows you to change the positions of the clouds in your sky, making your sky feel more dynamic and alive. Play around with this control until you find a cloud arrangement that suits your video scene.
Step 7: Incorporate an Artificial Sun
The icing on the cake is adding an artificial sun into your sky. The Hotspot Brightness option is your go-to control for this feature. Similar to the cloud settings, you can modify the appearance of your sun to match your video scene’s lighting conditions.
After following these steps, you’ll have a fully customized artificial sky that complements your video scene beautifully. But what if you’d rather incorporate a realistic sky photograph or a video into your footage?
Incorporating a Custom Sky Image or Video in DaVinci Resolve For Sky Replacement
Looking for an extra level of realism in your videos? How about replacing the sky with a genuine image or video of a breathtaking sunset or a dramatic cloudscape? DaVinci Resolve offers a seamless solution. This guide will explain the process, step by step.
Step 1: Import Your Sky Media
The journey to an authentic sky in your video begins with importing the image or video of the sky you want to use into DaVinci Resolve’s Media Pool. This could be a moving video clip of a beautiful sunrise or a still image of a starry night.
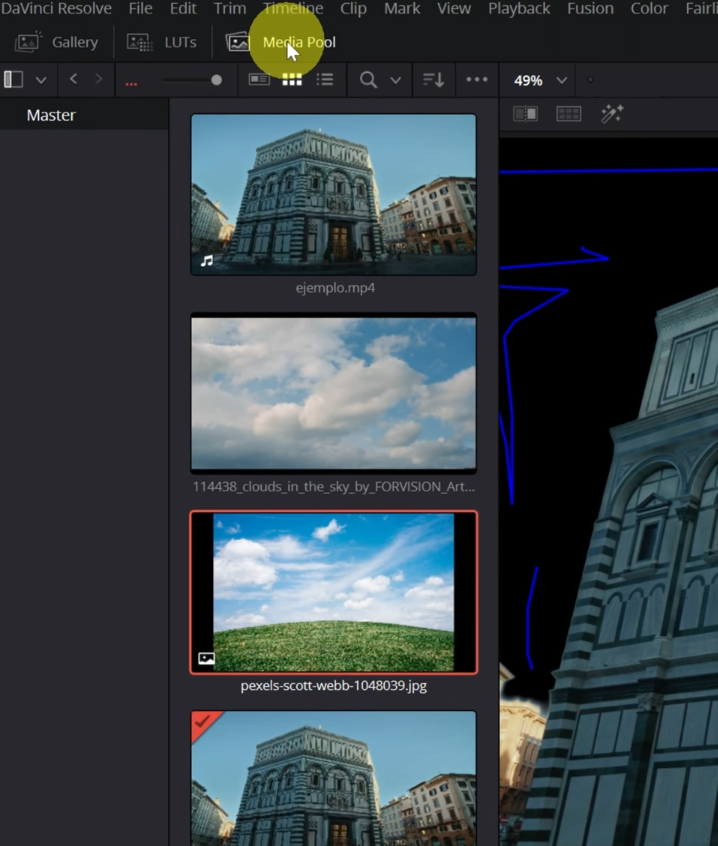
Step 2: Add Your Sky to the Nodes Panel
On the Color Page of Davinci Resolve, click on the Media Pool option in the top-left corner. Select the sky clip you want to incorporate and drag it to the Nodes Panel. A new node featuring your selected sky media is now added to your project.
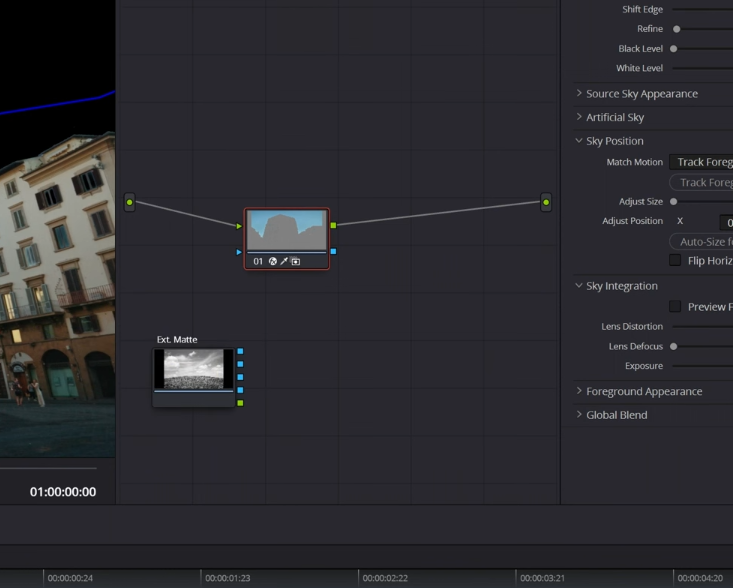
Step 3: Connect the Node
The next step is to connect this new node to the node where you’ve applied the Sky Replacement effect. The connecting process might be challenging due to a limited number of input ports, but don’t worry, there’s an easy workaround.
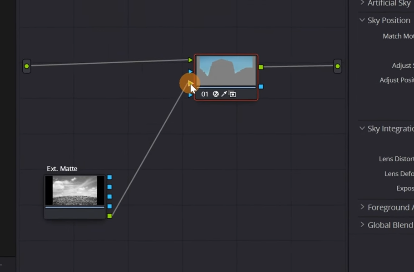
Right-click on the Sky Replacement node, then look for the Add OFX Input option and click it. This action adds additional input ports to your node, including a new green input, to which you can now connect the new sky node. Connect the green square of the sky node to the new green square of the Sky Replacement effect you just created.
Step 4: Incorporate the New Sky
Your new sky image or video is now integrated into your project. However, there’s a catch: if your video includes camera movement, your imported sky will appear static, breaking the overall continuity of the scene.
Step 5: Motion Tracking the Sky
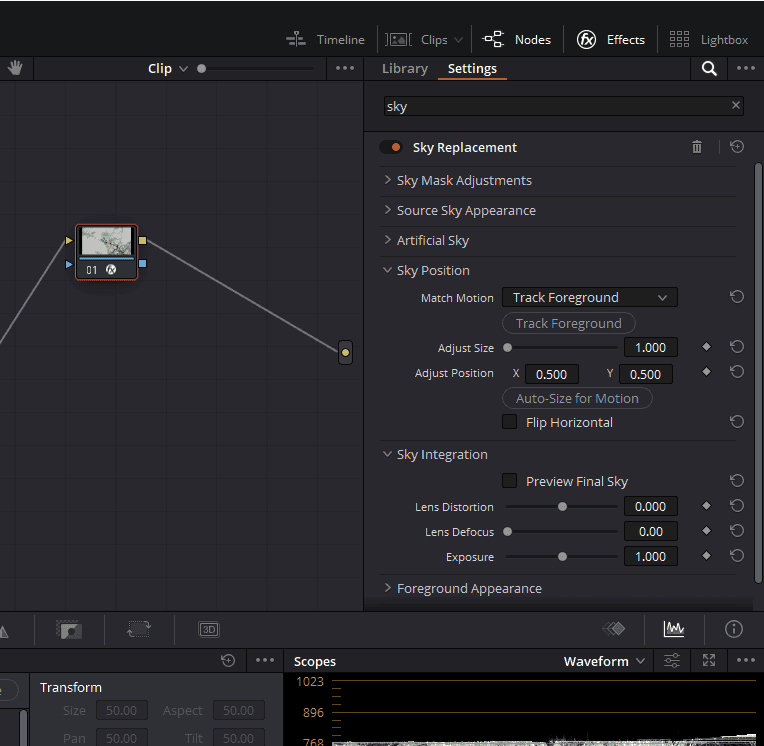
To synchronize the sky with the original video’s movement, you’ll need to apply motion tracking. Select the node where the Sky Replacement effect is applied, and navigate to the Sky Position section within the Sky Replacement menu. Here you’ll find the Match Motion option, which is key to your tracking process.
There are four different tracking options to choose from, including manual keyframing, tracking the foreground, tracking the original sky, and using the DaVinci Resolve FX tracker. For best results, we recommend either the track foreground or track original sky options.
Select your preferred tracking method and then click on the corresponding button (e.g., Track Foreground). DaVinci Resolve will take a few seconds to execute the tracking process.
Step 6: Troubleshooting and Tweaking
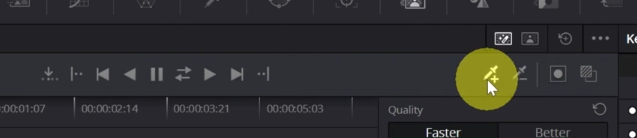
Following the motion tracking, you might notice some black borders. Don’t panic; this is normal and easy to fix. Simply click the Auto-Size for Motion button to eliminate these unwanted borders.
Review the tracking result to ensure the new sky is moving synchronously with your original video. If needed, repeat the tracking process using different methods until you’re satisfied with the outcome. Remember, you can always adjust the scale and position of your new sky to get a perfect fit.
Congratulations! You’ve successfully incorporated a custom sky image or video into your DaVinci Resolve project.
Final Adjustments for Perfect Sky Replacement in DaVinci Resolve
The sky’s the limit when it comes to creativity in video editing, and DaVinci Resolve lets you take full flight. After you’ve replaced the sky, it’s time to polish your work and ensure a seamless blend between the sky and the rest of your video.
Step 1: Matching Exposure Levels
Exposure is a crucial aspect of videography and can make or break your sky replacement results. Ideally, the exposure of your new sky should match that of your original video, creating a consistent and harmonious visual.
However, there may be instances where the exposure levels of the sky and the buildings or the landscape differ. To address this, you can tweak the exposure so that the sky and the ground elements align well.
Step 2: Achieving a Similar Appearance
In some situations, the color tones of the sky and the landscape or buildings might not complement each other. For instance, an orange sky at sunset paired with bluish buildings can result in a discordant effect.
To harmonize the scene, navigate to the ‘Foreground Appearance’ section. Here, by enabling the ‘Adjust Foreground’ box, you can modify various aspects of the foreground, including brightness, saturation, color temperature, and tint. Adjusting these settings allows you to achieve an appearance that is consistent with the sky, lending a professional finish to your sky replacement.
Step 3: Altering Sky Appearance
Just as you can alter the foreground appearance, DaVinci Resolve also allows you to modify the sky’s appearance under the ‘Source Sky’ section. This feature provides an additional layer of flexibility to achieve your desired aesthetics.
Step 4: Experimenting with Different Skies
If the sky you’ve chosen initially doesn’t quite meet your expectations, or you’re curious to see how different skies would impact your video, changing it is a breeze. Navigate to your media pool, select another sky, and drag it to the nodes panel. Then, disconnect the node of the previous sky and connect the node of the new sky.
If your new sky is darker than you’d like, remember that you can adjust the exposure to make it blend better with the buildings or landscape. This ability to interchange skies allows you endless possibilities to enhance your video and achieve the perfect atmosphere.
Congratulations, you’ve mastered the art of sky replacement in DaVinci Resolve! With practice, this technique will allow you to add unique touches to your videos and create stunning, professional results. Happy editing!