Hello everyone! Welcome back to Filmmaking Elements. Today we will discuss the best ways to reduce video noise in Davinci Resolve. Video noise is found with any camera, especially when shooting in low lighting conditions. The Noise Reduction tool in Davinci Resolve allows you to reduce video noise in the video. The Temporal and Spatial Noise reduction helps make the video clear and pleasant. Unfortunately, the video noise reduction feature is not available in the free version of Davinci Resolve, but that shouldn’t stop you from knowing about it anyway.
About Video Noise Reduction in DaVinci Resolve
Here is a clip with no video noise reduction, and I have another clip with video noise reduction. And you can see the difference and how much better the one with video noise reduction is. This clip was shot with a GH5 in the Cine D profile with noise reduction turned down fully. And if you look pretty closely, you can see there’s a lot of video noise, and it’s underexposed as well.

Video noise reduction is required when pushing the image during color grading, such as lifting the shadows. Doing all these effects and grading on the clip can induce a lot of noise in the video. Now we know some basic things about video noise reduction, it brings us to the next question. Where do you find video noise reduction, and how do you use it?

Where is Video Noise Reduction Tool in Davinci Resolve ?
I’m going to break down everything right now for you. To locate the noise reduction tool in DaVinci Resolve , you need to follow the below-mentioned steps-
- Firstly, go to the color tab.
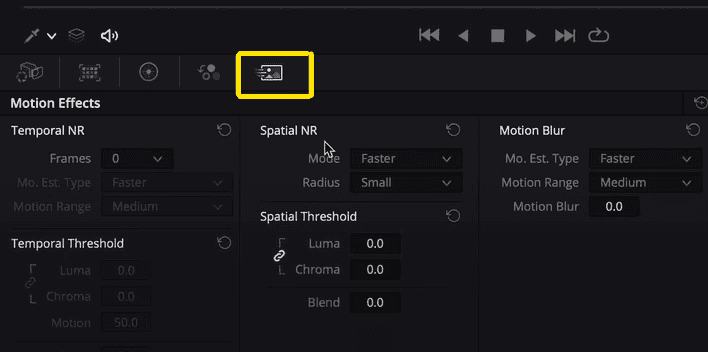
- Click on the Motion Effects option in the bottom left corner.
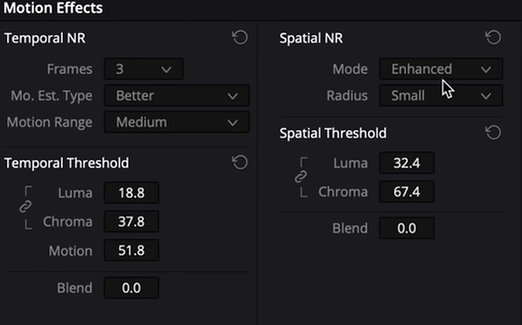
- Under motion effects, you will see Temporal Noise Reduction and Spatial Noise Reduction.
Now, the temporal and spatial noise reduction works from your graphics card. So if you have a powerful and fast graphics card, you can see the changes in real-time. If you don’t have the fastest graphics card, you have to wait for the clip to render out.
Also Read: Everything About Using LUTs In Davinci Resolve
How to Reduce Video Noise in Davinci Resolve?
We know there are two noise reduction options available in Davinci Resolve, Temporal Noise Reduction, and Spatial Noise Reduction. Both of these options are customizable, and you can use them individually or use them together. I think you can get the best results when you use them together. But then again, you also have to think about how much your GPU will be used while using this. Let’s look into these options in detail.

Temporal Noise Reduction in Davinci Resolve
Temporal noise reduction analyzes multiple images across a certain amount of frames to isolate the noise from the detail in the shot. We have three settings under the temporal noise reduction, Frames, Motion Estimate Type, and Motion Range.

- Frames: It shows the number of frames that you want to tell DaVinci to analyze to separate the detail in the frame from the noise. You can choose between 0 and 5. Zero is not averaging, and five is a high average. The higher the number, the more your computer will have to process to make it work. If you have a super-fast computer, you can choose five. If you have a system with the average speed, you should stick to three.
- Motion Estimate Type: The default option is set to faster. This option means that your computer will run faster to achieve the desired results. But if you want to get better results out of this video noise reduction, you might as well choose better. That’s what I do every time. Faster tends to make things look a little muddy, so you can go with better to avoid this.
- Motion Range: It has three settings, small, medium, and large. It lets you select the speed of the motion that the motion estimation should expect to exclude. So basically, you’ll have a small setting for objects that aren’t moving or are very slow with no motion blur. And if you have a lot of movement with motion blur in your clip, you should select large.
Also Read: How To Use Color Warper In Davinci Resolve
Temporal Threshold
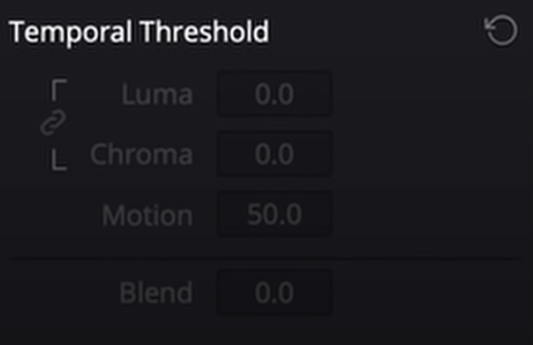
Next, we have the Temporal Threshold. Here are a few options: Luma, Chroma, Motion, and Blend.
- Luma: First, we have the Luma threshold, which lets you determine how much or how little the noise reduction is applied to the luminance of the channel. Luminance is the dark and bright parts of the image.
- Chroma: Chroma is the hue and saturation, the colors of the image. You can do the video noise reduction either before or after the grade. The order of operation is up to you.
- Motion: Next, we have the motion threshold; it’s default at 50. And this separates the moving and static pixels in the image. This motion estimation prevents the application of temporal noise reduction on the regions of the image that fall above this threshold to avoid artifacts by not applying the frame averaging to specific points of the image that are in motion.
- Blend: Blend is the next option we have. Blend is kind of like the strength of overall noise reduction that’s being applied to the frame. So, if you want to turn down the blend of it, you’ll actually turn the number up. If you do some super heavy video noise reduction and you think it’s a little too muddy, you can turn the blend up, maybe go to like 60%, and you’ll get different results.
When you adjust the Luma from zero to 100, you change just the luminance. And while adjusting the Luma, you will notice that Chroma is attached to it. And so basically, these two work together. And if you want to work with these separately, you can delink them by clicking on the little link on their left.
That way, you can work with these separately, and you don’t have to worry about them being tied together because usually there’s more Chroma noise than there is luminance noise in the video. That’s what I’ve noticed in a lot of videos.
To be honest with you guys, I don’t touch motion that much. I mess with it maybe a little bit here and there, but I leave this default. You can try using it. And for the blend, for the most part, I leave blend at zero, and I mess with the Chroma and the luminance.
So as you can see, temporal noise reduction can only do so much. Now, it’s time to move on to the next part of this tutorial and talk about spatial noise reduction.
Also Read: How To Export In Davinci Resolve- Absolute Guide
Spatial Noise Reduction and Threshold in Davinci Resolve
The spatial noise reduction controls let you smooth out regions of high-frequency noise throughout the whole video while attempting to avoid softening by preserving the detail. And it does what temporal noise reduction cannot do. Sometimes even after doing temporal noise reduction, you can still see some noise. If you look closely, there is some pixelization that you can still notice in your clip. So down here with spatial noise reduction, we have two options, mode, and radius.
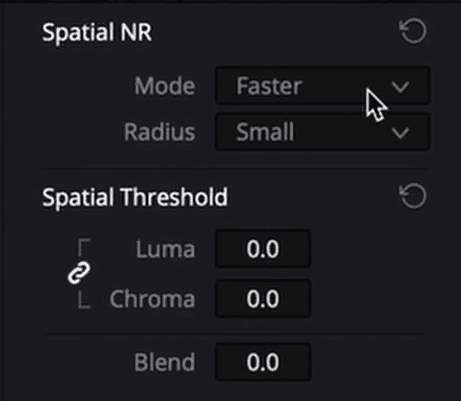
- Mode
Mode is our first option. Again, this is somewhat similar to the motion estimation type in Temporal Noise Reduction. There are three options under this, faster, better, and enhanced. But unlike the motion estimation type, I like to set it to Enhanced. So first, let’s discuss the default option, Faster.
Faster uses a super lightweight noise reduction on the whole clip. And it does produce a few artifacts when the video is cranked up. It’s like the very base as it is easy on your computer. So, if you’re in a hurry or don’t want to apply a certain amount of time, go with Faster.
Now, selecting better is a different algorithm that produces better results. But it is also at the expense of your processor, and it’s just really intense for the computer to render out. So, keep that in mind. Once you start selecting higher settings for the computer to work harder, it’s going to take longer for you to load.
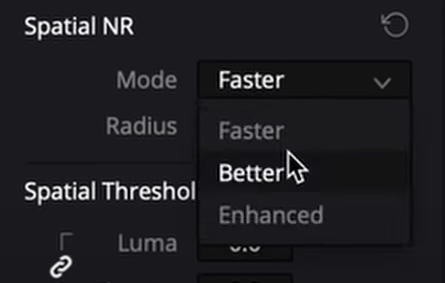
So, depending on your machine, you may want to stick with specific modes. If you don’t mind waiting, feel free to use this option.
Next, we have Enhanced. The one cool thing about Enhanced is that it lets you do some fine-tuning with the noise reduction, the Luma, and the Chroma. If you select faster or better, you cannot unlink the Luma and the Chroma in Spatial Threshold. That’s the one downside about using better and faster and the fact that these are just not as good.
But when you Select Enhanced, you can see that the little delink icon shows up. I typically like to keep the spatial thresholds around double the temporal threshold.
2. Radius:
Now, the last thing here I did not cover was the radius. So, here’s where a lot of cool things happen. The options here for radius are small, medium, and large. A smaller radius offers more excellent real-time performance for the actual noise reduction. So if you need less time to render something out, you may want to select small because it won’t take as long. It is also good to use if you have low numbers of the Luma and the Chroma values.
But when you start increasing the Luma and the Chroma values, you want to start pulling this up higher. So you may wish to go-to medium. I typically like to stay with the medium. It seems like a good middle for what I want to do, and it doesn’t take away too much from the image, and it also preserves the detail well.
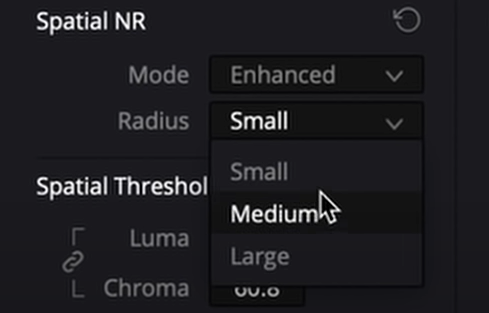
But just like with anything, there are trade-offs. If you want to wait longer and get a better result, you might as well sit here and click on large, turn up the Enhanced, really fine-tune these Luma and Chroma settings, get some coffee and come back.
And so the last thing I like to do on top of video noise reduction is to add some sharpening at the end since noise reduction takes away some of the details from the video.
So, I hope you were able to find the answer to all of your questions regarding DaVinci Resolve, like Best Ways to Reduce Video Noise in DaVinci Resolve and Various Video noise reduction options in DaVinci Resolve And if you have any more doubt regarding DaVinci Resolve, make sure to check out our other articles. If you have any suggestions feel free to contact us.