Autofocus technology has always fascinated me. For many, it feels like a little touch of magic; you glance through the viewfinder, gently press the shutter button, and voilà! The subject is crisply in focus. But have you ever paused to think about the intricate workings behind this seemingly simple action? Especially with the new generation of mirrorless cameras, there’s so much more happening beneath the surface.
I finally got my hands on the Nikon Z9, and I’ve been on a journey of exploration ever since. Its autofocus features, in particular, caught my attention. With every click, I grew more curious, diving deep into the nuances and mechanics of the Nikon autofocus system.
But why does the Nikon Z9 stand out, especially when compared to its peers? Well, for starters, mirrorless cameras like the Z9 are revolutionizing the autofocus game. Their mechanics and technology offer rapid focus, accuracy, and a plethora of customizable settings. And from my personal experience, the Z9 takes it a notch higher.
I’ve spent countless hours tweaking, testing, and understanding the autofocus settings of the Nikon Z9. Today, I want to share these insights with you.
Diving Deeper into Autofocus: A Comparative Study of Contrast and Phase Detection
Autofocus is more than just a button on your camera; it’s the culmination of intricate technologies that have transformed modern photography. We’ll delve into the technicalities of two predominant autofocus systems, exploring their strengths and challenges.
1. Contrast Detection AF: The Basics and Beyond
How it Works:
Contrast Detection AF is grounded in the principle of leveraging contrast to achieve sharp focus. When you select a focus point in your viewfinder, the camera examines the varying light intensity levels between adjacent pixels in that area.
- Analysis and Adjustment:
After pinpointing the area of maximum contrast (which corresponds to the sharpest focus), the camera communicates with the lens, instructing it to make necessary adjustments to achieve that sharpness. - Ideal Conditions:
Contrast Detection AF excels in environments with pronounced horizontal and vertical lines. These lines provide a significant difference in light intensity, allowing the camera to promptly and accurately determine the focus. - Potential Challenges:
However, this system isn’t infallible. In scenes with minimal contrast variations, like a homogenous sky, the camera might grapple to find a focus point. Moreover, if your primary subject doesn’t offer adequate contrast, the camera might inadvertently focus on background elements with stronger contrasting lines, like vegetation or intricate patterns.
2. Phase Detection AF: Speed and Precision
The Science Behind It:
Phase Detection AF utilizes tiny specialized lenses within the camera that split incoming light into two separate image paths.
- Measurement and Interpretation:
The camera then evaluates the relative alignment of these two images. If they align perfectly, the subject is in focus. If not, the disparity between the images provides data on how out-of-focus the subject is and in which direction the lens should adjust. - Notable Strengths:
One of the standout attributes of phase detection is its remarkable speed, often resulting in near-instantaneous focusing, especially beneficial for action shots or swiftly changing scenes. - The DSLR Limitation:
In traditional DSLRs, the AF sensor is a distinct component, simultaneously handling both phase and contrast detection. But this design has an inherent limitation. The size and placement of the AF sensor curtail the number of autofocus points available in the viewfinder.
The Mirrorless Revolution and Integrated AF Systems
The advent of mirrorless cameras, like the Nikon Z9, heralded a transformative phase in autofocus technology. In these models:
- Sensor Integration:
The AF system is integrated directly into the primary imaging sensor, combining the strengths of both contrast and phase detection methods. - Unparalleled Flexibility:
This fusion allows mirrorless cameras to offer edge-to-edge focus points across the frame. It’s a game-changer for photographers, providing unprecedented flexibility in composition and ensuring the desired subject is in sharp focus, irrespective of its position in the frame.
Navigating the Nikon Z9’s Autofocus Modes: A Deep Dive
The Nikon Z9, with its array of impressive features, provides photographers with diverse options for ensuring their images are crystal clear. Among these features, the autofocus modes are paramount. But with the choices available, how do you determine which one is right for your shot? In this detailed exploration, we’ll dissect the primary autofocus modes, offering insights on when and how to use each effectively.
1. Single Area Autofocus (AF-S): A Closer Look
Functionality:
The AFS mode is Nikon’s single-point autofocus system. When activated, this mode zeroes in on one specific area within your frame, ensuring it’s in sharp focus.
Ideal Usage & Practical Application:
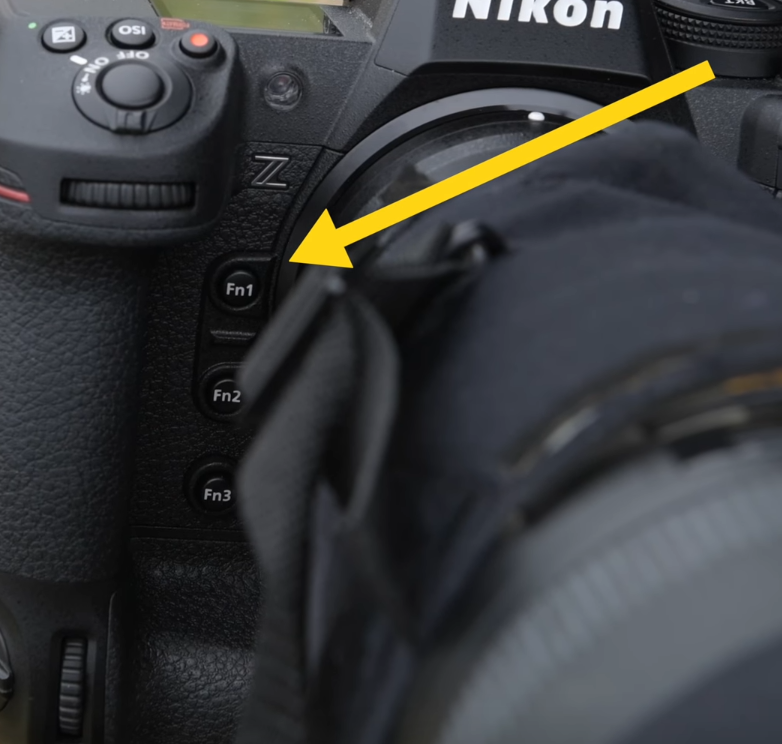
Primarily, I resort to AF-S when capturing still subjects — think scenic landscapes, posed portraits, or any subject that remains relatively stationary. Given the frequency with which I utilize this mode, I’ve customized my camera for easy access, assigning one of my function buttons directly to AF-S. This strategic move allows me to seamlessly secure a razor-sharp focus on the precise segment of my composition I wish to highlight, especially when the environment doesn’t present any erratic motion.
2. Continuous Autofocus (AF-C): Tracking Motion
Functionality:
AFC stands as a counterpoint to AF-S, designed explicitly for subjects that won’t stay still. As your subject traverses your frame, the AF-C mode continually recalibrates the focus, ensuring the subject remains crisp, regardless of its motion.
Ideal Usage & Personal Insights:
My passion for wildlife photography makes AF-C indispensable. Nature is unpredictable; animals might dart, fly, or leap without a moment’s notice. AF-C has been instrumental in such scenarios, maintaining sharpness even as my subjects move unexpectedly.
3. The Hybrid Approach: Manual Focus with a Touch of Auto
Functionality:
While autofocus is incredibly handy, there are times when the tactile control of manual focus is irreplaceable. But I’ve introduced a unique twist to this conventional system. My Nikon Z9 is set for continuous autofocus via the back button. The moment I release my thumb from this button, the camera reverts to manual mode.
Advantages & Workflow Integration:
This configuration offers me the best of both worlds. I can swiftly alternate between autofocus and manual without navigating cumbersome menus. If I want to retain manual control, all I need to do is abstain from pressing the back button.
Decoding the Back Button Focus Strategy
Default vs. Custom Setup:
Many cameras, straight out of the box, tie the autofocus function to the shutter release button. I’ve diverged from this standard setup, and here’s why.
Rationale & Practical Benefits:
Entrusting autofocus to the back button ensures that I maintain control over my focal point even during the final moments of capturing an image. Previously, I encountered scenarios where, after carefully focusing and recomposing, my focus would inadvertently shift upon pressing the shutter — a surefire recipe for blurred images.
To circumvent such issues, I’ve physically segregated the functions. My thumb, via the back button, oversees focusing. Simultaneously, my index finger remains dedicated to the shutter release. This division not only prevents unintentional focus shifts but also elevates the speed and efficiency of my shooting process.
Deep Dive into Nikon Z9’s Area Modes: Maximizing Your Focus
The Nikon Z9, a stellar addition to the camera world, offers photographers a plethora of choices when it comes to area modes. These modes are essential tools for getting those impeccable shots, and a nuanced understanding can truly elevate your photography. Let’s explore each mode in detail.
1. Pinpoint Mode: The Precision Master
- Description: Offers an ultra-precise focus point, allowing you to nail the focus exactly where you want.
- Features:
- The accuracy indicator turns green upon obtaining a perfect focus.
- Limited to AF-S mode.
- Does not encompass the entire viewfinder of the Z9.
- Not suitable for continuous mode.
- Best For: Static subjects where an exact focus is crucial. Think detailed macro shots or subjects with intricate details.
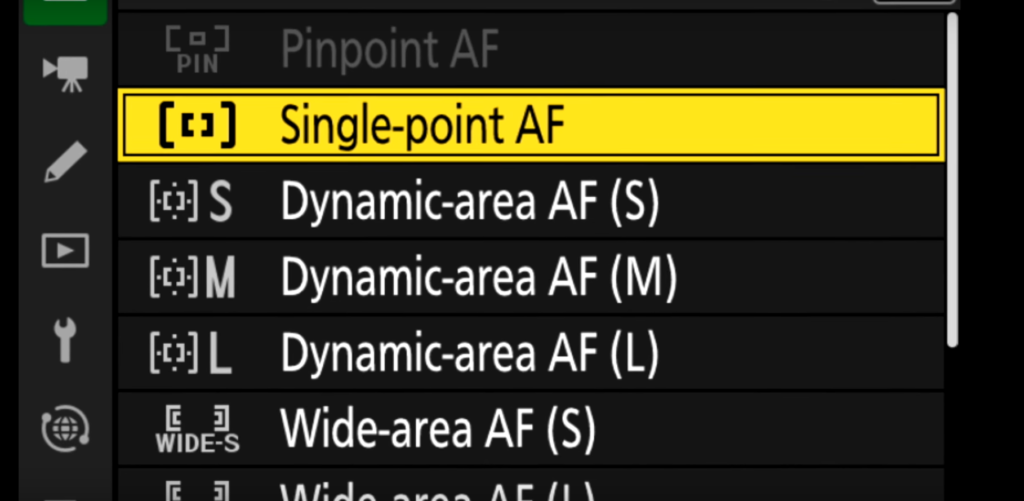
2. Single-Point: The Reliable All-rounder
- Description: Slightly larger focus point than the pinpoint, granting a bit more leeway while maintaining accuracy.
- Features:
- Fully compatible with continuous mode.
- Covers the majority of the viewfinder.
- Pro tip: Utilize the autofocus button (located on the lower left of the camera) to swiftly switch between focus modes and areas.
3. Dynamic-Area: The Adaptable Trio
- Description: Allows photographers to choose from three focus box sizes.
- Features:
- Sizes include small, medium, and large.
- Requires in-camera setting adjustments.
- Focus priority is given to the nearest subject within the chosen box.
- Caution: Be wary of multiple subjects within your chosen box to ensure focus on your intended target.
4. Wide-Area AF: The Customizable Maverick
- Description: Enables focus on a chosen frame area.
- Features:
- The recent firmware update facilitates the creation of custom boxes – be it long, narrow, vertical, or horizontal.
- Ideal for sports, offering versatility in focusing on players.
5. Auto-Area AF: The Autonomous Ace
- Description: Entrusts the camera with choosing the focus using the entire frame.
- Features:
- Typically focuses on the closest subject or the section with the highest contrast.
- Allows the camera’s intelligence to drive the focus decision, which can be a gamble in complex situations.
6. 3D-Tracking: The Wildlife Whisperer
- Description: This mode tracks subjects in three-dimensional space.
- Features:
- Particularly effective when combined with AF Subjects Detection.
- Delivers consistently in wildlife scenarios, tracking movement and ensuring sharp captures.
Mastering Wildlife Photography with Advanced Camera Tracking Features
Venturing into wildlife photography is a blend of patience, the right equipment, and an intimate understanding of your subject’s behavior. On a recent outing, I experimented with an advanced 3D-Tracking feature complemented by Animal Eye Detection, a feature becoming increasingly common in modern cameras. Here’s a guide on optimizing such features for capturing wildlife in motion.
1. Setting and Preparation:
- Choosing the right location is crucial. Be it private properties or public parks, understanding the terrain and habitats can give you an edge.
- When aiming for ground-level shots or those from an elevated perspective, consider tools like blinds. They help mask your presence and allow animals to behave naturally.
2. Gear and Camera Settings:
- Equip yourself with a lens suitable for your subject’s distance and size. For birds or smaller creatures, a telephoto lens might be ideal.
- Use 3D Tracking or a similar feature paired with Animal Eye Detection. Position the focus point on the animal’s eye or head, and let your camera lock onto it. Modern cameras with fast frame rates can capture multiple shots in a second, ensuring you don’t miss any action.
3. Understanding Advanced Tracking Features:
- Many of today’s tracking modes prioritize unique color patterns or contrasts. Recognize what the camera might lock onto. For birds, it’s often the distinct patterns in their eyes or feathers.
- Be prepared for occasional misfocus, like when the camera gets distracted by background elements. With experience, you’ll learn to swiftly reposition and refocus.
4. Anticipating Subject Movement:
- Spend time observing your subjects. Recognizing their behavioral patterns, like specific perching spots or characteristic movements, can prepare you for the best shots.
- For example, if a bird species is known for sudden vertical take-offs, frame your shot with additional space above them.
5. The Pros and Cons of Concealment:
- Tools like blinds offer excellent concealment but may limit your field of vision. While they might restrict some spontaneous shots, they often yield natural behaviors as animals remain undisturbed.
- The thrill in wildlife photography often comes from unexpected moments. Be it a sudden dive, chase, or a playful gesture, always be prepared to capture the unanticipated.
I hope you liked our article on Nikon Z9 Autofocus settings. Keep shooting!
- Also Read: Nikon Z9 Astrophotography Tips: Must Know
- Also Read: Top 5 Nikon Z30 Alternatives
- Also Read: Top 5 Nikon Z5 Alternatives