Welcome back to FilmmakingElements.com! In today’s post, we’re going to dive into the world of masking transitions in Davinci Resolve, a technique that has taken the film and video industry by storm. This visually stunning effect can be found everywhere from YouTube videos to TV shows, and has become a favorite among filmmakers and content creators alike.
Creating a Masking Transition in DaVinci Resolve: Step-By-Step Tutorial
Follow these detailed steps to create a masking transition in DaVinci Resolve:
Step 1: Import Media and Set Up Project
- Open DaVinci Resolve and create a new project or open an existing project.
- Import all the media files you want to use for the transition by clicking on “File” > “Import” > “Media.” You can also drag and drop your media files into the “Media Pool” section.
- Make sure you have a clip with an object that moves in front of the frame from top to bottom and fully wipes across the screen. This object will serve as the mask for your transition.
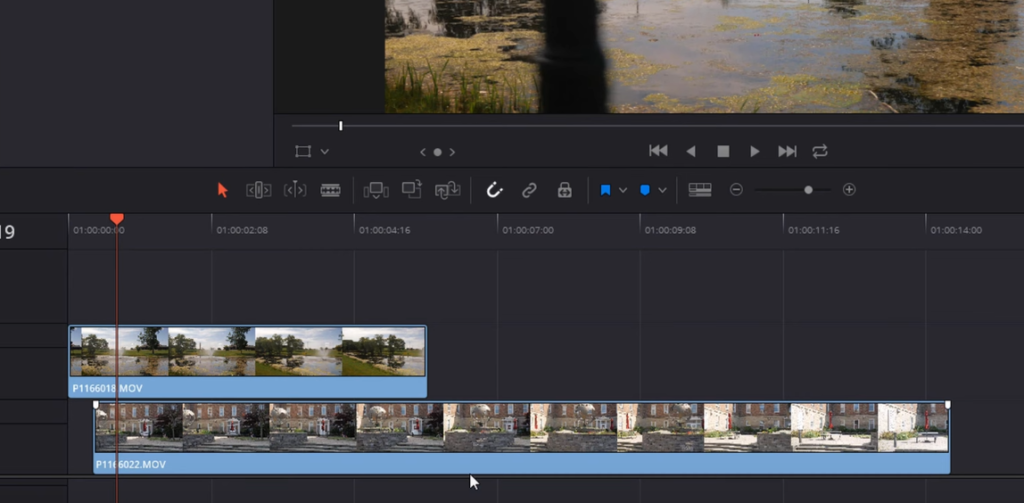
- In the “Edit” tab, add your clips to the timeline. Stack your clips on top of one another, with the first clip on video layer 2 (V2) and the second clip on video layer 1 (V1).
Step 2: Activate Alpha Output
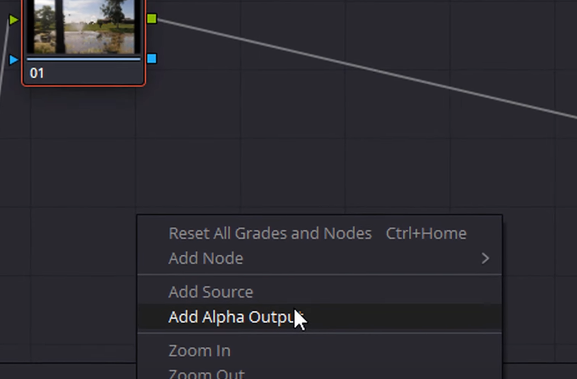
- Select the clip which you will transition from and switch to the “Color” tab in DaVinci Resolve by clicking on the “Color” button at the bottom of the screen.
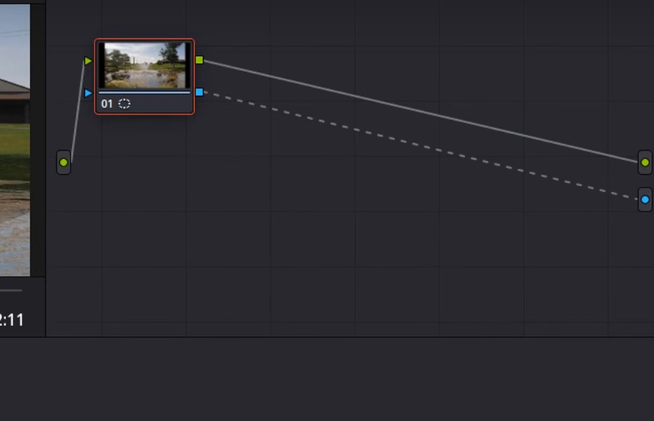
- In the “Nodes” section, right-click on the node graph and select “Add Alpha Output.” A small blue dot will appear on the right side of the node graph.
- Connect the blue square on the right side of the first node to the blue alpha output dot. This will activate the alpha output, which is essential for creating a transparent mask in the transition.
Step 3: Create a Mask Using the Pen Tool
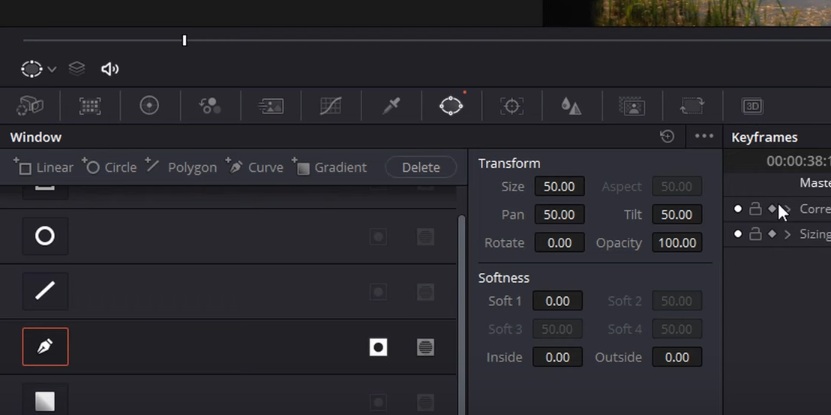
- In the “Color” tab, go the Window tool (circle with four dots) and select the pen tool (curve tool).
- This tool will help create a mask that will serve as the mask for your transition.
- To get a better view you can also zoom in and out using your scroll wheel or the zoom controls in the viewer toolbar.
Step 4: Start Keyframing
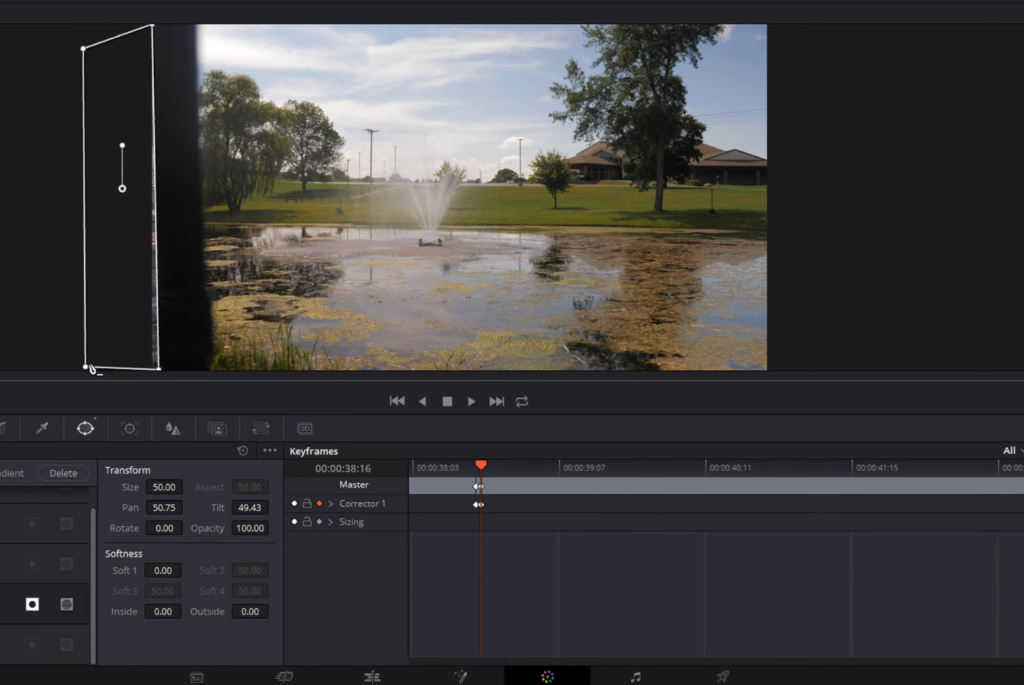
- Move your playhead to the point in your timeline where the moving object in the first clip starts to cover the frame.
- Draw a mask around the moving object by clicking on the viewer to add points and create a shape that follows the contours of the object. Close the shape by clicking on the first point you created. This initial mask will serve as the starting point for your transition.
- In the “Keyframes” panel, located below the “Nodes” section, click on the diamond-shaped button next to “Corrector 1” to add a keyframe for the mask. This will enable you to animate the mask over time as the object moves across the frame.
- Move your playhead to the next frame in the timeline by using the arrow key. Adjust the mask by clicking and dragging the points to follow the movement of the object. DaVinci Resolve will automatically add a new keyframe for each adjustment you make to the mask. If you need to add more points to the mask, simply click on the edge of the shape to create a new point.
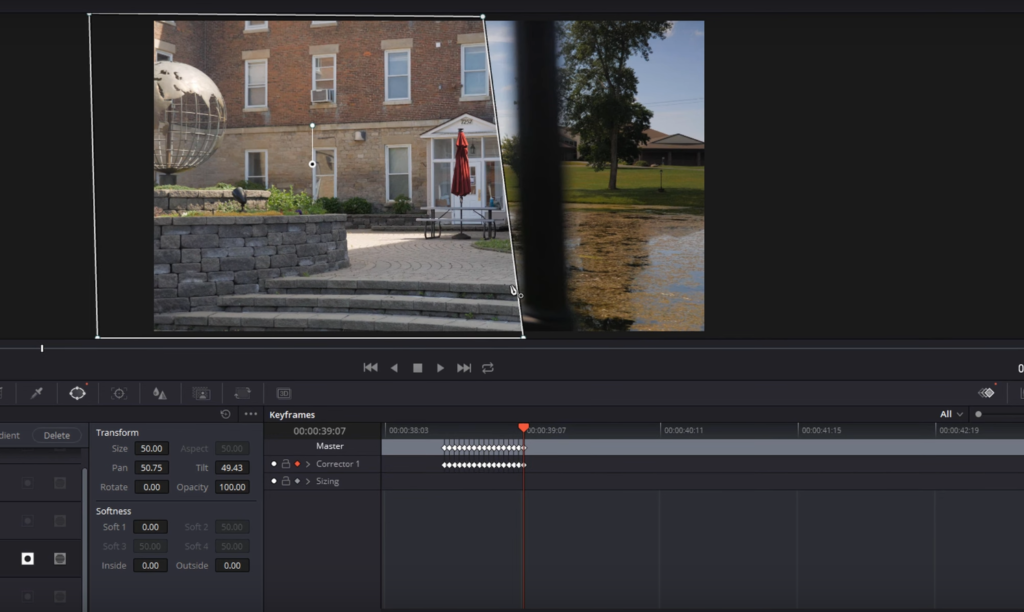
- Continue this process frame by frame, adjusting the mask to follow the moving object as it wipes across the screen. Be patient and take your time to ensure that the mask accurately follows the object’s movement. This can be a time-consuming process, but the results are worth it.
- As you progress through the frames, you’ll notice the second clip starting to be revealed beneath the first clip. Ensure that the mask is always positioned correctly to cover the edge of the moving object, creating a seamless transition between the two clips.
Step 5: Complete the Masking Transition
- Once the moving object has fully exited the frame, adjust the mask for the final time to ensure that the second clip is entirely revealed. If necessary, add additional points to the mask to cover any remaining areas of the first clip.
- In the “Keyframes” panel, review your keyframes to ensure that the mask animation is smooth and follows the moving object accurately. If needed, adjust individual keyframes by clicking on them in the panel and modifying the mask points in the viewer.
- After completing the mask animation, switch back to the “Edit” tab to review your masking transition. Play the transition back in real-time to ensure that it is smooth, accurate, and visually appealing. If necessary, make any final adjustments to the mask or keyframes in the “Color” tab.
Tips for Creating Masking Transitions in DaVinci Resolve
- Choose clips with clear, distinct moving objects that fully wipe across the frame. This will make it easier to create an accurate and seamless masking transition.
- Practice patience and precision when keyframing your mask. The quality of your masking transition is directly related to the accuracy of your mask animation.
- Use keyboard shortcuts to streamline your workflow. For example, use the arrow keys to navigate between frames in the timeline, and use the scroll wheel or zoom controls to zoom in and out of the viewer.
- Save your project frequently to prevent any potential loss of work due to crashes or other technical issues.
- Experiment with different types of moving objects and transitions to create unique and visually engaging masking transitions for your projects.
Enhancing Masking Transitions with Soft Edges, Time Remapping, and Stabilization
While a masking transition may look decent at first, there are always ways to improve its appearance and overall effect. In this section, we’ll explore techniques to soften edges, use time remapping, and stabilize footage for a more polished and professional transition.
Softening the Mask Edges

- In the “Color” tab, select the mask you created for the transition.
- In the “Power Window” section, locate the “Softness” slider. Adjust the slider to add a subtle softness to the mask edges. Be cautious not to add too much softness, as this may cause the two clips to blend together unnaturally.
- A value of around 3 should provide a gentle softening of the edges, making the transition smoother and less abrupt.
Time Remapping for a Faster Transition
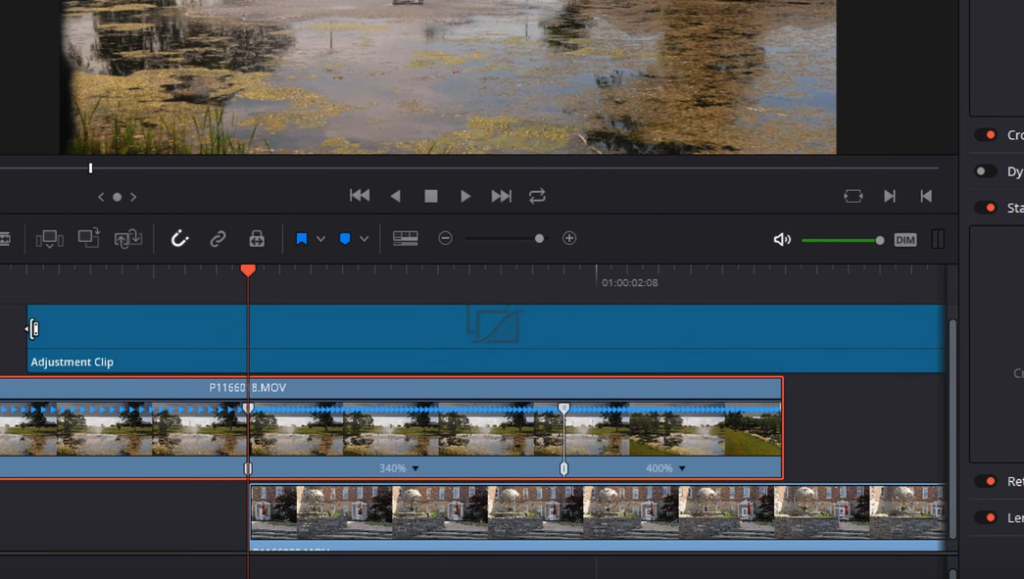
- Switch back to the “Edit” tab in Davinci Resolve and identify the point in the clip where the transition begins.
- Right-click on the clip which we will transition from, select “Retime Controls” or use the shortcut “Control+R.”
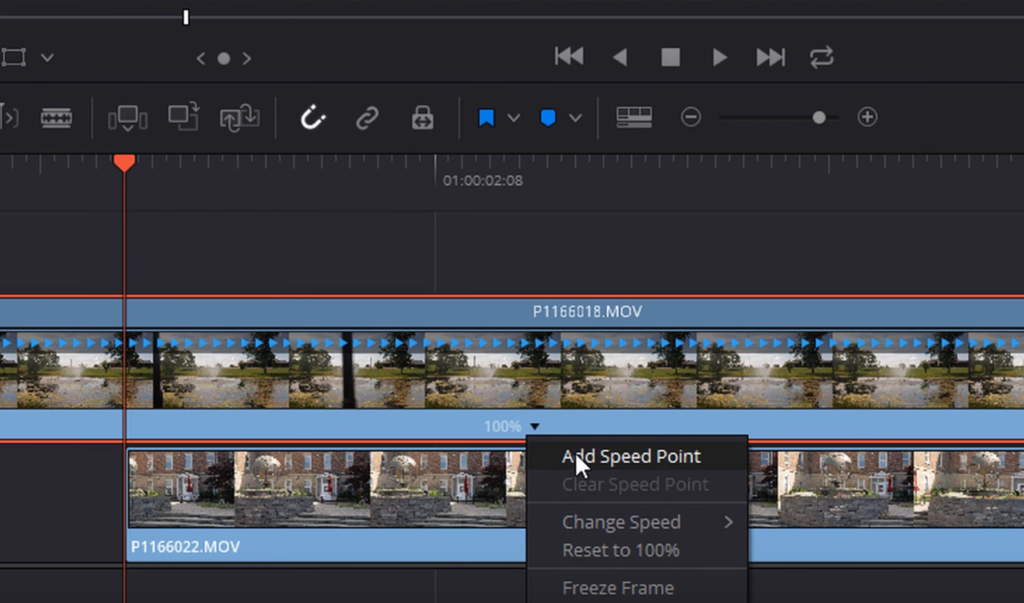
- Move the playhead to the point where the transition begins, and click on the drop-down arrow in the retime controls section located on the right side where 100% is written. Select “Add Speed Point” to mark the start of the transition.
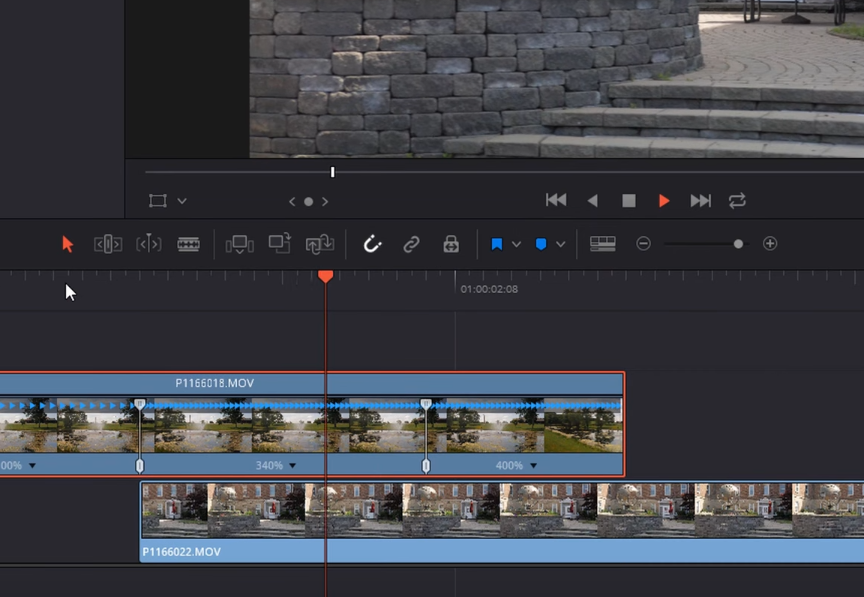
- Adjust the speed percentage to increase the speed of the transition. A value of 200% – 400% for a smoother effect.
- If necessary, add another speed point and adjust the speed percentage to fine-tune the transition speed.
Stabilizing Footage for a Smoother Transition
- In the “Edit” tab, select the clip you want to transition from.
- Open the “Inspector” panel on the right and click on the “Stabilization” tab.
- Click the “Stabilize” button to apply stabilization to the clip. DaVinci Resolve’s stabilization is fast and efficient, often providing better results than other video editing software.
- Once the stabilization is complete, review the footage to ensure it looks smooth and natural.
- Repeat this process for the second clip in the transition.
By incorporating these techniques, you can significantly enhance the quality and appearance of your masking transitions. Softening the mask edges, adjusting the transition speed with time remapping, and stabilizing your footage will create a more polished and professional final product that is sure to impress your audience.
Refining the Masking Transition with Time Curves and Directional Blur
To further elevate your masking transition, you can edit time curves and incorporate a directional blur effect. These adjustments will create a smoother transition and add a professional touch to your video project.
Editing Time Curves for Smooth Speed Changes
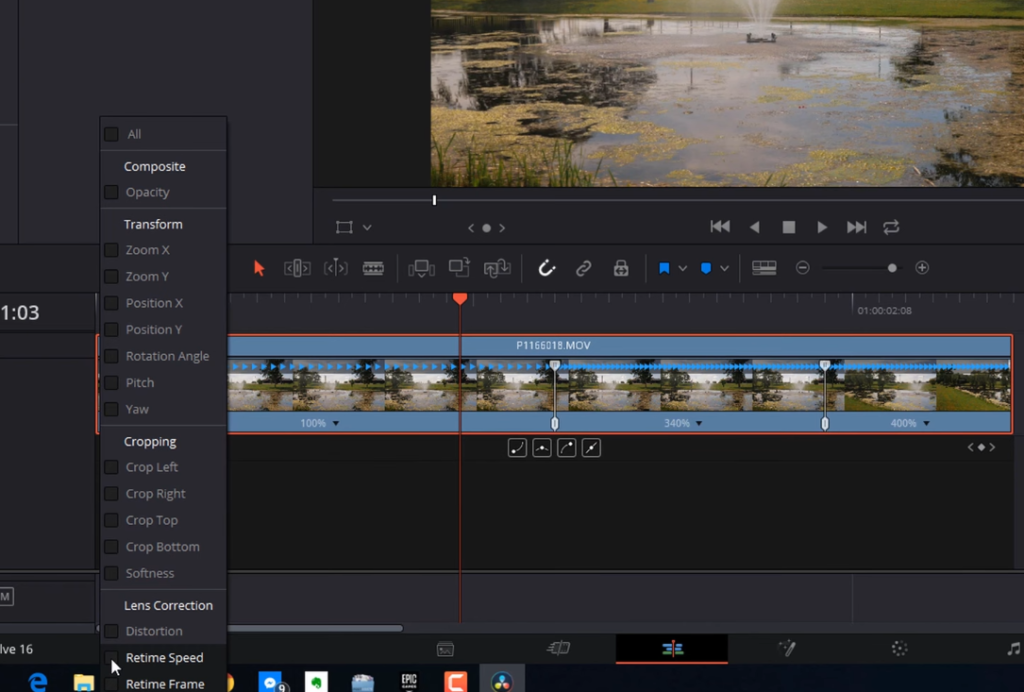
- In the “Edit” tab, right-click on the clip with the speed points and select “Retime Curve.”
- Click the arrow pointing downwards to open a dropdown menu, and change the selection from “Retime Frame” to “Retime Speed” to display the speed ramp curve.
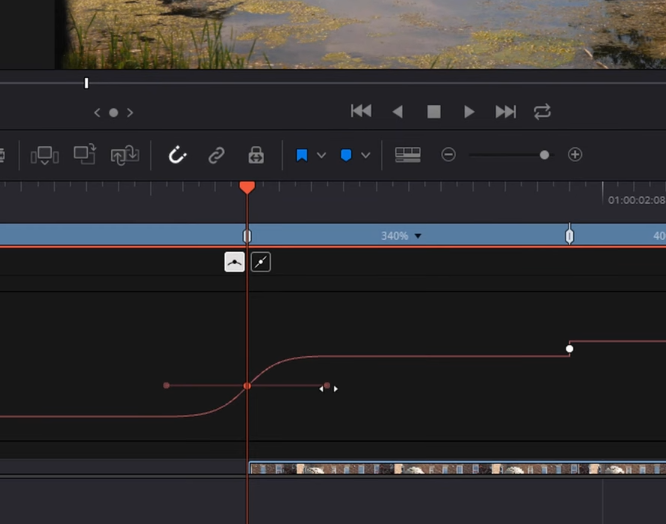
- Click on the curve and select the “Spline” icon to reveal the curve handles.
- Adjust the handles to create a smooth curve for the speed change, ensuring a seamless transition between the two clips.
- Close the “Retime Curve” window once you’re satisfied with the adjustments.
Adding Directional Blur with an Adjustment Clip
- Go to “Effects” from the top left corner and find the “Adjustment Clip.” Drag and drop it onto the timeline, positioning it above the two clips involved in the transition.
- Switch to the “Color” tab and click the timeline view icon on the top right corner to see the adjustment layer in the mini timeline.
- Open the “Effects” panel on the top right corner and locate the “Directional Blur” effect. Drag and drop it onto the node of the adjustment clip.
- Adjust the angle of the blur to match the direction of the masking transition. For example, if the mask moves horizontally, set the blur angle accordingly.
- Keyframe the blur effect to control its intensity throughout the transition. Start with a value of 0, increase the blur value at the midpoint, and return to 0 as the transition completes.
Congratulations on making it through this detailed guide on refining masking transitions in DaVinci Resolve! Your dedication to learning these advanced techniques showcases your commitment to elevating your video editing skills. Keep up the great work, and soon you’ll be creating professional-quality content that stands out from the rest. Thank you for reading, and we wish you continued success on your filmmaking journey!