
Hey everyone, welcome back to FilmmakingElements.com. In this article, we are going to cover Making DCP In Davinci Resolve.
Have you ever wanted to deliver your cinema project to a theatrical screening? If so, you’ve likely heard of a Digital Cinema Package (DCP). But creating a DCP can be a challenge, especially when it comes to using the correct settings.
Trust me, I’ve been there. I scoured the internet for tutorials on creating a DCP in Davinci Resolve, and it was a complete mess.
That’s why I’m writing this article—to help you not only create the DCP you need but also package it correctly for delivery to the theater and ingestion into their digital projector systems. With this guide, you can rest assured that your cinema project will be ready for its big-screen debut.
Making DCP In Davinci Resolve (Updated)
Changing project settings for creating a DCP in Davinci Resolve
When creating a DCP, the timeline must be set to one of these resolutions

- Go to File > Project Settings
- Choose any of the given resolutions given below in the table and select it in the “Timeline Resolution“
- To ensure there is no black space left, In the Image Scaling settings, set the “Input Scaling” to “Scale full frame with crop”.
Scaling full frame with crop makes sure that the original media fills the longest dimension of the timeline viewer, eliminating letterboxing or pillars. However, this frequently results in the top and bottom of the picture being cropped slightly.
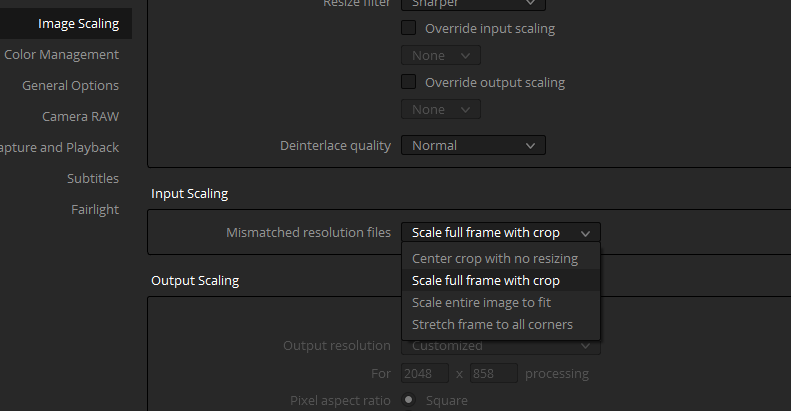
If you don’t want that you can leave the “Input Scaling” to default. It won’t create any problems except there will be pillars or letterboxing while the film is projected. Which is not a big issue.
| Resolution | Aspect Ratio | Dimensions (pixels) | Frame Rates (fps) |
|---|---|---|---|
| 2K Native | 1.90:1 | 2048 × 1080 | 24, 25, 30, 48, 50, 60 |
| 2K Flat | 1.85:1 | 1998 × 1080 | 24, 25, 30, 48, 50, 60 |
| 2K CinemaScope | 2.39:1 | 2048 × 858 | 24, 25, 30, 48, 50, 60 |
| 4K Native | 1.90:1 | 4096 × 2160 | 24, 25, 30, 48, 50, 60 |
| 4K Flat | 1.85:1 | 3996 × 2160 | 24, 25, 30, 48, 50, 60 |
| 4K CinemaScope | 2.39:1 | 4096 × 1716 | 24, 25, 30, 48, 50, 60 |
Preparing the sound mix
When creating a Digital Cinema Package (DCP), one thing to consider is the sound requirements. As I discovered while using Blackmagic Design’s Davinci Resolve, the setup can be a little particular. But fear not, I have some recommendations that should work for three different scenarios.
- Most likely if you have a DCP that you’re gonna create you might have a 5.1 surround embedded into one “WAV” master file
- Or you may still have the individual stems for your surround sound which is 6 individual channels.
- Or you just have a stereo track that goes with your film.
If you have one 5.1 surround embedded WAV
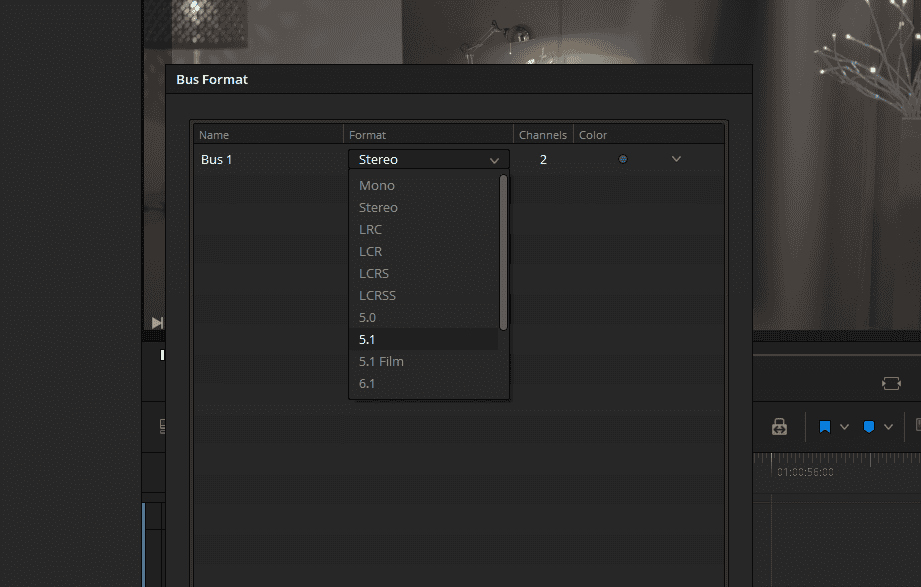
If you have just one 5.1 mix master, just drag and drop it into the timeline and Davinci Resolve will auto-detect that it is a 5.1 mix. Now, just go “Fairlight” dropdown menu on the top and select “Bus Format”. Under the “Format” option change “Stereo” to “5.1”.
For more in-depth explanation, read through this tutorial, Export 5.1 Audio From Davinci Resolve (2 Ways)
If you have 6 channels as individual files for your 5.1 surround
- If you have six individual channels or stem files, right-click in the audio track section
- click on “Add Tracks” and in “Number of tracks” type “6” and “Audio Track Type” to “Mono”.
- Delete the already existing track that is in stereo by default and has “2.0” written on it.
- Right-click on it and select “Delete Track”
- Set up the six tracks in the order of left, right, center, LFE, left surround, and right surround, and do a 5.1 surround bus.
- Go to the “Fairlight” page
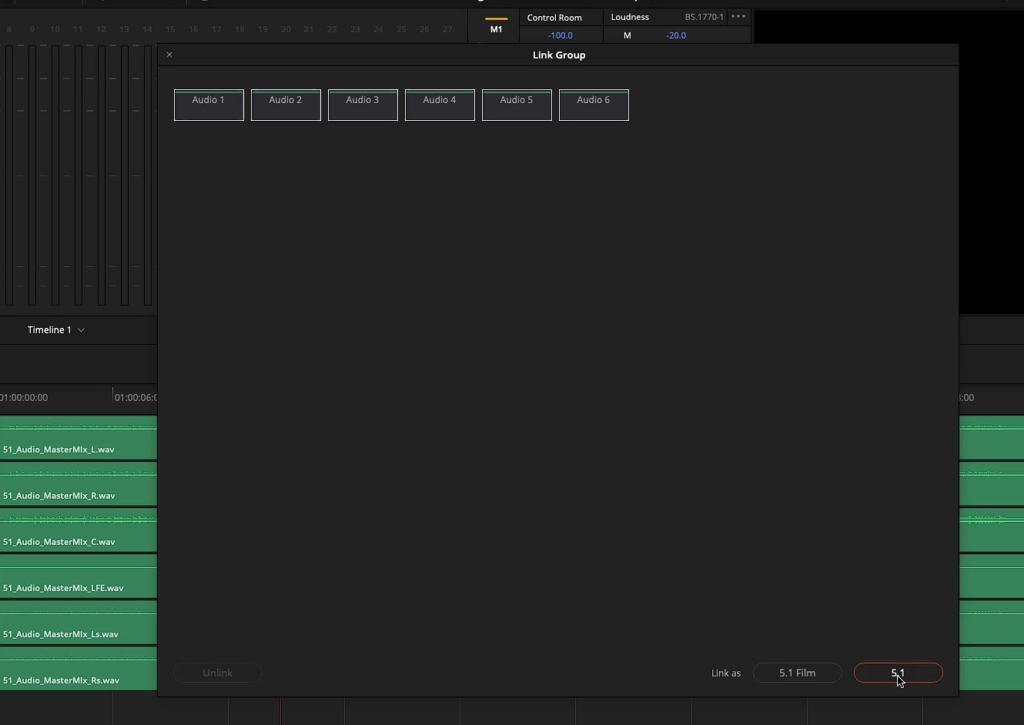
- Head over to the Fairlight drop-down menu and select “Link Group.”
- To set up a 5.1 surround sound configuration, select all the channels and click on the 5.1 button.
If you have just a stereo track
If you’re working with a stereo mix for your DCP, there’s a simple way to ensure that it plays correctly in a theater. Repeat the steps of creating 6 mono audio tracks.

- First, move the stereo track down to the left channel that is your first track from the six tracks.
- Then, click on the audio in the left channel while holding down the option key and drag it down to the right channel that is your second track from the six tracks, to create a copy.
- Next, right-click on the left channel and select “clip attributes.” Change the “format” to “mono” and make sure that only “Embedded Channel 1” is selected for the “source channel.”
- Now, move to the right channel and repeat the process. Right-click on the clip and select “clip attributes,” then change the format to “mono” and select “Embedded Channel 2” for the “source channel”.
- By following these steps, you can ensure that your stereo audio is correctly set up for playback in a theater as part of your DCP.
- Now we’re gonna want to go up to Fairlight in the top menu option and select “bus format”. Here we’re going to switch the “bus 1” to the “5.1” surround.
Making sure the audio panning is correct
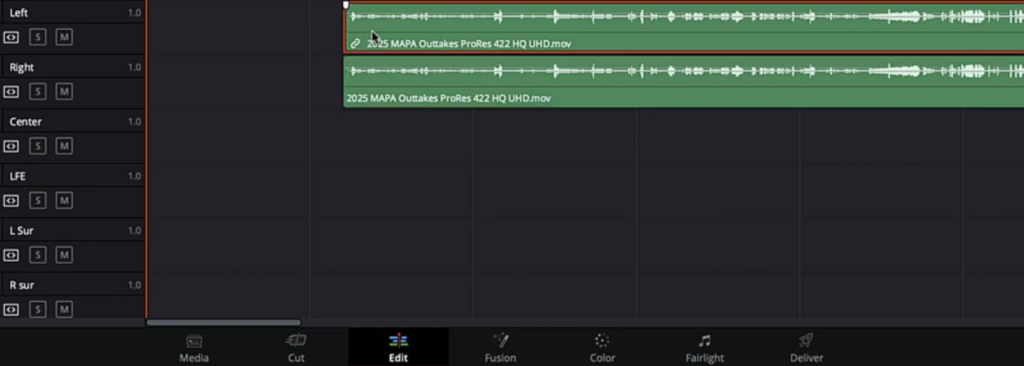
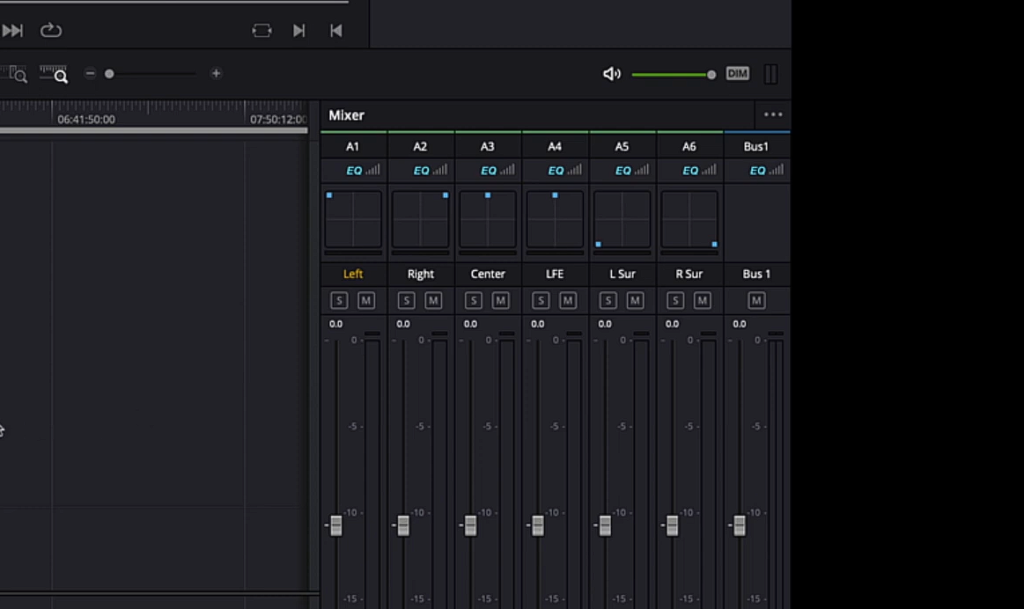
When you’re working on the audio for your DCP, it’s important to make sure the panning is correct. To check this in DaVinci Resolve, you’ll want to look at the “mixer” settings on the right side of your timeline. If you can’t see the “Mixer” panel, just click on the “Mixer” button in the top right corner of the Edit page.
In the mixer settings on the right side of your timeline, you will see small boxes under every track. Just drag the blue dot to adjust the panning.
For example, to adjust the first track for the left audio, drag the blue dot all the way to the top left. For the second track for the right audio, drag the blue dot all the way to the top right.
The center channel can be left as is in the default center position at the top. For LFE, leave it in its default position, and for the left surround, drag it to the bottom left. Finally, for the right surround, drag it to the bottom right.
To set your IN and OUT points on the timeline to determine where you want the render to start and end.
You can easily set these points by navigating to the Delivery tab in DaVinci Resolve and pressing “I” for the in point and “O” for the out point. Once you’ve set your in and out points, you can move on to configuring the render settings to create the final output of your project.
Settings On The Delivery Page To Export a DCP
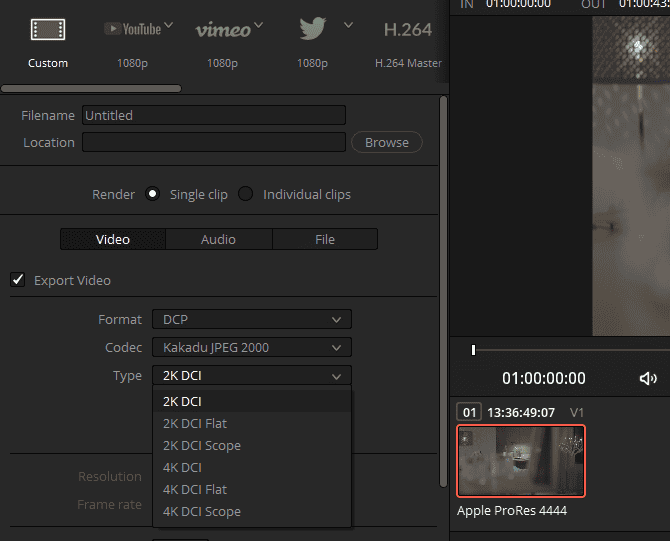
If you’re ready to export your DCP file, the Delivery page in DaVinci Resolve is where you need to be. The first step is to choose the preset for your export render, and in this case, we’re going to choose Custom.
- From there, you can select the name and folder location where you want the DCP file to be exported to.
- Once you’ve done that, make sure the export video box is checked,
- Choose DCP as the “Format” and “Kakadu JPEG 2000” as the “Codec”.
- For the “Type”, you can choose “2K DCI Flat”.
Choosing the right “Type” is very critical
When choosing the “Type” selecting the right resolution is critical. Make sure the resolution you set matches with the setting you choose here. Do refer to the table given above for setting the right resolution for your timeline.
It’s crucial to provide the correct resolution on your DCP package to the theater. If you don’t, there’s a risk that you could end up with black bars on the sides or the top and bottom of your image. Alternatively, if the image is too large, the screen picture could be cut off.
The “flat” aspect ratio of 1.85:1 is a typical full-screen view that you would see in a normal theater or television at home completely fills the image on the screen.
On the other hand, the “scope” video aspect ratio of 2.39:1 is typically wider and will still fill the screen on the correct scope theater screen.
When it comes to projecting films in theaters, some venues may have projectors that can switch between different aspect ratios, but it’s not a good idea to rely on this feature. It’s best to confirm with the theater beforehand and provide the correct format for your film.
It’s possible that the theater has a specific reason for not wanting to change the projector mode, and it’s important to respect their preferences and ensure that your film is presented in the best possible way.
Additional Settings before exporting
When rendering a film project for digital theater projection, it’s important to pay attention to the frame rate to ensure a seamless presentation. By default, most systems run at 24 frames per second for both video and audio.
However, if your original film project was filmed at 23.976 frames per second, you may encounter presentation issues on a digital theater projection system.
The DaVinci Resolve software will automatically default to 24 frames per second when rendering, but the audio may remain at 23.976. This can cause the video to play slightly faster than the audio, resulting in sync issues over time. While some audience members may not notice the issue, those closely involved in the editing process will likely notice a slight slipping of the dialogue towards the end.
Therefore, it’s important to ensure that the frame rate of your rendered film project matches the original film project to prevent any potential issues during presentation.
Keep in mind that the frame rate will be greyed out and locked according to what frame rate the project has been set on.
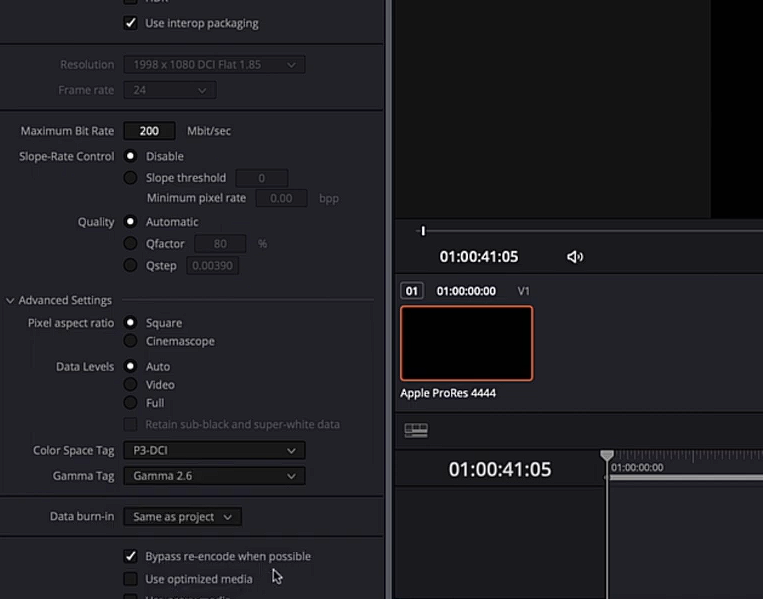
To guarantee smooth playback on a projection system, it’s advisable to set the “Maximum Bit Rate” to approximately 200 Mbit/sec, which is still deemed to be high-quality.
Click on the “Advanced Settings” option. Once there, you should select “P3-DCI” from the “Color Space Tag” drop-down and “Gamma 2.6” from the “Gamma tag” drop-down. These settings will ensure that your project is properly configured for the theatrical release.
Audio Settings On the Delivery Page For Exporting DCP
The last step is just to make sure that your audio settings are correct. if you’re doing a 5.1 surround Make sure that the “export audio” box is checked.

Most films will have a sample rate of “48,000” and “24-bit depth”. You can choose your desired “output track” format, with “Bus 1 (5.1)” being the typical format for surround sound.
Once your audio settings are in place, you can click “Add to Render Queue” and then click the “Render” button on the right-hand column.
Keep in mind that if you were color grading on a typical monitor like Rec. 709 with a Gamma 2.4 and are now watching this P3-DCI Gamma 2.6 DCP render, the colors may look off or even black and white with a strange tint. Don’t worry, this is completely normal.
Quality Checking
It’s important to remember that it’s not just one file, but rather a folder containing multiple files, including the metadata file. Be sure not to delete any of the files in the folder.
Once the rendering process is complete, you can import the newly created DCP file back into DaVinci Resolve under the Media tab. You can then preview the video and audio to ensure that everything looks and sounds as it should. This step is crucial to ensuring that the final product meets your expectations and is ready for projection in a theater.
Transferring the DCP
Before you start packaging the DCP, it’s crucial to contact the theater or festival to determine their acceptable formats. Each theater or festival may have different requirements for receiving DCP packages. For instance, some theaters may require a special 3.5-inch hard drive, while others may allow you to copy it to a USB drive.
If possible try doing an advanced test screening at the theater.
If you’re submitting the DCP for an international film festival, they usually ask for the DCP to be transferred online without any physical drives. In this case, you can make a ZIP of the folder containing your DCP and upload it to their online dashboard or email it to them.