Hi, I’m Salik, the author of FilmmakingElements.com. I have been a filmmaker for over 10 years. I am also a certified DaVinci Resolve Trainer and I have used DaVinci Resolve for many of my projects. This article will show you Keyboard Customization In Davinci Resolve- Full Guide.
We will cover how to map your keyboard, how to customize your keyboard shortcut and show you a few tricks that are very nice and very important. I will also show How to discover the options within the menu. We will also share some must-know keyboard shortcuts while working on Davinci Resolve which can drastically improve your speed and workflow.
How To Access Keyboard Customization Option In Davinci Resolve?
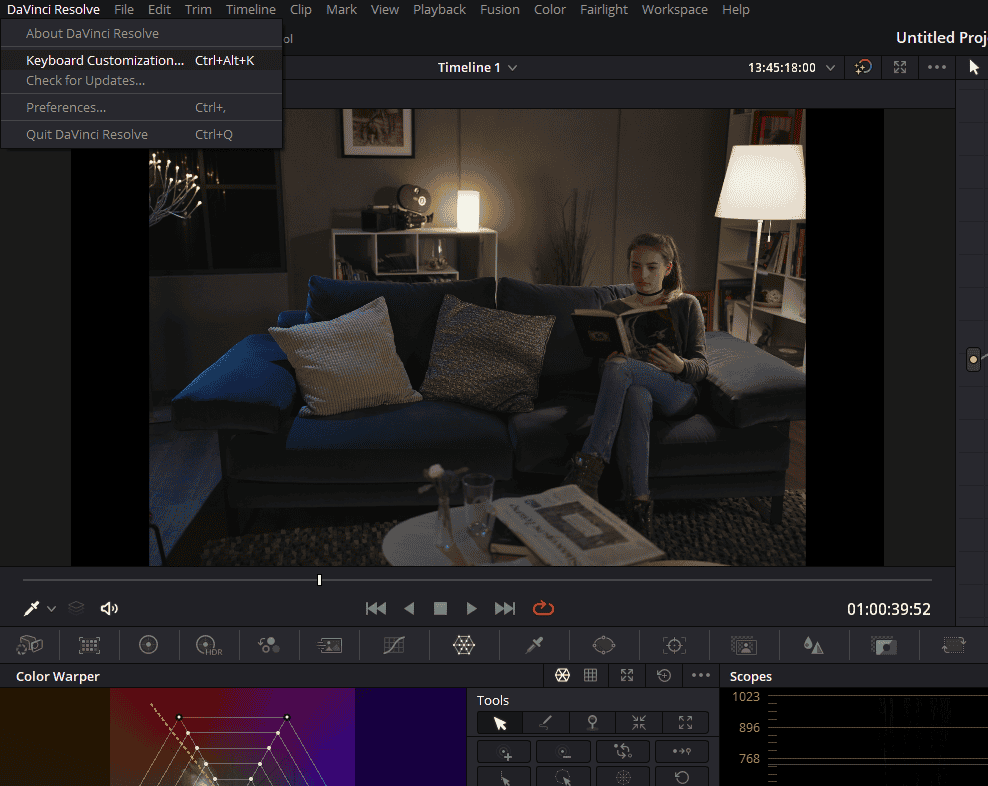
- Click on the DaVinci Resolve button located at the top left corner of the screen.
- Look for the Keyboard Customization option and click on it.
- A pop-up window will emerge, displaying a virtual keyboard along with various customization options.
A Detailed Guide to Understanding Keyboard Customization in DaVinci Resolve
1. Visual Layout of Keyboard Mapping
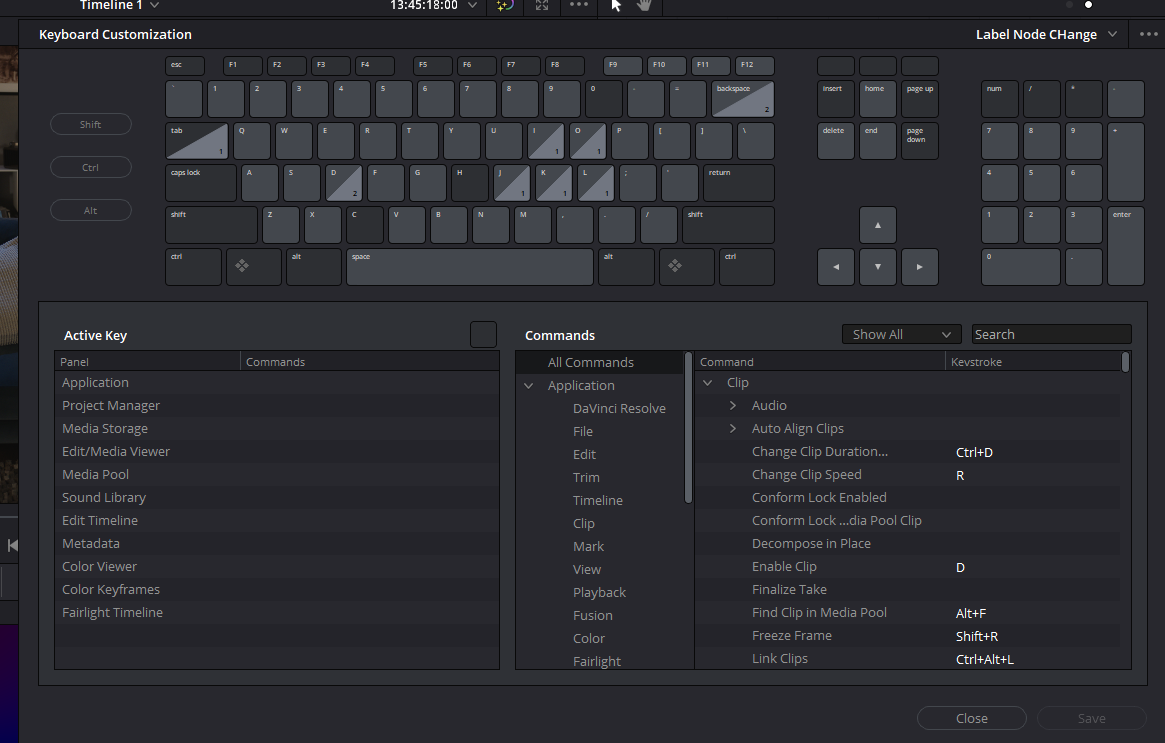
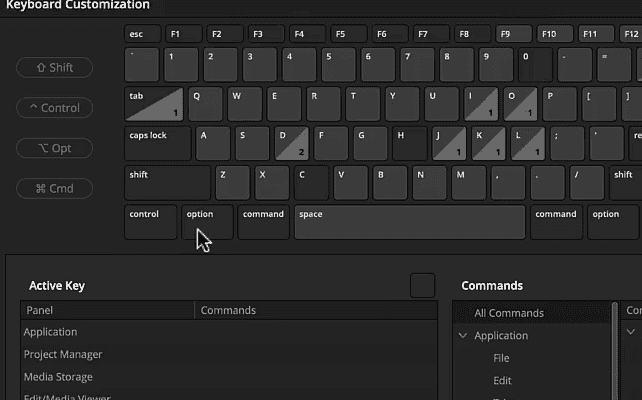
- Initial Observations: Upon accessing the Keyboard Customization options, you’re presented with a visual representation, or ‘map’, of your keyboard.
- Extended Keyboard Mapping: For users with a Windows PC that boasts an extended keyboard, DaVinci Resolve should accurately mirror your physical keyboard.
- Differences in Layout: Not everyone has the same keyboard. Some might lack a Numpad or have other unique designs. DaVinci Resolve attempts to adapt by offering various layouts to match common keyboard types. If discrepancies arise:
- It’s essential to ensure your computer’s drivers are current.
- Verify you’re using the latest version of DaVinci Resolve.
- Consider connecting a different keyboard model to see if the mapping issue persists.
2. Deciphering the Color Codes
The visual keyboard map in DaVinci Resolve uses a graded color system:
- Dark Grey Keys (e.g., F5, F1): These keys currently have no command linked to them.
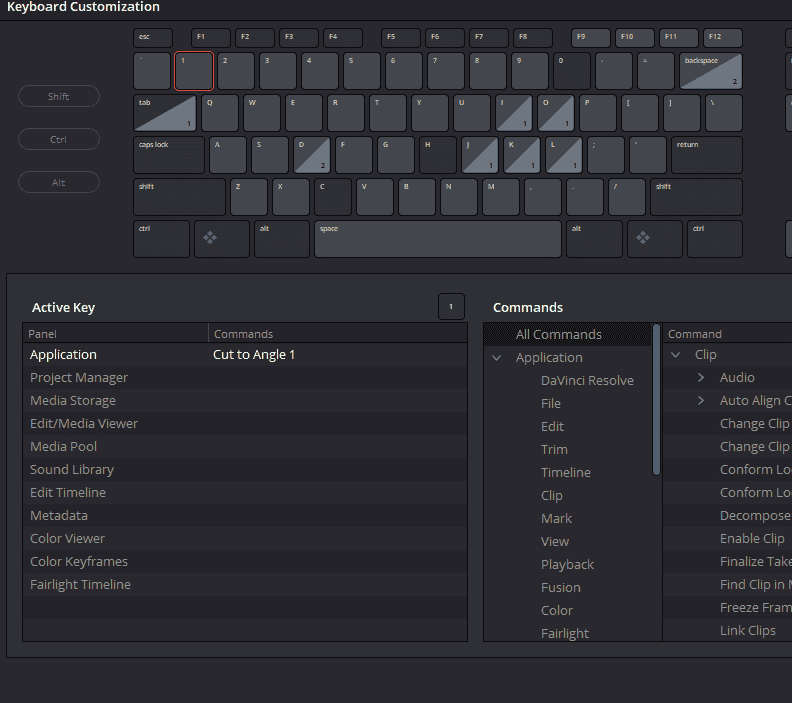
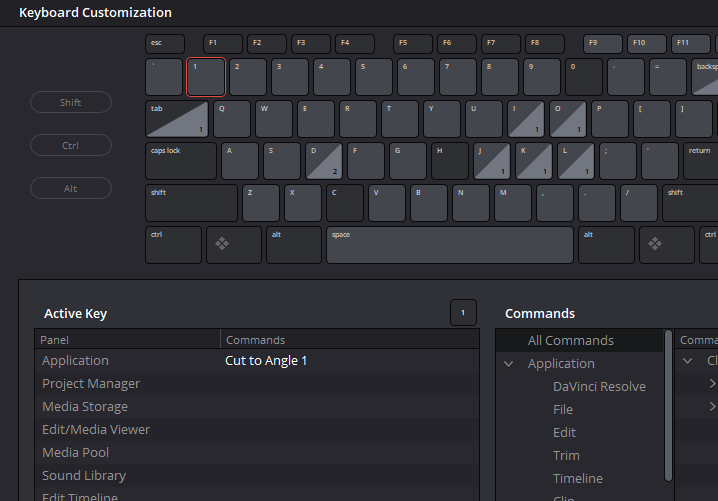
- Light Grey Keys: A specific command is assigned to these keys. For instance, selecting the “1” key reveals it’s mapped to the function “cut to angle 1”.
- Dual-Shade Keys: These keys possess dual functionalities. They carry commands both at the universal application level and specific tab levels such as timeline, metadata, or Fairlight.

3. Unpacking Command Levels
DaVinci Resolve designates commands at various software levels:
- Application Level Commands: These are global commands, operative throughout the entirety of the software. They remain consistent, regardless of the active tab or module.
- Tab-Specific Commands: These commands are particular to certain modules or sections, like timeline, metadata, Fairlight, etc.
4. Making Use of Modifier Keys
Modifier keys play a crucial role in extending the functionality of basic keys:
- For Mac Users: To the left of the visual keyboard, you’ll encounter the modifier keys “command, option, control, and shift”.
- For Windows Users: The modifier keys displayed are “shift, control, and alt”.
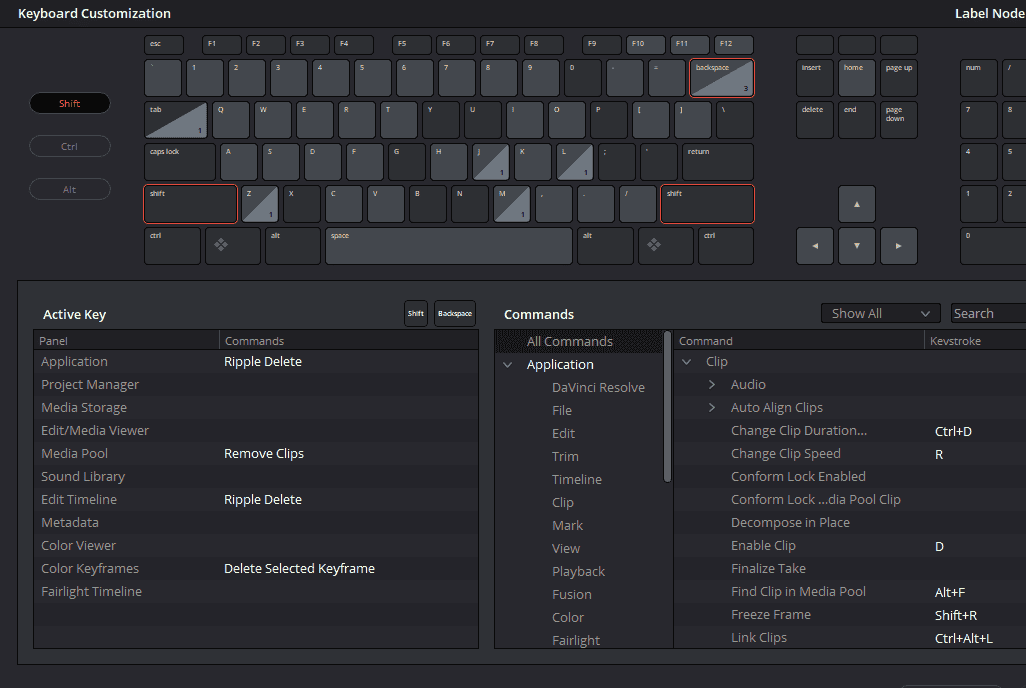
Utilizing these keys can reveal multi-layered functions. For instance, activating the shift key and pressing the backspace key unveils several command layers:
- At the Application Level, it’s mapped to “Ripple Delete”.
- At the Media Pool Level, the function is “Remove Clips”.
- The Edit Timeline Level commands a “Ripple Delete”.
- The Color Keyframes Level uses it to “Delete Selected Keyframe”.
5. Delving into the Commands Window
A section that’s indispensable for understanding and modifying key functionalities:
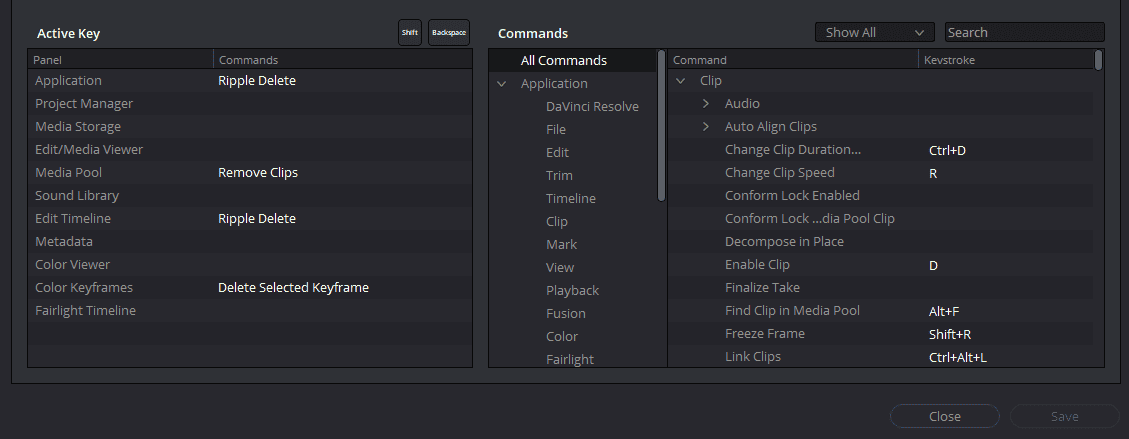
- Scope of Commands: The Commands Window offers a holistic view of key assignments. When a key is assigned at the Application Level, it influences a broad spectrum of functions such as File, Edit, Trim, and more.
- Customization: This window is more than just a reference point. It’s an interactive space where users can not only verify existing key assignments but also assign or alter them based on personal preferences.
Customizing keyboard shortcuts in DaVinci Resolve isn’t just about improving speed—it’s about optimizing the software to align with your unique editing style. By understanding the layout and intricacies of the Keyboard Customization options, you’re one step closer to a more efficient and personalized editing experience.
Understanding Commands in Keyboard Customization Preference
In DaVinci Resolve’s Keyboard Customization window, each key and its combinations are mapped to specific commands. By understanding these assignments, users can navigate and edit efficiently.
Discovering Key Assignments
- Shift+Y Assignment:
When selecting the combination “Shift+Y”, you’ll notice it lacks a designated command. Conversely, the “Shift” key alone is mapped to “select clips forward on this track.” - Visualizing Command Assignments:
This interface not only allows users to determine which key is mapped to which command but also facilitates a deeper understanding of the intricate key-to-command relationships.
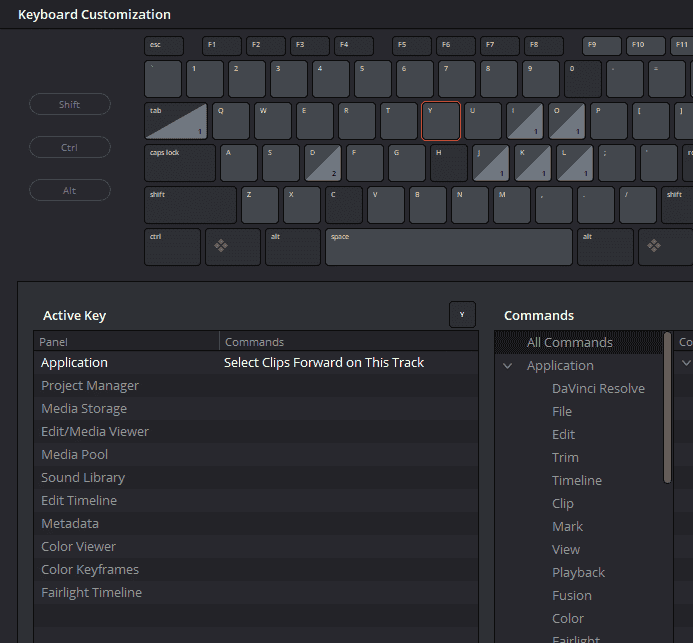
So keyboard mapping here will help you discover what the command is assigned to which.
Alternative Ways to View Assignments
Using “Backspace” as a case study:
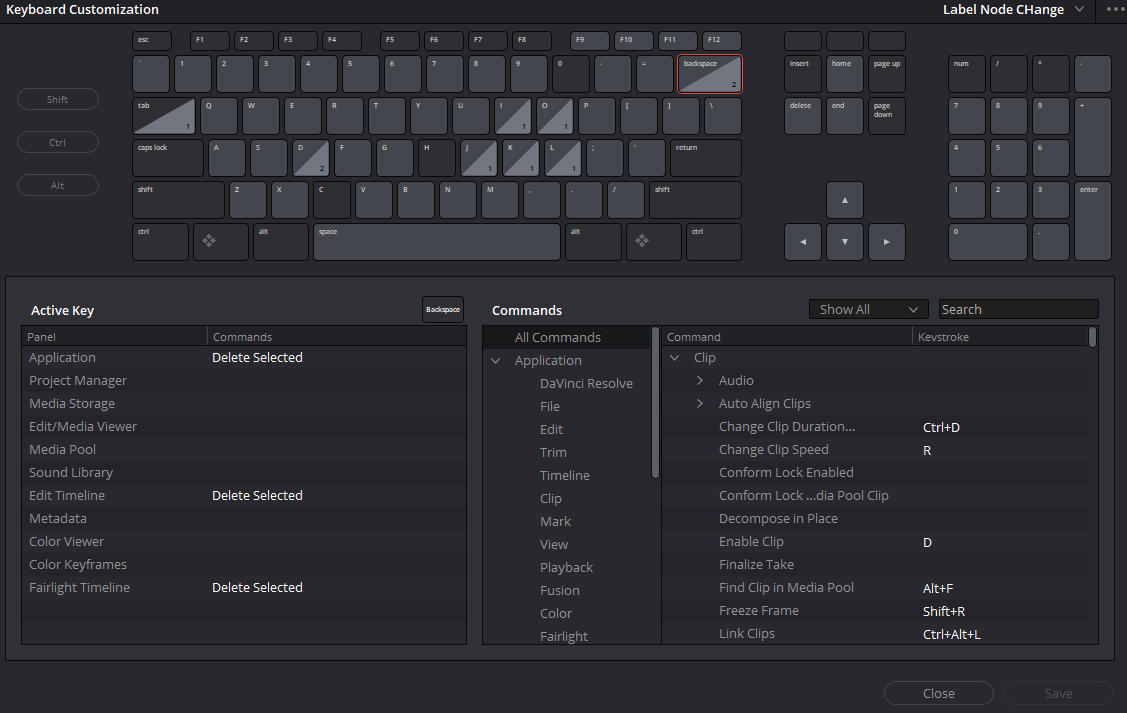
- Basic Assignment:
Highlighting the “Backspace” key shows its application-level assignment: the “Delete Selected” command. - Navigating Through the ‘Commands’ Window:
Adjacent to the key mapping is the “Commands” window. Initially set to “All Commands,” it provides a comprehensive list. But upon selecting specific applications, such as “Edit,” the options narrow down to only those relevant to the chosen application.For instance, within the “Edit” application, the “Delete Selected” command links to the “Backspace” key. - Drilling Down to Specific Applications:
Venturing into more granular levels like the “Edit Timeline,” the “Commands” window updates accordingly. For example, within the timeline editing phase, the “Delete Selected” command again corresponds with the “Backspace” shortcut.Similarly, transitioning to the “Fairlight Timeline” adjusts the “Commands” window to that context. Here, users can view and, if needed, alter the key associated with the “Delete Selected” command.
Changing the shortcuts for Davinci Resolve
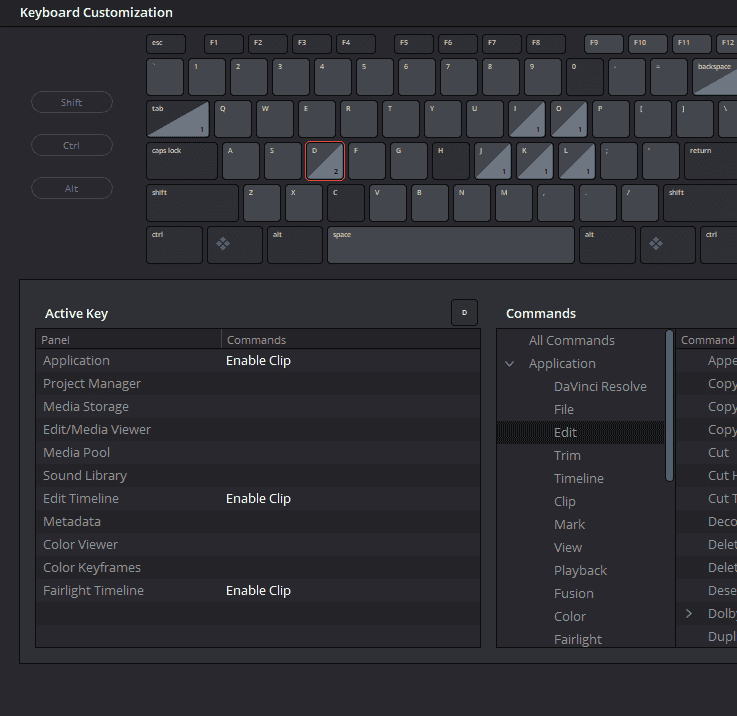
Identifying Existing Shortcuts
- Inspecting a Key:
To discover a key’s current assignments, simply select it. For example, choosing the “D” key displays its roles in the “Active Key” window. You’ll notice it’s allocated on three distinct levels, with one at the Application Level and two internal assignments. The virtual keyboard also provides a visual representation of these assignments.
Modifying a Shortcut
- Initiating a Change:
If the current assignment doesn’t suit your preference, you’re free to modify it. - Removing an Existing Shortcut:
Navigate to the “Commands” window and click on the Cross (X) button. This action erases the chosen assignment. For instance, if you wish to remove the “Enable Clip” shortcut linked with the “D” key and assign it to “F,” proceed with this step. - Handling Conflicts:
Upon selecting “F” for the new shortcut, DaVinci Resolve might alert you if there’s an existing function tied to “Option F” – in this case, “Timeline>Match Frame.”- To override the existing assignment, click “Assign.” Note: This action will unassign “F” from “Match Frame” and reassign it to “Enable Clip.”
- If DaVinci Resolve encounters such conflicts, it flags them with a yellow error notification.
- Reverting to Default:
Mistakes happen. If you’re unsatisfied with the changes or wish to revert to the default setting, click on the circular arrow icon next to the modified command.
Multiple Assignments
You’re not confined to a single assignment for each command. DaVinci Resolve allows the allocation of multiple keys to the same function, enabling flexibility in your workflow.
How to View All Assigned Commands in DaVinci Resolve
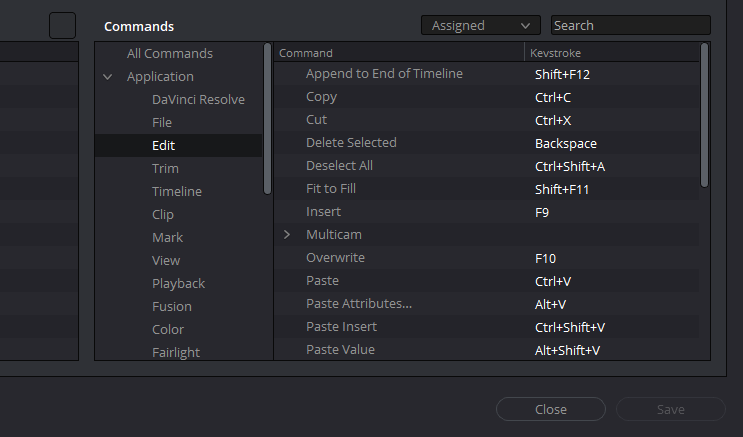
- Access the “Commands” Window:
Instead of individually clicking on a key within the virtual keyboard layout, you can see a comprehensive list of assigned commands by navigating to the “Commands” window. - Select the Desired Application:
For instance, if you’re interested in exploring the keyboard shortcuts applicable during video editing:- Click on the “Edit” option from the list of applications.
- Browse and Modify:
Once inside, you’ll be presented with all the keyboard shortcuts related to the “Edit” function. Here, you not only have the liberty to view them but also to modify as per your preferences.
Exploring the Panels in the Commands Section Of the Keyboard Customization Window
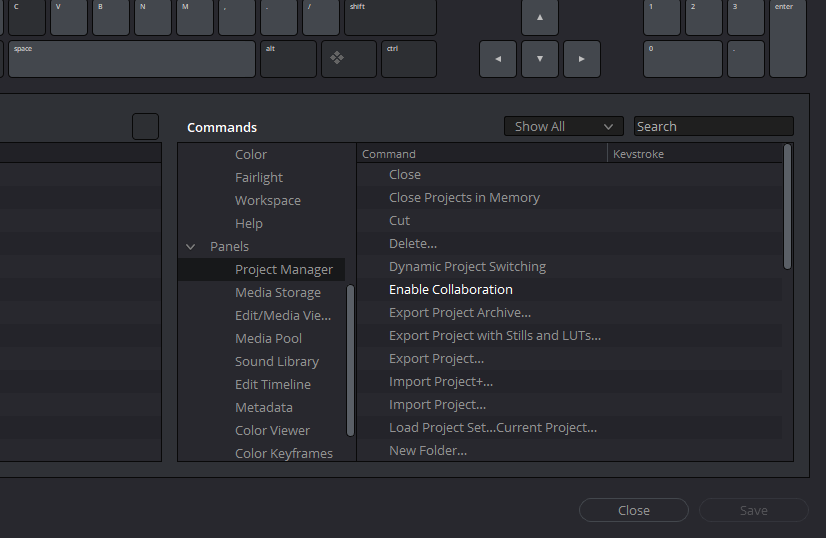
There is also a menu called “Panels” in the Commands window. In DaVinci Resolve’s Keyboard Customization window, there is a specific section dedicated to the ‘Panels’. Here’s how to explore it and harness its potential:
Navigating the Panels
- Locate the ‘Panels’ Menu:
Within the Commands window, find and click on the menu labeled “Panels.” - View Commands Specific to a Panel:
Selecting a panel, such as the ‘project manager,’ displays all possible commands pertinent to that panel.
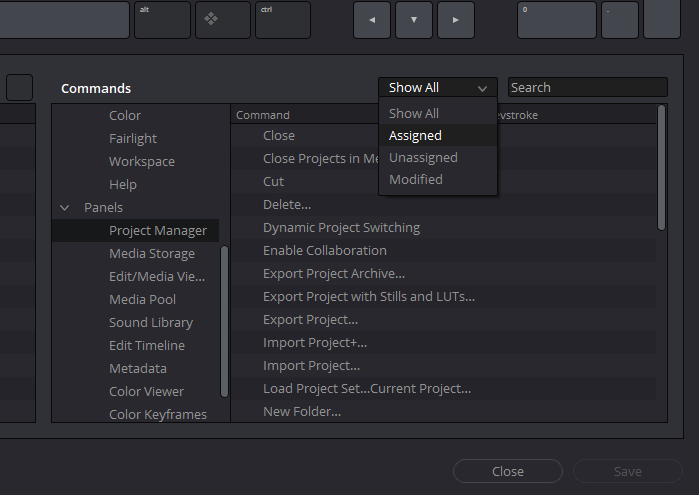
Filtering and Customizing Commands
- Using the Filter:
Positioned above is a filter menu, defaulted to “Show All.” This allows you to sift through either:- “Assigned” commands
- “Unassigned” commands
- Identifying Default Shortcuts:
For instance, in the ‘project manager’ panel, you might observe that no shortcuts are assigned by default. - Assigning New Shortcuts:
For enhancing efficiency, assign shortcuts to the previously ‘unassigned’ commands. The filter tool can streamline this task by displaying only unassigned commands. - Avoid Overlapping Assignments:
As a precaution, ensure that your new shortcut doesn’t overlap with an existing one. This avoids confusion and maintains an intuitive editing experience.
Enhanced Productivity with External Tools
Some professional editors and colorists elevate their workflow by programming frequently used DaVinci Resolve shortcuts into their “Stream Deck.” This tool, featuring customizable keys, can trigger specific commands or sequences, offering rapid access and efficiency.
Finding Shortcuts in DaVinci Resolve
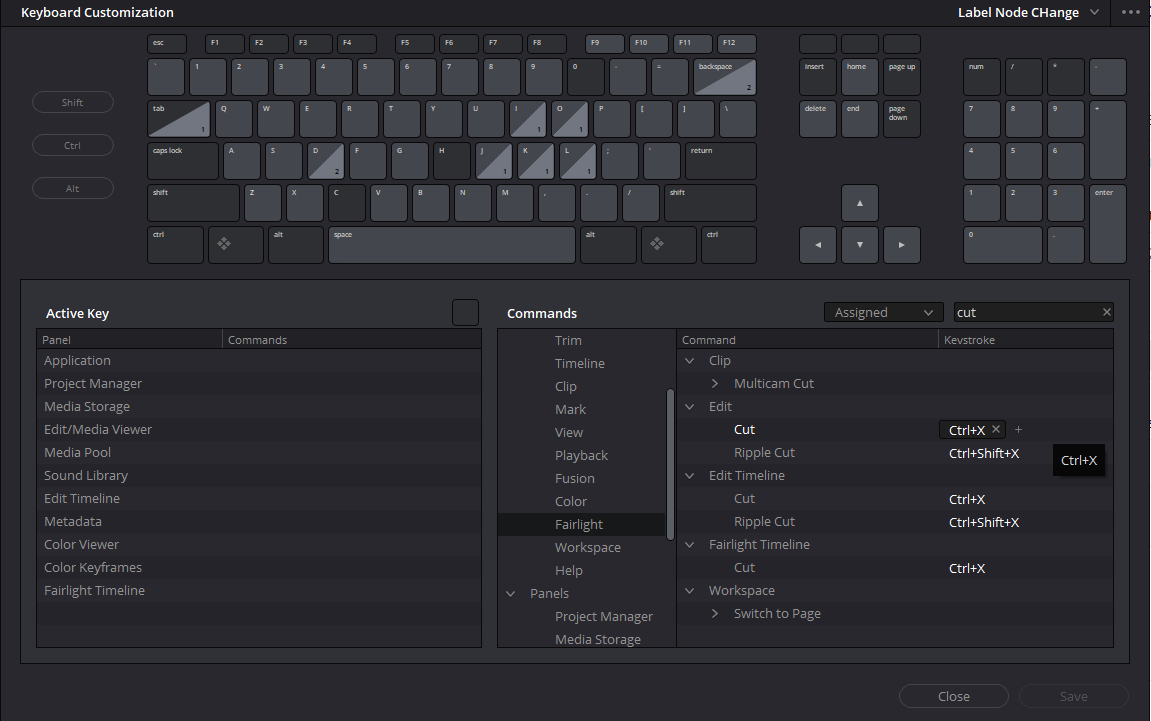
1. Access the Keyboard Customization Panel:
When you’re deeply engrossed in editing and suddenly draw a blank on a specific shortcut:
- Navigate to the “Keyboard Customization” option.
2. Leveraging the Search Capability:
At the heart of the Keyboard Customization panel is the Search box. It’s designed to help you quickly locate commands:
- Input the command or function you’re interested in. For instance, if you’re trying to find the keyboard shortcut for “Cut,” simply type “Cut” into this box. The system will then display all related commands, making it easy to spot the one you’re after.
3. Advanced Filtering Options:
To fine-tune your search results and make them more relevant:
- Select the “Assigned” filter. This option filters out unassigned keys, showing only those keys that have functions tied to them. It’s particularly useful when you’re sure the function you’re searching for has a dedicated shortcut.
4. Zone in on Specific Modules:
DaVinci Resolve is compartmentalized into different modules, each catering to a specific aspect of the editing process. If you’re searching for shortcuts relevant to a particular module:
- Choose the specific module from the commands window. For instance, if you’re focused on how to cut a timeline specifically in the Fairlight audio module, select “Fairlight” from the list. This will narrow down the displayed shortcuts to only those applicable within Fairlight, making your search more targeted.
How to use the Premiere Pro, Final Cut Pro X, Avid Media Composer, and Pro Tools shortcuts in Davinci Resolve?
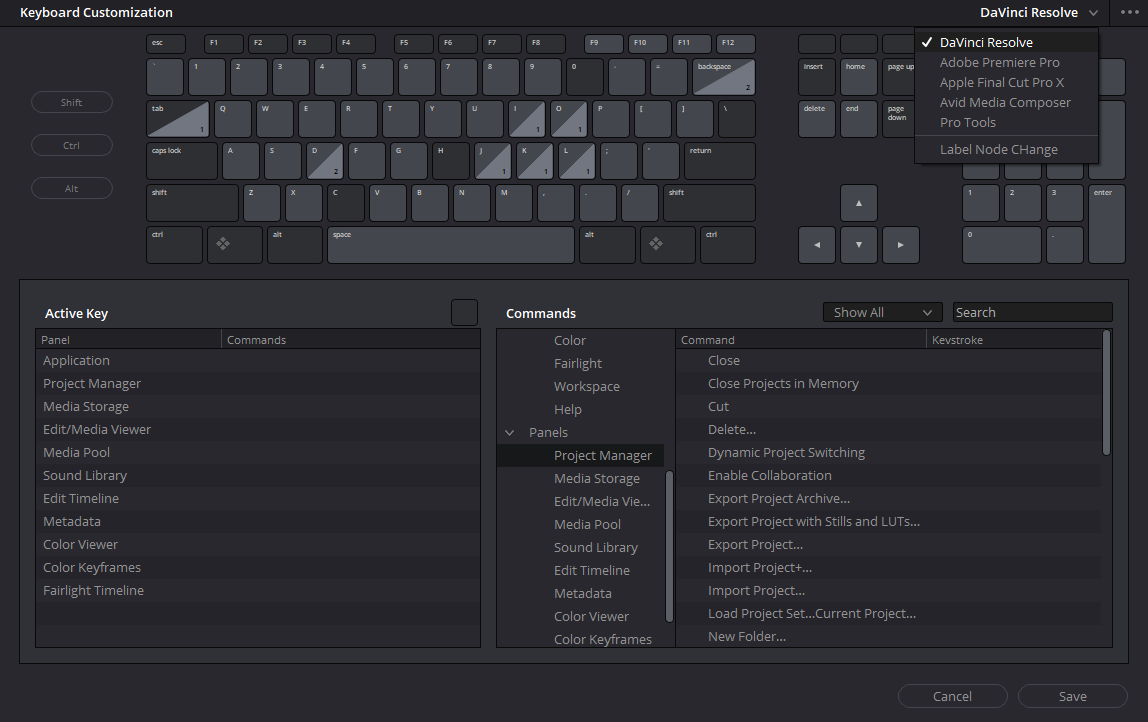
Transitioning from software like Premiere Pro, Final Cut Pro X, Avid Media Composer, or Pro Tools to DaVinci Resolve? One of the challenges could be adjusting to new keyboard shortcuts. Fortunately, DaVinci Resolve simplifies this transition.
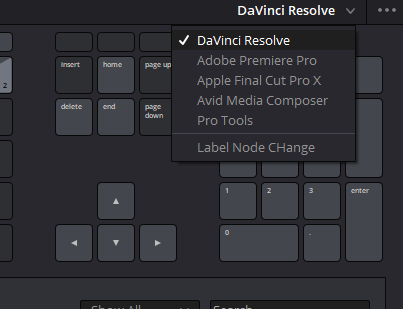
- Navigate to the Main Menu:
Begin by clicking on the “DaVinci Resolve” label, situated in the top left corner of the interface. - Access Keyboard Customization:
From the dropdown menu, select the “Keyboard Customization” option. - Locate the Presets Dropdown:
In the Keyboard Customization pop-up window, direct your attention to the top right corner. Here, you’ll identify a dropdown arrow. - Choose Your Familiar Preset:
Click on this dropdown arrow to unveil a list of shortcut presets. This list includes default shortcuts for:- Premiere Pro
- Final Cut Pro X
- Avid Media Composer
- Pro Tools
- Select & Apply:
Simply select the preset that aligns with your previous software. This action will map DaVinci Resolve’s keyboard shortcuts to resemble the chosen software, providing a more familiar editing experience.
Save and Access Your Keyboard Shortcut Presets in DaVinci Resolve
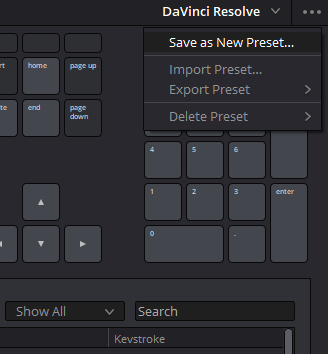
Customizing your keyboard shortcuts in DaVinci Resolve enhances your editing efficiency. If you’ve made several adjustments, you might want to save these settings. This guide outlines the process.
Steps to Save Your Keyboard Shortcut Preset
- Finalize Your Customizations:
Once you’ve completed your keyboard customization in DaVinci Resolve, ensure all changes are as you desire. - Access the Preset Menu:
Look towards the top right corner of the interface and click on the three dots. - Save Your Custom Preset:
From the dropdown menu, select “Save as new preset.” - Name Your Preset:
Provide a suitable name for your custom preset. This helps in easily identifying it later.
Accessing and Switching Between Presets
- Locate the Preset Dropdown:
To access your saved presets, find the dropdown arrow next to the preset name. - Choose Your Desired Preset:
Click on the arrow, revealing a list of all saved presets. You can then select the one you wish to use.
Benefits of Multiple Presets
- Shared Workstations: If multiple editors use the same workstation, each can have their own preset, ensuring personalized efficiency. By simply switching to their preset, they can immediately start editing in DaVinci Resolve with their preferred shortcuts.
- Versatility: There’s no limit to the number of presets you can create, providing flexibility for different editing tasks or individual preferences.
Also Read- 10 Must Know Davinci Resolve Shortcuts
Exporting and Importing Keyboard Customization In Davinci Resolve
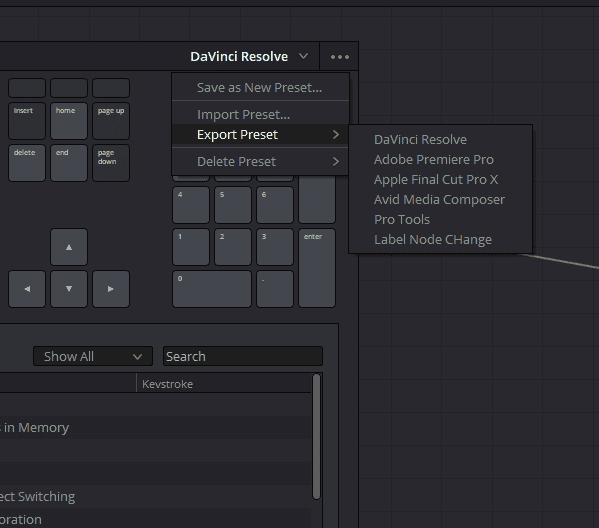
Moving to a new workstation or wanting to try a colleague’s shortcut presets? DaVinci Resolve’s capability to import and export keyboard customizations simplifies this process. Here’s how:
Exporting Your Custom Keyboard Preset
- Open Keyboard Customization:
Begin by accessing the Keyboard Customization window in DaVinci Resolve. - Access Export Options:
- Locate the three-dot icon at the top right corner.
- Hover over “Export Preset”. This will display a sub-menu listing all your saved presets.
- Select and Save:
Choose the desired preset and select a location on your PC to save it. The preset will be saved as a.txtfile. Given its minimal size, this file can easily be shared via email, cloud storage, or other methods.
Importing a Custom Keyboard Preset
- Open Keyboard Customization:
Navigate to the Keyboard Customization window in DaVinci Resolve. - Access Import Options:
Click on the three-dot icon in the top right corner. From the dropdown, select “Import Preset.” - Select the Preset File:
Navigate to the location where the desired.txtpreset file is stored and select it. DaVinci Resolve will then load this preset into your current setup.
How to Delete a Keyboard Customization Preset In Davinci Resolve?
Deleting a preset is a straightforward way. But keep in mind you can only delete presets made by you, not the pre-installed ones. Click on the three dots again, hover over the “Delete Preset,” and select the one you want to delete.
Must-Know Keyboard Shortcuts for DaVinci Resolve
In the vast world of video editing, efficiency and precision are everything. Each tool, each function, and most importantly, each shortcut contributes to refining the process. As someone who has poured countless hours into DaVinci Resolve, I’ve realized the sheer significance of mastering these keystrokes. Here’s a comprehensive guide to my go-to shortcuts and why they matter.
Remember: I’m referencing Mac shortcuts. For PC users, swap ‘command’ with ‘control’ and ‘option’ with ‘alt’.
1. Transport Controls – Mastering Playback:
- Space bar: This is your basic play and pause. Instead of moving your cursor to the play button, a simple tap saves you those precious seconds.
- Pause while playing (K): If you’re playing a video and want to stop at a precise frame, use ‘K’. It offers more precision than the space bar.
- Skip Forward (Hold K + L): When examining frame-by-frame details, this combination lets you move forward without having to drag your playhead manually.
- Skip Backward (Hold K + J): The counterpart to the previous shortcut, it’s vital for editors who require granularity in their edits.
- Fast Forward (L): By pressing ‘L’ repeatedly, you can control playback speed, a feature I love using, especially when skimming through lengthy clips.
- Rewind (J): The opposite of fast-forward. Essential for quickly revisiting a previous section.
- Zoom in/out (Command + or -): For those meticulous edits or when you need to look at the bigger timeline picture, zooming is indispensable.
2. Navigating the Timeline – Your Editing Roadmap:
- Select clips (Command + arrow keys): Instead of manually clicking on clips, this shortcut helps in swiftly moving through your timeline and grabbing the clips you need. This is especially useful when working on complex projects with multiple assets.
- Move clips (Option + up/down): I can’t count the times I’ve used this to reorder my layers or ensure a B-roll shot aligns perfectly with the main footage. With the mouse, you run the risk of an accidental frame shift, but this shortcut ensures precision.
3. Refining Edits – The Heart of Video Editing:
- Add an Edit (CMD B): Picture this as your ‘cut’ tool. Instead of picking up the blade tool, a quick CMD B at your playhead will cut the clip. This has revolutionized my editing speed.
- Remove & Ripple (CMD SHIFT + open bracket): The ‘pro’ way to eliminate unnecessary footage. Find the unwanted section’s beginning, hit CMD B, then navigate to its end, use this combo, and watch it vanish seamlessly.
- Trim End (CMD SHIFT + close bracket): Another essential tool in my editing arsenal. It helps discard unneeded portions at the end of a clip quickly.
It’s not just about memorizing these shortcuts; it’s about weaving them seamlessly into your editing ritual. Every project I’ve worked on, be it short clips or extensive film edits, these shortcuts have been invaluable. As you integrate them into your workflow, you’ll find your editing becoming swifter, smoother, and more precise.
Happy Editing!

