Hi, I’m Salik, the author of FilmmakingElements.com. I have been a filmmaker for over 10 years. I am also a certified DaVinci Resolve Trainer and I have used DaVinci Resolve for many of my projects. How To Transcode In Davinci Resolve, two easy ways.
I want to talk about video transcoding, transferring footage from one video codec to another Davinci Resolve.
Transcoding footage can have dramatic results when it comes to playback on your computer while you’re editing. So really, what is that?
What is transcoding?
Most digital video files are well before processed and compressed in the camera and do not require extensive post-processing. In order to be shown as a readable image, RAW data must first be debayered and transcoded. Even with high-end computers, the editing process may be taxing. As a result, rather than working directly in RAW, most editorial and visual effects will use transcoded raster formats like QuickTime, DPX, or OpenEXR.
Well, it is taking footage, which is a movie, and keeping the same movie, but changing the way in which it is stored on your hard drive. That’s a layman world’s definition for transcoding.
Now when you do this, you change the footage to a codec that can make it so that it’s easier for the processor to read and makes your editing workflow easier with minimal lag and smooth playback times.
You could also transcode to make the file size of the footage smaller. That way, you could transport or move the data across the network easier, or you could store it on a disk using less disk space.
There’s a variety of reasons you might want to do this, and you need to be aware of what’s happening when this occurs. Transcoding is a simple process that runs through an encoder, a software used to transcode footage on your computer, and it chooses the raw footage as an input as well as a codec. This is a coding-decoding algorithm that explains how to store the bits onto the disk for use.
With that codec, the encoder puts those two things together and generates an output file, which is an encoded form of the first footage you pushed in.
Why should you transcode every project?
Now, why might you want to do that? When we talk, we might want to save storage space on a disk, which means when the footage is played back, the processor on the computer fills in some of the gaps by inferring what goes between each of the different pixels.
Or you might want to make it easier for the processor to read by filling in those pixels during your incode or you’re transcode so that when it’s payback time, it’s easier for the computer to playback the footage.
Codecs like Prores and DNxHR are easier to edit on Davinci Resolve or any other NLE whatsoever than codecs like H.264 or H.265.
H.264, the most used codec, is ideal for online YouTube or Vimeo playing, but it isn’t suitable for most editing systems, including Davinci Resolve. The H.264 and MPEG codecs are both 8-bit formats that enable a large amount of footage to be recorded on a compact flash drive or memory card. H.264 employs extended GOP (group of pictures) compression, implying that most frames are interpolated from keyframes, making nonlinear systems’ editing “natively” more processor intensive. When it comes to editing, all videos must be transcoded to a 10-bit format (such as ProRes or DNxHR), which takes time and extra processing.
Now, in a lot of forum posts in a lot of places, you see people complaining their computer isn’t fast enough while they’re trying to edit their footage. Well, this can be a solution. So today, I’ll show you how to encode or transcode footage from one codec to another in Davinci Resolve, and we can talk about some that are easier for your computer to play than others.
- Also Read- Who is a DIT on a film set? Responsibilities and How to be one!
- Also Read- 10 Best Learning Cinematography YouTube Channels for Amateurs!
- Also Read- 10 Best Short Films on Mubi To Watch In 2022
How To Transcode In Davinci Resolve (2 Easy Ways)
1. How to transcode in Davinci Resolve, the traditional way
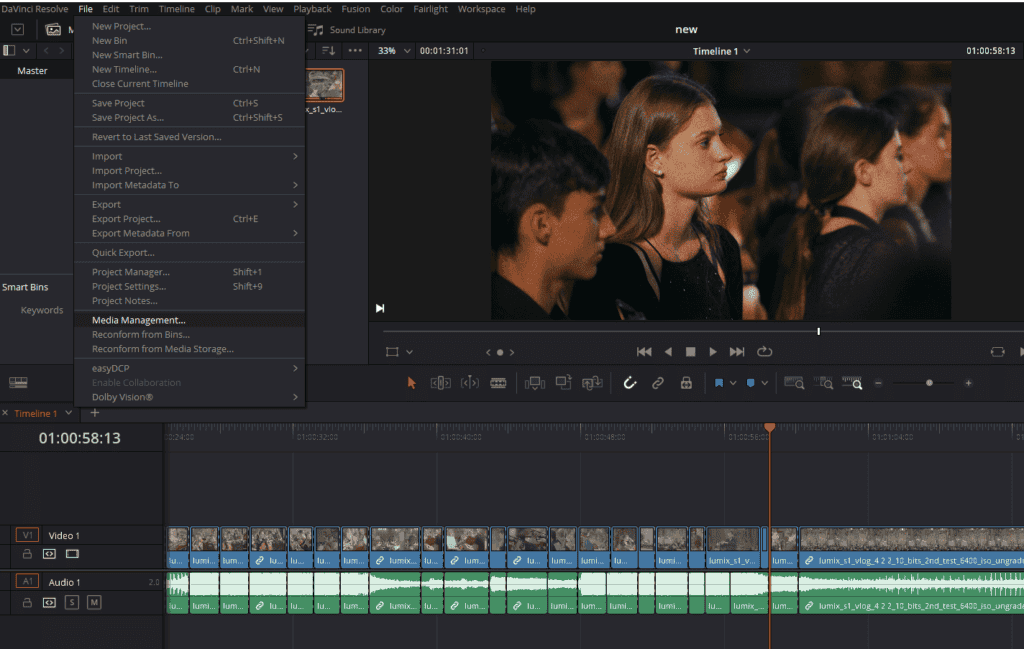
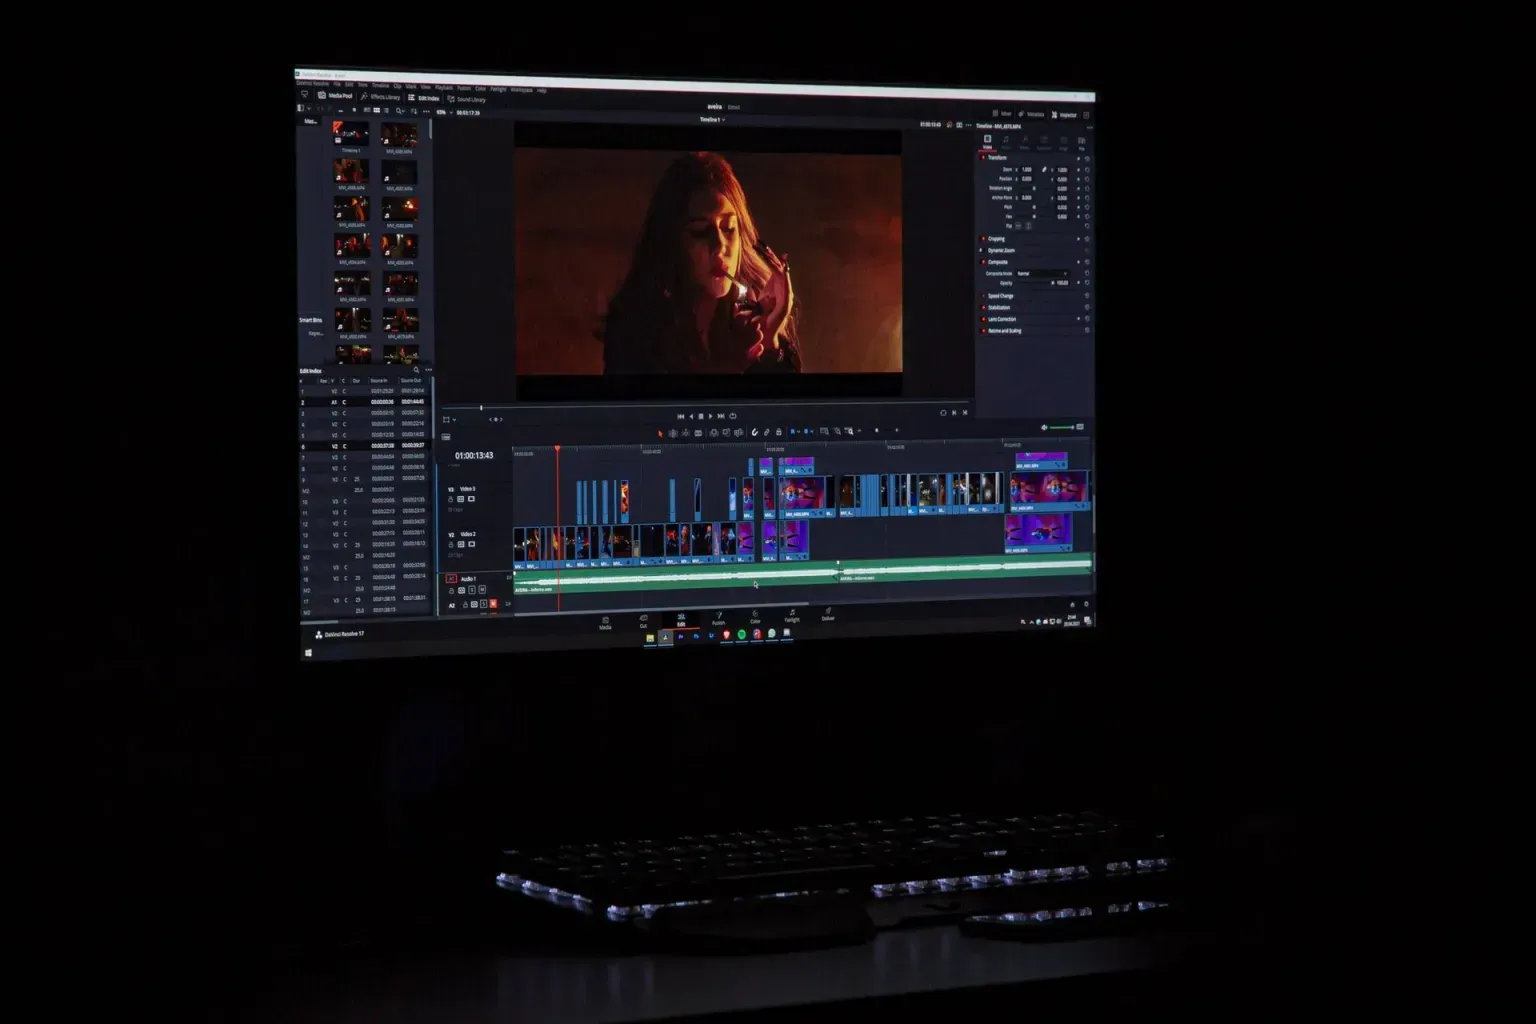
We are in DaVinci Resolve and, I have added some clips into my media pool, and I’m here on the edit tab you can see at the bottom; I’m going to take the items, which seem to be playing back slowly on my computer, and I’m going to go to file and then media management.
Now, media management has a couple of different options. I can copy media from one location to another. For instance, a remote drive to my local drive move it to faster storage.
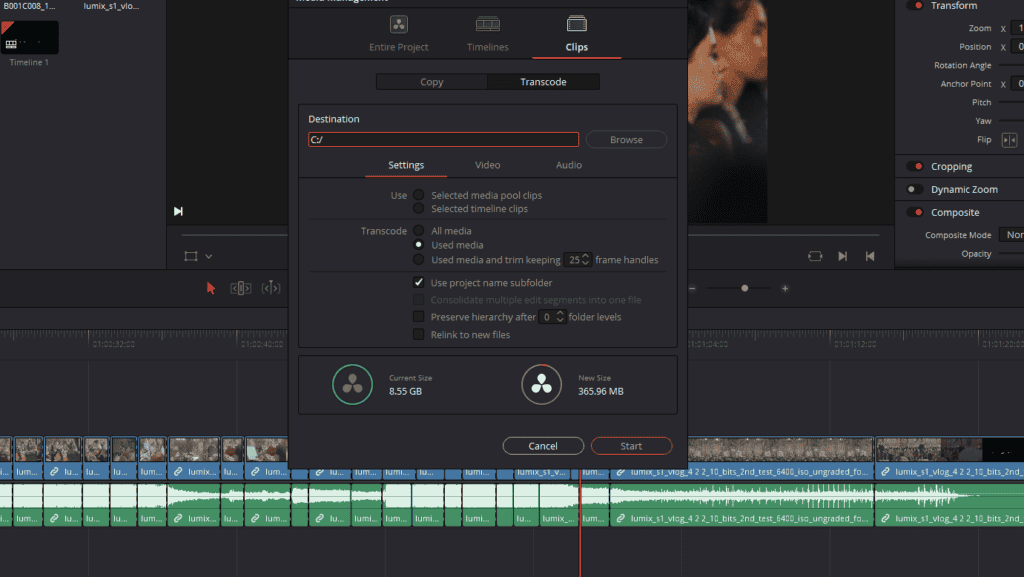
Now that I’m in the transcode panel, you’ll see I can choose where I want my output. So when it merges, as we saw earlier, it merges a codec with the footage that it’s taking in. Where do we want to put it?
I’m going to browse to a location on my computer that I will use for the output. I have some more options; I can use the selected timeline clips, the ones that have the footage in them.
I can transcode all the media, only the media that’s been used, or I can trim it and manage it.
So you get a general idea. We’re going to take files that are difficult for the computer to edit, and we’re going to make them easier for it to edit by changing the codec that they’re stored with.
Now, there’s actually an easier way to handle this. I could encode it by clicking Start. It would transcode all of the footage that I passed to it, and it would store it where I told it to.
I could then link that footage back to the footage in my media pool and edit against the easier files, then finally render against those that were originally in the pool. That’s a lot of clicking and work, though.
2. An easier way to transcode footage in Davinci Resolve
What I’d rather do is use a really neat feature that they’ve put into DaVinci Resolve. And now that we understand the theory and why, I think it’s pretty neat to see how it works.
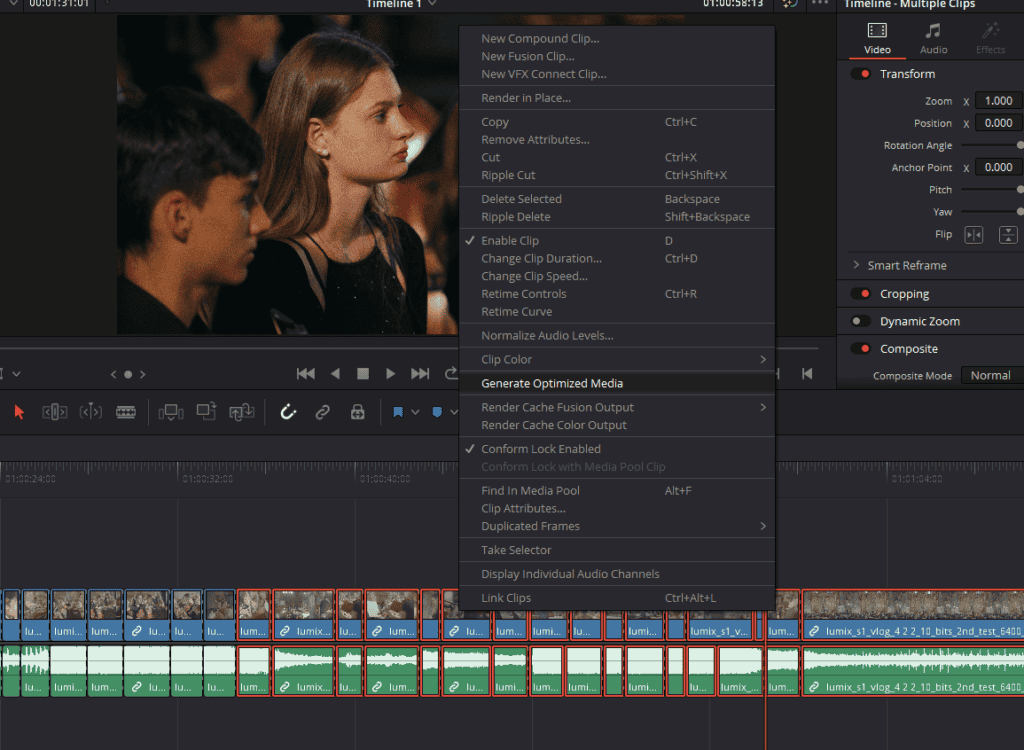
You can right-click on any amount of footage that you got in your media pool or one that you already put on your timeline. Click and opt for “Generate Optimized Media.”
Now, I would generally recommend you do it against your timeline if you know that you’ve got your duration set because it’ll encode what’s on the timeline and what’s used, rather than maybe an extra hour and a half worth of extra footage sitting in your media pool. You can put in and out points roughly if you go with the second method.
So you right-click on the footage, and you choose Generate Optimized Media. What this does is effectively transcode, and you say, well, that’s great.

Where did all the options go? In fact, the options exist right inside of your project settings. If you hit your project settings in your file menu and you choose “Master Settings,” you’ll see here Optimized Media and Render Cache. This talks about what it would transcode to, should you ask it to optimize media for you.
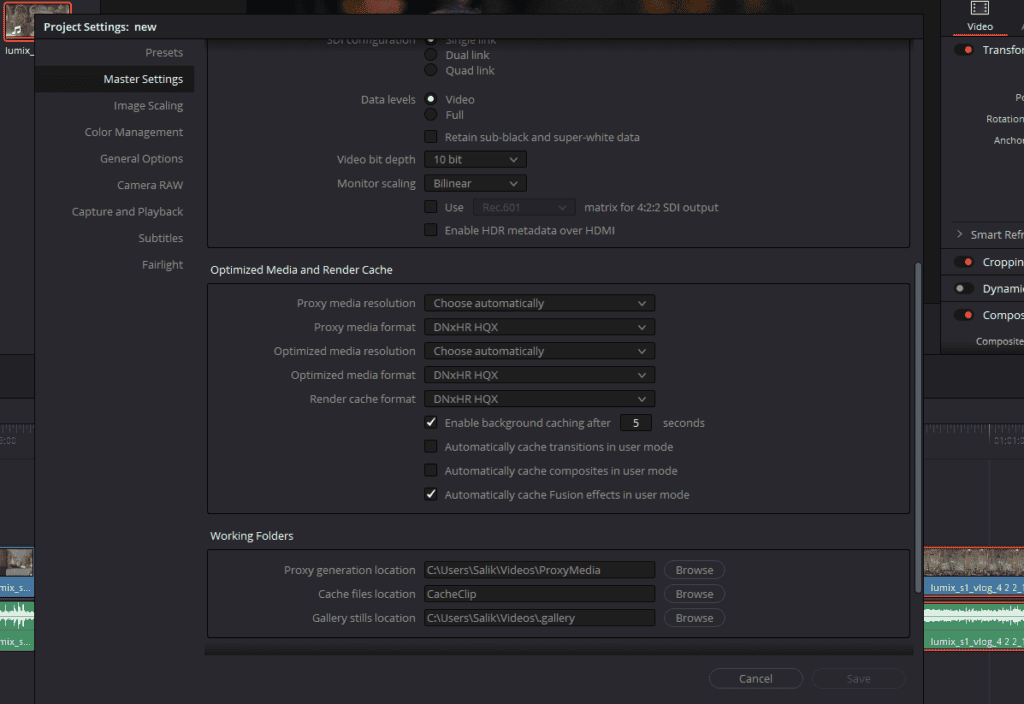
You can choose to change the resolution, which can make it easier for the computer to process it by going down in resolution. Or you can change the format in which it is stored in.
In this case, I’m letting it choose automatically based on hardware specifications, but it’s always good to know where you can go to change it. So again, right-click on the footage go to Generate Optimized Media. It will generate the file for you in the background, and it will use it as you’re editing and scrubbing through the media pool as you’re going through your edit tab, fusion, and color tab.
When you get to delivery, you then have an option. You may not have ever noticed it, but it’s down in the advanced settings. Use optimized media as this is in the delivery tab; it’s asking do you want me to use the optimized media when I render your final project.
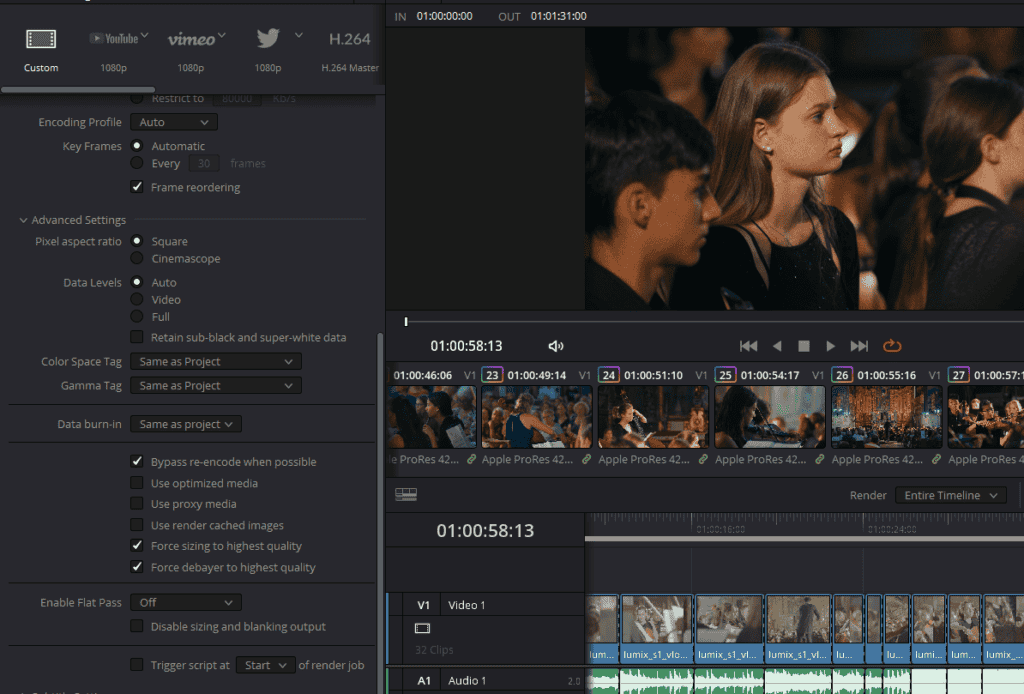
I’d leave it unchecked because it would potentially use the lower quality media than what you originally got in from your film crew. Only use it for your personal projects or your personal youtube videos.