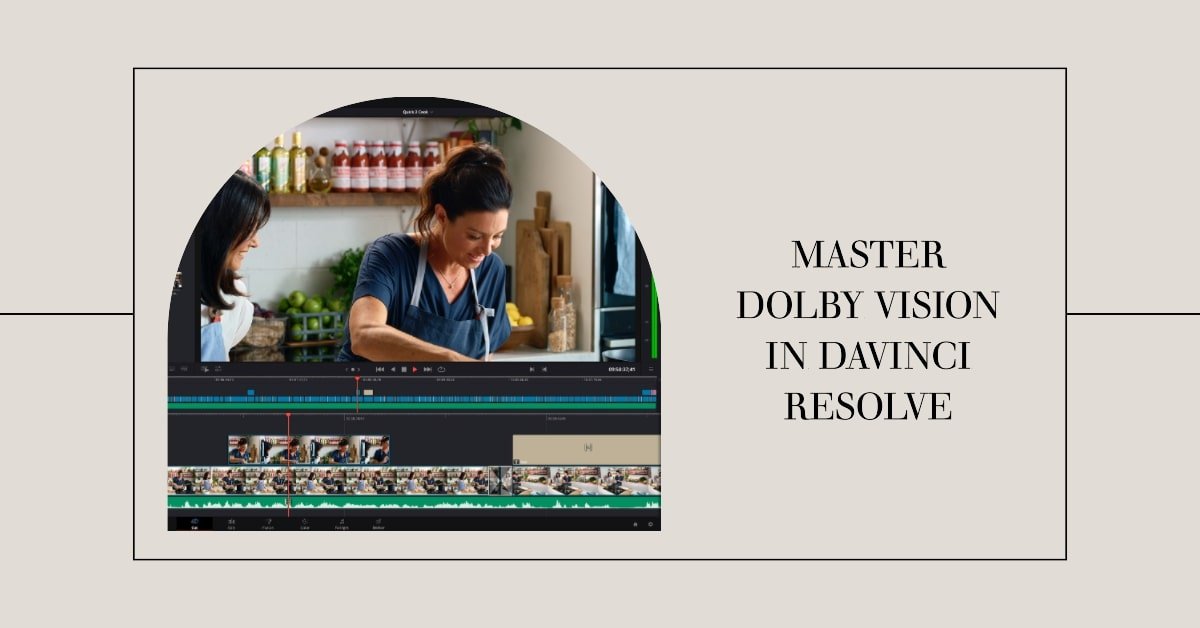
If you’re like me, passionate about filmmaking and post-production, you’ve definitely come across Dolby Vision. Recognized as a leader in HDR technology, Dolby Vision is revolutionary, ensuring that a filmmaker’s vision transitions seamlessly from the editing bay to the audience’s screen. On my blog at FilmmakingElements.com, I’ll be taking you through the intricacies of setting up a project in Dolby Vision using DaVinci Resolve.
Have you ever wondered why giants like Netflix, dominating the streaming scene, favor Dolby Vision as their go-to HDR standard? I did. And the answer is compelling. Dolby Vision, an innovation by Dolby Laboratories, ensures that an HDR master is perceptually mapped onto any screen equipped with a Dolby Vision chip. This means that the creative brilliance of the original grade isn’t compromised, regardless of the screen it’s viewed on.
But there’s more to it. What’s especially fascinating is Dolby Vision’s ability to generate an SDR version straight from the HDR master content. So, even if you or someone you know doesn’t have an HDR device, the content can still be appreciated on a regular SDR display.
The brilliance doesn’t stop there. The Dolby Vision workflow scrutinizes HDR images, meticulously converting them to SDR frame by frame. This treasure trove of data is stored as dynamic color metadata, making the mastering process a breeze. Once you’ve mastered and delivered a single Dolby Vision IMF, powerhouses like Netflix take over, translating it into Dolby Vision, HDR10, and SDR formats.
To tap into this incredible tech, it’s essential to configure DaVinci Resolve just right. Join me as I walk you through the setup – from tweaking project settings to engaging with the Internal CMU (ICMU) and unraveling the complexities of a Dolby Vision metadata file. Let’s get started!
Step-by-Step Guide to Setting Up a Dolby Vision Project in DaVinci Resolve
Harnessing the capabilities of Dolby Vision in DaVinci Resolve can seem complex, but with this detailed walkthrough, you’ll have a clear path to follow. Let’s break it down step-by-step:
1. Starting Your Project:
- Launch DaVinci Resolve and open your intended project.
- Access project settings by either pressing Shift + 9 or clicking on the small gear icon located in the bottom right corner of your interface.
2. Mastering the Settings:
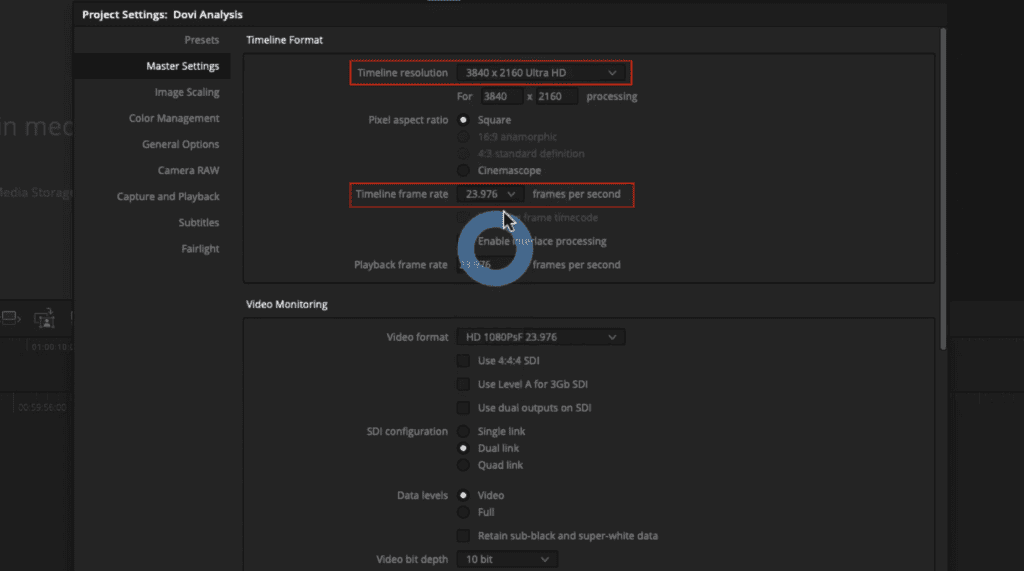
- Within the project settings, navigate to the ‘master settings’ menu.
- Change your ‘timeline resolution’ and ‘timeline frame rate’ according to the project.
- In the ‘video monitoring’ section, match this resolution and frame rate. Do note that these settings are dependent on your monitor capabilities and won’t impact your final render.
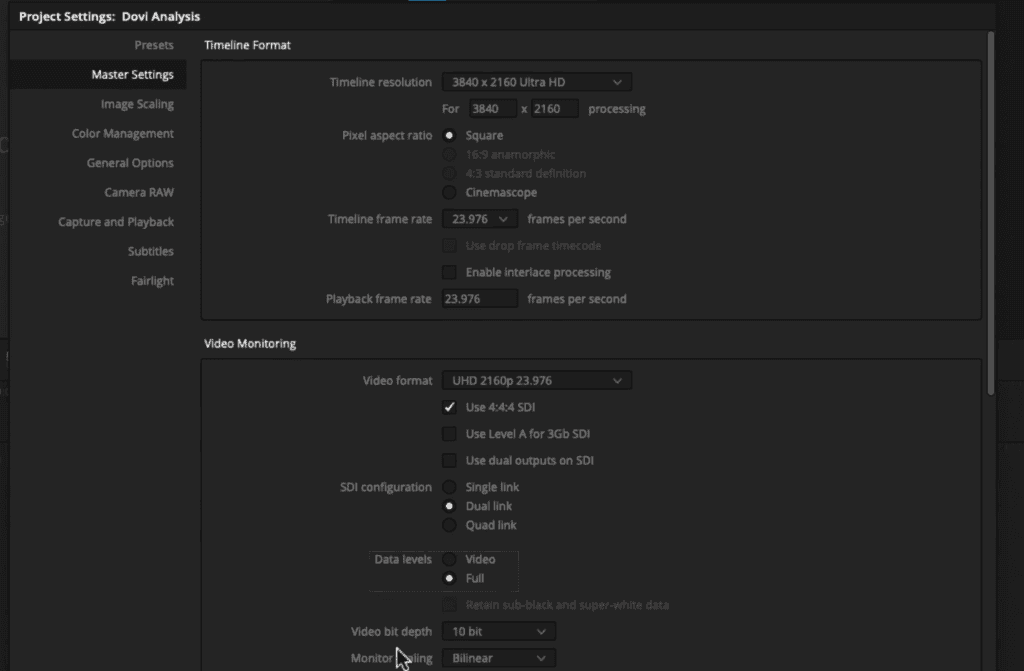
3. Delving into Dolby Vision:
- It’s crucial in a Dolby Vision project to activate ‘ Use 4:4:4 SDI’ in the ‘Video Monitoring’ section. This is because Dolby Vision algorithms require a 4:4:4 signal on your monitor.
- Select ‘Full’ in the ‘Data Levels’ option. Endeavor to operate in full range when grading in Dolby Vision.
4. Setting Up Color Management:
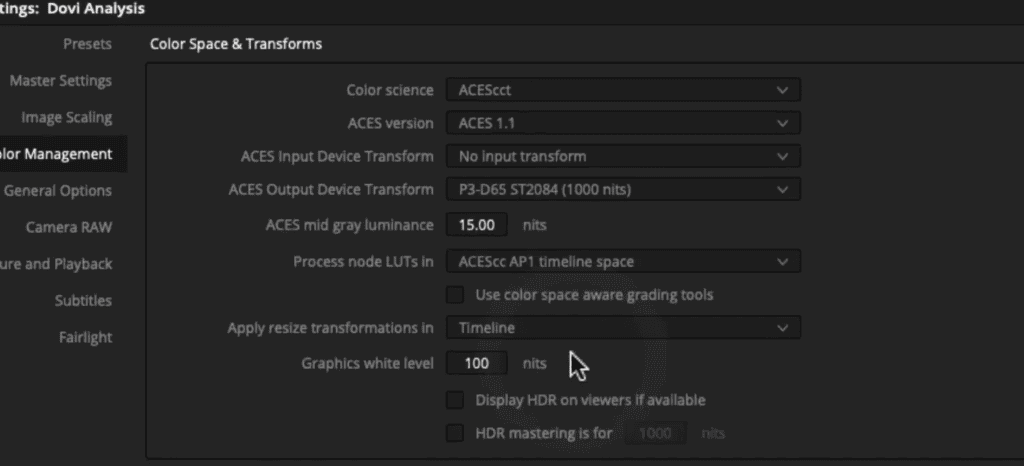
- Proceed to the ‘color management’ menu in the project settings of Davinci Resolve.
- The focus is on setting up a project in ACES:
- Under ‘color science,’ choose ‘ACEScct.’
- From the ‘ACES Version’ dropdown, select the latest version.
- Keep the ‘ACES Input Device Transform’ on ‘no input transform’.
- For the ‘ACES Output Device Transform’, choose ‘P3-D65 ST2084’ (1000 nits) this should be in line with your mastering display capabilities and calibration.
5. Activating Dolby Vision:
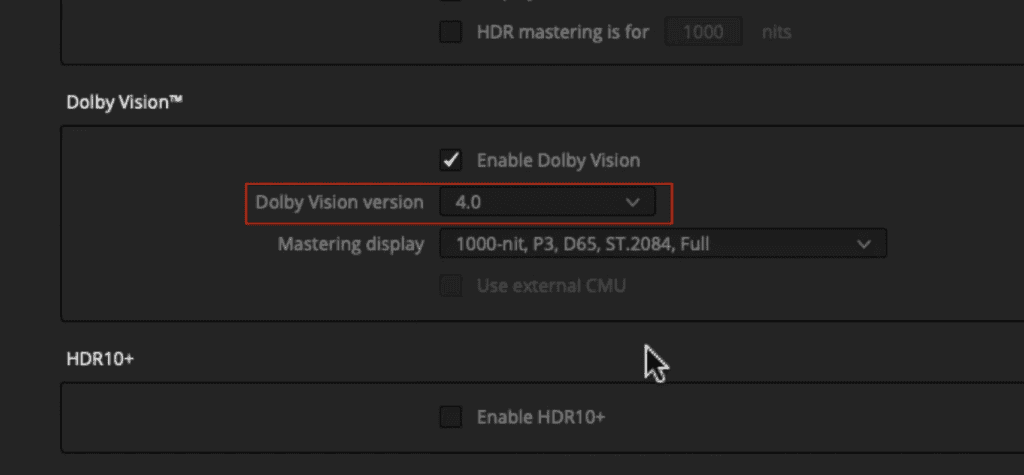
- In the Dolby Vision section, tick the option that says ‘Enable Dolby Vision.’ This action will turn on the internal content mapping unit inside Resolve.
- The Dolby Vision palette on the color page becomes active, facilitating all operations required to run Dolby Vision in Resolve.
- For the ‘Dolby Vision Version’ selection, it’s advisable to pick the latest version.
- Next, in the ‘Mastering Display’ inform the system about the display you’ve calibrated for. It’s paramount as this selection influences global metadata which gets stored in the metadata file. In this guide, the choice is ‘1000 nits, P3-D65, ST2084, full.’ This option also can vary for you depending upon your monitor calibration.
6. Grading Preparation:
- On the Color page, locate and click on the Dolby Vision icon above the Primary Wheels. This action will make the Dolby Vision palette pop up.
- If you’re on an SDR monitor, due to the P3-D65 ST2084 color space setting, the images might appear subdued. Always trust your calibrated reference monitor over your computer monitor.
- When grading in HDR, you must adjust your scopes to nits. Do this by selecting the three-dot option menu to the right of the waveform and selecting Waveform Scale Style > HDR.
7. Begin Grading:
- Now that you’re equipped with the right settings, it’s time to dive into grading.
Adjusting Aspect Ratios and Output Blanking in DaVinci Resolve
Aspect ratios are a fundamental part of film and video production, conveying a particular emotion or style. When working with Dolby Vision in DaVinci Resolve, setting the appropriate aspect ratio becomes even more vital to ensure accurate analysis and display. Here’s a deep dive into how you can optimize aspect ratios and use output blanking effectively:
1. Importance of Setting Output Blanking:
- If your project doesn’t follow the standard 1.77 aspect ratio, configuring your output blanking prior to the analysis is paramount.
- The purpose? The Dolby algorithm needs clarity on the active picture area. Setting a letterbox post-analysis can lead to unintended image changes that encompass the letterboxing. Moreover, this sequence could mean the analysis takes the black level of the letterbox into account, especially during the scene’s darkest points.
2. Understanding Level 5 Metadata:
- The image’s aspect ratio gets stored as level 5 metadata, essentially a global setting. It’s crucial to understand this as you delve deeper into adjusting output blanking.
3. Adjusting Output Blanking for the Entire Project:
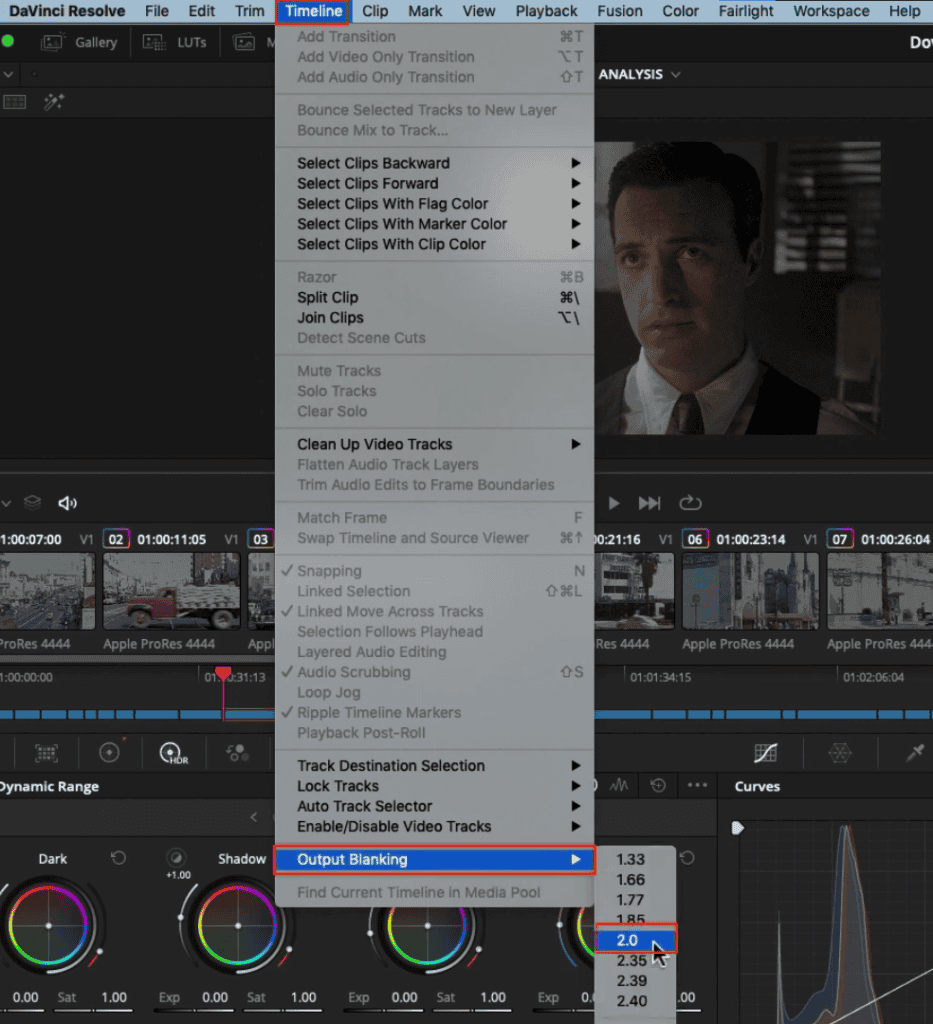
- Navigate to the timeline menu, located at the top of the interface, and select the output blanking option.
- Here, you’re presented with multiple aspect ratios. For the sake of this guide, let’s select 2.0.
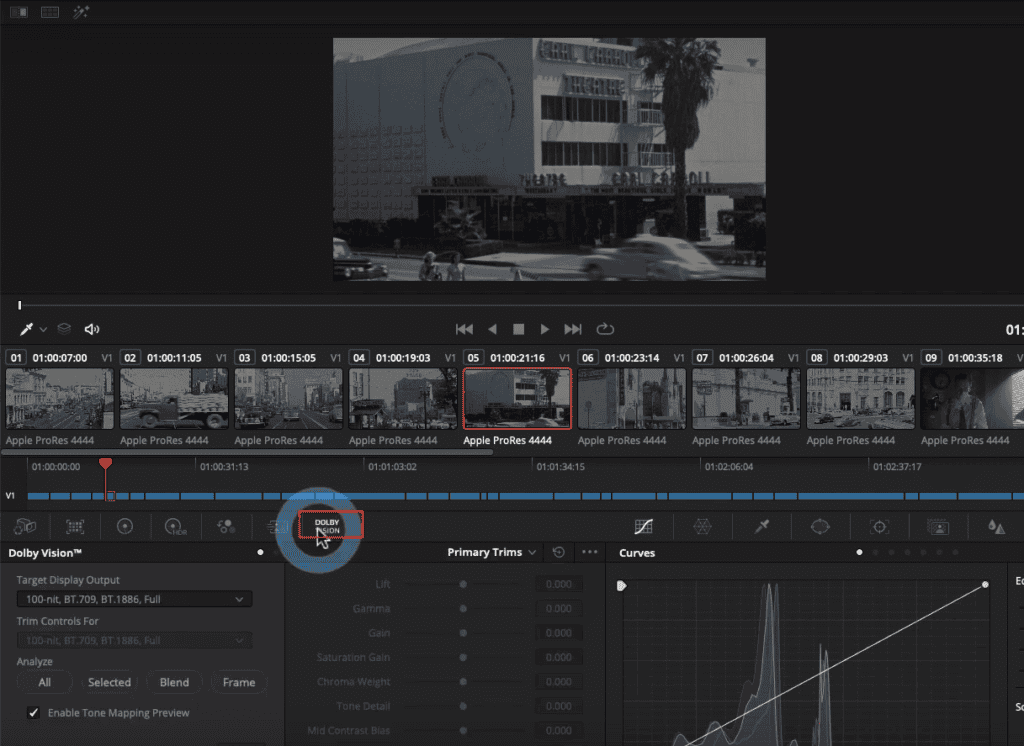
Delving into the Dolby Vision Palette in DaVinci Resolve
When you click on the Dolby Vision button above the primary wheels on the Color page of Davinci Resolve, you get access to Dolby Vision Palette. DaVinci Resolve offers a dedicated palette to harness the power of Dolby Vision, and here’s a step-by-step guide on how to utilize it effectively:
1. Understanding the Dolby Vision Palette Layout:
- On your left: You’ll notice settings pertinent to your target display output and varied methods to carry out the analysis.
- On your right: Here lie the trim controls, crucial for refining the SDR (Standard Dynamic Range) image post-analysis.
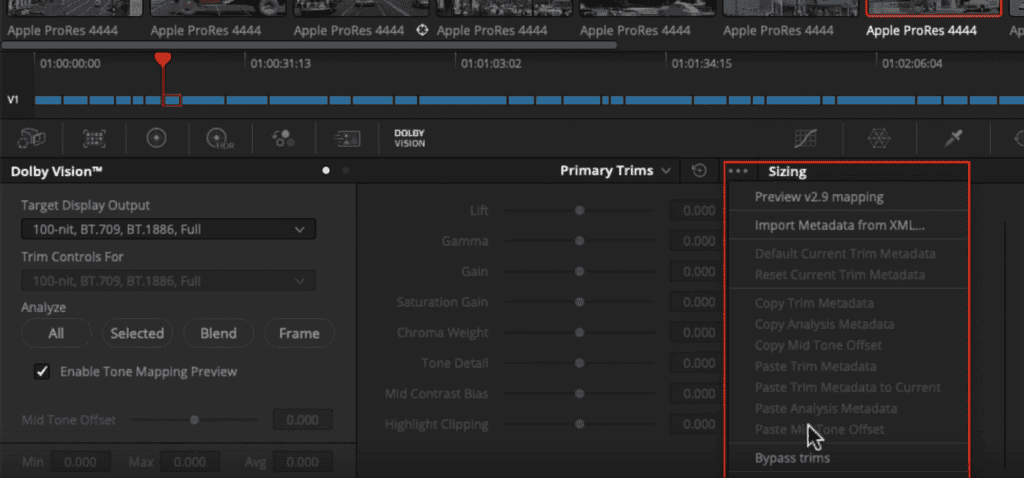
- Like most panels in Resolve, when you click on the three white dots at the top right corner of the Dolby Vision Pallete, it houses an option menu, granting functionalities like copying, pasting analysis, trim values, or even importing Dolby metadata via an XML.
2. Setting up the Target Display Output:
- A pre-analysis essential is ensuring your target display output is configured to ‘100-nit BT.709, BT.1886, Full.’ This is effectively the SDR grading standard.
- Every clip on your timeline needs a Dolby analysis, ensuring consistency and optimal quality.
3. Selecting the Right Analysis Method:
- DaVinci Resolve offers various analysis methods tailored for either the entire project’s runtime or specific timeline portions.
- The Dolby Vision’s core function? For every clip, it discerns the brightest and darkest points and calculates average luminance. Through this, Dolby Vision’s algorithm adeptly converts the HDR image into SDR, maintaining the initial creative intent of the SDR version.
4. Beyond Automatic Analysis:
- While the Dolby Vision technology excels at auto-converting between HDR and SDR, it doesn’t stop there. The palette provides an array of tools for users to refine the SDR version further post-analysis.
Mastering the Dolby Analysis in DaVinci Resolve
When venturing into the world of Dolby Vision within DaVinci Resolve, understanding how to effectively utilize the analysis options provided by Dolby in the Dolby Vision Pallete in the ‘Analyze’ section, can make a world of difference. Let’s dissect each of these tools to maximize your post-production efforts.
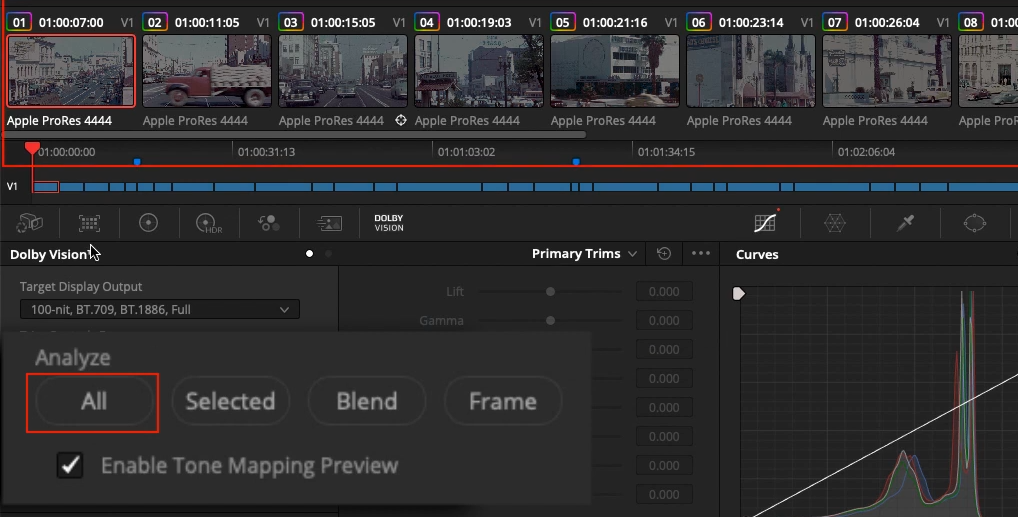
1. The ‘All’ Option:
- Function: Analyzes all clips within your timeline.
- Use Case: Ideal when analyzing a show for the first time.
- Note: While comprehensive, this method can be time-consuming.
2. The ‘Selected’ Tool:
- Function: Analyzes specific frames of selected clips in the Clips Sequence Viewer.
- Use Case: Beneficial when introducing a new VFX shot post a complete analysis, or when you’re after a quick clip analysis.
- Post Analysis: Upon completion, various options in the Dolby panel become accessible. However, access might be contingent on possessing a Dolby license.
Metadata Insights:- Min: Denotes the lowest black level in a shot.
- Max: Highlights the highest luminance level.
- Average: ReThis representshe mean luminance level throughout the shot.
- Every analyzed clip will have its unique set of these values.
3. The ‘Blaine’ Technique:
- Function: Averages the L1 metadata values across selected shots.
- Use Case: Perfect for achieving consistent mapping across a sequence of akin shots.
- Process: On choosing this method, all selected clips acquire the same L1 values, derived from averaging the metadata of all selected shots. In essence, Blaine views your entire selection as a singular clip.
4. The ‘Frame’ Tool:
- Function: Analyzes the current frame and propagates its values throughout the clip.
- Use Case: Ideal for shots that transition through varying lighting conditions.
For instance, for a scene featuring intermittent light flashes, selecting a poster frame that captures the entirety of the clip’s essence and using the ‘Frame’ tool ensures uniformity across the clip.
Bonus: Transferring Metadata Between Clips:
Ever wanted to apply an existing analysis to another clip? Simply:
- Navigate to the options menu by clicking on the three-dot menu on the top right corner of the Dolby Vision Pallete.
- Choose ‘copy analysis metadata’.
- Shift to your desired clip.
- Reopen the options menu.
- Select ‘paste analysis metadata’.
Optimizing the Analyze Process in DaVinci Resolve
When working with DaVinci Resolve, mastering the intricacies of the analysis process can be the distinguishing factor between a novice and a seasoned professional. Let’s delve into a detailed exploration of critical considerations that can substantially influence the outcome and quality of your projects.
1. Importance of Sequence Layering:
- The First Layer Philosophy: Your primary content should always occupy the foremost layer of your timeline. This is the foundation upon which all subsequent elements are added. Whether it’s the primary footage, core narrative clips, or crucial visual elements – they should find their home here.
- The Second Layer Trap: Placing a clip on the second layer, unintentionally or otherwise, can distort the accuracy of the analysis. The software might misread the importance or hierarchy of clips, leading to undesirable results. Always double-check your timeline layering before initializing an analysis.
2. Navigating the World of Dissolves:
- Pre-Analysis Strategy: Before venturing into the realm of analysis, ensure that all your intended dissolves are already incorporated into the timeline.
- Why This Matters: Resolve, being the smart software that it is, has a built-in mechanism to calculate per-frame metadata for each individual frame within a dissolve. This automation can be a blessing, but it’s always prudent to review the resulting mapping post-analysis to ensure that it aligns with the desired visual outcome.
3. Tackling Text Files and Graphics:
- A Key Principle: Never underestimate the impact of text and graphics on your sequence. They need the same rigorous analysis as any video clip.
- Layering Challenges: Say you have a graphic or a piece of text on the second layer, and you want this to influence the analysis. The trick here is compound clipping. By merging the primary content with the text or graphic into a single compound clip, you can then proceed with the analysis. This ensures that the analysis factors in all the combined visual elements.
4. Animation: Constraints and Creative Solutions:
- The Current Reality: As of now, DaVinci Resolve doesn’t support animating trims, presenting some limitations to dynamic transitions and effects.
- A Crafty Solution: For those aiming for per-frame metadata that integrates two distinct analyses, the dissolve effect is your best friend. Consider a scenario where there’s a white fade transition between two clips:
- Begin by exporting this as a standalone clip.
- Re-import the clip back into Resolve.
- Segment the clip and integrate a dissolve transition.
- On analyzing the pre and post-transition segments, Resolve showcases its prowess by generating per-frame metadata, ensuring the two segments harmoniously blend.
- A Crafty Solution: For those aiming for per-frame metadata that integrates two distinct analyses, the dissolve effect is your best friend. Consider a scenario where there’s a white fade transition between two clips:
Mastering the Dolby Vision Analyze in DaVinci Resolve
When working with DaVinci Resolve, achieving the desired visual quality often involves leveraging Dolby Vision’s advanced analysis techniques. Let’s break down the detailed process of conducting a Dolby Vision analysis in Resolve and optimizing the generated metadata for maximum visual impact.
1. Commencing the Analysis:
- Whole Timeline Analysis: Initiating a complete analysis by selecting ‘All’ from the Analyze options. Initiating a complete analysis of your timeline ensures the creation of L1 metadata for every clip, which is vital for in-depth Dolby Vision assessment.
- Real-time Mapping Verification: Once the analysis concludes, it’s paramount to verify the mapping in real-time. This real-time review happens on an SDR (Standard Dynamic Range) image.
- Monitor Calibration: Always adjust your monitor settings to reproduce Rec.709 Gamma 2.4, ensuring accurate visual representation.
2. Ensuring Proper Scope Settings:
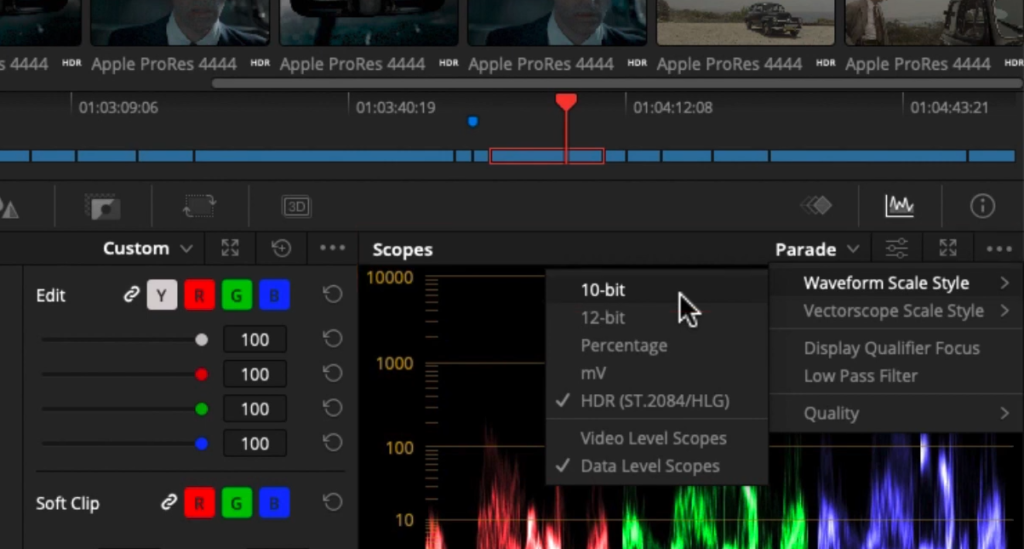
- SDR Scope: The scope for your analysis should be shifted to an SDR scale, click on the three-dot menu on the top-right corner of scopes and go to Waveform Scale Style> 10-bit.
- Dolby Vision Panel Configuration: Always double-check your target display within the Dolby Vision panel. To bypass the analysis, simply deactivate the ‘Enable Tone Mapping Preview’ checkbox.
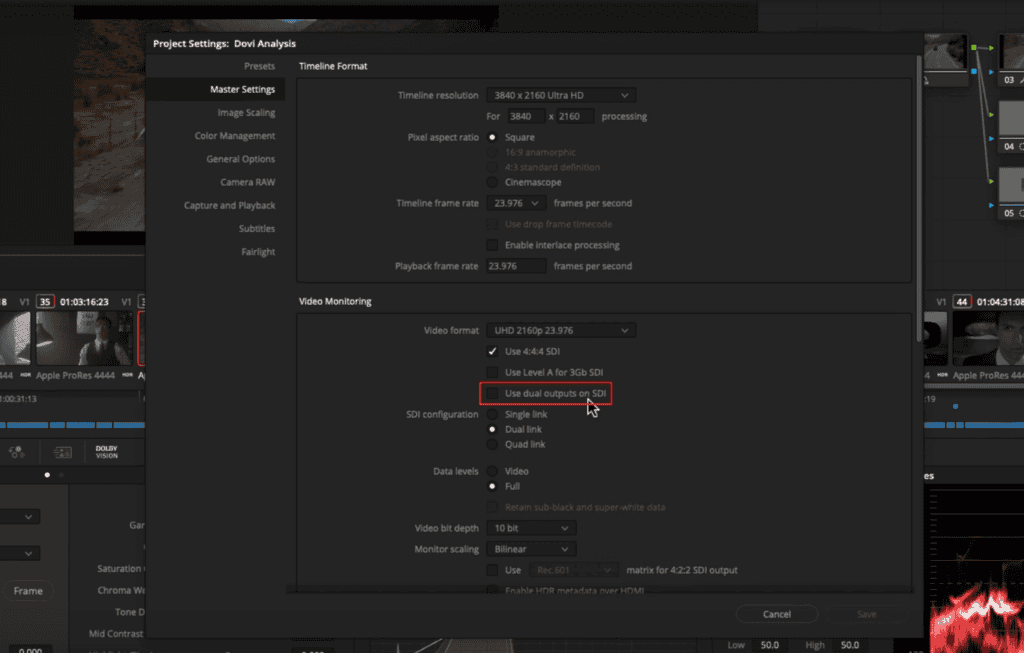
3. The Dual Monitor Advantage:
A dual monitor setup in Resolve, especially with an IO video card that offers two SDR outputs, allows for simultaneous HDR and SDR visualization. This concurrent view can be achieved by selecting ‘use dual outputs on SDI’ in the video monitoring settings by going into project settings.
4. Refining the Mapping:
- Trim Controls & Mid tone Offset Slider: Even after initial analysis, there may be a need for precise adjustments using Trim Controls or the Mid tone Offset slider. The latter works as an offset for the L1 analysis and primarily focuses on the image’s mid tones without influencing blacks and highlights.
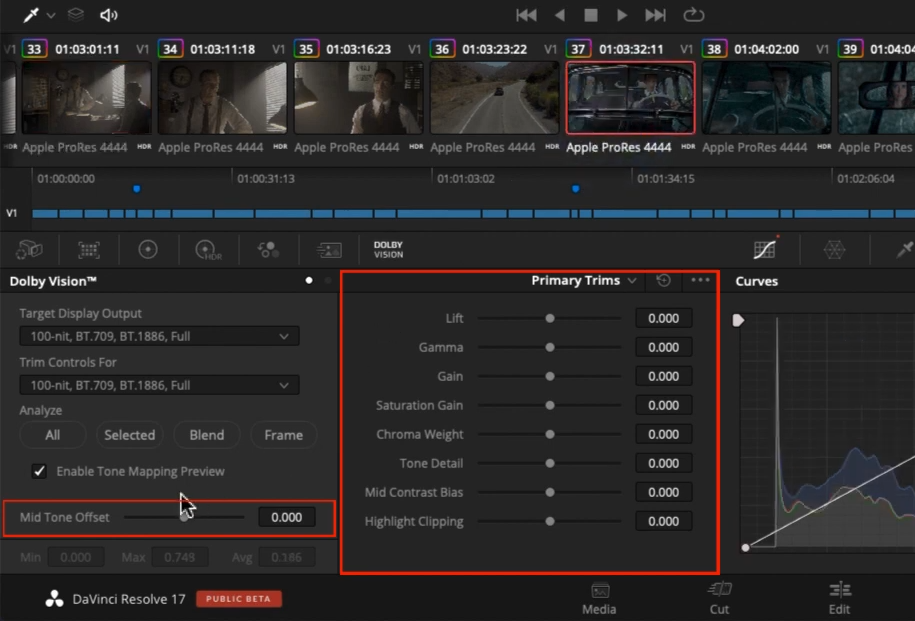
5. Understanding Primary Trims:
- Lift, Gamma, and Gain: These controls are comparable to standard Resolve controls, influencing shadows, midtones, and highlights respectively.
- Saturation Gain: Adjusts saturation without complete desaturation.
- Chroma weight & Tone Detail: Both settings help in reducing luminance in saturated colors while preserving color saturation.
- Mid Contrast Bias & Highlight Clipping Trim: These tools enable fine-tuning the image contrast, especially around the mid-tone regions.
6. Navigating Secondary Trims:
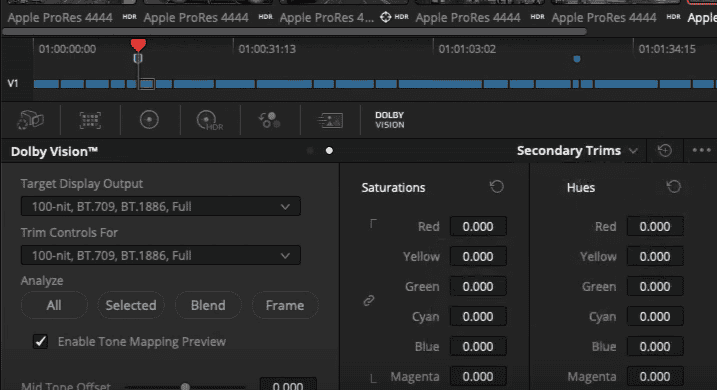
- 6 Color Saturation Controls: They allow tailored adjustments to the saturation of primary and secondary colors, akin to the Hue vs. Sat curve in Resolve.
- 6 Color Hue Controls: Especially useful for shifting a wider color gamut into a limited one like Rec.709 SDR.
Guide to Exporting Dolby Vision Metadata in DaVinci Resolve
DaVinci Resolve is renowned for its comprehensive post-production capabilities, including the ability to handle Dolby Vision metadata. In this guide, we’ll walk through the process of exporting this metadata as an XML. This can be particularly useful if you’re looking to master in another software or create an IMF in a different project. Let’s dive in step-by-step.
Understanding the Need for Metadata Export:
- Other Mastering Softwares: If DaVinci Resolve isn’t your only mastering tool.
- Alternate Projects: When creating an IMF in a different project.
- Specific Requests: Situations where you’re explicitly asked for a metadata file.
Step-by-Step Process to Export Metadata:
1. Start at the Edit Page:
- Open DaVinci Resolve and navigate to the Edit page.
2. Reach the Timeline Menu:

- Right-click on the Timeline in the Media Pool.
- From the drop-down, select the ‘Timeline’ menu.
- Within this, find and click on the ‘Export’ option.
3. Opt for Dolby Vision XML:
- You’ll notice several export options, one of which will be ‘Dolby Vision XML’. Click on this, and a popup window will appear.
4. Configure Your XML Settings:
- Go to the ‘Options’ tab within the popup.
- It’s imperative to select ‘Dolby Vision version 4.0’ to ensure compatibility and encompass all the features.
- Now, focus on naming your file. DaVinci Resolve often provides a suggested name that captures essential details like the analysis version, target display, and color spaces. You can either use this or input a name of your choice.
- Once satisfied, click on ‘Save’ to finalize your metadata export.
Using Dolby Analysis for SDR Deliverables Export:
1. Head Over to the Deliver Page:
- From the main DaVinci Resolve interface, navigate to the ‘Deliver’ page.
2. Customize Your Export Preset:
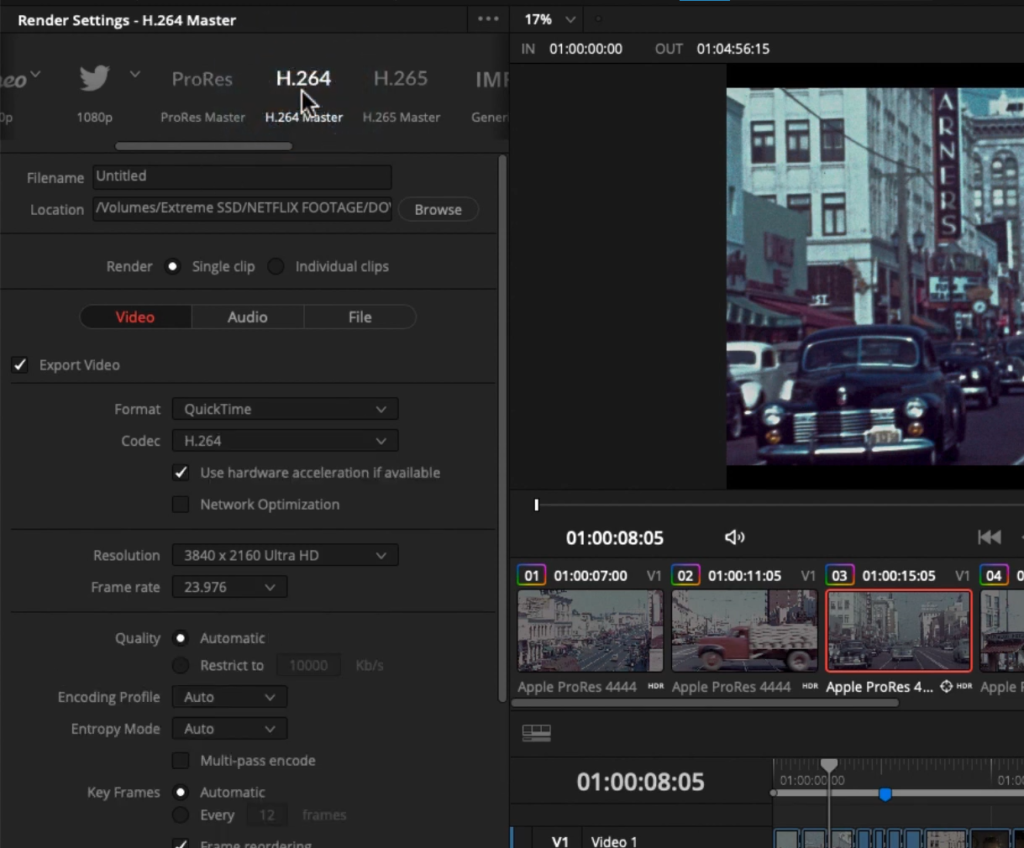
- Choose a preset that suits your needs, such as ‘H.264’. This isn’t set in stone; other formats like ‘ProRes’ or ‘DPX’ are available too.
3. Tweak the Codec:
- Depending on your project requirements, you can adjust the codec settings as you see fit.
4. Embed SDR Dolby in Your File:
- If you aim to have the SDR version derived from Dolby included in your file:
- Look for the ‘Advanced Settings’ tab and open it.
- Find the ‘Tone Mapping’ options and select ‘Dolby Vision’. This action lets you choose the specific tone mapping you wish to embed.
- Next, pick the analysis you carried out (like 100-nit, BT.709, BT.1886 Full) and ensure it’s applied in full.
5. Initiate the Render:
- After naming your file and finalizing other settings, hit the ‘add to render queue’ and then ‘render’ or ‘render all’ button to process your project.
Conclusion
In this comprehensive guide on FilmmakingElements.com, we have dissected the intricate details of setting up and mastering a Dolby Vision project using DaVinci Resolve. As the film and media industry continues its shift toward high-dynamic-range (HDR) content, Dolby Vision emerges as a pivotal technology ensuring the filmmaker’s creative vision remains consistent across a plethora of displays.
In conclusion, embracing the power of Dolby Vision in post-production can immensely elevate the quality and consistency of content. With the right knowledge, tools, and techniques, filmmakers can harness this groundbreaking technology to its fullest, ensuring their creative vision translates impeccably from the editing suite to the audience’s screen.