Welcome back to FilmmakingElements.com, in this article I share my Davinci Resolve Color Shift DCTL, which will be free to download.
Diving into the vast world of video editing and color grading, I’ve always been fascinated by the potential of DaVinci Resolve. It’s a platform that has allowed me to explore, experiment, and express my vision in countless ways. One of my most exciting ventures in this realm has been the creation of a DCTL tool called “Color Shift.” Yes, you read that right—I’ve crafted this tool from scratch!
DCTL, or DaVinci Color Transform Language, is a powerful scripting language within Resolve. It’s the backbone that lets users like me design and apply custom color transformations to videos, giving them a distinct touch. The “Color Shift” tool I’ve developed isn’t just about adjusting hues here and there. It’s about dynamically transforming colors to breathe life into a scene, to shift moods, or to evoke certain emotions. Picture turning a regular beach scene into a golden-hour masterpiece or giving a cityscape that dreamy, vintage vibe. That’s the magic my “Color Shift” tool brings to the table.
But here’s the best part: I’m willing to share my “Color Shift” tool with you, and guess what? It’s absolutely free! Through this article, not only will I provide insights into how the tool works, but I’ll also guide you on how you can harness its potential for your own projects. So, join me as I unravel the wonders of color grading and offer you a piece of my creative journey with DaVinci Resolve.
Exploring the Color Shift DCTL Sliders and Tetrahedral Logic
Navigating the intricate workings of my Color Shift DCTL, the brilliance of DaVinci Resolve’s DCTL becomes evident. Central to this tool are the meticulously crafted sliders and the fascinating tetrahedral logic.
- Understanding Primary and Secondary Colors in DCTL:
- Primary Colors: Red, green, and blue serve as the foundational blocks of all perceivable colors.
- Secondary Colors: Derived from the primary shades, we have cyan, magenta, and yellow.
- Within the “Color Shift” tool, these colors come equipped with sliders, granting users the capability for precise adjustments. Want to amplify the deep blues of an evening sky or tone down the yellows for a dusk-like ambiance? These sliders become your key to such transformations.
- The Magic of Tetrahedral Logic:
- At first glance, “tetrahedral” might sound intimidating, but it’s simply a reference to a 3D color map.
- This logic ensures colors aren’t merely shifted on a linear scale. Instead, they undergo transformations in a three-dimensional space, which allows for a spectrum of rich and dynamic color variations.
- Imagine transitioning from a 2D sketch to a 3D sculpture. Every nuanced adjustment introduces depth, making scenes more immersive and vibrant.
- Elevating Visual Appeal:
- The fusion of the sliders with tetrahedral logic means we’re not just recoloring videos; we’re metamorphosing them.
- It’s about enhancing the visual narrative, creating scenes that resonate and captivate viewers.
- As I’ve experimented with these elements, even a slight tweak has often been the difference between a good shot and a cinematic masterpiece.
How to Import and Use This DCTL
Integrating my Color Shift DCTL into your DaVinci Resolve workflow might seem like a technical challenge, but with a clear understanding and a systematic approach, it becomes a breeze. Let’s dive deeper into the intricacies of this process:
- Before You Begin:
- Download and Extract: Ensure you’ve downloaded the Color Shift DCTL from the provided link.
- Importing the DCTL into DaVinci Resolve:
- Open DaVinci Resolve: Launch the software and either open an existing project or create a new one.
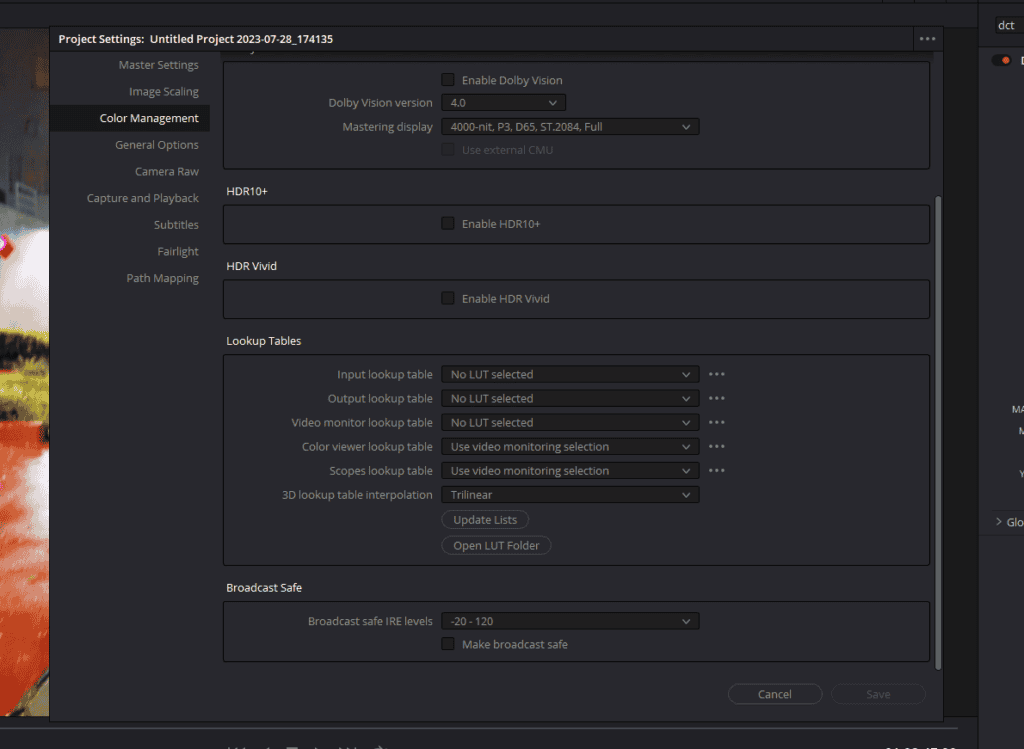
- Accessing Project Settings: In the lower right corner, you’ll find a gear icon. Click on it to open the ‘Project Settings’ menu.
- Dive into Color Management: Inside Project Settings, locate and click on the ‘Color Management’ tab on the left panel.
- Opening the LUT Folder: Scroll down to the ‘Lookup Tables’ section. Here, you’ll see an ‘Open LUT Folder’ button. Clicking this will direct you to the directory where DaVinci Resolve accesses its LUTs and DCTLs.
- Importing the DCTL: Copy the Color Shift .dctl file and paste it into the DCTL folder which is already there in the directory..
- Utilizing the DCTL in Your Projects:
- Access from LUTs Section: After successfully importing, restart Davinci Resolve and head over to the color page.
- Apply to Desired Node: In the node tree, select the node you wish to apply the DCTL to. Click on the ‘Effects’ button on the top-right corner and scroll till you find ‘DCTL’. Simply drag and drop the DCTL onto this node.
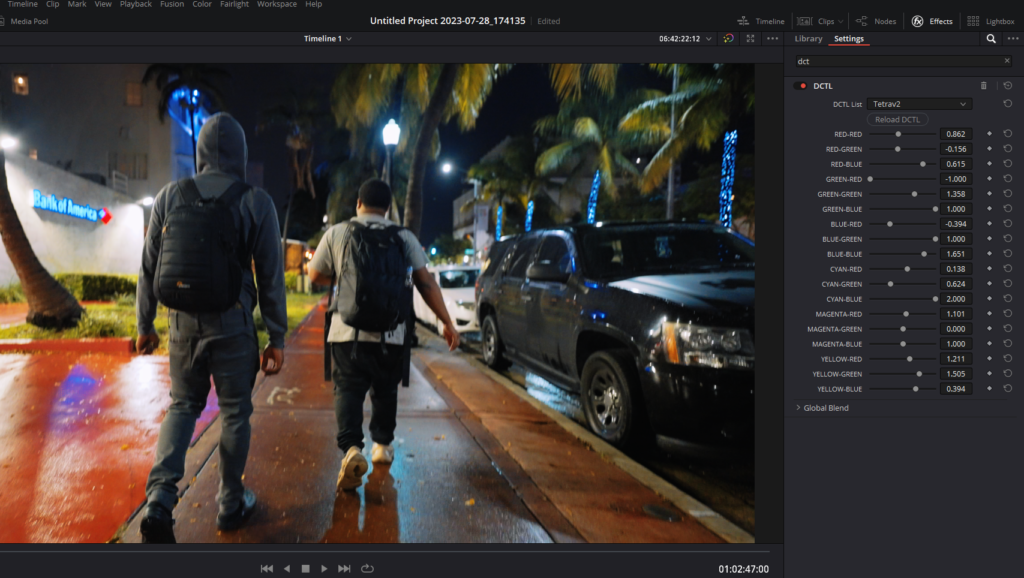
- Detailed Adjustments: Select the Color Shift DCTL from the drop-down list. The power of DCTL lies in its parameters. On the right panel, you’ll see various sliders corresponding to the DCTL parameters we’ve discussed below.
Download the Davinci Resolve Split Tone DCTL From Here
Implementing Color Shift DCTL in Your Projects
Attention, video aficionados! The moment of revelation is upon us. After discussing the wonders of the Color Shift DCTL, it’s time for you to harness its transformative power. Allow me to guide you on seamlessly integrating this tool into your DaVinci Resolve projects. By the end of our journey, expect your visuals to be imbued with that cinematic allure we all desire.
Step 1: Preparing the Groundwork
Kick things off by firing up DaVinci Resolve. Ensure that the video clip you wish to enhance is snugly fit into the timeline – this will serve as our artistic playground.
Step 2: Delving into DCTLs
Shift your attention to the Color page within DaVinci Resolve. Pick the node that’s slated for the Color Shift DCTL magic. Hover to the ‘Effects’ button situated at the top-right and skim through until ‘DCTL’ catches your eye. A swift drag and drop of the DCTL onto your chosen node, and you’re set.
Step 3: Unveiling the Magic
Peruse the drop-down menu, and there you’ll spot the Color Shift DCTL. With a click, you’ve summoned the effect. But hold on, the essence lies in the ensuing tweaks.
Step 4: Crafting Your Vision with Color Shift DCTL’s Tools
With the Color Shift DCTL now part of your video, the realm of customization unfolds:
- Color Sliders: These are the gateways to adjust primary and secondary colors. Slide them to introduce cooler or warmer tones, deepening the shadows or lifting the highlights.
- Tetrahedral Logic: This unique feature transforms colors in a three-dimensional manner. It isn’t just about linear adjustments; it’s about creating depth and dynamics in the color spectrum.
- Intensity and Balance: Tweak the intensity for pronounced color shifts or maintain subtlety. Balance ensures the shifts blend harmoniously within your video.
Dive deep, experiment, and familiarize yourself with each nuance. The beauty of this tool is the freedom it offers – there’s no prescribed formula, only your unique vision.
Step 5: Review and Refine
Give your creation a spin by hitting play. Mesmerized by the outcome? Fantastic! If you sense room for improvement, return to the toolset and tweak till your vision crystallizes on screen.
Practical Uses and Real-World Impact of Color Shift DCTL In Davinci Resolve
In the realm of video editing, tools like “Color Shift” aren’t just about adding a splash of color. They’re about breathing life into visuals, transforming mundane scenes into cinematic masterpieces. Let’s delve into the tangible impact and the myriad of scenarios where the “Color Shift” DCTL can truly shine.
- Reviving Old Footage:
- We’ve all stumbled upon old video clips that look washed out or have color imbalances. With “Color Shift,” these vintage memories can be rejuvenated, making them appear as vibrant as the day they were captured.
- Enhancing Natural Beauty:
- Imagine a serene sunset. Now, employ “Color Shift” to accentuate the oranges, purples, and pinks, making the horizon dance with color. Similarly, the cool blues of a winter morning can be amplified to encapsulate the chill in the air.
- Setting the Mood:
- From the eerie greens of a horror scene to the warm, golden hues of a romantic sequence, “Color Shift” can be the unsung hero in setting the emotional tone of a scene.
- Product Showcases and Advertisements:
- For those in the commercial sphere, ensuring product colors pop and captivate viewers is crucial. Whether it’s the lush red of a lipstick or the crisp white of a sneaker, “Color Shift” can make products stand out, ensuring they remain etched in viewers’ memories.
- Documentaries and Travel Vlogs:
- Capturing the essence of diverse landscapes, from dense forests to bustling urban centers, can be enhanced with subtle color shifts, making viewers feel as though they’re right there, experiencing the journey firsthand.
Now, while I’ve outlined a few scenarios, the true potential of “Color Shift” is boundless. I wholeheartedly encourage every reader to dive into their own projects, play around with the tool, and witness the transformation. Whether you’re a seasoned professional or just starting out, the magic lies in experimentation. So, roll up those sleeves, let your creativity run wild, and watch as “Color Shift” elevates your work to new cinematic heights.
- Also Read: Davinci Resolve Split Tone DCTL: Free Download
- Also Read: Davinci Resolve Color Density DCTL: Free Download
- Also Read: LUTs For RED KOMODO: Free Download