Hi, I’m Salik, the author of FilmmakingElements.com. I have been a filmmaker for over 10 years. I am also a certified DaVinci Resolve Trainer and I have used DaVinci Resolve for many of my projects. In this article, we will be covering the basics of DaVinci Resolve’s color management system. This tutorial is specifically designed for beginners who want to learn how to use Davinci Resolve’s color management effectively.
In any project, you may encounter footage from various sources, such as RED RAW, Blackmagic RAW, Canon. These files come with different camera profiles, which can make the color grading process challenging. One example is when a shot appears flat because it was captured in RED color space and needs to be adjusted for contrast and appearance.
By the end of this article, you will have a solid understanding of how to use DaVinci Resolve’s color management system. So let’s dive in and start mastering color management in DaVinci Resolve!
Exploring Non-Color Managed Grading in DaVinci Resolve
We’ll first take a look at the non-color managed way of color grading in DaVinci Resolve. This method, known as display-referred color grading, relies on your display to help you achieve the desired look for your footage. However, it may not be the most accurate way of grading, as we’ll demonstrate.
Follow these steps for non-color managed grading in DaVinci Resolve:

- Open project settings: In DaVinci Resolve, go to File > Project Settings or press Shift + 9 to open the project settings window.
- Select DaVinci YRGB: Under the “Color Management” tab, set the Color Science to “DaVinci YRGB.” This will be the non-color managed setting for the project.
- Set timeline color space: Choose the appropriate color space for your project. In this example, we will set the timeline color space to Rec709 Gamma 2.4, which is suitable for broadcast television.
- Save project settings: Click “Save” to apply the changes and close the project settings window.
To improve the appearance of your footage, you’ll need to manually adjust various settings, such as the offset, lift, gain, saturation, and contrast. After making these adjustments, your clip should look better and more suitable for a Rec 709 display.
While display-referred color grading can yield satisfactory results, it’s not the most accurate method. When a camera captures a scene, it uses a specific profile, which can be converted to Rec 709 Gamma 2.4 without having to guess where the controls should be set. This is where color management in DaVinci Resolve comes into play, providing a more precise way of grading your footage.
Embracing a Color Managed Workflow in DaVinci Resolve
The advantage of using color management is that it takes into account the unique color profiles and manufacturer-specific science behind different camera formats, such as Sony, RED, and Blackmagic. This ensures a consistent and accurate starting point for your grading process across various sources.
Step-by-Step Guide to Using Color Management in DaVinci Resolve
- Reset previous adjustments: If you’ve made any adjustments to your footage, reset them to return to the ungraded image.
- Open project settings: Click on the gear icon in the lower right corner to access the project settings.
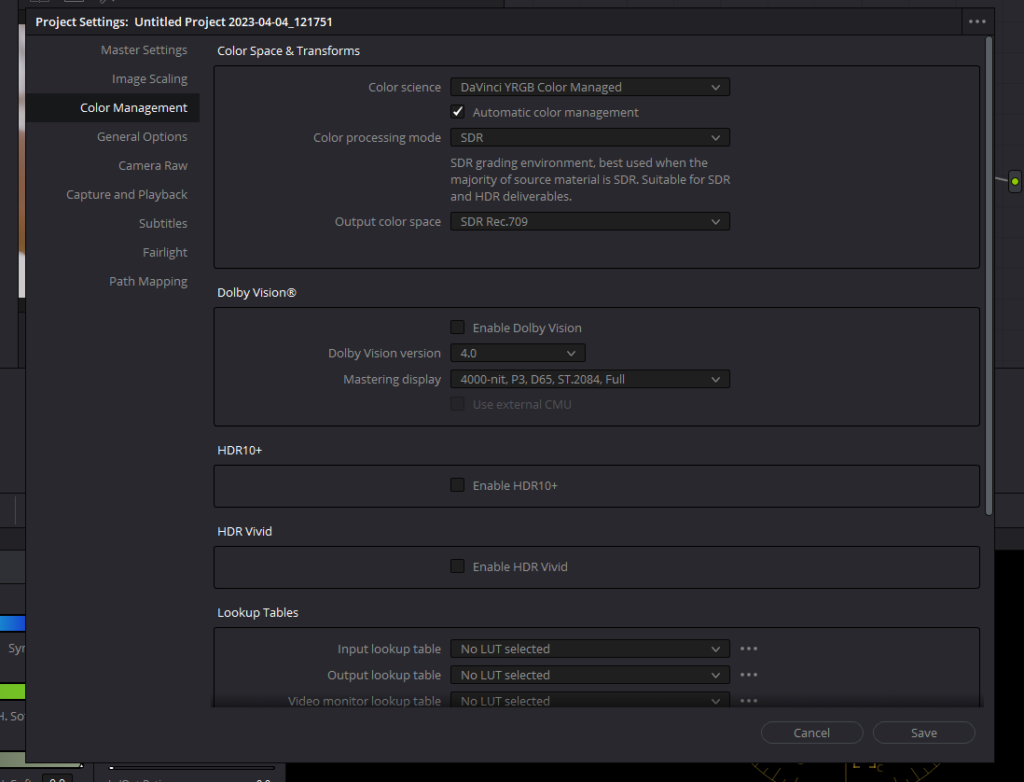
- Change color science: In the project settings, navigate to the “Color Management” tab. Change the color science from DaVinci YRGB to DaVinci YRGB color managed.
- Choose processing and output settings: In the “Color Management” tab, set the “Color Processing Mode” to “SDR (Standard Dynamic Range)”. For “Output Color Space”, choose “SDR Rec 709”.
- Save settings: Click “Save” to apply the color managed settings to your project. Your footage should now automatically adjust to the correct settings for a Rec 709 Gamma 2.4 display.
- Evaluate and balance footage: Examine your footage and ensure that it’s properly balanced for Rec 709. If necessary, make small adjustments to achieve a consistent look across different camera formats.
- Add nodes for further adjustments: With your footage now properly balanced, you can add nodes to fine-tune your grade. Nodes allow you to organize your color grading adjustments in a non-destructive manner.
- Adjust color, contrast, and saturation: Within the nodes, make any necessary adjustments to color temperature, contrast, and saturation to achieve the desired look for your project.
- Apply secondary corrections: Use additional nodes to apply secondary corrections, such as vignettes, power windows, or masks, to further enhance your footage.
- Monitor your scopes: Keep an eye on your waveform, parade, and vectorscope to ensure your adjustments stay within the acceptable limits for your chosen color space.
- Finalize your grade: Once you’re satisfied with the overall look of your footage, finalize your grade by saving your project and exporting your footage with the applied Simplifying Color Management for Large Projects in DaVinci Resolve color grading adjustments.
Simplifying Color Management for Large Projects in DaVinci Resolve
Managing color for large projects with hundreds of shots can be a daunting task. In this section, we’ll discuss how DaVinci Resolve’s color management system can simplify this process and ensure consistent grading across all your footage, regardless of the camera format.
Detailed Steps for Simplifying Color Management in DaVinci Resolve
- Use a color managed workflow: Ensure that your project is set to use DaVinci YRGB color managed in the project settings.
- Automatic recognition for RAW footage: DaVinci Resolve will automatically recognize and adjust footage shot in RAW formats, such as RED RAW, ARRI RAW Blackmagic RAW, using the camera metadata to apply the correct input color space.
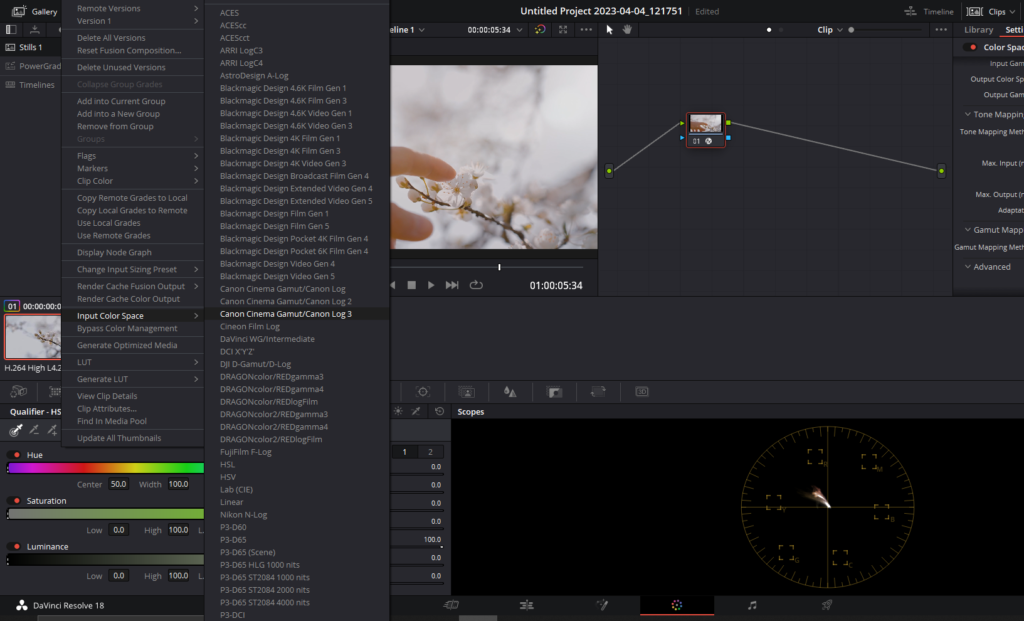
- Manually assign input color space for non-RAW formats: For formats without camera metadata, you will need to manually assign the correct input color space.
- Right-click on the clip in the thumbnail viewer in the color page.
- Choose “Input Color Space” from the context menu.
- Select the appropriate color space based on your knowledge of the clip’s origin.
- Select multiple clips and assign input color space: In larger projects with numerous clips, you can select multiple clips at once and assign the correct input color space to all selected clips.
- Hold down the ‘Ctrl’ key (or ‘Cmd’ key on a Mac) and click on each clip you want to select in the timeline.
- Right-click on any of the selected clips.
- Choose “Input Color Space” from the context menu.
- Select the appropriate color space for all selected clips.
Simplifying Input and Output Transformations in DaVinci Resolve
DaVinci Resolve’s color management system can be a lifesaver for beginners, as it automatically handles Input Device Transform (IDT) and Output Display Transform (ODT) adjustments for you. By simply setting the processing mode to Standard Dynamic Range (SDR) and the output color space to Rec 709, Resolve will manage everything behind the scenes, ensuring your footage looks its best.
In this simplified SDR grading environment, you can easily switch between SDR and HDR deliverables without having to regrade everything. You just need to transform the output color space, making the process efficient and hassle-free. When automatic color management is on, DaVinci Resolve will present you with fewer options, doing the hard work for you and streamlining the grading process.
It’s essential to understand that color processing and color science are done before making any adjustments in the color page. The display output is set after you’ve completed your work, ensuring that you’re always working in the largest color space possible, which is the best practice for maintaining high-quality results.
By leveraging DaVinci Resolve’s color management system, you can efficiently grade your projects without worrying about complex color space adjustments, ultimately saving time and creating a polished final product.
Node Level Color Managment in DaVinci Resolve
Instead of relying solely on DaVinci Resolve’s automatic color management, you can also perform Node Level Color Managment in DaVinci Resolve. This approach gives you more control over where the transformations occur in the processing pipeline. Here’s how you can utilize the node-based color space transform:
Detailed Steps for Node-Based Color Management in DaVinci Resolve
- Create multiple nodes: In the Color page, create several nodes in the node tree for your clip by right-clicking on a node and selecting Add Node> Add Serial. The number of nodes depends on the complexity of your grade and the number of adjustments you plan to make.
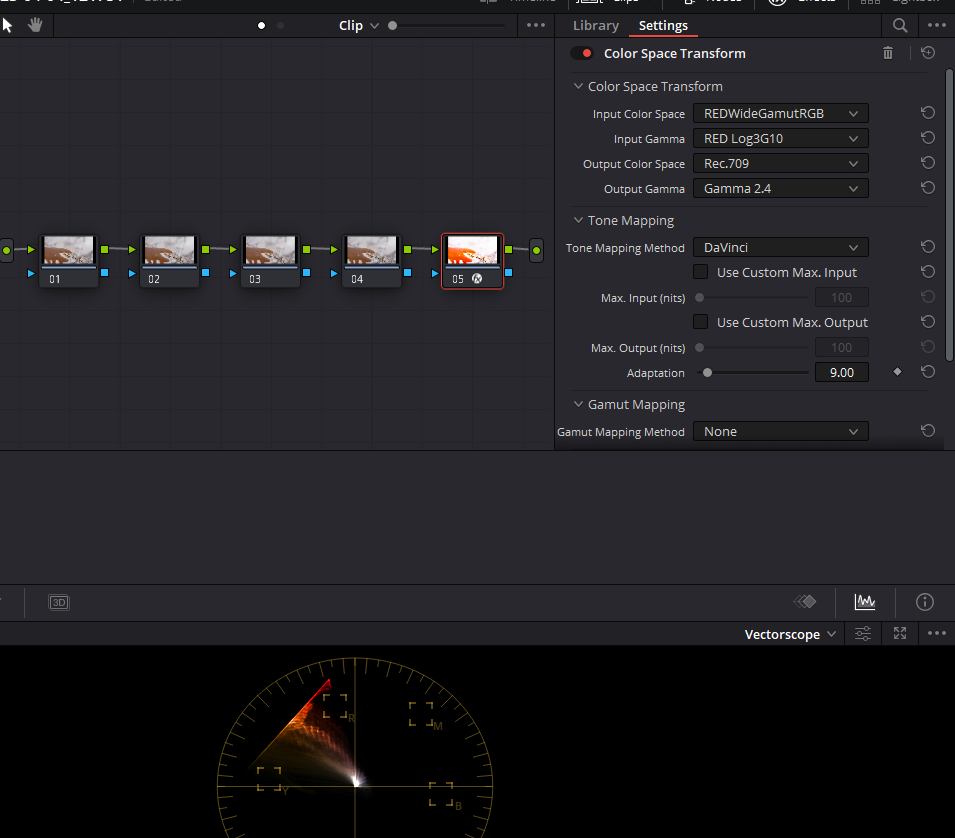
- Apply Color Space Transform: Navigate to the Effects Library in the top right corner, and search for “Color Space Transform.” Drag and drop the effect onto the last node in your node tree. This node will handle the color space conversion for your footage.
- Set the input color space and gamma: In the Color Space Transform settings, select the appropriate input color space and gamma for your footage. This information should match the color space and gamma used when the footage was recorded. For example, if your footage was shot on a RED camera, you might choose “REDWideGamutRGB” as your input color space and “Log3G10” as your input gamma.
- Set the output color space and gamma: Choose the output color space and gamma that matches your desired output format. For example, if you’re working on a project for broadcast television, you might select “Rec. 709” as your output color space and “Gamma 2.4” as your output gamma.
- Configure tone mapping: In the Color Space Transform settings, ensure the tone mapping option is set to “DaVinci.” This setting allows DaVinci Resolve to automatically map the colors from the wide input color space to the narrower output color space, preventing any clipping or hard transitions between colors.
- Perform your grade: With the Color Space Transform node in place, perform your grading on the nodes before the color space transform node in the node tree. This ensures that your color adjustments are made in the correct color space and that the final output will be accurate.
- Place the Color Space Transform node at the end: It is crucial to place the Color Space Transform node at the end of your node tree. This ensures that the color space conversion happens after any of your grading adjustments.
Last Words
Thank you for reading our article on Color Management in DaVinci Resolve. We hope that this guide has provided you with a solid understanding of the importance of color management and how to effectively use it in your projects. By leveraging DaVinci Resolve’s powerful color management tools, you can achieve consistent and accurate color grading, regardless of the various camera profiles you encounter. Keep experimenting and refining your skills, and you’ll be on your way to creating visually stunning content in no time. Happy color grading!