
Welcome back to Filmmaking Elements, where we discuss all things related to the world of filmmaking. Today, we want to address a common question that we often see online – How To Calibrate LG C2/G2 For Color Grading? and do you really need to spend $40,000 on a Sony BVM monitor to colour-grade your work? The answer is no, you don’t. While the Sony BVM Series X300, 310, and 311 are excellent reference displays in high-end production studios, they are not the only options available. There are many more affordable options on the market that still provide high-quality results.
While there may be some trade-offs depending on the monitor you choose, we’ve found that LG OLED panels are a great option for client monitors in our studios. These monitors are available in larger sizes, easy to see, and simple to calibrate to match our reference panels. They also perform well in both HDR and SDR. Additionally, Technicolor has worked closely with LG to support the development of these displays and incorporate useful features like inbuilt pattern generators and CalMAN compatibility.
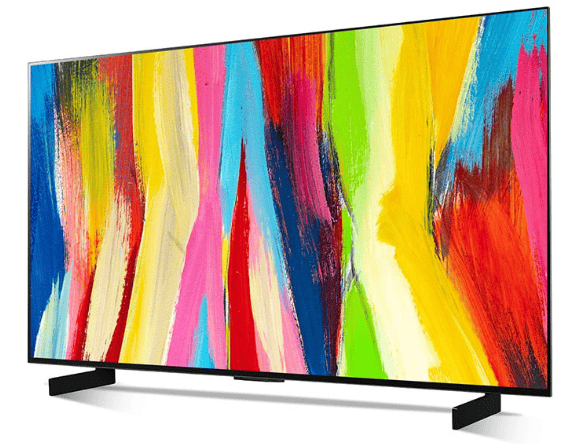
In this blog post, we will be discussing the configuration of the 42-inch LG OLED C2/G2 display. It is an excellent option for a reference monitor in some of our suites. And how to calibrate LG C2/G2 for color grading? We also use the 65-inch LG OLED C2/G2 display as our client monitor, which is located above us to provide a balanced viewing experience for our clients.
The LG OLED C2/G2 42-inch consumer display is the focus of this post. This monitor is often available for around $1,000, which is an excellent price for a monitor of this quality. Although it is the smallest in the C2 series, the 42-inch size is ideal for a reference grading display. It can be placed on a desk, allowing you to sit close to it without straining your eyes.
If you’re considering the LG OLED C2/G2 display for color grading, it’s worth noting that it has all the features of the larger C2/G2 panels and offers the highest brightness-to-panel size ratio. However, there are a few disadvantages to the C2/G2 series when compared to the LG C1 series. For example, if you’re using CalMan for calibration, the C1 series and some of the earlier A series panels support their onboard pattern generators.
Unfortunately, at the time of this article, the C2/G2 series onboard pattern generator is not functional or compatible with CalMan. However, according to recent updates, this capability will be added to the C2/G2 series in the near future. This means that you may not need to invest in an external pattern generator, which can be more expensive, once the update is released.
Hardware and Software Required to Calibrate LG C2/G2 For Color Grading
If you’re wondering what hardware you’ll need to Calibrate LG C2/G2 for colour grading. Here’s what I use in my own setup.
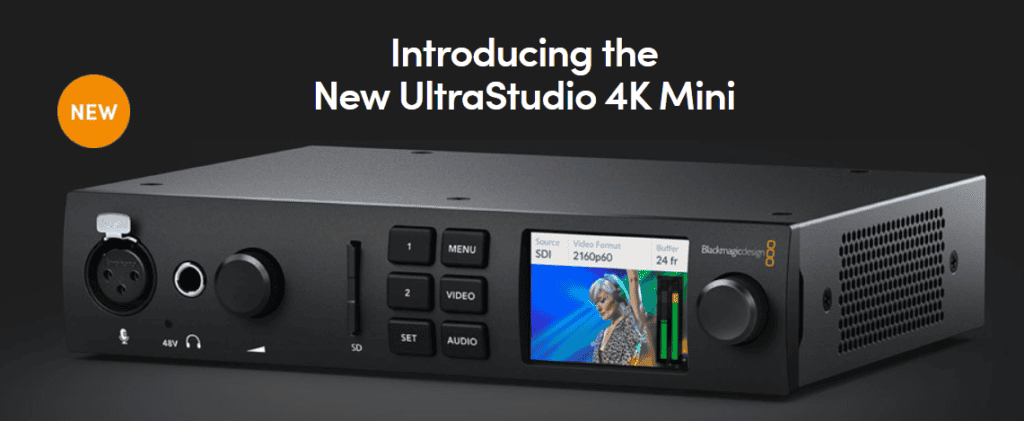
- To start with, I use a Blackmagic Design UltraStudio 4K Mini. With this setup, I’m able to import and export 4K content through HDMI and SDI, as well as a monitor in both HDR and SDR. It costs around $1,000 for the unit and connects using Thunderbolt.
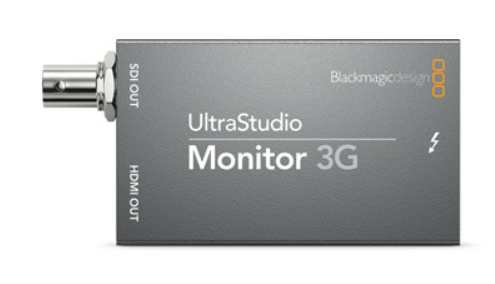
- However, if you’re looking for a more budget-friendly option, the UltraStudio Monitor 3G is a great choice at around $125. It offers HDMI and SDI out, Thunderbolt in, HDR and SDR, and 1080p.
- For pattern generation, we use a Raspberry Pi, which is an affordable and reliable option for generating test patterns.
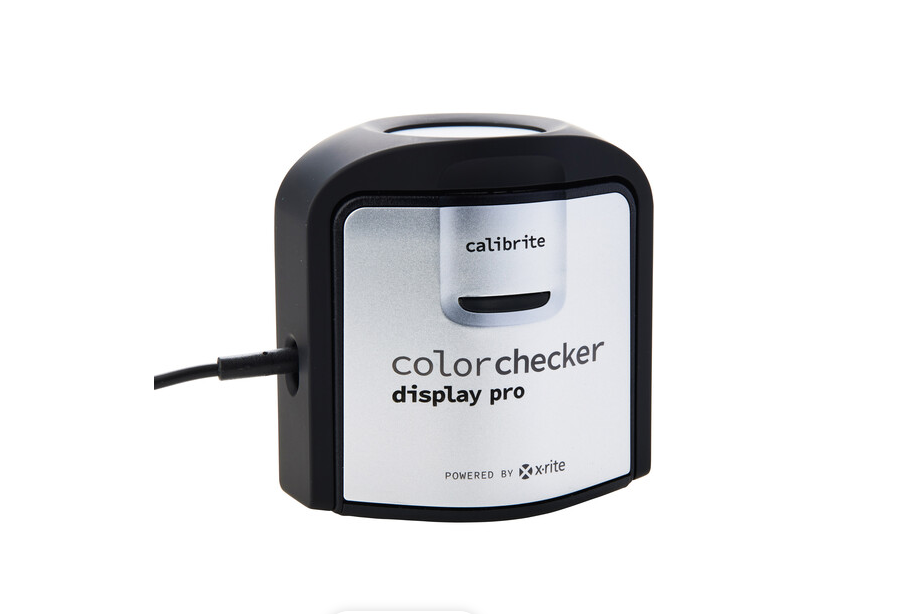
- Again, these are available for about $150. And for our colorimeter, we’re utilizing the Calibrite ColorChecker Display Pro, which has since replaced the X-Rite i1 Display Pro.
- Make sure you’re using top-notch 8K Ultra HDMI cables, which is the crucial step. In this manner, you can broadcast a strong 4:4:4 signal without any problems. Hence, setting them up and installing them would come first. After that, you may use their outputs to connect to your monitor.
- We won’t plug into Resolve to perform the calibration. To calibrate the LG OLED C2/G2 reference monitor, we’ll be using CalMan software with our pattern generator.
- Unfortunately, CalMan is not compatible with Macs, so if you’re using a Mac, you’ll need to install Windows through boot camp before using the software.
The Tools and applications, if needed, will be mentioned along with the steps to calibrate LG C2/G2 for color grading.
Steps To Calibrate LG C2/G2 For Color Grading
In order to calibrate LG C2/G2 for color grading, we need to follow the below-discussed steps.
First, we’ll connect our Raspberry Pi pattern generator to the monitor. Then, we’ll use CalMan on a Windows computer to perform the calibration. It’s important to note that CalMan is a crucial tool for professional color grading, and it allows us to achieve accurate colors on our reference display.
1. Connect the Raspberry Pi Pattern Generator to the Monitor
It is the first step to calibrate LG C2/G2 for color grading. To connect the Raspberry Pi to the TV, it needs to be powered up using USB-C or USB micro power port. Once it is powered on, the HDMI connection can be made. For those interested in installing and configuring the Raspberry Pi device and Pi generator, a link to the instructions can be found HERE.

- To connect to a Raspberry Pi, you can use an application called device control. The installation process is covered in detail on the fantastic webpage on the AVS forum. Once you have connected to your Raspberry Pi, you can begin the calibration process using the CalMan software.
- After launching the device control application, we can connect to the Raspberry Pi by entering a web address as discussed in the guide on how to access the Raspberry Pi generator in the link given above.
With the Raspberry Pi generator now acting as our pattern generator for CalMan, we can produce patches or colors needed to calibrate the screen.
2. Place the Calibrator Over the LG C2/G2 TV
It is one of the important steps to calibrate LG C2/G2 for color grading.
- To begin the calibration process, we will use a calibrator and place it over the monitor ensuring that it is pushed against the screen and perfectly centered.
- Make sure that the calibrator isn’t tilting sideways.
- We must avoid any leaks that might cause light to enter and result in incorrect readings.
CalMan will recognize the web address and interface with the Raspberry Pi generator’s operating shell script to calibrate the screen.
3. Lauch CalMan Home For LG
You will also need an application called Calman Home For LG which can be purchased for $150. This software provides all the necessary calibration capabilities for LG TV, making it an affordable and practical choice. However, if you need to calibrate displays from other manufacturers or your computer monitor, you can opt for the full CalMan suite, which costs around $2,000.
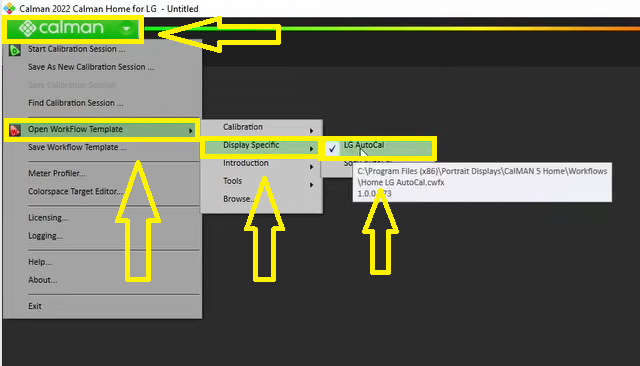
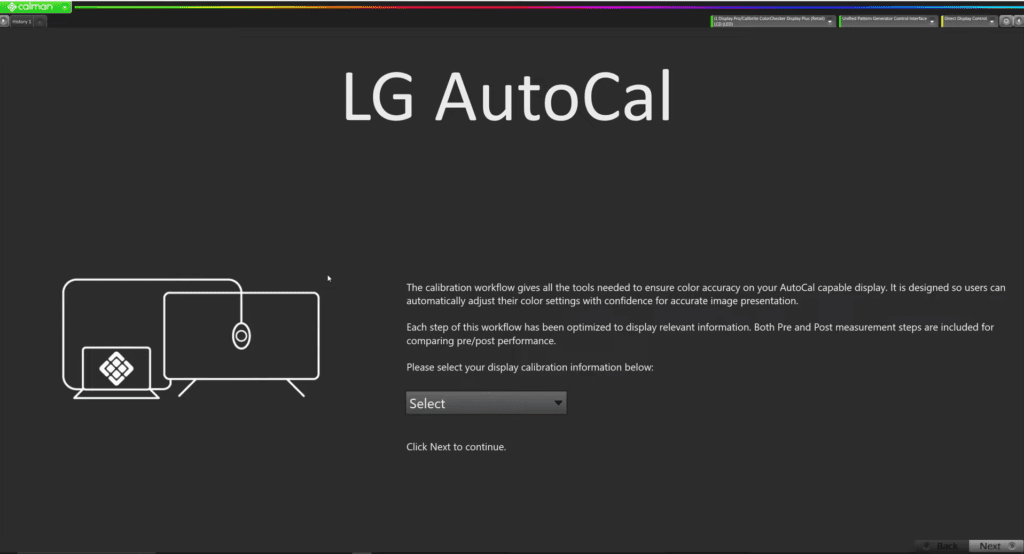
We’ll be using the LG AutoCal or AutoCalibration tool within the CalMan home application, and we’ll open a workflow template specific to LG AutoCal.
Next, use the LG AutoCal software.
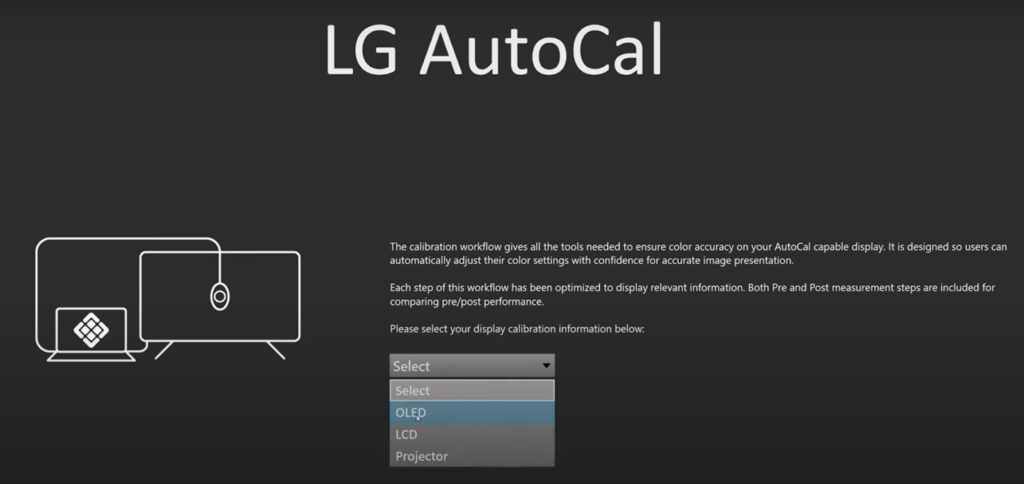
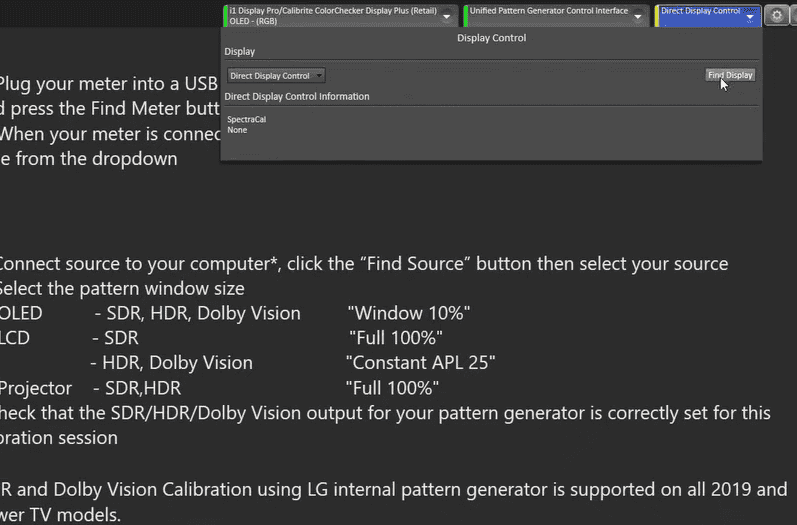
- First, we need to select the OLED setting as we will be calibrating an LG OLED display (refer picture above). With the LG AutoCal software, we can calibrate several new LG LCD displays, including the Nanos and QLEDs. However, for a reference broadcast monitor, we strongly recommend using the LG OLEDs.
- For this demonstration, we will set up and calibrate for SDR mode rather than HDR. The calibration procedures for both modes are very similar.
After that click on the ‘Next’ option given at the bottom right corner to move on to the next step of calibrating LG C2/G2 For Color Grading.
4. Setup the Calibration Session
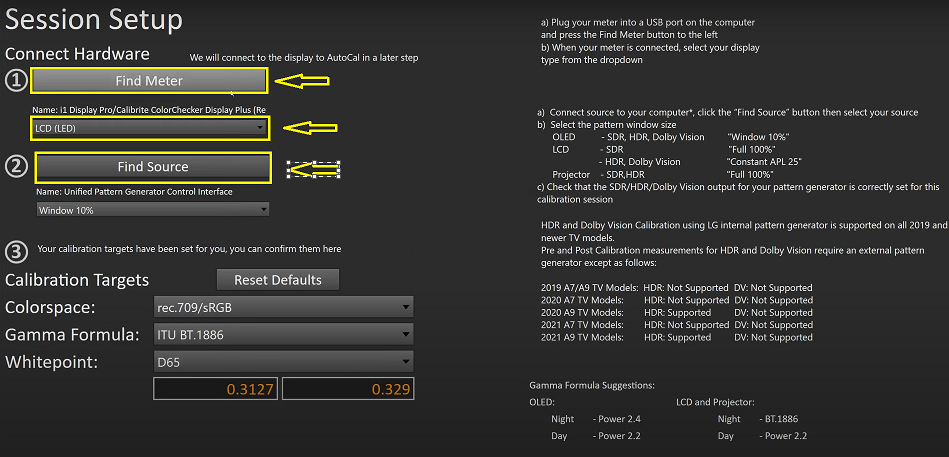
Now, in this step, we need to locate our meter and pattern generator.
- We will select the location meter and then configure it for an OLED WRGB, which is set to LCD (LED) by default.
- Once the meter has been located, we will identify it as our meter as X-rite Pro Display, in our case.
- Finally, we will locate our pattern generator by clicking on ‘Find Source’ and proceed with the calibration process.
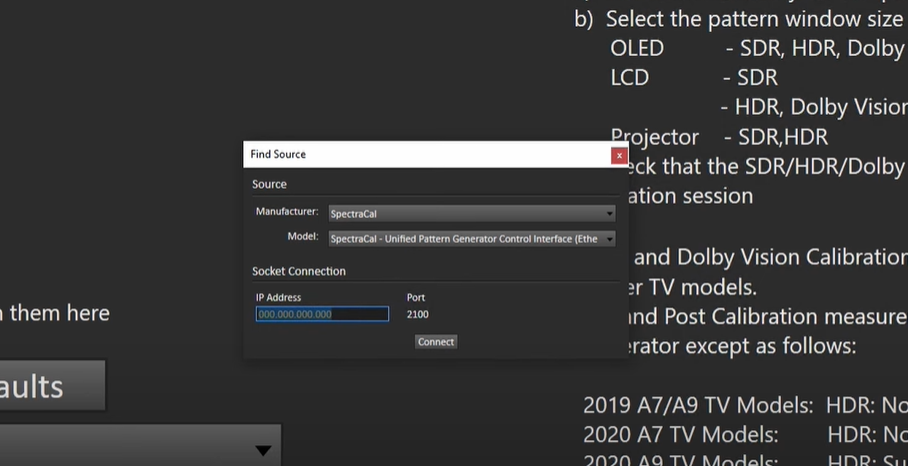
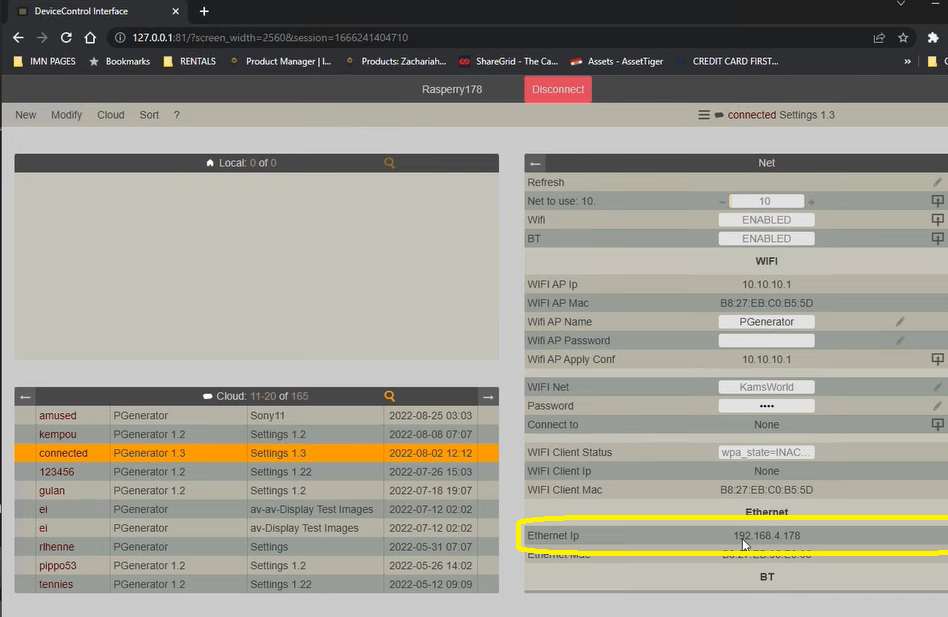
In order to connect to the Raspberry Pi, we need to select the SpectraCal option and enter the Raspberry Pi’s IP address. In this case, the IP address is 192.168.4.178. It can be found by going back to Device Control Interface as shown in the photo below.
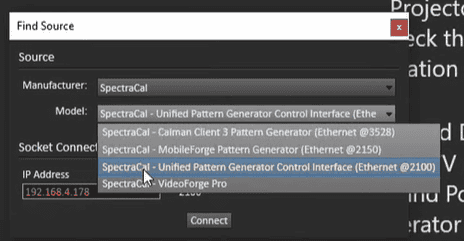
Once we’ve entered the IP address, we’ll choose the SpectraCal unified pattern generator control interface (refer photo below) and click connect.
This will allow us to access the Raspberry Pi’s web window and control the pattern generator. It’s important to keep all the options at their default values and not change any settings at this time. We’ll also need to locate our display and follow the subsequent instructions.
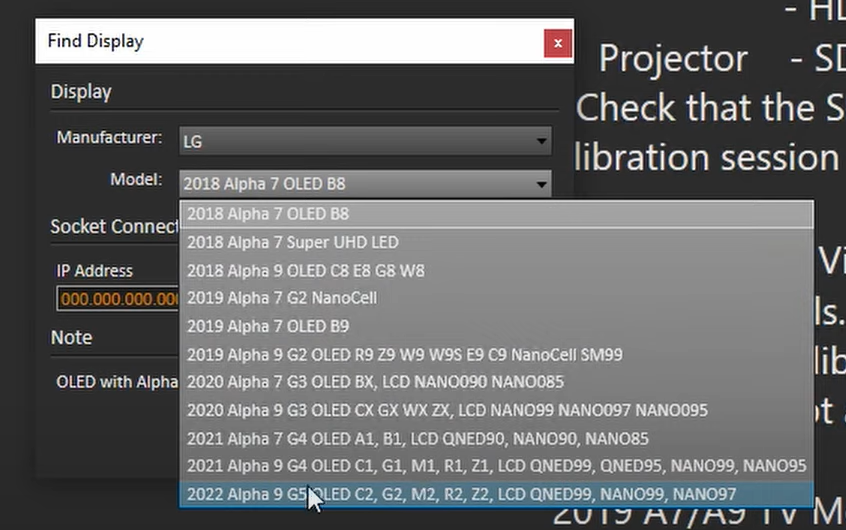
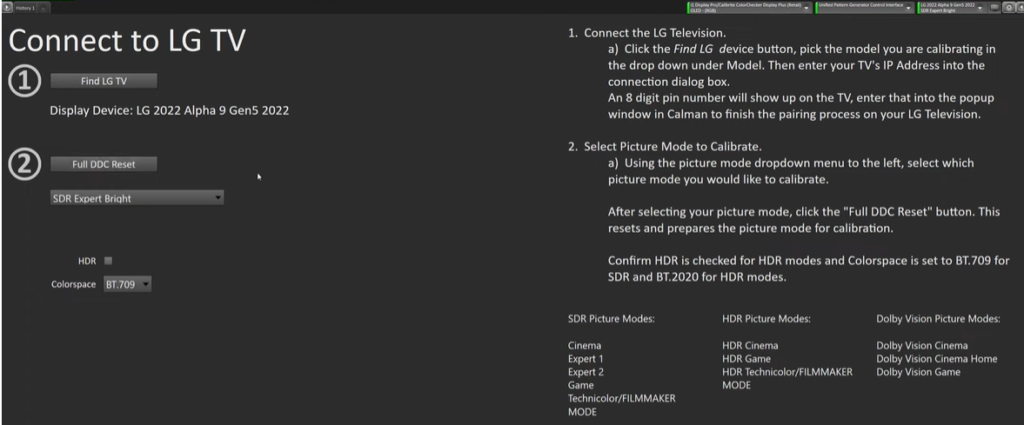
5. Connect to The Display
Now we will confirm whether the display is connected before proceeding.
- To do this, we will select “Find display” and choose LG OLED.
- Then we’ll select C2/G2 as the model (refer photo below). It’s essential to choose the correct model for your display type, whether it’s C1, A1, B9, or an older model.
Next, we’ll check the IP address of our LG TV.
- We’ll click on settings, switch to the all settings mode.
- Select the network under general settings.
- In our case, a Wi-Fi connection has already been established, and we’ll check our IP address by selecting advanced network options under other network settings.
- Please note that your IP address and settings may vary depending on your network configuration and how you linked your display to the internet.
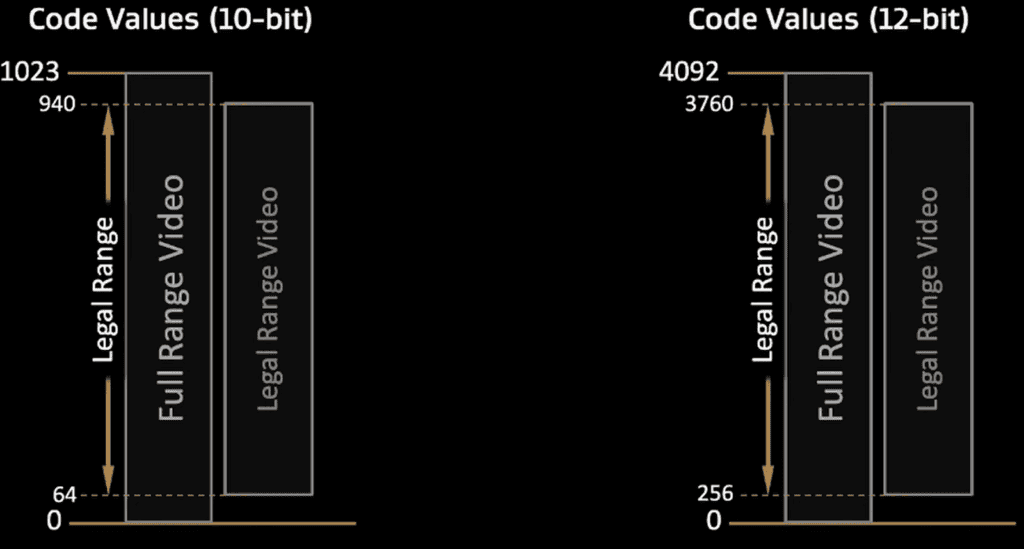
In this step, it is recommended to use a wireless connection as it should easily find an IP address and connect to your network. Once connected, it will search for the display and activate the TV’s calibration mode, displaying a menu with the option to start calibration. It’s important to consider the data range now that the monitor is configured.
The data range refers to the code values associated with black and white, which is often limited or broadcasted with black at 16 and white at 235. However, the calibration used in this process is called limited, which has 16 black and 255 white pixels in 8-bit values.
Also, Read- Video Vs Full Data Levels In Davinci Resolve
6. Make Sure All Devices are at the Same Settings
It is very important step to calibrate LG C2/G2 for color grading. When calibrating a display, it’s important to ensure that all devices in the chain are set to the same settings. If the Raspberry Pi pattern generator is sending limited signal, then CalMAN and the monitor also need to be set to the same numbers.
- To do this, we can go to the settings page on the TV. And choose the ‘All Settings’ option using the remote control.
- Go to the Advanced Settings Option.
- Select the video range setting, which can be found under the Brightness option.
- The options are Auto, Limited, and Full, with Limited being the recommended setting for calibration. It’s important to note that displays are often set to Limited by default in most of the cases.
- If your DaVinci Resolve system is going to be set to Full Range after calibration, you can switch it back to Full. But switching after calibration may cause inconsistencies.
- For this particular calibration, the Expert Bright mode will be used with default values of 16 to 255 and 33-point calibration. It’s worth noting that when the internal pattern generator from LG becomes available again. Full Range calibration will be possible with some pattern generators.

In order to achieve the best calibration results, it’s important to adjust the calibrations for each mode individually. The SDR Cinema and SDR Expert Bright modes are both options. For this demonstration, a new calibration will be added to the Expert Bright setting since there’s already one in Cinema.
7. Set Calibration Targets
The calibrating targets are then examined. Generally, it’s recommended to calibrate to a Rec 709 color space for non-HDR deliverables.
For feature films displayed in theatres, it’s best to calibrate to P3 or DCI P3. It shifts the white point to 6000 Kelvin instead of 6500 Kelvin and allows working in a wider P3 color space. It’s also standard practice to calibrate to P3 for HDR deliverables. However, for the purposes of this demonstration, a Rec 709 delivery will be used. The reason is that most readers will be working towards that.
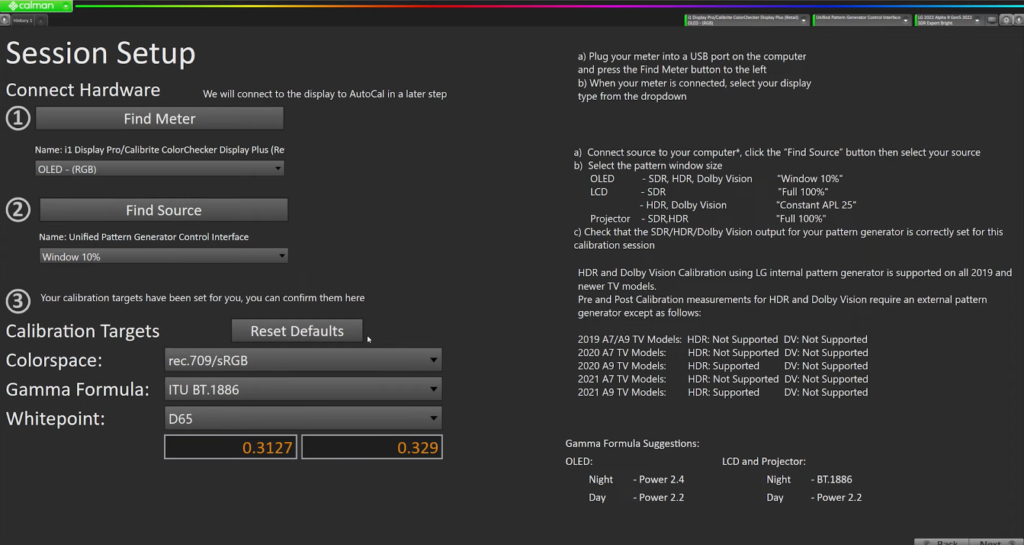
In the world of calibration, gamma settings are crucial. The default gamma setting in many devices is ITU BT.1886. It was chosen to help make up for LCD displays’ poor black reproduction. This gamma is intended to restore some of the contrast that is lost when using backlit LCDs. Providing a little more contrast in extremely deep blacks for displays with few backlight zones or edge-lit illumination.
However, OLED panels require calibration to what is called a full power gamma, which provides annotations for CalMan. There are a few gamma value options available, with gamma 2.4 being the industry standard for a long time. Most displays, including those on Apple devices and even OLED panels, are set to gamma 2.2 by default. Gamma 2.2 is a good option, providing accurate results when examining anything on an iPad or MacBook screen.
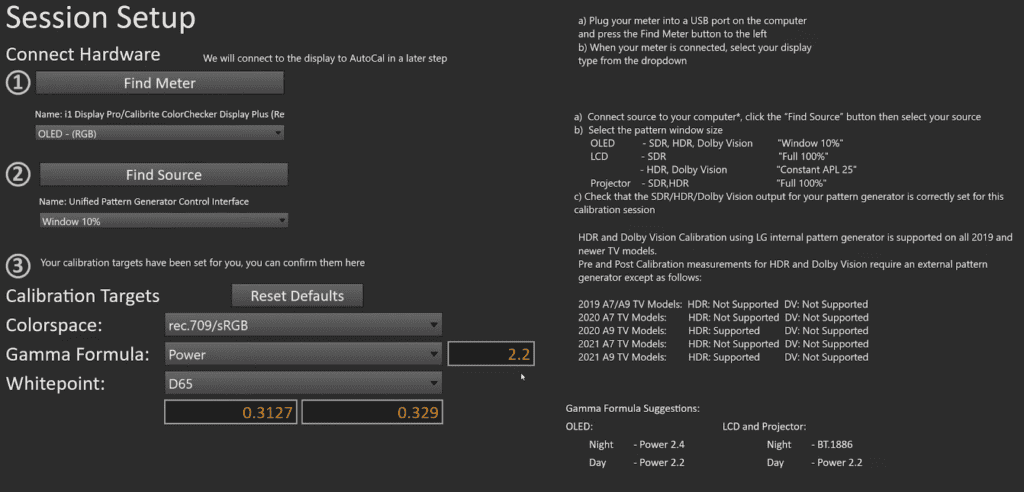
We’ll leave this at gamma 2.2 and D65 for the white point. So, we’ve set our color temperature to 6500 Kelvin. The D65 or 6500 Kelvin coordinates on a CIE can be seen in the above picture. Now, click on the ‘Next’ button.
8. Pre-calibration Measurements to Calibrate LG C2/G2 For Color Grading
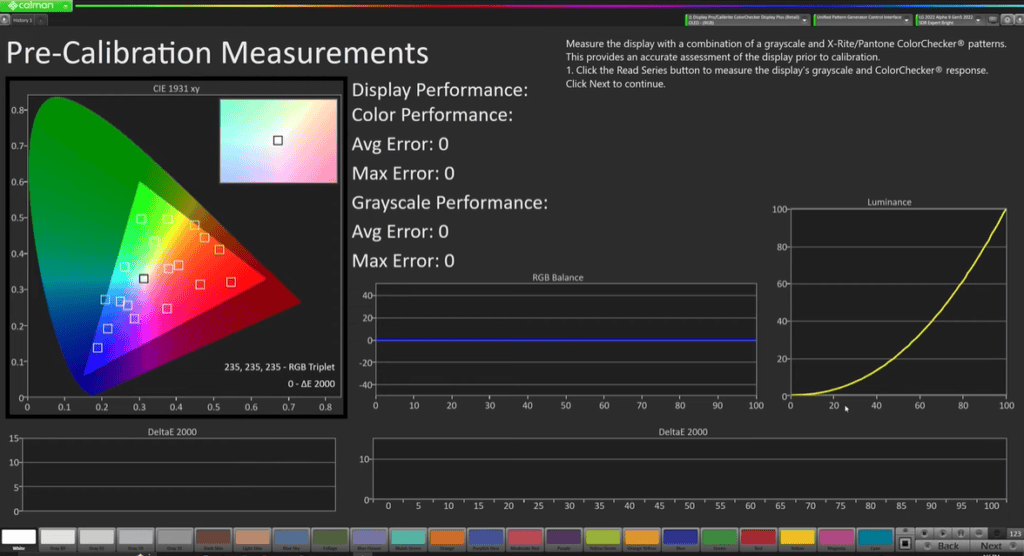
- Now, we’re going to take some pre-calibration measurements to see where the screen is at and make some adjustments.
- Then we’ll measure again to see if the changes we made have improved the screen.
- Adjusting the room is an essential step in this process. It’s important to do this in a dark room with the lights turned down. Because any reflected light off the screen can come back into our sensor and give us bad readings.
- We should close the curtains to make the room as dark as possible. Once we have a dark room, we can follow the instructions on the screen and click the read series button.
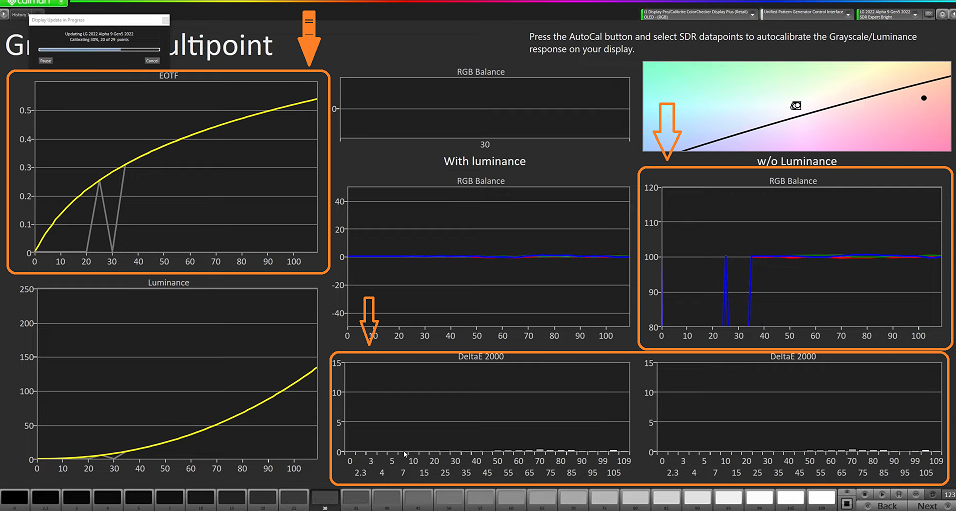
The screen will start cycling through color patches to get the necessary calibrations. As each patch is shown, we observe the results on the screen. The goal is to have the RGB Balance line, which represents gamma as straight as possible across the color spectrum, with a blue line. We don’t want to see any color separation.
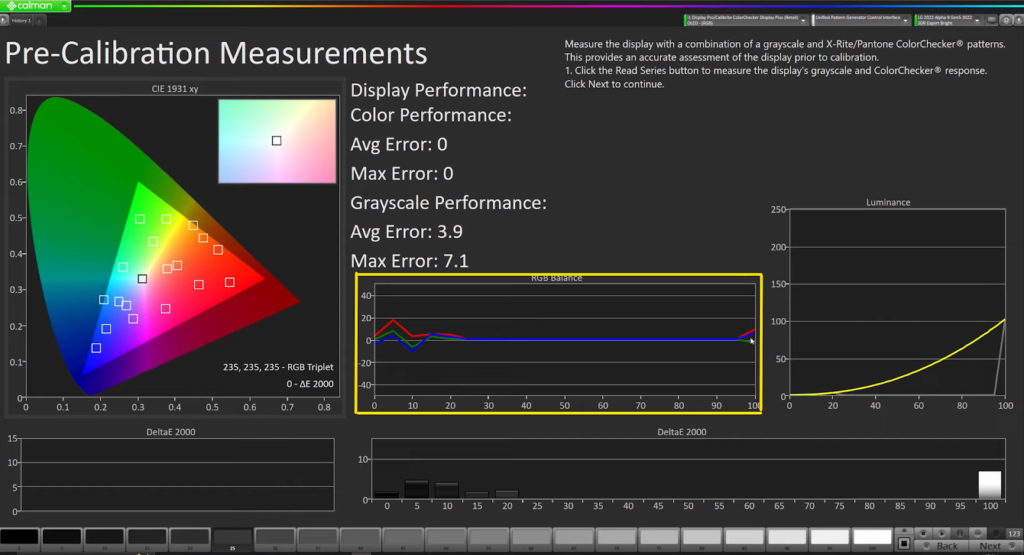
Currently, the screen needs to be calibrated in its current mode because it’s showing unequal values from shadow to highlight. On the right side of the screen, we can see the luminance curve. At the moment, it seems like we’re tracking well on a gamma 2.2.
Additionally, the delta, which is shown at the bottom represents the difference from the target. We want to have a low average and low maximum error in the delta values. This step is crucial for achieving accurate calibration results.
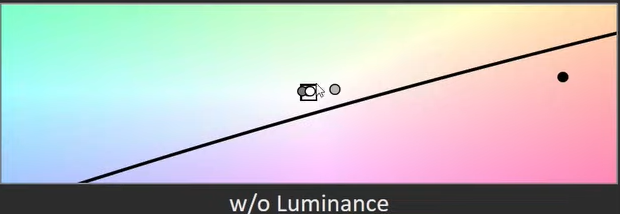
Now, after adjusting the white balance and gamma, the calibrator will start sending out color patches to analyze how the white balance expands throughout the entire spectrum. On the screen, the CIE curve shows white boxes that represent the color patches being sent and dots that represent where they’re being read. The difference between the patch and the reading is reflected in the delta or the offset value, which is shown in the average error or maximum error.
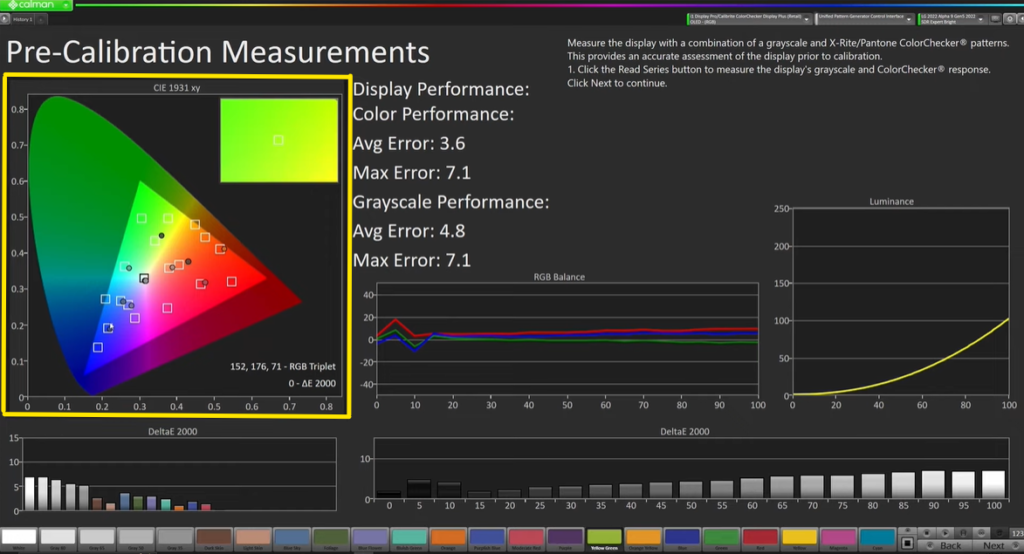
In this case, although the white point values and color temperature are mostly within the box, there are some skews in the mid-green and mid-red orange, with the greens being far out of the box with a high delta. While the blues are looking good, the reds and oranges are skewed, indicating a need for further calibration in these areas. You can see that in the Delta curve at the bottom.
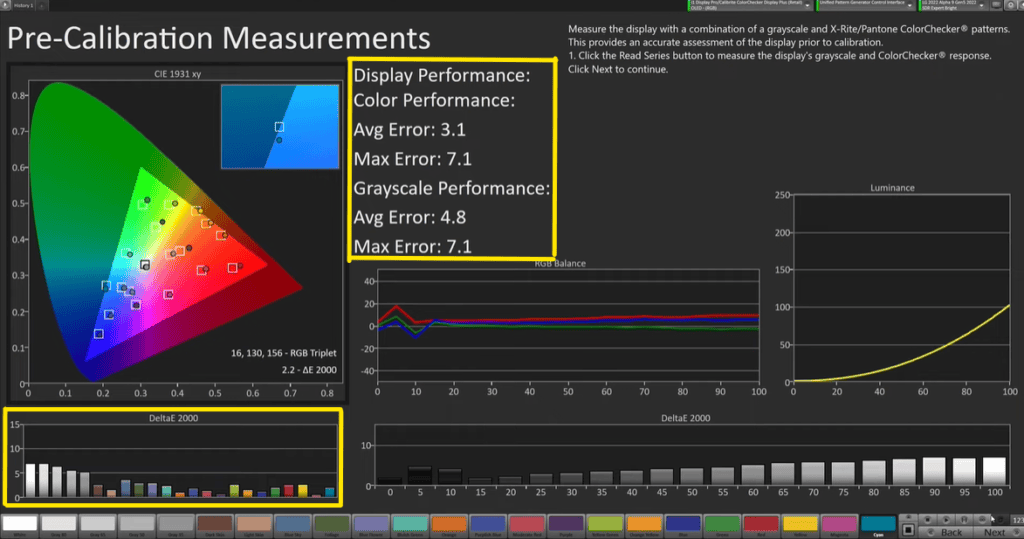
We can see that several of our delta numbers are approaching five and that both our maximum and average error readings are significant. So, we are aware that we must calibrate this screen. Our RGB balance reveals it to us, our points are not landing in all of the boxes, as is evident. But we are aware that our gamma tracking is fairly accurate. So, let’s go on to the next screen.
9. Do a Full DDC Reset
In the next step of the calibration process, the user is prompted to perform a full DDC reset. This step involves resetting any user input settings or color calibrations to the default settings for the current SDR Expert bright mode.
By doing this, any settings that could potentially cause problems with the display are wiped out. It allows the system to build upon a clean slate. It is important to note that this step can greatly affect the overall quality of the calibration. After this, we need to verify the settings on the LG C2/G2 TV.
- To do this, we’ll pick up our remote and navigate to the settings.
- Once there, we’ll go to all settings, then to picture, and finally to advanced settings.
- Under brightness, we’ll verify that the auto dynamic contrast and peak brightness are turned off.
- We also need to make sure that our video range is set to limited, which we discussed earlier.
- Next, we’ll turn off motion eye care.
- Moving on to the colour settings, we don’t need to make any changes there.
- Then, we’ll go to clarity and make sure that super-resolution, noise reduction, MPEG noise reduction, smooth gradation, real cinema, and true motion are all turned off.
After verifying all these settings, we can exit the settings and head back to the calibration by clicking on the ‘Next’ option.
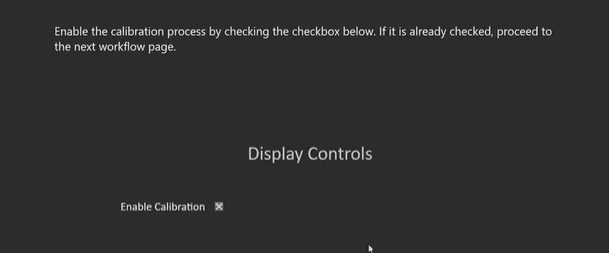
10. Enable the Calibration
We’ll then make sure that the calibration is enabled by checking the checkbox for it as shown in the picture below. And move to the next step.
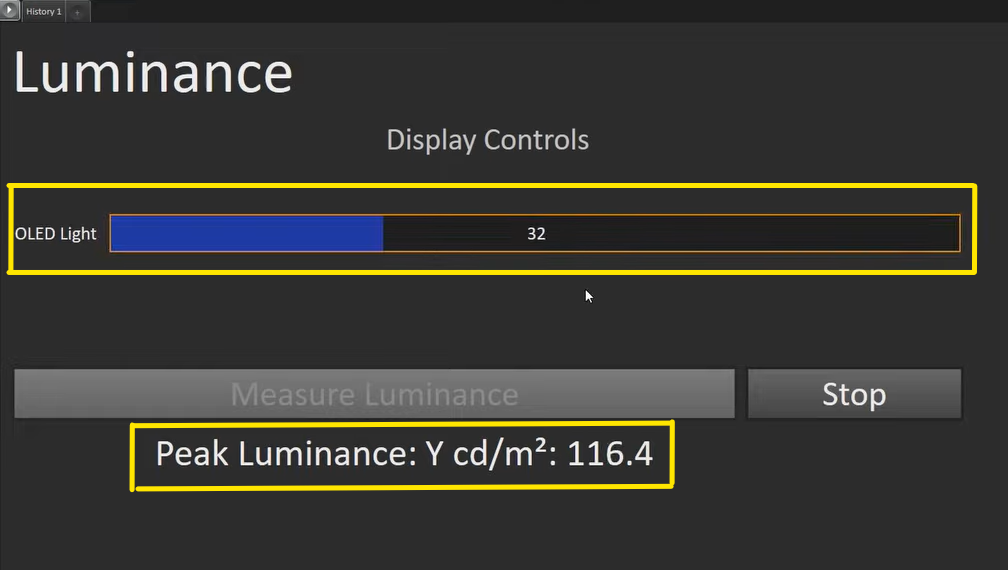
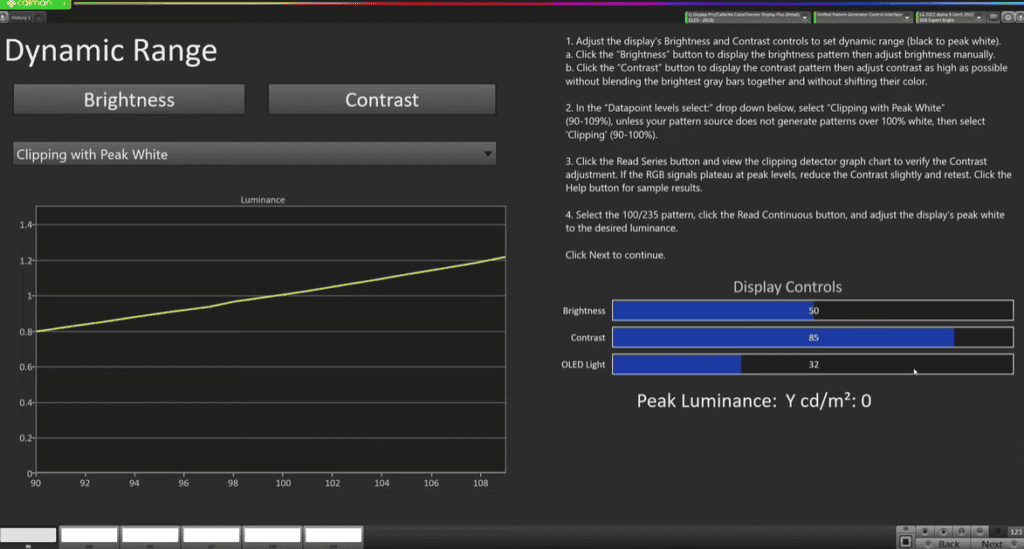
11. Measure the Peak Luminance
In calibrating a monitor, measuring peak luminance is an important step. It allows us to set the brightness level of the display to a desired standard, which can help us better evaluate the colors and contrast in our content.
While the specification for REC 709 is 100 nits, many people prefer a brighter display for a better sense of their grade. This is yet another instance where it depends somewhat on personal preference. The recommended range for SDR peak luminance is around 115 to 140 nits.
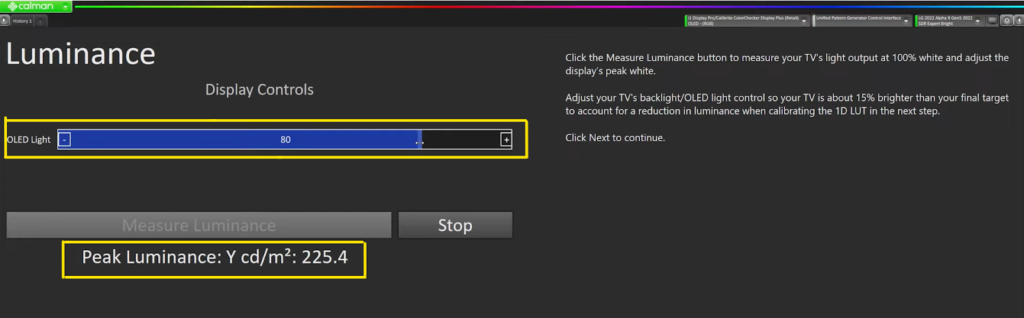
To measure peak luminance, we’ll let the calibrator throw out patches and adjust the brightness until we hit the desired range. In this case, we start at 225 nits and bring it down to 116 nits. Once we’ve hit the desired range, we can hit stop and move on to the next step.
Also Read: 3 Best Cost Effective & Safe V-Mount Batteries (2023 Updated)
12. Create a LUT to Calibrate LG C2/G2 For Color Grading
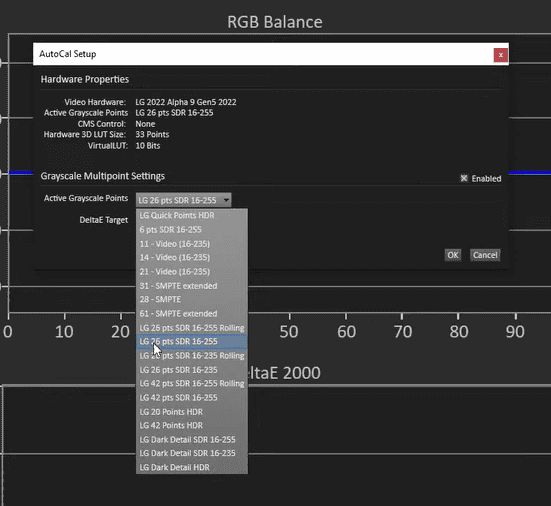
In this step of calibrating a display, we are going to use grayscale multi-point to create a LUT and auto-calibrate the display.
- To begin, we need to press the auto-calibrate button and select the SDR data points to auto-calibrate.
- This button can be found at the right bottom of the screen, and upon clicking it, a menu will appear.
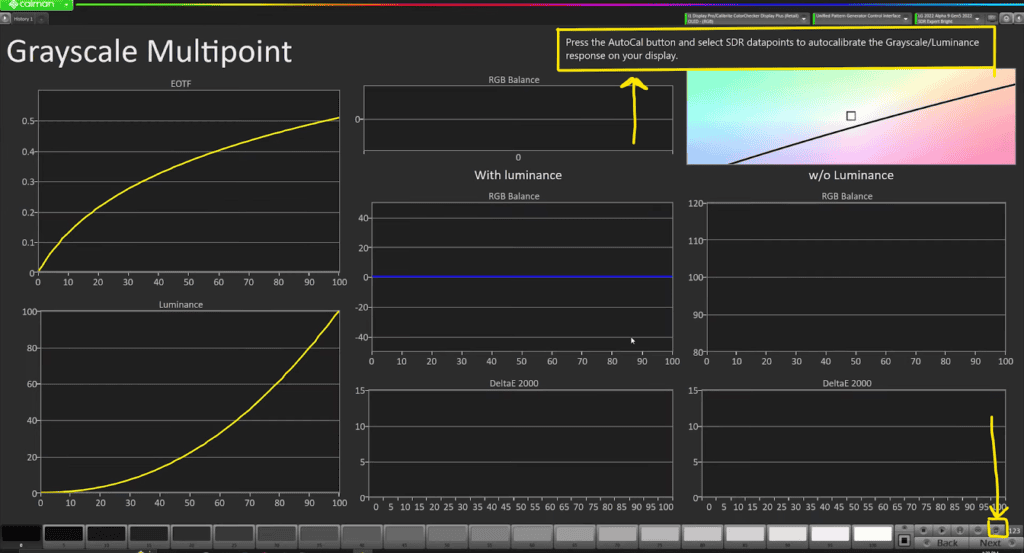
- It is important to note that we need to make sure we have selected the correct data range levels, and by default, it should be set to LG 26-point SDR 16-255.
- Once we have verified this, we can click OK and proceed with the calibration process.
So, what’s occurring here is quite similar to what we saw on our screen of pre-calibration data. Calman is sending a signal to the pattern generator, telling it what value to display on the screen. The pattern generator then sends that colour in a patch to the screen, which is known as an L12 square. The xrite i1 display pro then reads that patch and sends the data back to Calman, which looks for a difference in those values.
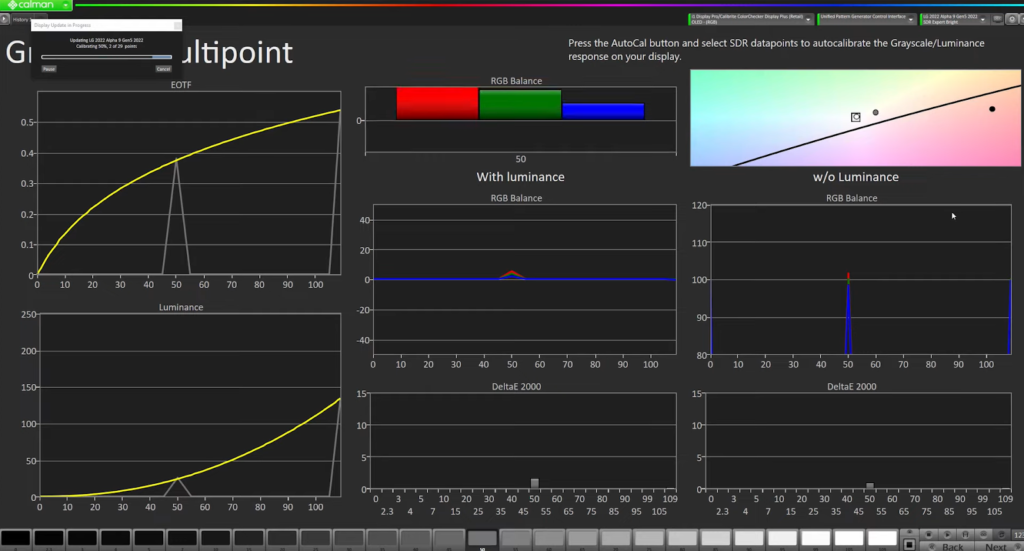
The small box in the centre of the screen (refer photo below) represents the value that Calman is sending out and expecting to see back. The little white dots that appear on the screen are the values that the calibrator is sending back to Calman. If there is a difference, Calman creates a LUT (Look-Up Table), sends it to the TV, and then re-sends the patch to the screen, looking at the difference again.
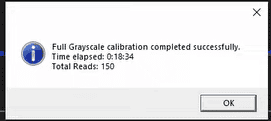
The calibration tool repeats this process until it achieves values as close to the centre of the box as possible, obtaining a perfect RGB and gamma balance (EOTF reflects it). The tool repeats the process multiple times to ensure accurate calibration, which can take up to 20 minutes.
So, we can sit here and watch it make these changes. You can notice in our highlights we’ve got a really good RGB balance happening (in the photo below), as we don’t have a lot of separation between our blue, red, and green channels here.
Here, we can see that the calibrator is working really well to get a good calibration. The gamma curve, which is set to gamma 2.2, is tracking nicely without a lot of separation between the grey and yellow lines, indicating a good calibration.
Additionally, the new deltas for both RGB and gamma are very low, which means that there is very little separation from patch values. This shows that the computer is working to recalibrate the display with each read it sends and getting closer and closer to a low delta or low read. As the adjustments are made, we can see that the RGB balance gets balanced out really nicely again.
After 18 minutes and 34 seconds and 150 reads, the calibration process has finished and the results are in. The monitor’s tracking from shadow to highlight is excellent, with balanced luminance and low delta values across the board. This provides a reliable indication that the calibration was successful. As the process has taken some time, it’s important to be aware that calibration can take a while. Now that the calibration is complete, we can move on to the next page.
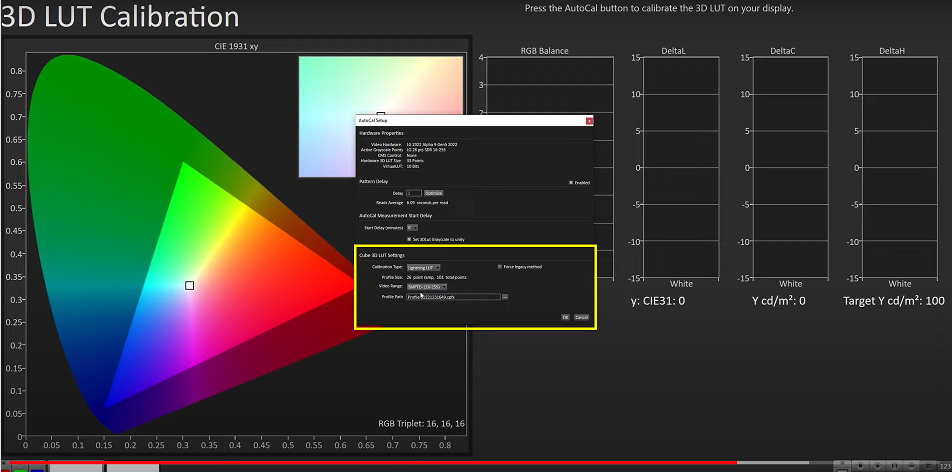
13. Create Final 3D Lut to Calibrate LG C2/G2 For Color Grading
In this step, we’re going to create the final 3D LUT and upload it to the monitor. This will ensure that each color value is hitting our targets.
- To start this process, we need to click the AutoCal button at the bottom right corner of your screen, which will bring up a dialogue with several options such as Lightning LUT, Matrix LUT, and Fix Grids.
- For the LG OLED C2/G2, it’s recommended to use the Lightning LUT. We also need to ensure that our video ranges are set to SMPTE+ or Limited.
- We’ll leave all the settings at their default and click OK to begin the final calibration process.
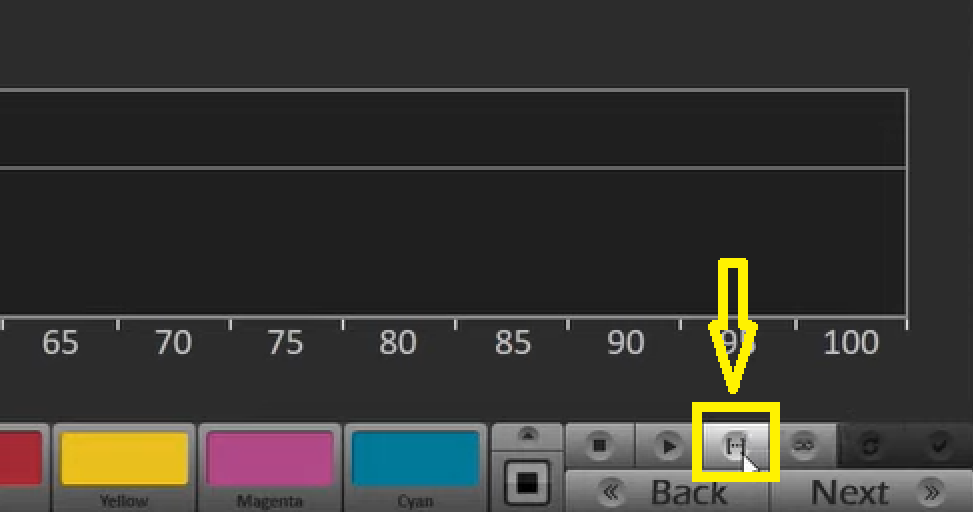
After clicking OK, we will see how the computer is going to start updating the display. It sends color patches to calibrate each of the color values. Every color that we see on the bottom of the screen (refer photo below) is going to get generated and sent over to the display.
The calibration process will take a reading for each one of them, look at the offset, and adjust it to make a LUT so that we can get good RGB balance throughout the entire CIE spectrum, not just in the white point, which we did on the last screen.
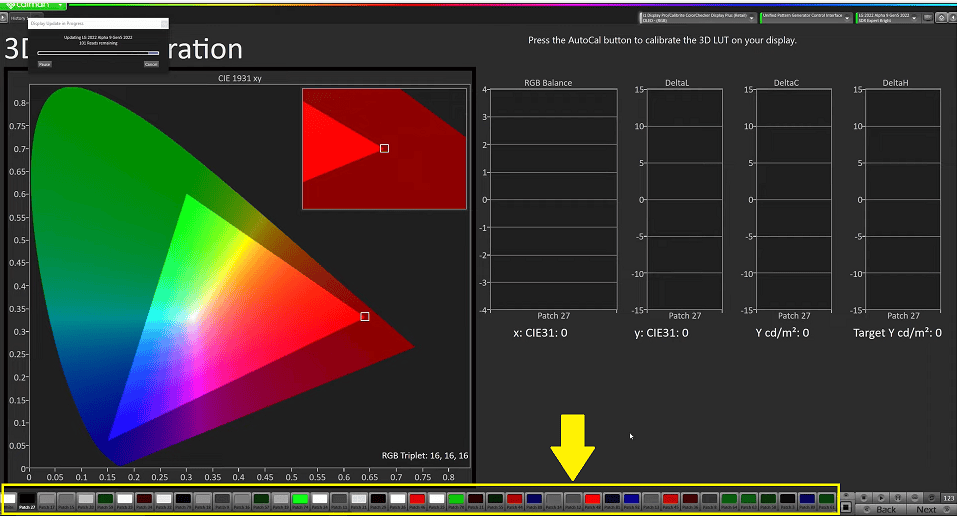
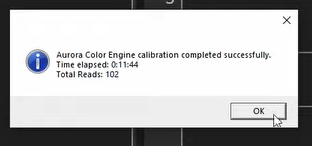
It took 11 minutes to complete 102 reads in our case, indicating a quick and efficient calibration process. After clicking “OK,” we can move on to the next screen where we have the option to verify the brightness and contrast of our display.
14. Recheck the Brightness and Contrast Levels
This allows us to ensure that the calibration has not negatively impacted the overall brightness or contrast of the display. However, it is not always necessary to check this. And we can simply proceed by clicking “Next” to complete the calibration process.
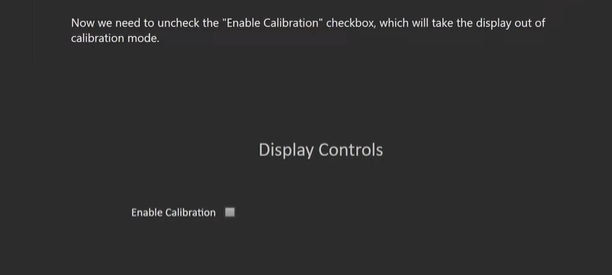
15. Uncheck the Enable Calibration Option
After completing the calibration, the next step is to verify it and ensure that there is no error in calibration. To do this, we need to disable the calibration by turning it off (refer picture below). And then click on Next to move to the post-calibration verification screen.
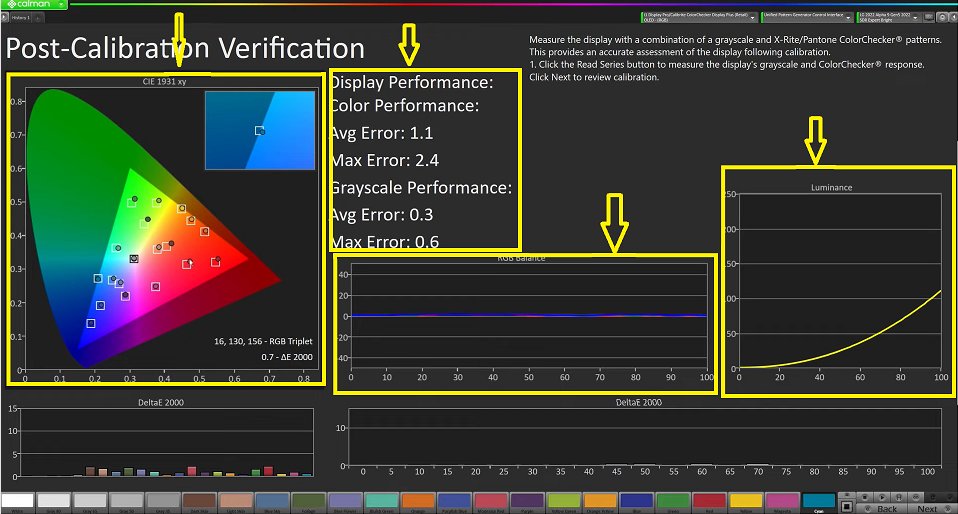
16. Post-Calibration Verification to Calibrate LG C2/G2 For Color Grading
Here, we will click on Read Series (refer to photo below) and watch the color patches shoot out, just like we did on the first screen. This process is very similar to what we did earlier, where we looked at how close we were to each calibration point and the average error delta between each point. This process takes around five to ten minutes.
In this step of the calibration process, we can observe significant improvements in the RGB balance of the display. The previous calibration had shown big separations in the red channel, particularly in the mid-tones, with an average error and max error performance of around 3 and 7.
However, with the new calibration, the performance has improved to 0.3 and 0.6, indicating a significant enhancement in the overall display performance. As the calibration process finishes, we can start to see the effects of the calibration on the screen. Some variation is normal, and we can see that there is still some slight variation in the red and orange colors.
Possible Reasons for Color Variation even after Calibration
After completing the calibration and verification process, it is common to see some skewness in colour on the screen. This could be due to several factors such as-
- Ambient light in the room
- Insufficient screen warm-up time, or
- The natural colour variation occurs as screens age.
While some variation is normal, it’s important to ensure that the calibration has made a significant improvement in overall performance.
When calibrating a screen, it’s essential to ensure that the colors are balanced correctly and that the screen is performing well. We want to see good tracking of colors, particularly at the edges of the gamut. Although some variation in color is normal, it’s important not to see heavy variations way outside the box or greens reporting way off.
If there is any error in calibration, we might need to redo the calibration and start over again. Once we’re satisfied with the calibration, we can move on to the next step by clicking next.
It’s also crucial to let the screens warm up for about 30 to 40 minutes before calibrating to avoid any variances.
17. Pre/Post Calibration Comparison
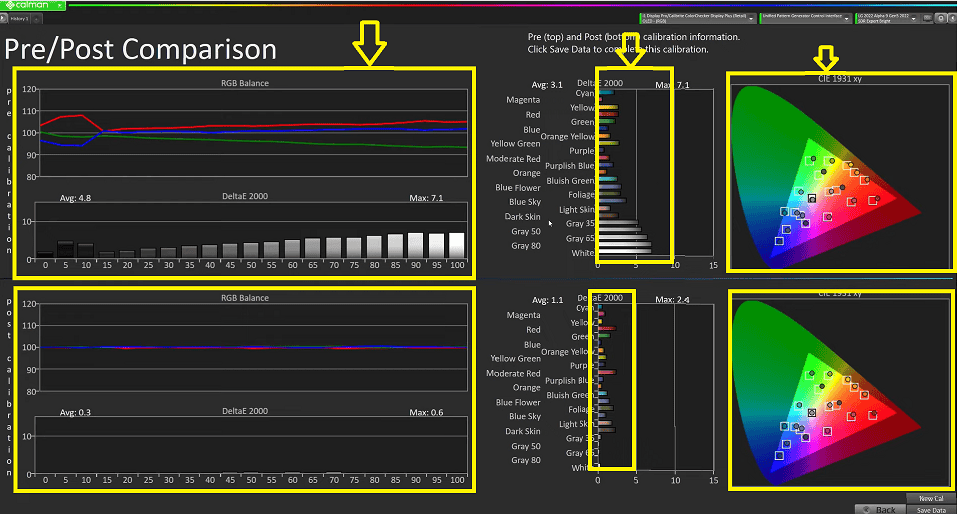
We can now see the discrepancies between our pre and post-calibration measurements. With our previous patches, we were extremely close.
But have a look at the significant variations in our shadow to highlight RGB balance. Hence, our whites, greys, and delta reflect the difference between how considerably off we were before and how close we are now to zero. So, this calibration performance is excellent and demonstrates that we have a monitor that is accurately calibrated and operates far below our maximums.
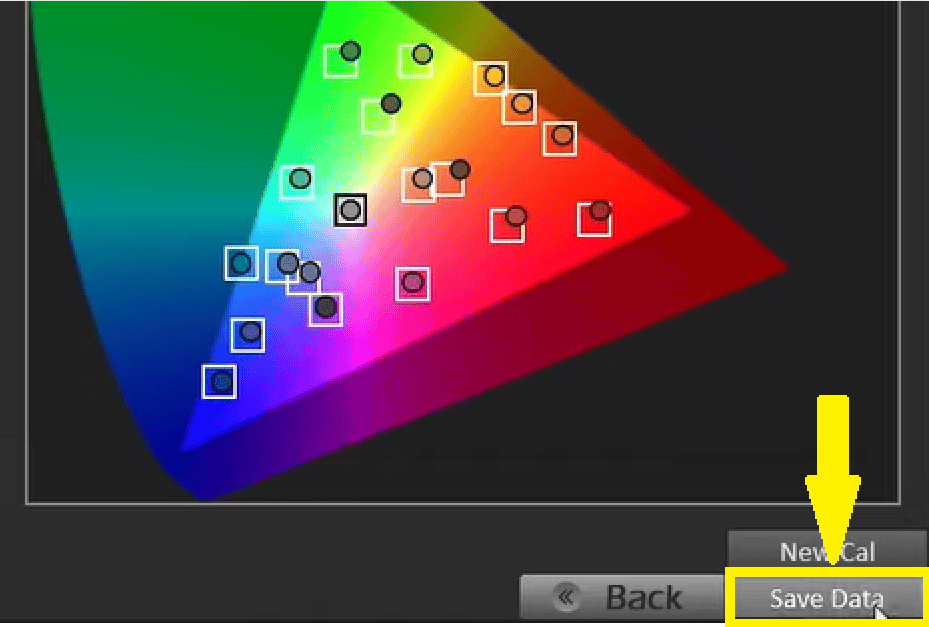
Now that we have the information, all we need to do is preserve it for later use. We can therefore click that to save. We can now shut down Calman and return to instructing you on how to set this up in DaVinci Resolve.
18. Setup the Calibration in DaVinci Resolve
In order to connect a consumer display to UltraStudio, we will need to use an HDMI cable. It’s important to use an ultra-high bandwidth HDMI cable that can support up to 8K since we will be sending a 444 signal. This is especially important because some lower-cost HDMI cables may not be compatible with this signal. Therefore, we need to make sure we get a good quality HDMI cable that can support up to 8K video to ensure that the signal transmission is correct.
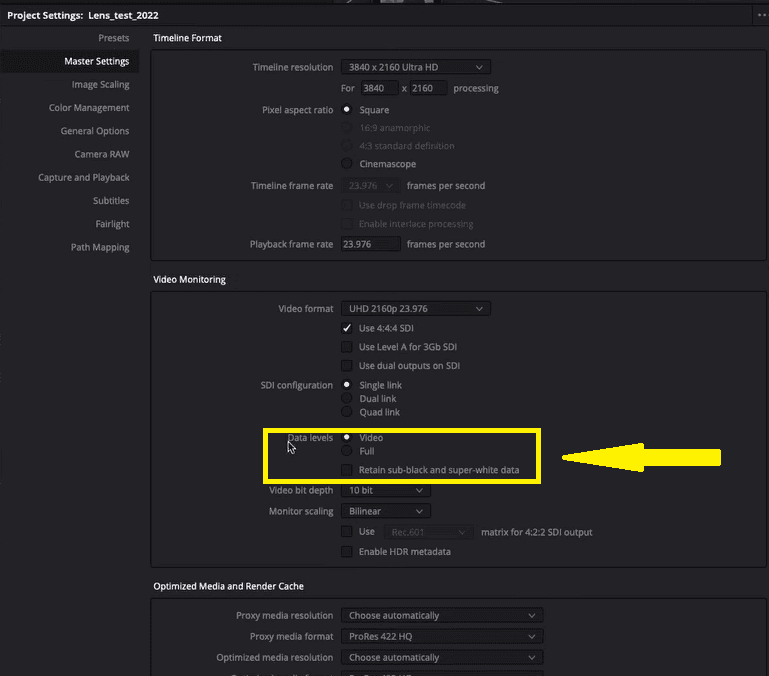
In order to maintain consistency across devices and ensure that the calibration is accurate, it’s important to make sure that the project settings in Resolve match the settings used during calibration. This includes the data level, which should be set to video to match the limited range used during calibration.
This also means that the video should be sent in 10-bit depth, which can be enabled by selecting it in the drop-down menu called “Video bit depth”.
While it is still possible to send 4:4:4 SDI video without these settings, it is important to use video range data values to ensure accurate calibration results.
Additional Options and Information
When it comes to working with 12-bit color depth, there are a few things to keep in mind. While it is acceptable to change your monitor from limited to full range and maintain the same calibration, you may lose some accuracy in darker blacks and shadow tones.
However, this loss of accuracy is minimal. If you want to perfect your calibration, you can recalibrate using a full-range device that can send patches in full range.
In Resolve, with the 4:4:4 SDI checkbox on and video data ranges set to 10 bit, your project is now ready to go.
After calibrating your monitor and setting up your project settings, it’s important to check your footage and ensure that your calibration has taken effect. One way to do this is to look at a range of footage, including both dark and light shots, to ensure that you have good tracking with your results.
Conclusion
It’s important to look out for errors in the LUT such as heavy crunchiness in the blacks, a lot of noise or pixelation, or over-saturation in colors. If you notice any of these issues, it’s recommended to start the calibration process over with a full DDD reset. By doing so, you can ensure that you have accurate and high-quality footage for your projects.
In this article, we have learned about how To calibrate LG C2/G2 for color grading. And also that it is possible to achieve color accuracy in our displays without spending a fortune. By using a $1,000 consumer LG OLED TV and a few tools, we can calibrate our display and get accurate colors for our color-grading projects. Stay tuned for more informative articles.