
Welcome to FilmmakingElements.com, where we are dedicated to helping you develop your digital video color correction, finishing, and delivery skills. With the addition of editing and Fairlight Infusion, even DaVinci Resolve is becoming a popular option for many creators.
In this post, we’ll explore how to create smooth slow-motion and speed ramps in DaVinci Resolve. Slow-motion is when something appears to be moving slower than it does in real life. However, simply slowing down a normal piece of video may not always produce the desired cinematic effect.
To create a cinematic slow-motion effect, it’s important to understand the proper techniques for using DaVinci Resolve. We’ll guide you through the process, so you can achieve the desired look for your videos.
HOW TO ADD SMOOTH SLOW MOTION IN DAVINCI RESOLVE
1. Smooth Slow Motion With Higher Frame Rates In Davinci Resolve
In order to achieve the desired slow-motion effect, it’s important to shoot your clips with a higher frame rate than you would normally playback video with. For example, a clip shot at 240 frames per second will be 10 times faster than the standard 24 frames per second used for film.
When a clip is shot at a higher frame rate, it captures more information, allowing you to slow down the footage while maintaining the clarity of the image. Keep in mind that not all clips are suitable for slow motion, and it’s important to understand the proper techniques for shooting and editing slow-motion footage in order to achieve the desired cinematic effect.
After that, you need to play back the footage at a normal playback speed. When you playback a clip with a higher frame rate at the normal playback speed, it turns into slow motion. For example, if you shot a 240-frame video at 240 frames per second, that one-second clip will be played back at a slower pace, resulting in a smooth slow-motion effect.
It’s important to remember that slowing down normal speed footage can result in a stuttery playback, which is why it’s crucial to shoot footage at a higher frame rate.
When you bring the footage into the timeline, you’ll play it back at the standard 24 frames per second, resulting in a longer, smoother slow-motion clip.
In the case of our previous example, if you have a 240-frame clip shot at 240 frames per second and you play it back at 24 frames per second, the resulting clip will be 10 seconds long.
When it comes to working with slow-motion footage in DaVinci Resolve, there are some basics that you need to keep in mind.
- Firstly, you need to right-click on a clip in the media pool and select “Clip Attributes.” From here, you’ll see the video frame rate listed at the top of the first tab.
- The next step is to bring the footage into your timeline. When you do this, DaVinci Resolve will automatically adjust the playback speed of your footage based on the frame rate of your timeline.
- For example, if you shot your footage at 240 frames per second and your timeline is set to 24 frames per second, then each frame of your footage will be played back in slow motion.
- However, it’s essential to keep in mind that when you bring high frame rate footage into your timeline, DaVinci Resolve is essentially throwing away a ton of frames to match the lower frame rate of your timeline.
- This can result in a choppy or stuttering playback, which is not ideal for creating smooth slow-motion footage.
- To avoid this issue, it’s recommended that you set the frame rate of your footage to match the frame rate of your timeline.
- You can do this by right-clicking on your footage in the media pool, selecting “Clip Attributes,” and adjusting the video frame rate accordingly.
- Following these steps ensures that your slow-motion footage plays back smoothly and looks great in your final video project.
When you shoot footage at a higher frame rate and adjust it to a lower frame rate, you’re essentially stretching out the frames, making them last longer, and creating smooth slow-motion footage.

The best way to do slow motion is to shoot at a high frame rate and then set your footage to play back at your timeline frame rate. By doing this, your slow-motion footage will look natural and visually appealing.
2. Slowing Footage Shot At Normal Frame Rate In Davinci Resolve
In video editing, there may be times when you want to slow down footage that was shot at normal speed or you can say shot at normal frame rates such as 24 fps, 25 fps, or 30 fps.
- To do this, you can use the retime controls in your DaVinci Resolve.
- In the timeline, select the clip you want to slow down and press Ctrl+R to bring up the retime controls.
- You can also do this by right-clicking on any footage and selecting retime controls from there.
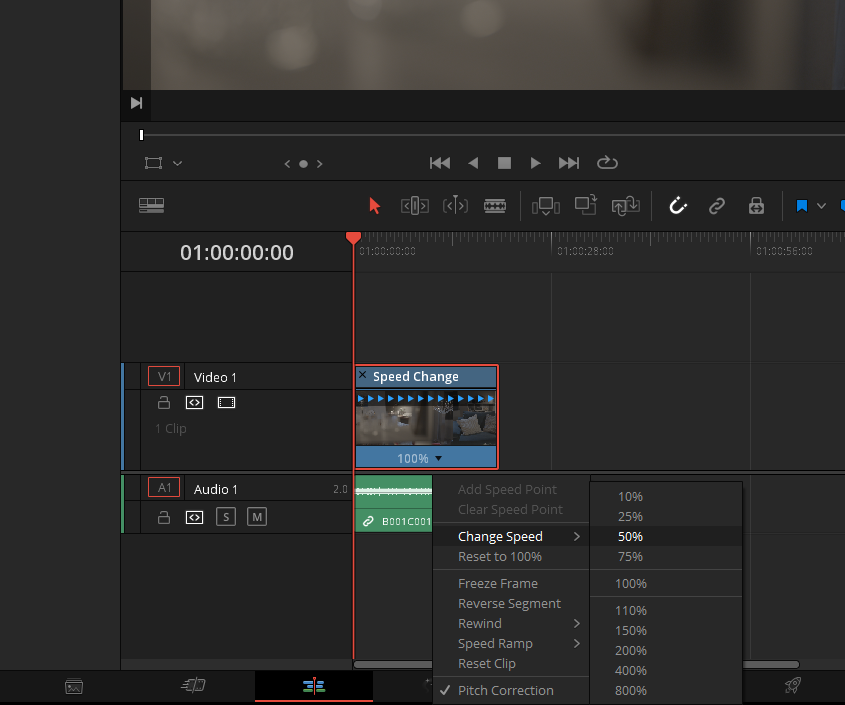
- From there, you can adjust the speed of the clip by changing the percentage in the drop-down menu.
- For example, setting the speed to 50% will make the clip twice as long and playback half as fast.
- However, if you slow down footage to less than 24 frames a second, it may result in a stuttery look.
- Conversely, you can speed up footage by changing the speed to a higher percentage.
Speed Ramping Effect In Davinci Resolve
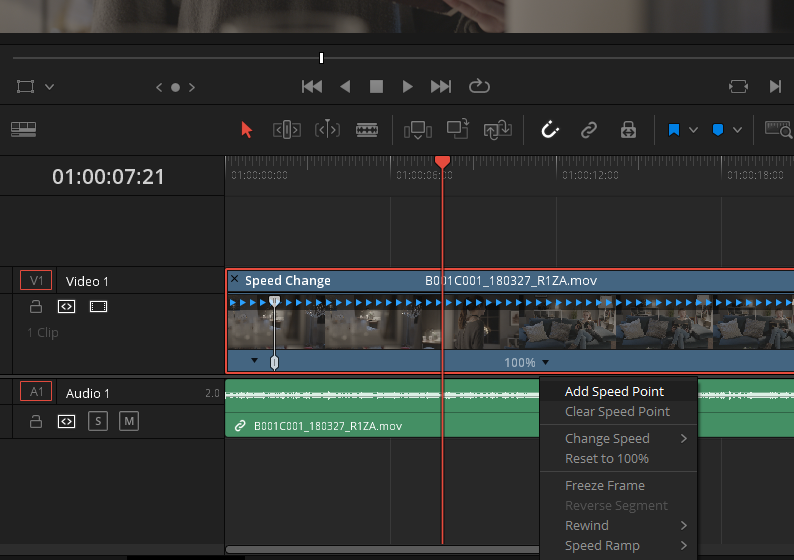
In addition to changing the overall speed of a clip, DaVinci Resolve also allows users to add speed points to specific frames in the timeline.
By selecting a frame and clicking the “add speed point” option, users can specify the speed at which that frame and the surrounding frames will be played. This can be a useful tool for creating dramatic slow-motion or fast-motion effects at specific moments in the video.
Additionally, you can create some really cool effects by using ‘Speed Ramping’. This technique involves changing the speed of a clip at different points in the timeline to create a smooth transition between different speeds.
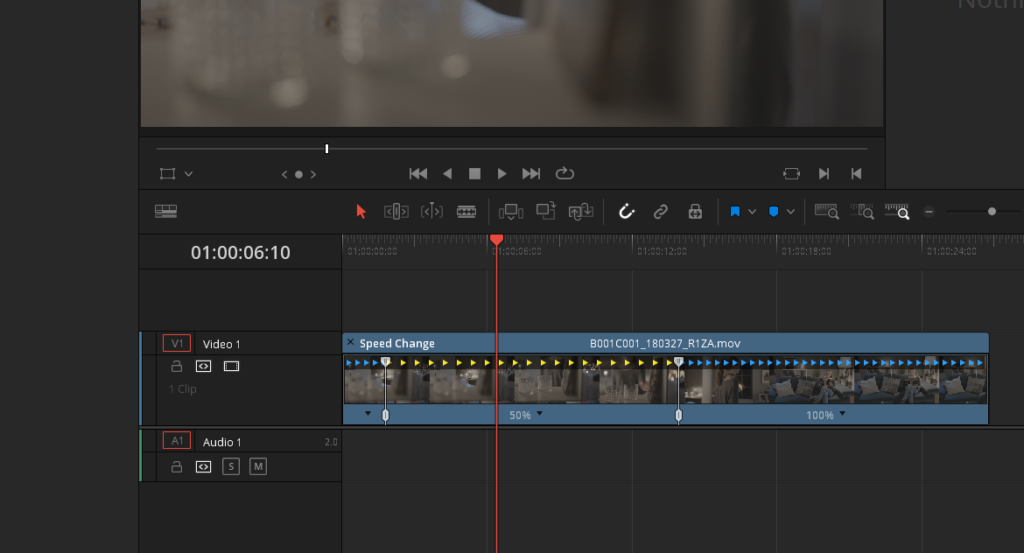
By using the speed change controls, you can add speed points wherever you want in the timeline and adjust the speed of a clip at that point. For example, you can speed up the beginning of a clip and then have it play in slow motion afterward. The possibilities for creating unique and engaging videos are endless with this technique.
So. if you bring in high frame-rate footage, it can give you a lot of freedom and creative options.
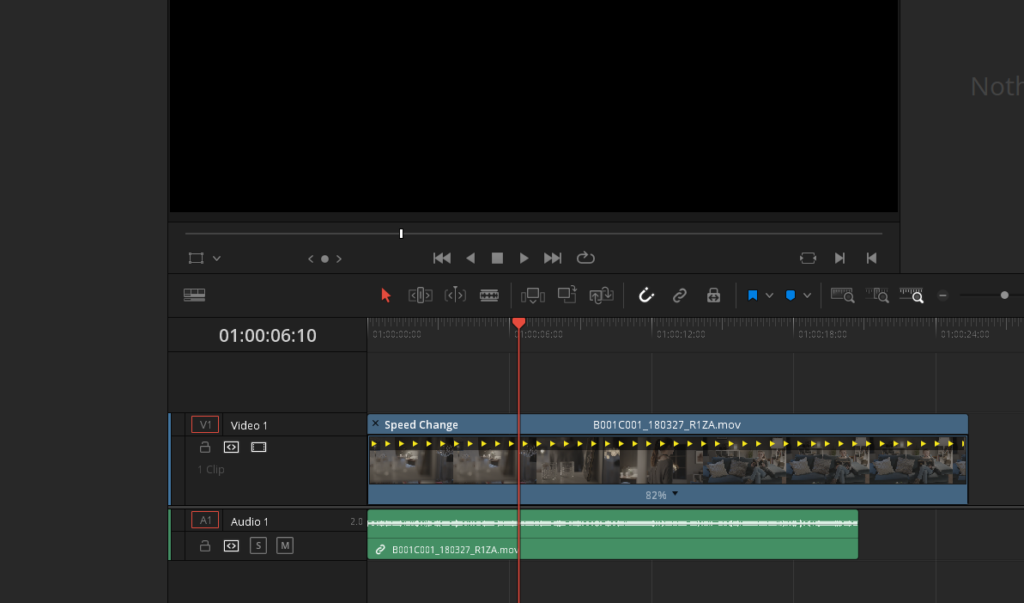
Once you are done with your speed changes, you can click the close icon on the top left corner of the clip to remove the controls and continue with your editing.
Retiming clip while stretching the clip in Davinci Resolve
In addition to using the retime controls to adjust the speed of a clip in the timeline, you can often use it to extend the length of a video.
- By selecting the clip and entering retime mode using the Ctrl+R shortcut, you can grab the edge of the clip and stretch it to make it longer or shorter.
- This will automatically retime your video depending on how much you stretch or shrink it.
- This is particularly useful for footage that doesn’t quite fit into your desired edit duration.
- For example, you can stretch a b-roll clip just a bit longer to fill a gap.
Although this method isn’t specifically for slow motion, it provides an alternative way to modify a clip’s length without affecting its playback speed.
Adding Smooth Slow Motion In Davinci Resolve
In video editing, sometimes we may need to slow down footage without making the footage so jerky. This is where retime options come in handy.
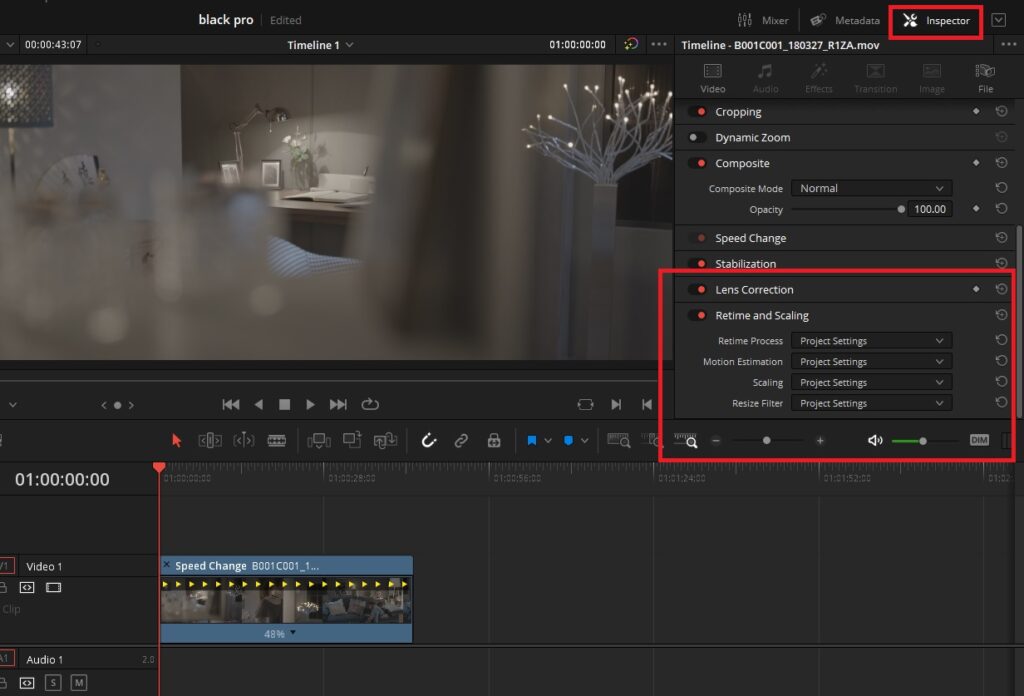
After selecting a clip, we can access the “Inspector” tool on the right-hand side and find the “retime and scaling” option at the very bottom. By double-clicking it, we can access a few options to help us slow down footage without making it look jerky.
The first two options are “Retime Process” and “Motion Estimation”. These options can help us achieve smoother slow motion by analyzing and predicting motion within the footage.
Understanding Retime Process In Davinci Resolve
In DaVinci Resolve, the Retime Process tool has three different methods for processing clips that do not fit the project frame rate in mixed frame rate timelines and clips with speed effects such as fast forward or slow motion.
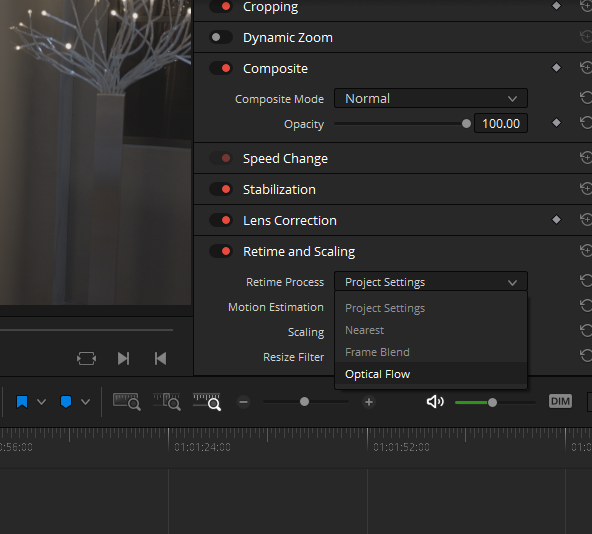
It’s important to note that “Project Settings” is the default setting for each clip in every timeline, so changing this setting will affect how most mixed frame rates and speed-effected clips are processed, except for those with custom settings chosen. The 3 Methods are:
- The first method is called “Nearest“, which is the most processor-efficient but also the least sophisticated. This method either drops frames for fast motion or duplicates frames for slow motion, which can result in a choppy or jerky motion.
- The second method is “Frame Blend“, which is also processor-efficient but can produce smoother results than Nearest. With Frame Blend, duplicated frames are dissolved together to smooth out slow or fast motion effects, making it useful when Optical Flow produces unwanted artifacts.
- Finally, there is “Optical Flow“, which is considered the highest quality method of speed effect processing but also the most processor-intensive. This method uses motion estimation to generate new frames from the original source frames to create slow or fast motion effects. Optical Flow can produce exceptionally smooth results, especially when the motion in a clip is linear. However, it can also create unwanted artifacts if there is unpredictable camera movement or two moving elements crossing in different directions. Despite this, Optical Flow is generally considered the best option for high-quality speed effects.
Understanding Motion Estimation in Davinci Resolve
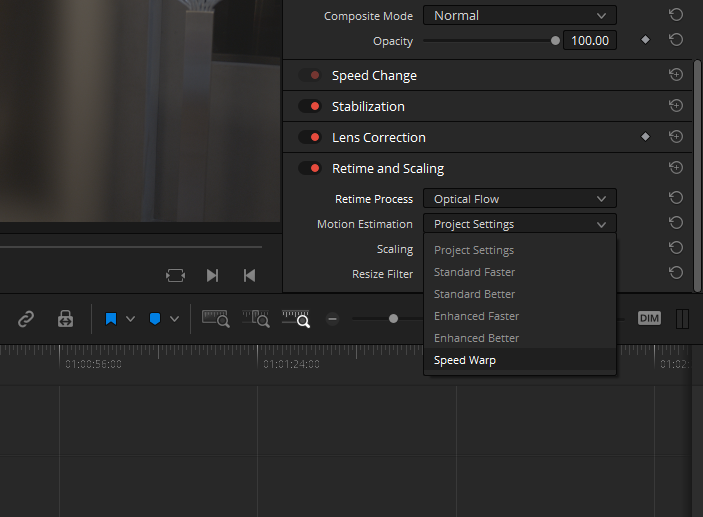
In DaVinci Resolve, Motion Estimation is a useful tool that allows you to control the quality and speed of your project.
Motion Estimation can be used when working with mixed frame rate clips in a timeline with Optical Flow retiming enabled, or when using Image Stabilization or Temporal Noise Reduction controls in the Color page.
By selecting the Motion Estimation drop-down in the Master Settings of the Project Settings window, you can choose options that balance the trade-off between quality and speed.
Why choose optical flow for smooth slow motion Davinci Resolve
In simpler language, the Optical Flow uses motion estimation to generate new frames from the original source frames and create slow or fast motion effects.
Essentially, Optical Flow looks at all of the pixels in each frame and figures out what each little thing is moving to, estimating what each frame in between these frames should look like. It does this by looking at each little point and trying to predict movement.
While it’s not perfect, it’s a more sophisticated method than just blending frames together.
This results in a smoother and more realistic motion than other methods like frame blending.
Additionally, by adjusting the Motion Estimation setting in the Master Settings of the Project Settings window, users can control the speed-quality trade-off of the retiming process. The farther down the menu they go, the nicer the motion will look, but the harder it will be on the computer.
When it comes to choosing the Retime Process method in DaVinci Resolve, it’s important to consider the balance between quality and processing power.
Enhanced Better generally produces a nicer result than the other options, but it requires more computer power. For the best possible result, you can use Speed Warp, but this will take a significant amount of time and processing power.
Playing around with the retime process and motion estimation can help to achieve the desired effect. Shooting at a high frame rate is recommended, but if that is not possible, using tricks like adding speed points and changing the speed in each section can also create cool effects.
Conclusion
In conclusion, adding smooth slow motion to your videos can significantly enhance the visual appeal and overall quality of your content. With the help of Davinci Resolve’s retime controls and motion estimation features, you can achieve the desired results while balancing the speed-quality trade-off.
Additionally, pre-rendering your clips through the render cache color output option can provide real-time playback while editing, without compromising the performance of your computer.
By experimenting with different retime processes and motion estimation settings, along with shooting footage at high frame rates, you can create stunning slow-motion effects and take your video editing skills to the next level.
- Also Read- How To Add Shapes In Premiere Pro
- Also Read- 5 Tips For An Indie Filmmaker (Must Read!)
- Also Read- Best Samsung T5 SSD Alternative For BMPCC 4k & 6k