How to export from Premiere Pro? For every kind of deliverable.
Adobe Premiere is the most comprehensive non-linear video editing application available on the internet. This program has all of the capabilities and features that any user, whether amateur or expert, may require to edit their films.
However, despite Adobe’s efforts to make the interface as simple as possible so that any type of user can understand and exploit it without having to spend hours on it, the complexity of this video editor means that if we encounter it for the first time, we will almost certainly be baffled as to where to begin.
This post will go over an important feature of the program: exporting the produced film. Exporting the video means processing all the video to save it in a file so that it can be played by any multimedia player. During this procedure, we must select the output quality, codecs to be used, and other attributes that our movie will have once the process is over.
Depending on the computer we have, exporting the video may take a long time since, in addition to converting it to the desired format, all of the material must be processed and produced from scratch. This is the final stage in the editing process, thus in this post, we will show you how to utilize this feature to export our video from Premiere Pro.
With the Quick Export Button, you can easily export your videos.
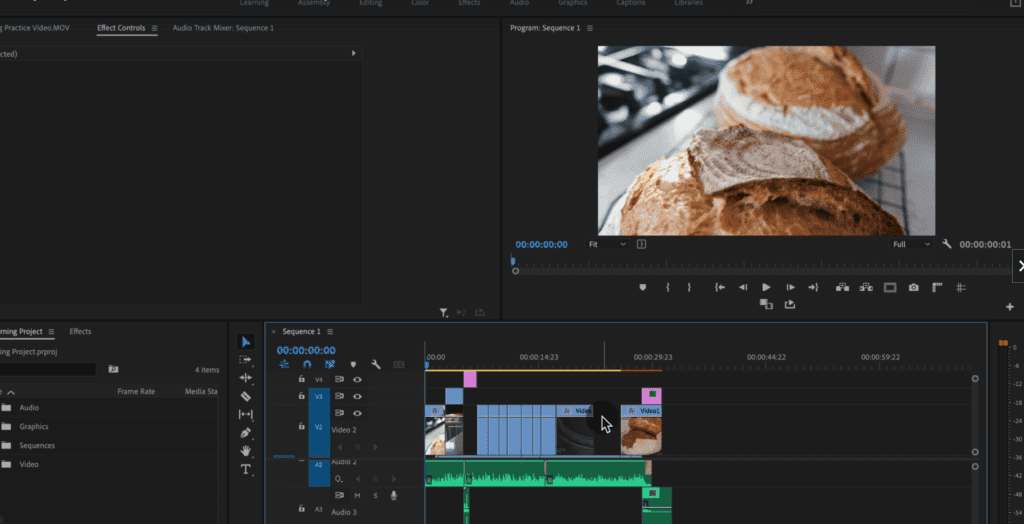
This article is all about exporting your videos, so once you’ve done all of your editing, it’s time to share your videos with the world.
The first thing you want to do is set the in and out points or the duration on your timeline for what you want to export.
There are times when I’m editing a long video where I’m just exporting maybe a segment or a scene to show to the director of the film.
Or there might be times where on my timeline I have extra footage.

I personally often use space on my timeline just to hold graphics or clips temporarily that I might or might not use.
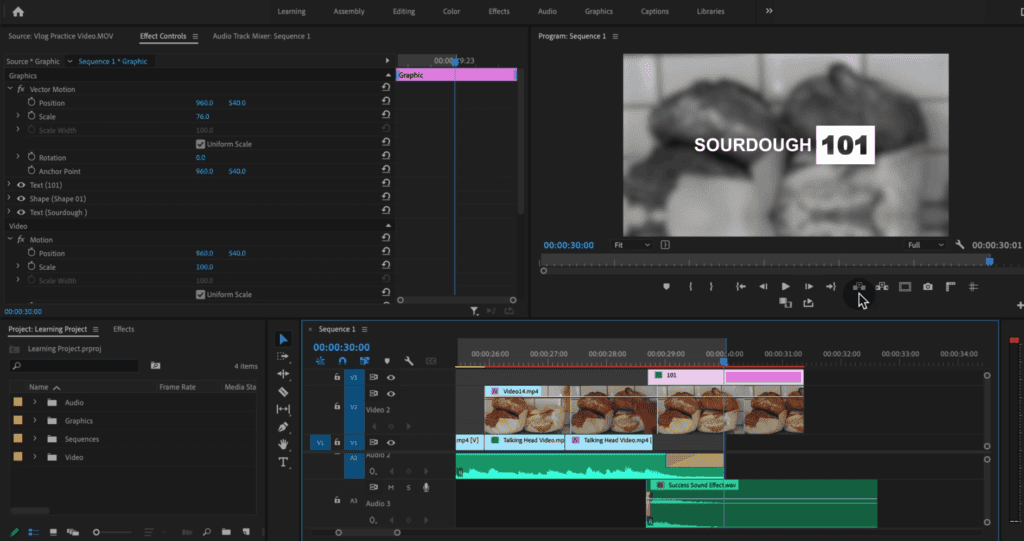
And so it’s important to set that in and out points so that it’s only exporting the part of the video that you want. To do that, put your playhead on your timeline and scrub through to where you want to export it, and press the out key on your keyboard or the “O” key, the out point keyboard shortcut.
Or you can do the mark in (I) and out (O) buttons from under the program monitor window.
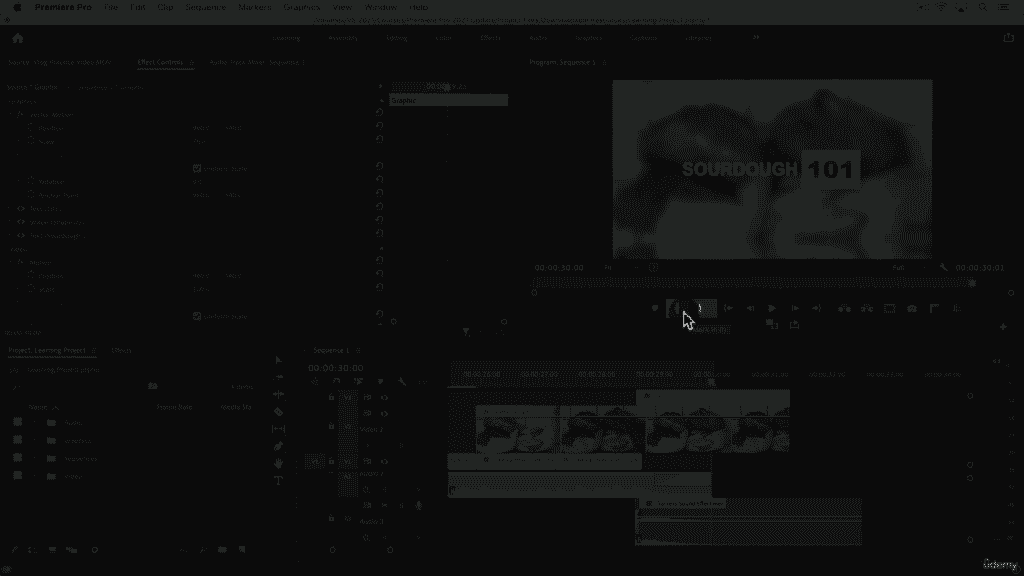
And then you can see the highlights on our timeline, the area from the very beginning to the end of our video.

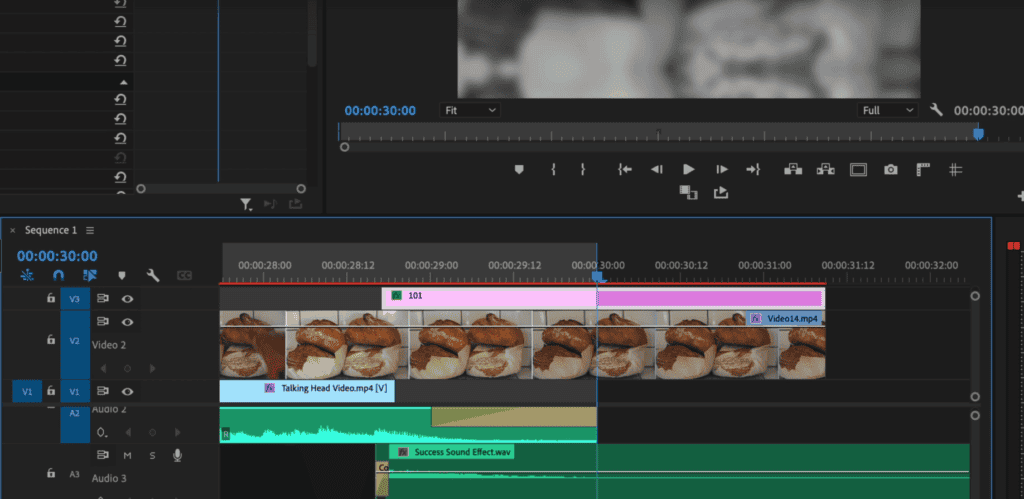
Another thing to note, though, is because I went straight to 30 seconds on my timeline, but that’s going to do export all 30 seconds plus the frame at 30 seconds.
So the duration of my video would end up being 30 seconds and one frame.
So I want to go one frame previously.
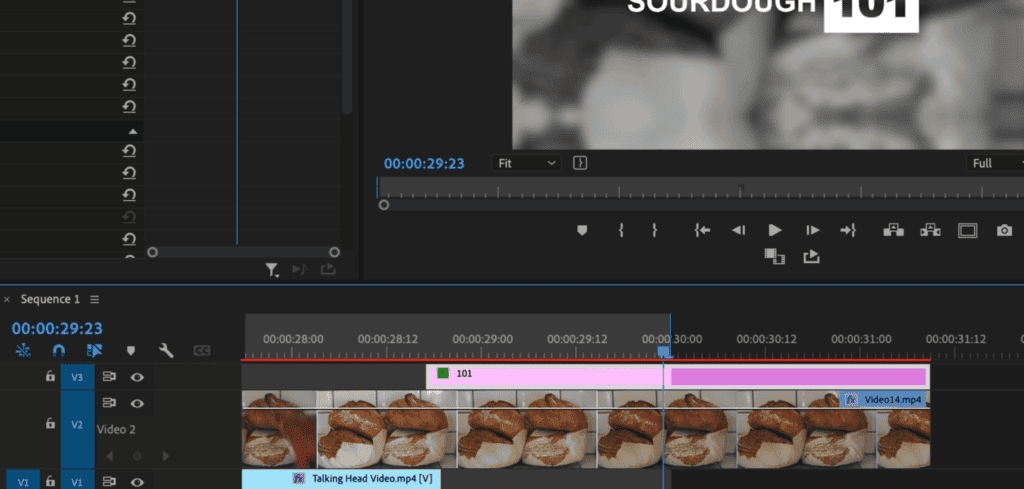
So at twenty-nine seconds and 23 frames and press the out keyboard shortcut, “O” again.
And you can scrub through your timeline frame by frame with your left and right arrows.
And now you can see the duration is exactly 30 seconds if you need it to be as precise.
The quickest way to export your video is with the quick export button that’s on the top bar.
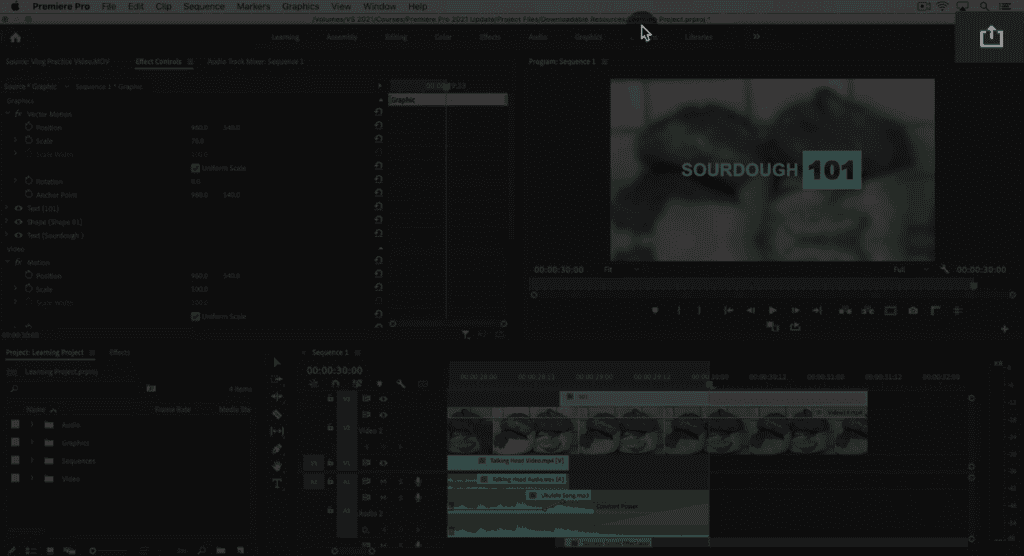
If you click this button, you’ll see some basic options for exporting.
One is the location and file name. So click on this and then type in a name that you want and choose where you want to save it on your documents.
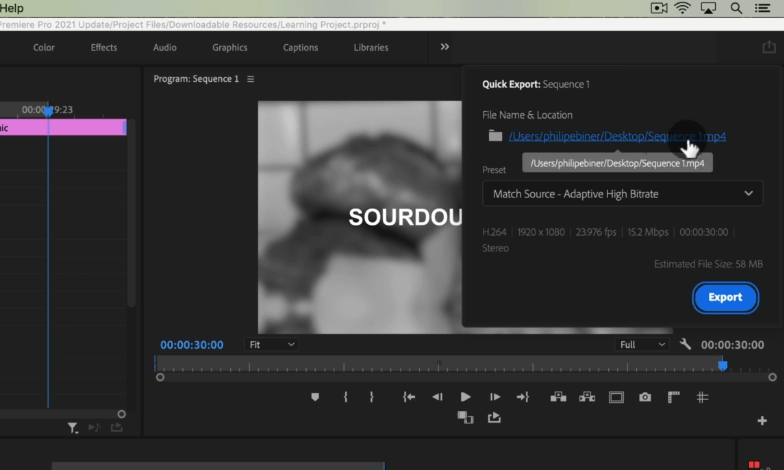
Next is the preset, there are just a few presets in the quick export button. You have three presets that basically match the sequence size and settings.
This will match the frame size.
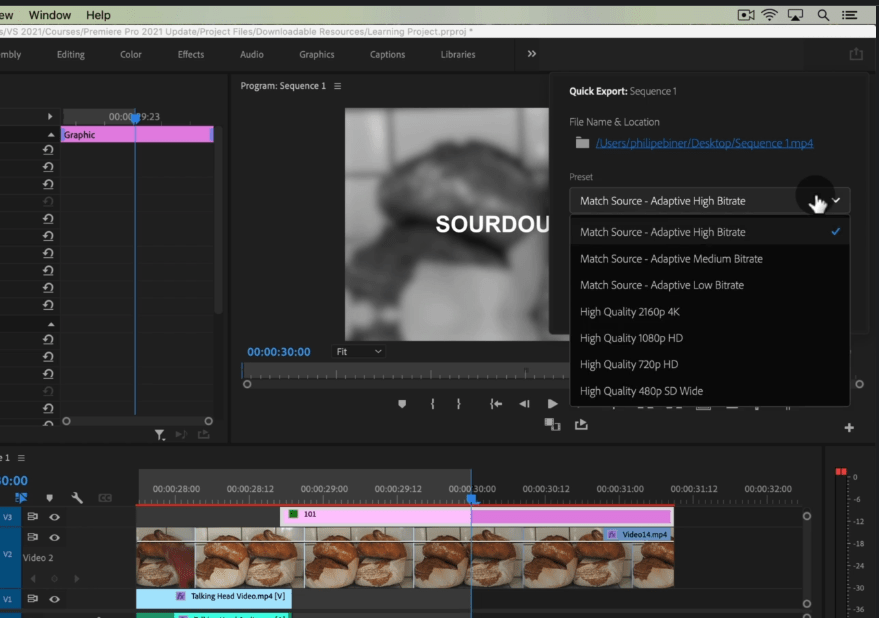
So if you’re editing a 1920*1080 sequence, it’s going to match that. It’s going to match the frame rate and it’s basically just adjusting the quality.
The higher the bit rate, the higher the quality. So a high bit rate is great if you want to sort of great quality, full-quality footage.
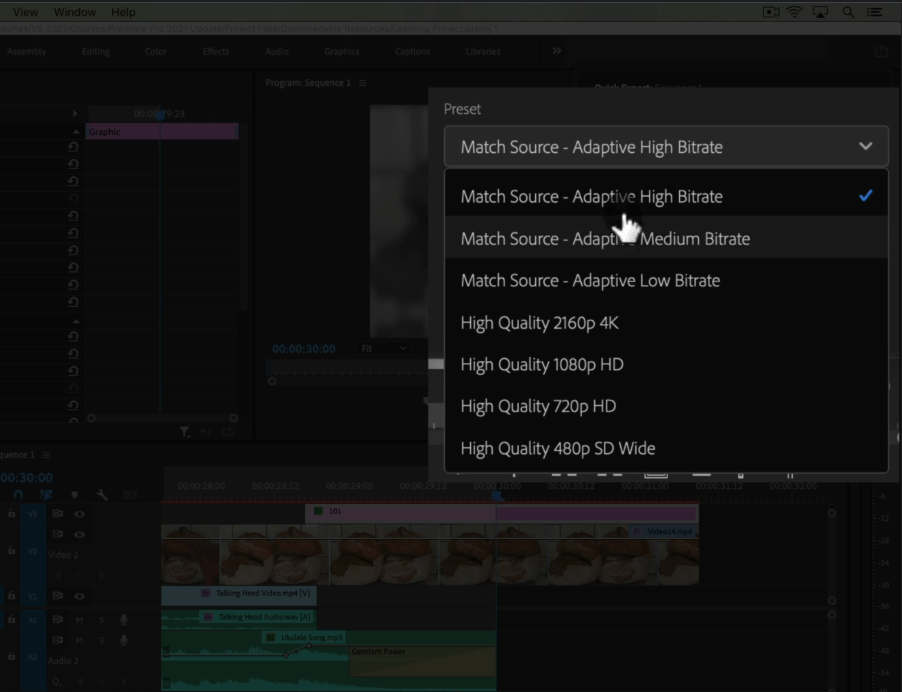
But if you’re wanting to save space and export a smaller file size, you can choose one of the medium or low bit rate options. Typically I choose high, but if I’m just exporting a draft or something to send to a director to check it out, then I’ll choose one of the lower ones.
You also have these other high-quality settings for different frame sizes. So if you want a quick 4K, 1080p, 720p, or 480p option, you can choose one of those as well. The high-quality 1080p is going to be very similar to the match source, high bit rate option.
- Also Read-What is lens flare in filmmaking? Secret recipe to cinematic storytelling?
- Also Read-10 Common Mistakes Made by Amateur DP/Cinematographers
- Also Read-How To Fake Golden Lighting Effect Without Golden Hour- 5 Epic Ways
How should we export our video project?
It’s time to export the video when we’ve finished all we’ve done, whether it’s merging two clips or generating a professional super montage. To do so, we must first access the File> Export menu, where we will find a number of possibilities.
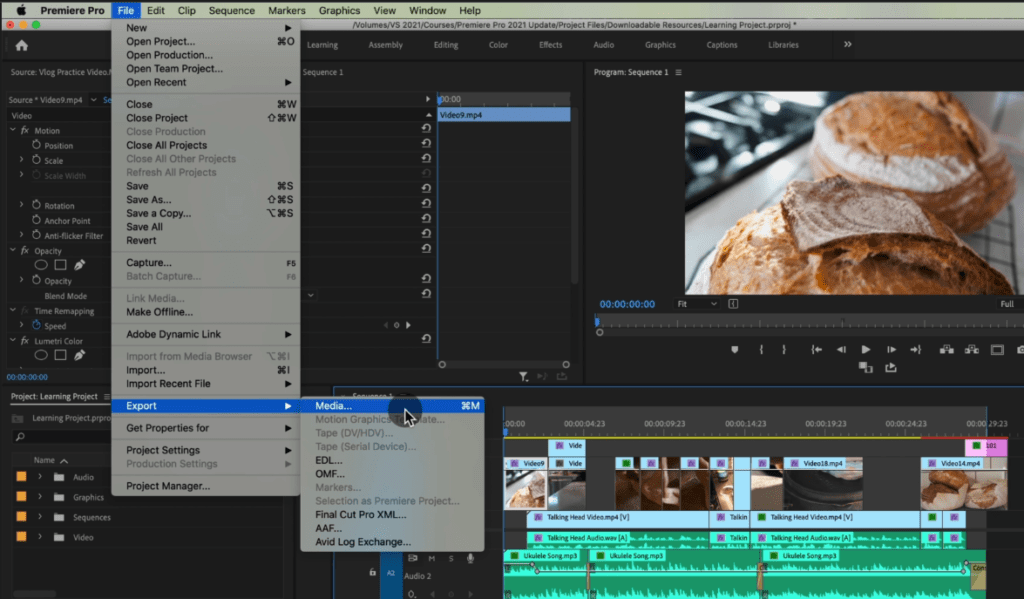
We will not go into depth about all of these alternatives because we will almost certainly never use them. As an aside, the ” Final Cut XML ” option will be shown, allowing us to convert the Adobe Premiere file to Apple’s Final Cut Pro format.
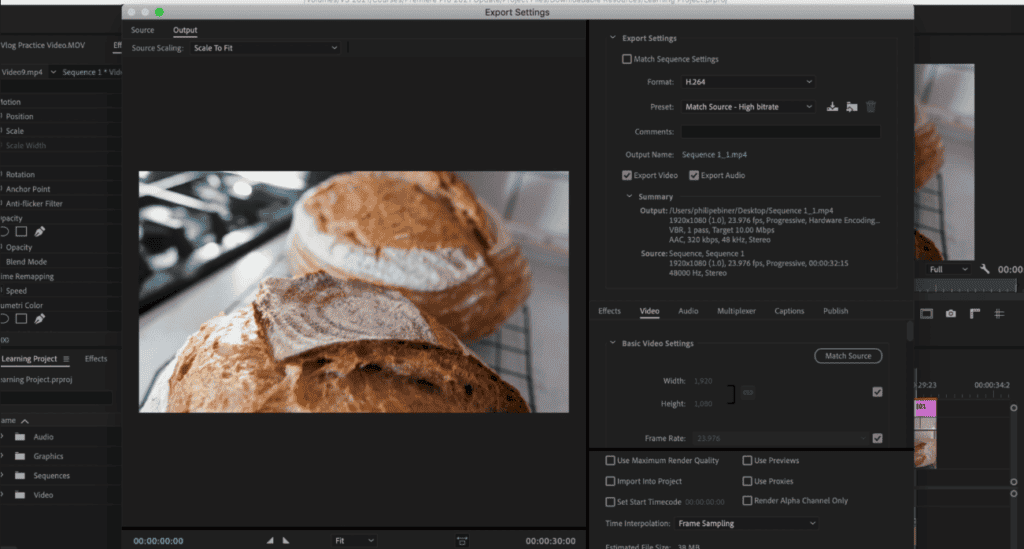
“Media” is the choice for exporting the project that we are interested in. When we click on it, we will be presented with a new window similar to the one seen below.
All of the video export options will be configured from this window. And we’ll take a close look at them.
Make it clear why you’re exporting the video
Will you save a video for personal use? Do you want to have the best quality possible? Will you post it on YouTube or another video platform? These are some of the questions we must consider before proceeding. We will be able to select the proper codec, quality, and size of the video thanks to them.

A thumbnail of the video may be seen on the left side of the export window. We can even make it from here. On the right side, we’ll see all of the choices for customizing the export.
Select the appropriate format, codec, and preset
The first item to decide on is the format and codec to utilize. We may select the format using the drop-down menu. As we can see, Adobe Premiere provides a fairly comprehensive list of acceptable video formats to which we may export the film.
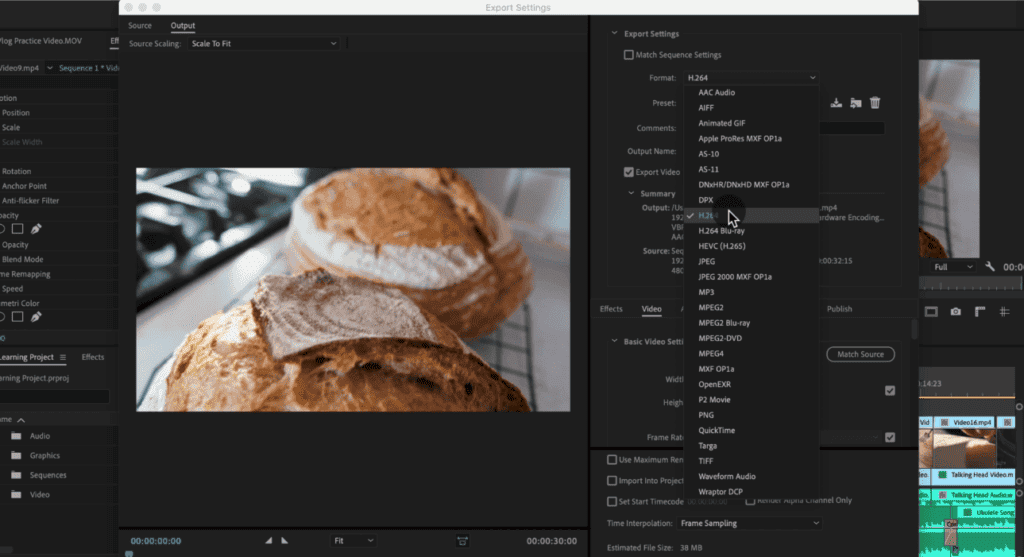
Furthermore, within each format, we will discover a selection of presets or default settings. We can customize these values ourselves by hand (as we will see later), but if any of the presets suit our needs we can save time by selecting one. For example, if we want to publish the movie on YouTube, we may choose from a variety of settings.
Where to save the video?
After selecting the format and setting, we must decide where we want to save the movie on our computer. Below the presets is a box where we may make a comment (for example, a movie description) that will be saved in the video’s metadata.
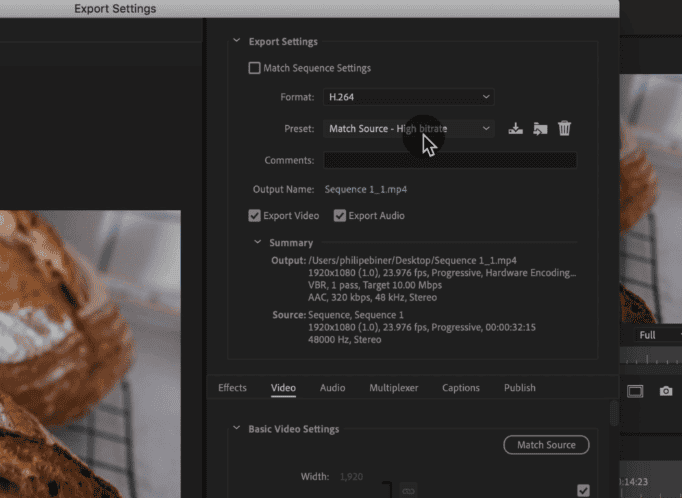
There is also a part called “exit name.” When we click on it to change it, we can specify where we want the video saved and give it a new name.
There will also be two boxes where we can select whether or not we want to export the audio and video (in case we simply want to save one track separately) and a summary table with all of the video attributes.
What happens if I use the incorrect codec?
We emphasize the significance of selecting the right codec when exporting video using Adobe Premiere once more. We may encounter issues if we make a mistake and select the incorrect codec. The most typical issues vary from poor video quality to the inability to use the video on another platform or play it on our PC.
Unless we have particular requirements, it is best to ensure that the video we are exporting has a standard codec (to avoid difficulties like this) and that it has the right resolution, quality, and frames. Of course, the greater the quality, the more space the movie will take up on our computer. Furthermore, we will never be able to achieve a higher quality than the original movie, so if we arrange it this way, we would be wasting disc space for nothing.
Because we will have spent several hours editing the video, we should take a few moments to select the best format, resolution, and quality. Always save a duplicate of the project so that you may export it again if required.
When exporting videos with Adobe Premiere, you have advanced choices?
In addition to selecting a format and a default option, Adobe Premiere Pro’s export feature allows us to change all of the video’s parameters. Below the “export settings” box that we saw in the previous paragraph, we can discover a series of tabs that enable us to alter the codec’s advanced parameters.
The options available here are grouped into four categories:
- Effects: In this part, we may customise a set of effects that will be applied to the movie. SDR effects, picture overlay, timeline sync, and more are available.
- Video: it will allow us to modify the resolution of the video, the frame rate, the ratio, encoding settings, the encoding speed, the distance between key frames and if it is a virtual reality video.
- Audio: We may adjust the audio format, basic codec and sample parameters, as well as the speed.
- Multiplexer: This allows us to select the kind of multiplexer as well as the flow compatibility.
If our video contains subtitles, we will be able to adjust them from this page, under the relevant tab. In addition, the last page allows us to immediately distribute our film on several sites once it has been processed. This will allow us to save time by allowing Adobe Premiere Pro to handle tasks such as delivering the film over FTP or publishing it on YouTube, among many others.
Once we’ve tweaked all of these settings to our taste, we may store our own preset to utilize in future films more efficiently.
Create and save the video
We’ve arrived at our destination. Just above the export buttons, we can see a variety of choices for configuring the export’s final settings. For example, we may select the highest processing quality, whether we want a real-time preview of the video, the chosen time interpolation, and so on.
We can also see how big the movie will be once it’s processed and saved on the computer. When we click on “Cola,” the application will send it to Media Encoder, where it will be ready for export. In this manner, we may continue to use Adobe Premiere Pro while the video is being processed, or we can add many projects to be processed automatically in a row.
If we do not want to utilize Media Encoder, the “Export” option uses Adobe Premiere Pro’s own rendering engine to process and export the video directly from the software.
A Detailed Guide to Exporting Videos for YouTube
Exporting videos for YouTube might seem straightforward, but the devil is in the details. Ensuring maximum quality requires understanding your software’s features and YouTube’s recommendations.
1. Prepping Your Sequence
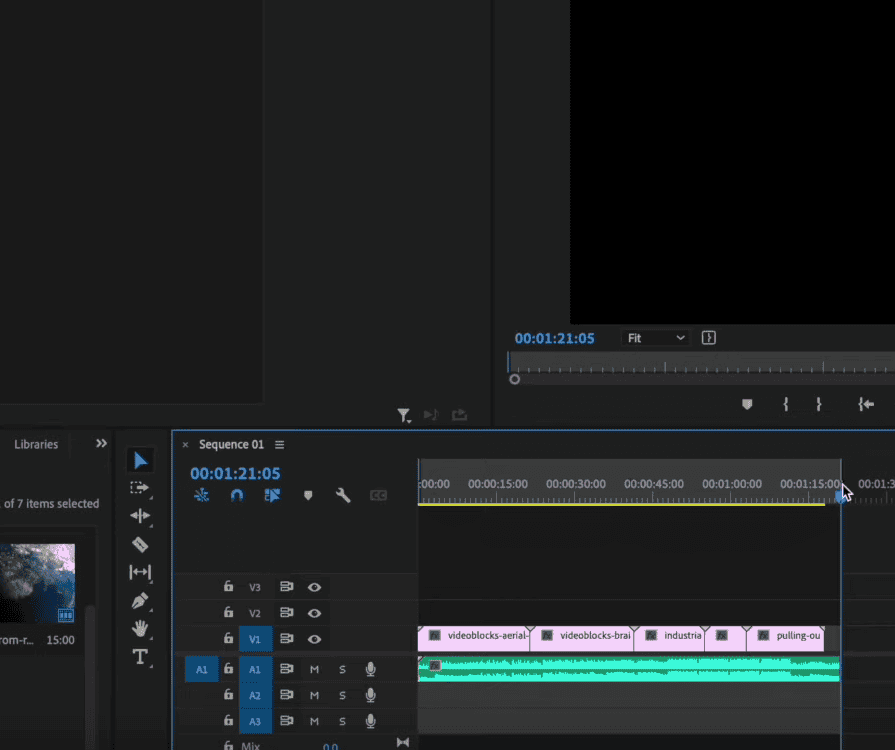
Before exporting, it’s crucial to determine the exact portion of your video sequence you wish to include in the final output.
Steps:
- Within your video editing software, navigate to the beginning of the desired sequence.
- Traverse to the end of the sequence, and mark it using the “O” (Out) key on your keyboard.
- Should you make an error or wish to alter the selection, simply right-click and select the “Clear in and out” option. This will allow you to re-specify your sequence boundaries.
2. Initiating the Export Process
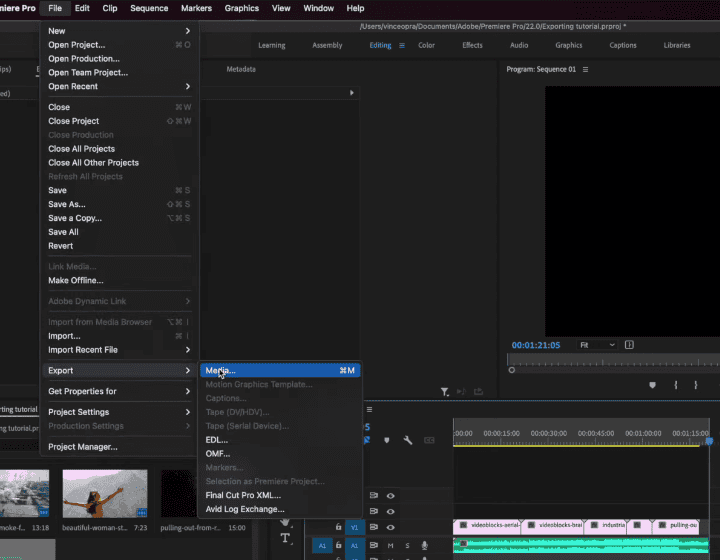
- Go to the ‘File’ option in your menu on the top.
- Select ‘Export’, followed by ‘Media’.
- This will present a visual representation of your selected sequence. Verify that all desired content lies within the marked boundaries.
3. Configuring Export Settings
Delving into the technicalities, here’s how to ensure optimal export settings:
Video Settings:
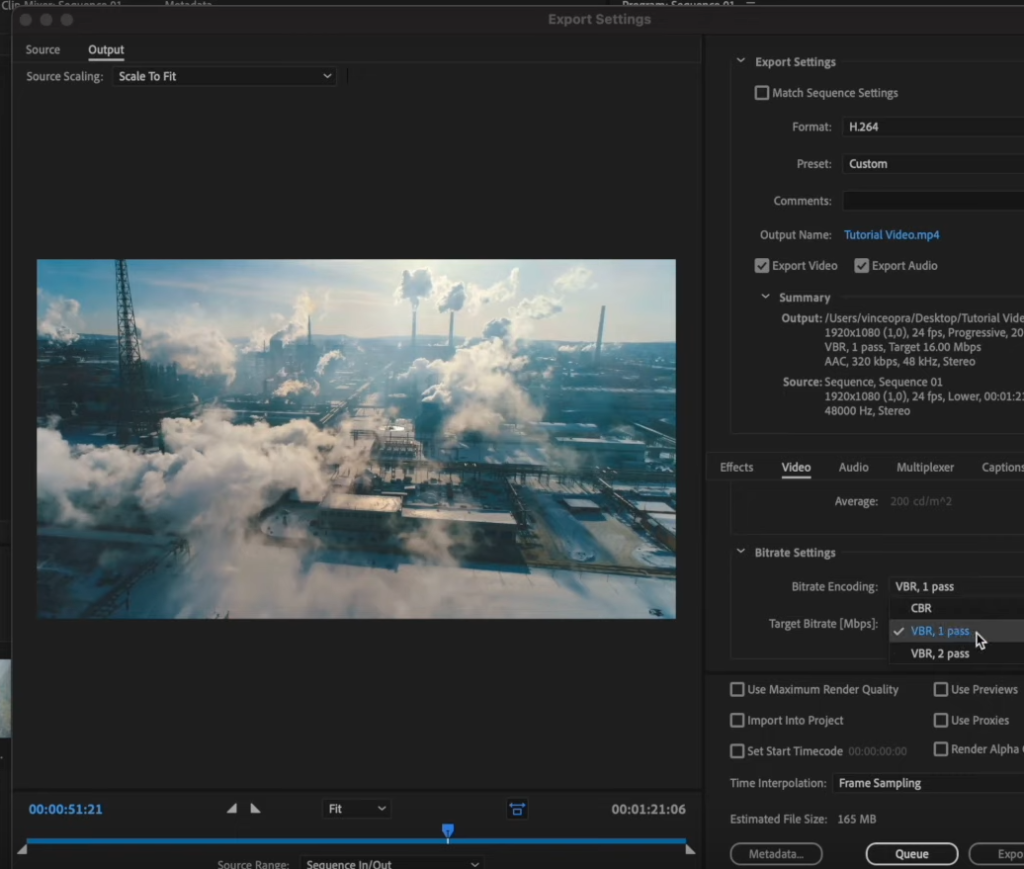
- Format: Choose h.264. This codec is popular for web-based videos due to its balance between quality and file size.
- Preset: Use the YouTube 1080p full HD preset as a starting point. This caters specifically to YouTube’s recommended settings for 1080p videos.
- Output Name: Specify your desired file storage location and filename.
- Resolution & Frame Rate: Your export’s resolution and frame rate should match your sequence’s settings. For example, if your sequence is in full HD (1920×1080) at 24 fps, your export should mirror these settings.
- Bitrate Settings: Bitrate determines the amount of data processed per second in your video.
- CBR (Constant Bitrate): Keeps a constant bitrate throughout the video.
- VBR 1 pass: Analyzes and varies the bitrate once through the video.
- VBR 2 pass: Analyzes the video twice, allowing you to set both minimum and maximum bitrates. This is ideal for dynamic videos with a lot of motion.
Recommendation: For static videos, use VBR1 at 15 megabits per second. For dynamic content, VBR2 pass with 15 megabits minimum and 25 megabits maximum is optimal.
- Advanced Video Settings:
- Aspect: Choose square pixels.
- Rendering: Opt for “Render at Maximum Depth” to ensure best color detail.
- Encoding Settings: Set the level to 4.2 and select a high profile for best results.
Audio Settings:
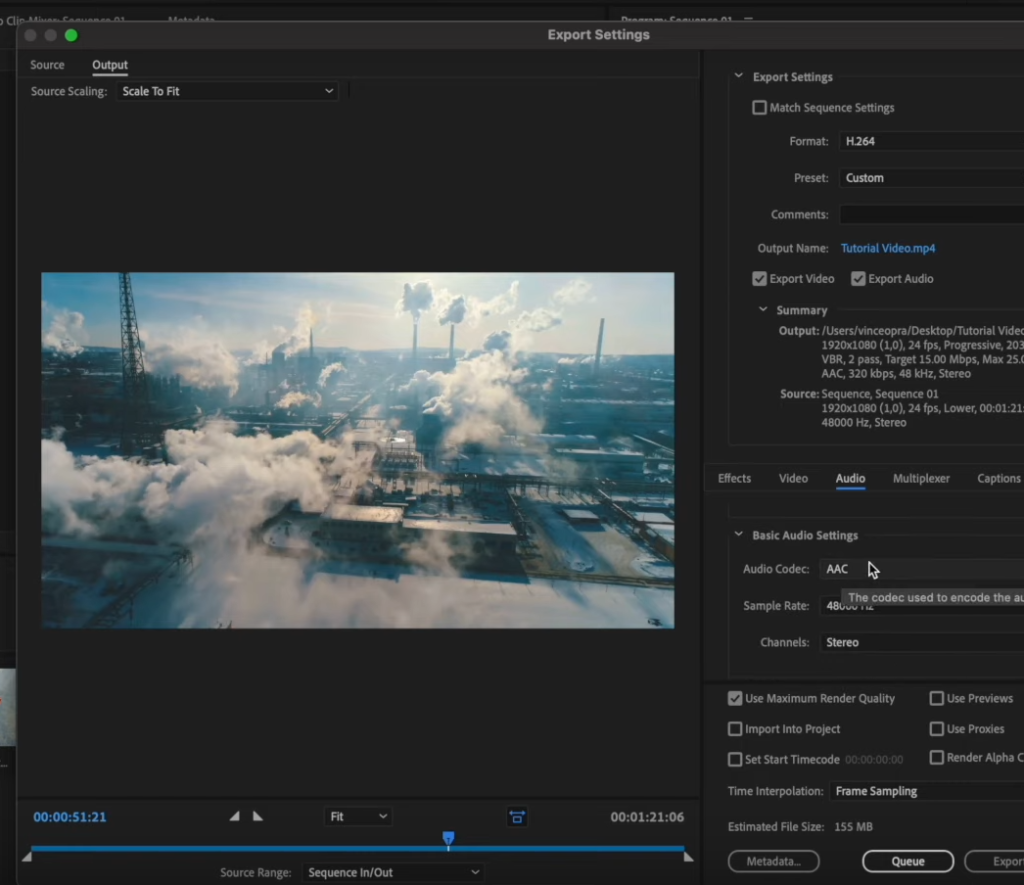
- Audio Codec: Choose AAC, which offers a good quality-to-size ratio.
- Channels: Opt for stereo.
- Bitrate: Set to 320 for high-quality audio.
4. Finalizing the Export
Once your settings are in place:
- Direct Export: Click ‘Export’ to initiate the process within your editing software.
- Queue for Later: If you have Adobe Encoder, you can click ‘Queue’. This sends your video to Encoder, letting you continue editing in the primary software.


