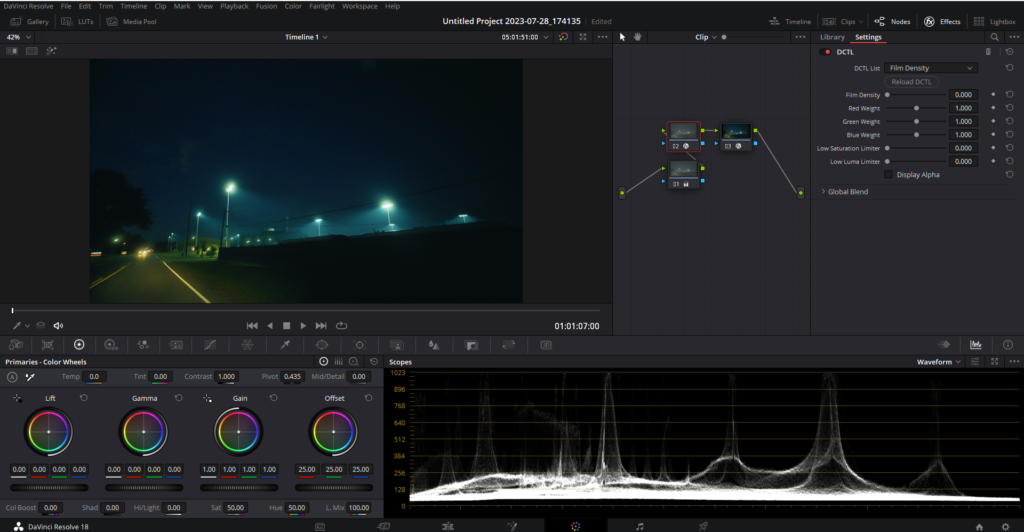
Welcome back to FilmmakingElements.com, in this article I share my Davinci Resolve Color Density DCTL, which will be free to download. When I first ventured into the world of color grading, DaVinci Resolve quickly became my go-to software. Among its myriad of features, the DCTL stood out, offering a versatile platform for creating custom color transformations. For those unfamiliar, DCTL is akin to a programming language tailored for DaVinci Resolve, enabling users like myself to craft intricate color effects using mathematical operations.
Now, amidst the vast sea of DCTL scripts and effects, one particular tool has consistently piqued my interest: the Film Density DCTL. To appreciate its significance, it’s essential to understand the concept of ‘film density.’ In traditional film processing, film density refers to the opaqueness or transparency of a film strip. The denser the film, the darker it appears. In a digital context, this density translates to the depth and richness of colors in an image.
Employing the Film Density DCTL in DaVinci Resolve allows me to emulate this traditional film characteristic, adding a layer of authenticity and depth to digital footage. It’s a bridge between the old and the new, merging the tactile feel of analog film with the precision of digital technology.

Key Functions and Parameters of my Davinci Resolve Color Density DCTL
As I delved into the Film Density DCTL, its nuances and capabilities began to unfold. While it might seem intricate at first glance, the DCTL I’m providing is designed for ease of use, ensuring that even those new to color grading can harness its potential. Let’s break down some of its core components:
- RGB Conversions:
- Purpose: Transition between the RGB (Red, Green, Blue) and HSV (Hue, Saturation, Value) color spaces.
- Functions in Play: RGB_to_HSV and HSV_to_RGB.
- Why It Matters: While RGB offers a linear representation of color, HSV provides an intuitive grasp, allowing for nuanced hue, saturation, and brightness adjustments.
- Saturation Adjustments:
- Purpose: Control the intensity or vibrancy of colors in the footage.
- Function in Focus: Saturation function, combined with luma.
- Significance: Achieve the perfect balance in color intensity, ensuring footage neither looks cartoonish nor drained of life.
- The Role of Limiters:
- What They Do: Act as safeguards, ensuring color and brightness values stay within desired thresholds.
- Parameters to Know: p_LimitS (Low Saturation Limiter) and p_LimitL (Low Luma Limiter).
- Benefits: Maintain the richness of colors and prevent undesired extremes in brightness, especially in scenes with specific moods or lighting.
How to Import and Use This DCTL

Integrating my Film Density DCTL into your DaVinci Resolve workflow might seem like a technical challenge, but with a clear understanding and a systematic approach, it becomes a breeze. Let’s dive deeper into the intricacies of this process:
- Before You Begin:
- Download and Extract: Ensure you’ve downloaded the Film Density DCTL from the provided link.
- Importing the DCTL into DaVinci Resolve:
- Open DaVinci Resolve: Launch the software and either open an existing project or create a new one.
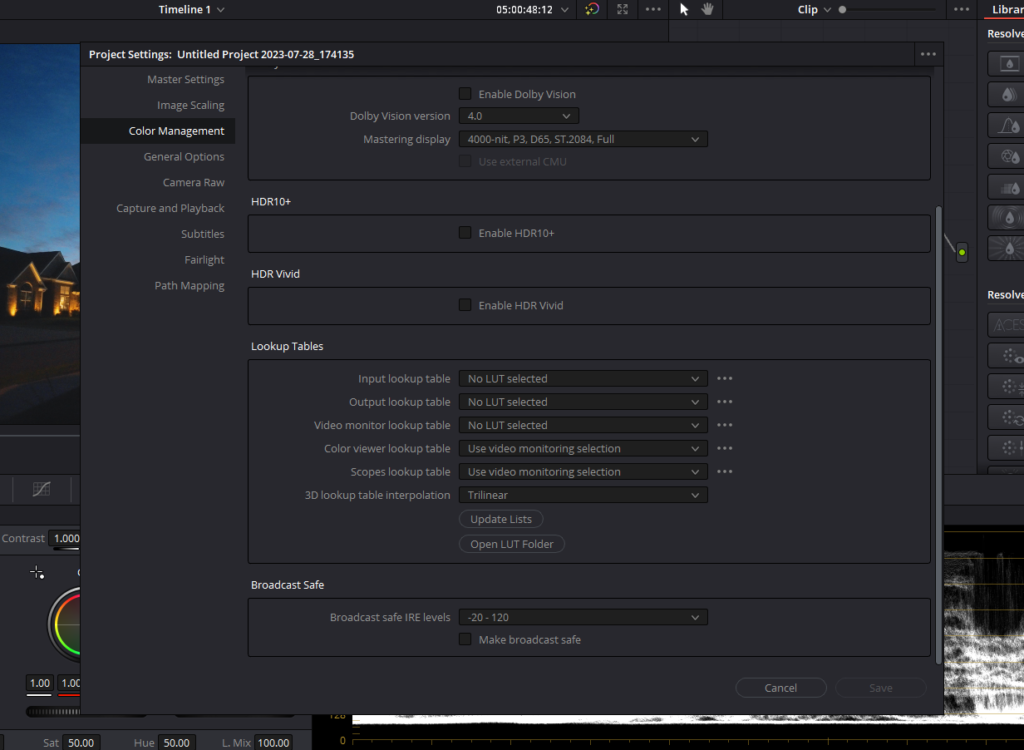
- Accessing Project Settings: In the lower right corner, you’ll find a gear icon. Click on it to open the ‘Project Settings’ menu.
- Dive into Color Management: Inside Project Settings, locate and click on the ‘Color Management’ tab on the left panel.
- Opening the LUT Folder: Scroll down to the ‘Lookup Tables’ section. Here, you’ll see an ‘Open LUT Folder’ button. Clicking this will direct you to the directory where DaVinci Resolve accesses its LUTs and DCTLs.
- Importing the DCTL: Copy the Film Density .dctl file and paste it into the DCTL folder which is already there in the directory..
- Utilizing the DCTL in Your Projects:
- Access from LUTs Section: After successfully importing, restart Davinci Resolve and head over to the color page.
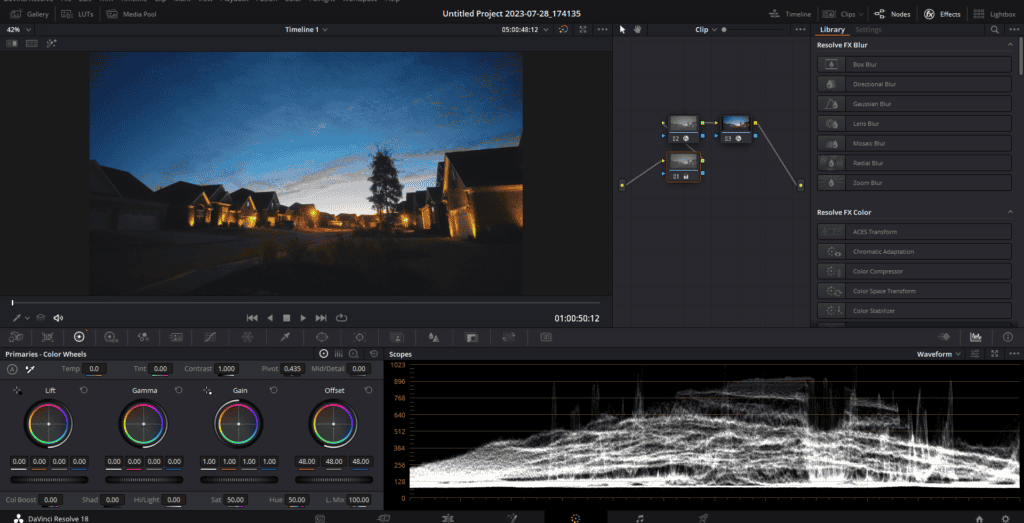
- Apply to Desired Node: In the node tree, select the node you wish to apply the DCTL to. Click on the ‘Effects’ button on the top-right corner and scroll till you find ‘DCTL’. Simply drag and drop the DCTL onto this node.
- Detailed Adjustments: Select the Film Density DCTL from the drop-down list. The power of DCTL lies in its parameters. On the right panel, you’ll see various sliders corresponding to the DCTL parameters we’ve discussed, such as saturation, limiters, and RGB weights. Adjusting these allows for precise control over the effect.
Download the Davinci Resolve Color Density DCTL From Here
Optimizing Film Density for Color Grading

The art of color grading is a delicate balance between technical prowess and creative vision. With tools like the Film Density DCTL at our disposal, this balance becomes more achievable. Here’s how to optimize your grading process using the DCTL:
- Mastering the DCTL:
- Ease of Use: The DCTL I’m introducing is user-friendly, ensuring a smooth experience even for those just starting their color grading journey.
- Experimentation: Don’t be afraid to play around with the parameters. Each project is unique, and sometimes the most unexpected settings can yield stunning results.
- Resources and Free Download:
- Access for All: I believe in democratizing the art of color grading, which is why I’m offering this DCTL for a free download.
- Support & Community: Along with the DCTL, I recommend joining online forums and communities. They’re treasure troves of tips, tricks, and advice from fellow colorists who’ve been in your shoes.


