Hi, I’m Salik, the author of FilmmakingElements.com. I have been a filmmaker for over 10 years. I am also a certified DaVinci Resolve Trainer and I have used DaVinci Resolve for many of my projects. In this article, we will dive deep into the world of ACES (Academy Color Encoding System) and explore its workflow in Davinci Resolve. If you’ve been eager to learn about color grading and want to know the ins and outs of ACES, this guide is for you. Let’s get started!
Demystifying ACES: An In-Depth Look at the Academy Color Encoding System for Motion Images
Color management is crucial in the film and motion picture industry to ensure that the colors captured by cameras are accurately reproduced on various displays. The Academy Color Encoding System (ACES) is a color management framework designed specifically for this purpose. This blog post takes a deeper dive into the world of ACES, exploring its significance in human vision, image reproduction, and the role of color spaces.
What is ACES?
- ACES, or the Academy Color Encoding System, is a color management framework developed by the Academy of Motion Picture Arts and Sciences and other industry partners.
- The primary goal of ACES is to provide a standardized method for transforming what the camera captures into what our displays can reproduce, while also offering an intermediate stage for color grading and visual effects work.
- By implementing ACES, filmmakers can maintain color consistency and achieve a higher level of accuracy throughout the production and post-production processes.
The Science of Human Vision and Image Reproduction

- The electromagnetic spectrum comprises various forms of radiation, such as X-rays, gamma rays, radio waves, ultraviolet light, and visible light.
- Human eyes are sensitive to a narrow band of this spectrum, perceiving colors as varying amounts of red, green, and blue.
- Similarly, cameras and displays reproduce color using the RGB model, which expresses color as varying percentages of pure red, green, and blue.
The Importance of Color Spaces
- Color spaces are the essential building blocks that define the range and limits of colors that can be reproduced by a camera or display system.
- They provide a standard for defining “pure red”, “green”, and “blue” in the context of cameras and displays, ensuring accurate and consistent color representation.
- Some common color spaces include sRGB, Adobe RGB, and DCI-P3, each offering a different range of colors that cater to various applications and industries.
- Implementing the correct color space is crucial for maintaining color fidelity and ensuring the final output closely resembles what the filmmaker or content creator intended.
How ACES Enhances Color Management
- ACES streamlines the color management process by offering a unified and device-independent color space.
- This color space provides a vast color gamut and high dynamic range, allowing for the storage and manipulation of color data without compromising quality.
- ACES also offers a standardized set of transforms, known as the ACES Reference Rendering Transform (RRT) and Output Device Transforms (ODTs), which ensure consistent color reproduction across various output devices and display technologies.
- By incorporating ACES, filmmakers can eliminate the guesswork in color management and focus on their creative vision, knowing that their work will be accurately represented on any display.
Exploring the Role of Color Spaces and the Advantages of Using ACES for Color Management
Color management is essential in the filmmaking industry to ensure that the colors captured by a camera are accurately reproduced on different displays. This blog post delves into the concept of color spaces and explains how the Academy Color Encoding System (ACES) simplifies color management, ensuring accurate and consistent color reproduction across various devices.
Understanding Color Spaces
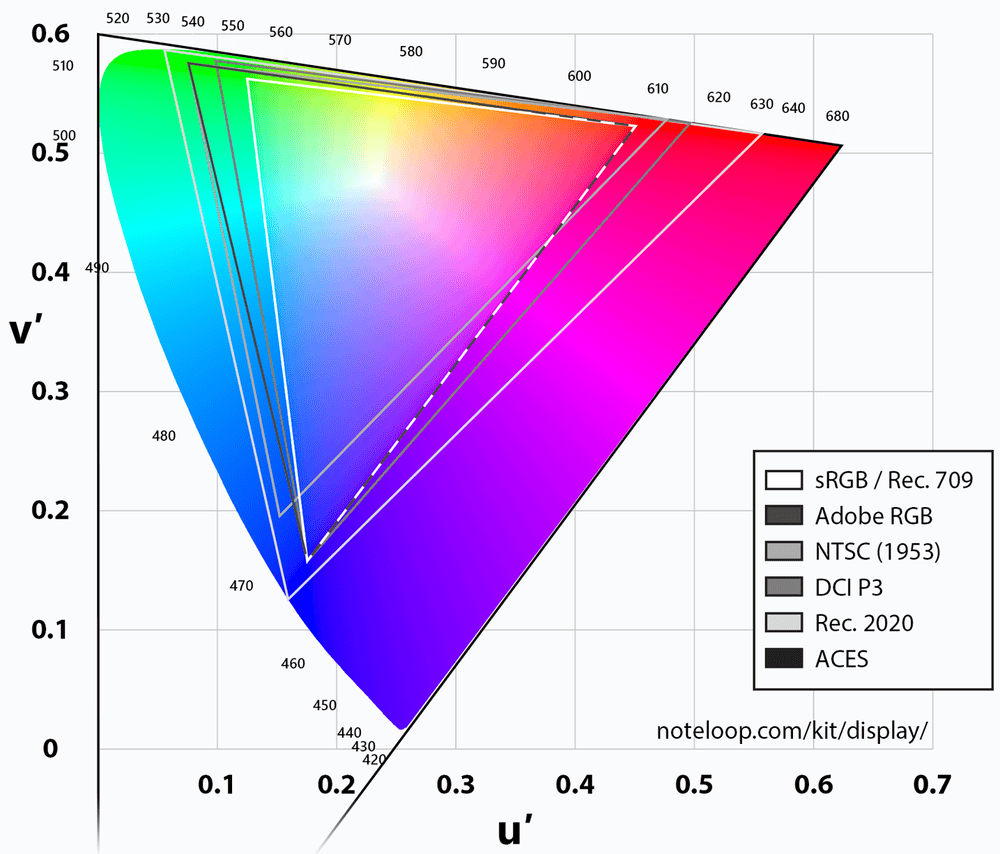
- Scientists have measured the full range of wavelengths that fall within the visible spectrum, represented as a horseshoe-shaped graph.
- A color space is a triangle within this horseshoe, defining the purest red, green, and blue that a device can capture or reproduce.
- Points outside the triangle cannot be captured or reproduced by a device using that specific color space.
Color Space Transformations
- When the color space of an image is known, it can be transformed into another color space using mathematical calculations.
- This transformation is crucial when viewing an image captured on one device (Camera A) on a different display (Display X) that has its own color space.
- Color management is the process of mathematically transforming the image from one color space to another, ensuring accurate reproduction.
The Role of ACES in Color Management
- ACES, or the Academy Color Encoding System, is a user-friendly system designed to streamline color management.
- It offers support for a wide range of cameras and displays, simplifying the process of transforming images between different color spaces.
- ACES ensures faster and more accurate color management than manually adjusting colors by eye, leading to consistent and precise color reproduction.
ACES Workflow In Davinci Resolve: 2 Methods
1. ACES Workflow In Davinci Resolve: Project Level
In this section, we will delve into the first method of implementing ACES workflow at the project level in DaVinci Resolve, enabling users to simplify their color grading process and maintain color consistency across different display mediums.
Implementing ACES Workflow at the Project Level in DaVinci Resolve
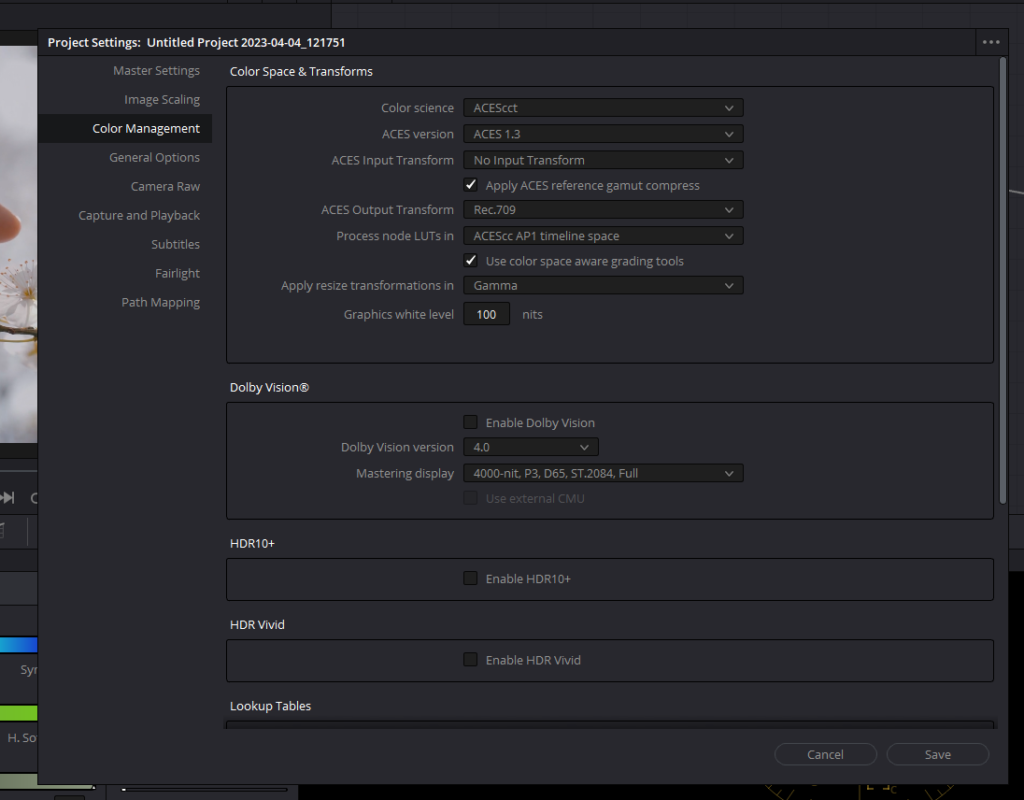
- Access the Project Settings: Open your project in DaVinci Resolve by clicking on the gear-looking icon in the bottom right corner and navigating to the Color Management panel within the Project Settings.
- Choose ACES Color Science: In the Color Science dropdown menu, you will find DaVinci YRGB (the default manual color management system), ACES CC, and ACES CCT (the colorist variant of ACES). Select either ACES CC or ACES CCT to reveal all ACES controls. Choose the latest version of ACES in the ACES Version drop-down menu.
- Configure Default Input Device Transform: This setting determines the color space and gamma of your source footage. If your project is shot on one single camera or multiple cameras in the same color space such as Arri Log C, choose Arri LogC3 in the ACES Input Transform drop-down menu. If you have shot on multiple different cameras leave the ACES Input Transform on the default option which is No Input Transform. Keep in mind that in both cases ACES automatically recognizes the color spaces and transform RAW clips.
- Set ACES Output Device Transform: The output device transform defines the color space and gamma of your final output. Choose the appropriate setting depending on your deliverables and the display mediums they will be viewed on such as Rec.709 or sRGB if you are delivering to the web.
- Color Space Aware: Don’t forget to tick the checkbox which says “Use color space aware grading tools” so that tools like HDR wheels and color warper work in a better way.
- Save Your Settings: Once you have configured your ACES settings, click Save to apply the changes to your project.
Customizing ACES Input Transforms for Specific Clips
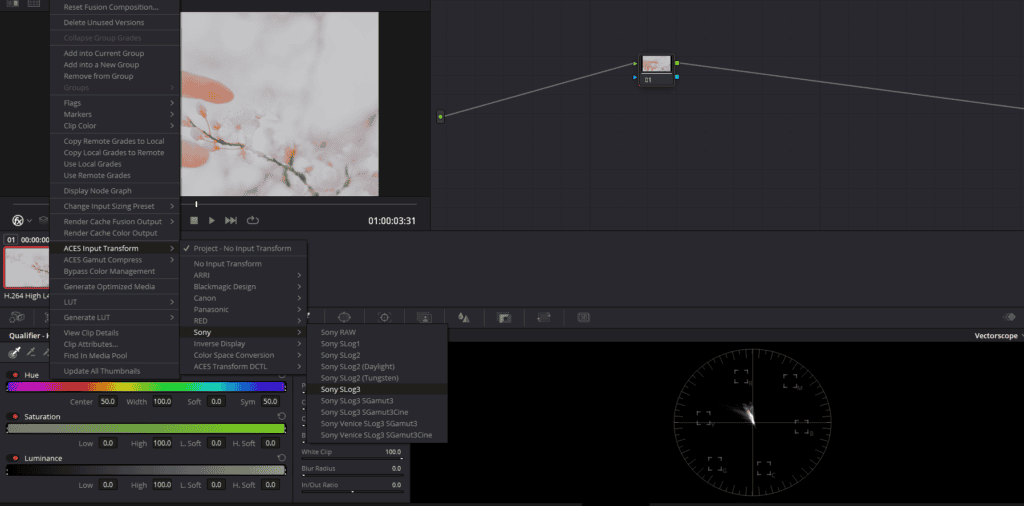
For non-raw clips without color space metadata, you can manually assign an ACES input transform by right-clicking on the clip from the thumbnail viewer on the color page and selecting the appropriate setting based on the information provided about how the clip was shot and its origin. This manual assignment allows for greater control and accuracy when working with various camera formats and color spaces.
2. ACES Workflow In Davinci Resolve: Node Level
In this section, we will explore the second method of how ACES workflow can be harnessed in DaVinci Resolve at the node level, providing more control and flexibility for professional colorists and editors. Don’t forget to revert back to default project settings before following further.
Implementing ACES Workflow in DaVinci Resolve at Node Level
- Node-Based Workflow: DaVinci Resolve can utilize a node-based workflow for color grading, allowing users to build complex color adjustments through a series of interconnected nodes. This provides a non-destructive and flexible environment for achieving precise color control.
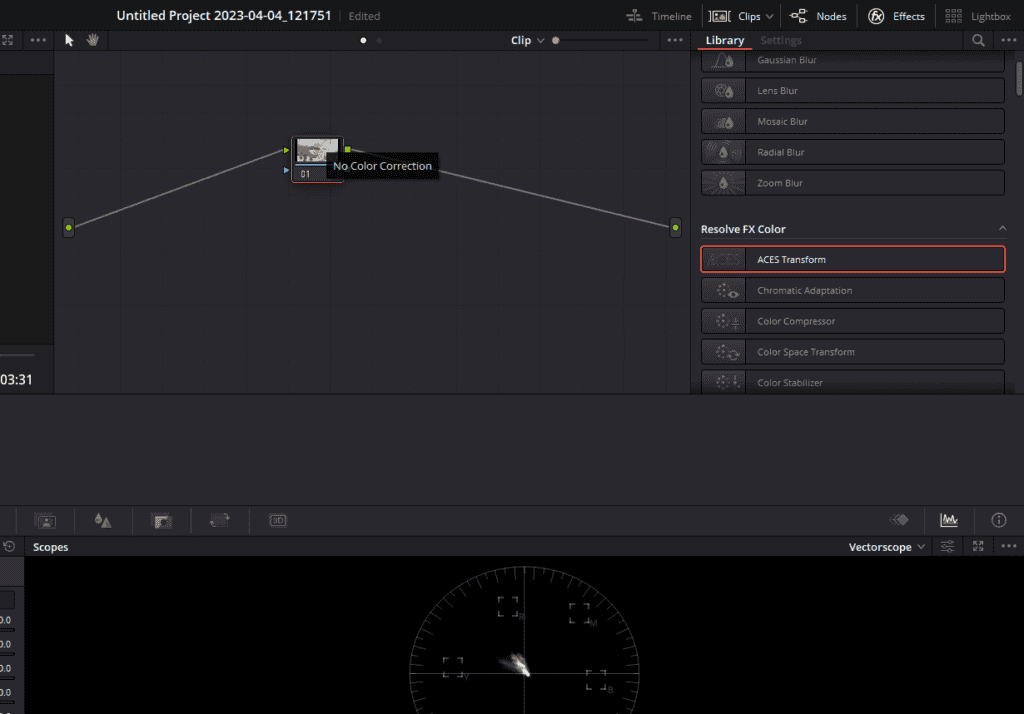
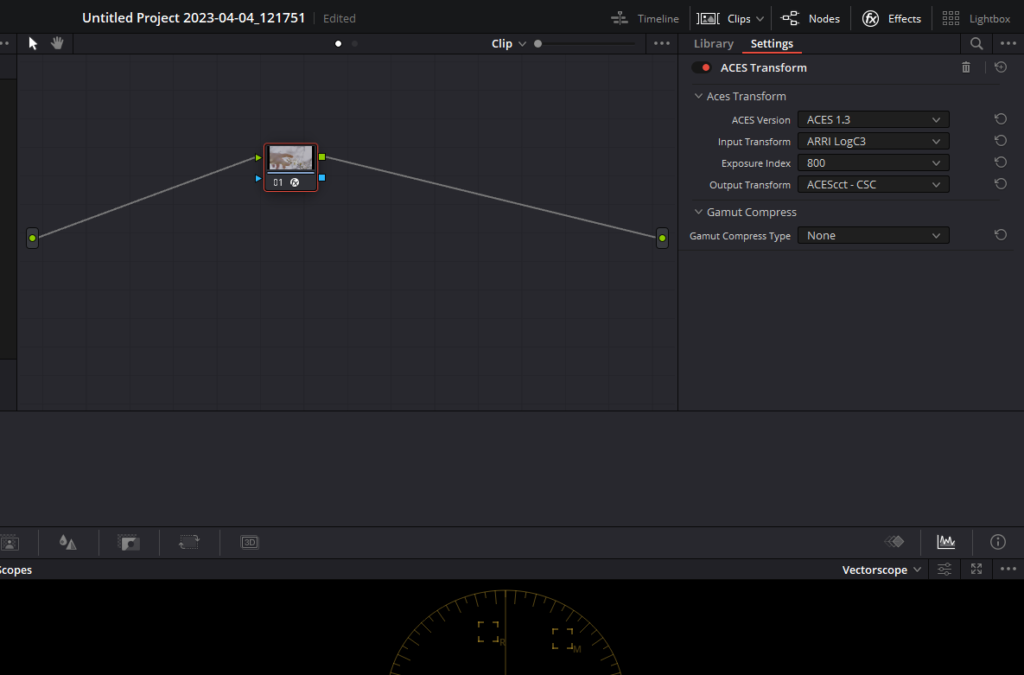
- Converting To ACES: Select a clip and move to the color page of Davinci Resolve. Click on the Effects button from the top right corner. Look for ACES Transform and drag and drop it onto a node. This node will convert your source footage to the ACES color space. Firstly select the latest ACES version from the drop-down menu. Select the appropriate Input Transform based on your camera’s color space for example Arri LogC3 if shot on Arri. In Output Transform select ACEScct.
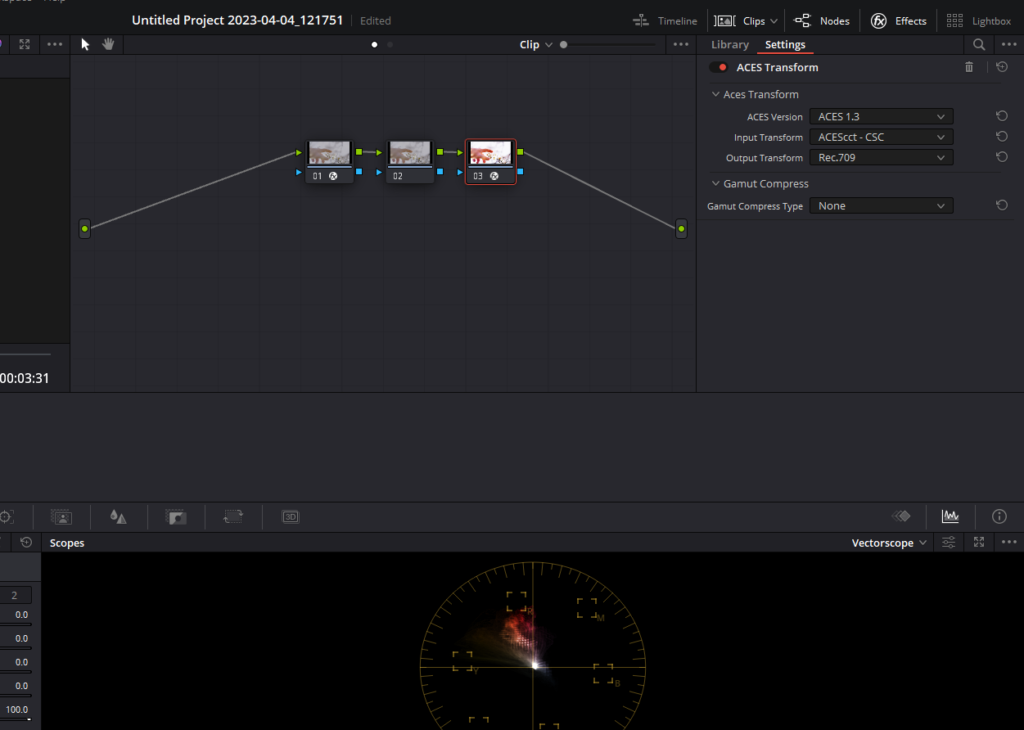
- Device Transform: Add a node after the previous node. This node will convert your graded footage from the ACES color space to the target color space for final output such as Rec.709 or DCI-P3. Once, again head back to Effects and drag and drop a, ACES Transform effect on this node. In Input Transform, select ACEScct and in Output Transform select Rec.709 or sRGB if you are delivering to the web.
- Color Grading Nodes: Now, in between these two nodes, you have created an ACES sandwich. Any color adjustments between these nodes you do will happen in ACES. Create nodes in between and use DaVinci Resolve’s powerful tools such as the Color Wheels, Curves, and Windows to achieve your desired look.
Also Read- Davinci Wide Gamut: What Is It & How To Use In Davinci Resolve
The Benefits of Using ACES Workflow in DaVinci Resolve
- Color Consistency: ACES workflow ensures color consistency across different display mediums, platforms, and devices. By adopting a standardized color management system, you can be confident that your graded footage will maintain accurate colors, regardless of the target display.
- Simplified Grading Process: ACES workflow eliminates the need for manual color space conversions and simplifies the color grading process. This allows colorists to focus on creative grading without worrying about potential errors or inconsistencies stemming from disparate color spaces.
- Improved Collaboration: Using ACES workflow in DaVinci Resolve fosters seamless collaboration between different post-production departments. With everyone working within the same color management framework, you can ensure cohesive visual outcomes and minimize communication errors.
- Future-proofing: ACES workflow maintains the highest color fidelity, making it easier to remaster or repurpose projects for future display technologies without compromising image quality. This ensures that your projects are always ready for the next generation of screens and display standards.