How To Upscale with Super Scale in Davinci Resolve
Alright, welcome back, everybody. Today, I will be going over the super scale feature in DaVinci Resolve and how you can use it.
The Super Scale tool in Davinci Resolve isn’t like the others.
It employs a sophisticated algorithm and AI power that enhances video detail while expanding, making it a processor-intensive procedure. But don’t worry, we even have a solution for that in this article.
Why should you upscale your videos anyway?
When you upscale a 1080p video to a 4k video before or after editing, a video editor just changes the overlay resolution of the video. But in the world of television and technology. An advanced algorithm transforms your 1080p video into a 4k resolution. It will have better pixels and higher and sharper quality. The Super Scale feature in Davinci Resolve uses an advance AI to convert your low-resolution video into higher resolution.
People also tend to upscale their video when they don’t have a good quality camera that can output 4k and beyond, but they are looking forward to it.
What is the super scale feature in Davinci Resolve?
First thing, what is the super scale feature? Well, that is DaVinci Resolve’s built-in AI upscaler, and it actually gives you better results than the regular upscaling features found in the base version of DaVinci Resolve.
Basically, this is going to give you a better overall image when you scale your image up to be a bigger size than it was recorded in. for example, my camera can only do 720p and look half respectable. I’ve got an old camera that I’m using right now, but I convert all of my videos to 1440p.
To give me a nice-looking final product, I upscale my video, and when I do that, I’m making the image twice as big as it was recorded in.
If you think about it on a Pixel by Pixel basis, this means that what was originally a single Pixel, now to make the image twice as big goes from a one by one to a two by two, meaning that one Pixel now turned into four.
When you look at the actual image quality, that is going to result in a more imprecise image when you just use normal upscaling, and that’s where the super scale feature in Davinci Resolve comes in.
What it does is try to interpolate what those four pixels should look like instead of just creating four identical pixels with the original Upscaling that’s found in pretty much every video editor.
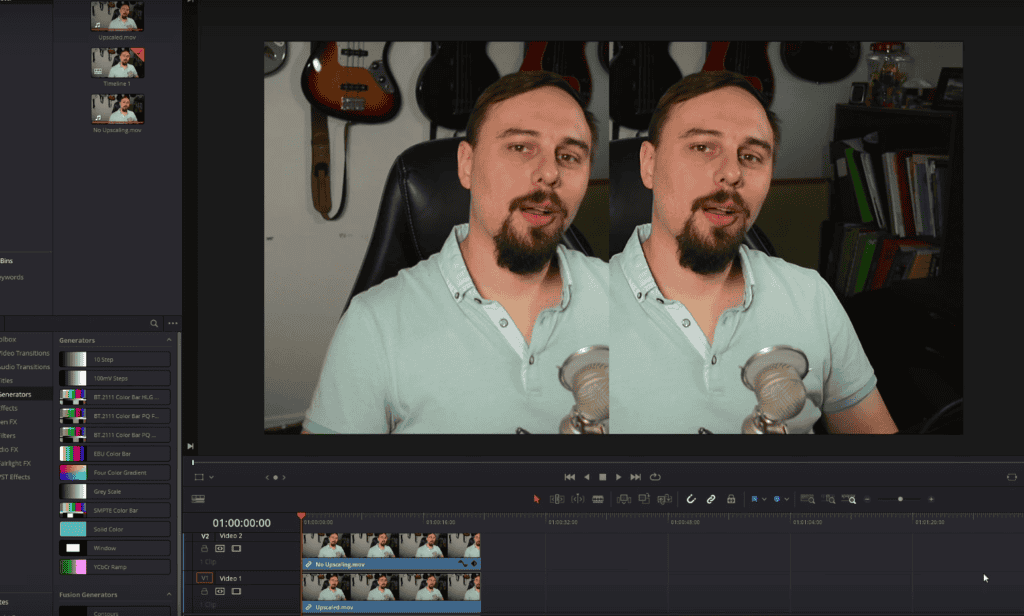
What I currently have in the timeline are two different videos. The one on the left is that I just took some original 720p footage and put it into a 1440p timeline. Let DaVinci Resolve handle the normal upscaling, rendered it out, and put it back into another 1440p timeline.
The one on the right is one that I used the super scale feature on where I put it into a 4K timeline, upscaled it by three times, rendered it out, and then put it into a 1440p timeline.
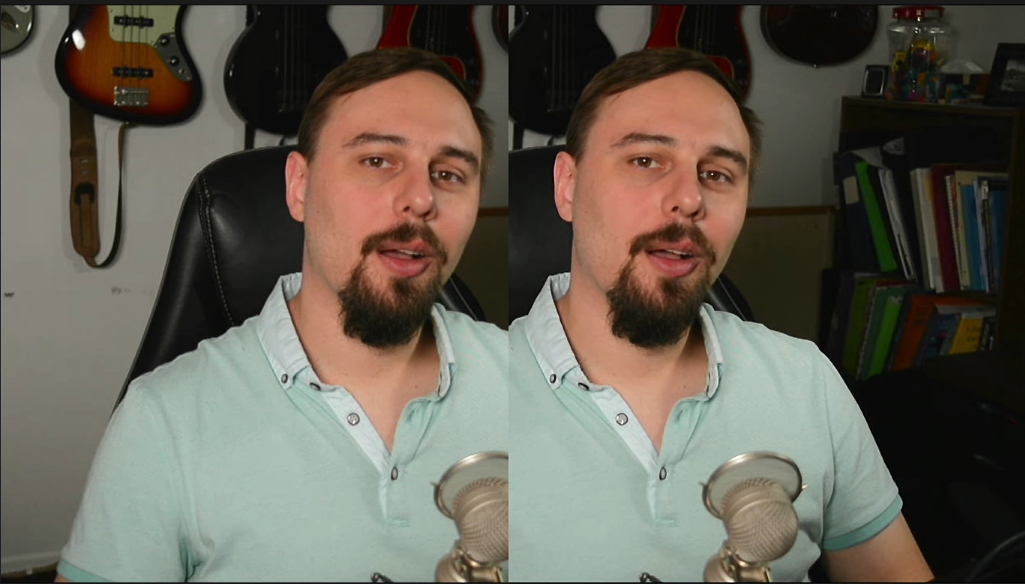
I don’t know if you can see this. Hopefully, my website’s compression doesn’t kill this demonstration too severely, but there’s quite a world of difference between the two images. We use an image compressor plugin, so sorry if the difference isn’t visible.
That just means that because AI is upscaled, I’m starting with a cleaner base image, so I get a substantially better result than if I was just upscaling the usual way. Now, how do we do this with all of that out of the way?
Upscale with super scale AI in Davinci Resolve
Well, there’s no easy way to say it, but you have to have the paid version of DaVinci Resolve. You have to buy the Studio version. It’s significantly cheaper than most other video Editors, but it is a cost that you will have to gobble to do this.
I do this by going into the project settings, and I change my timeline resolution to one that’s bigger than the overall finished video that I want.
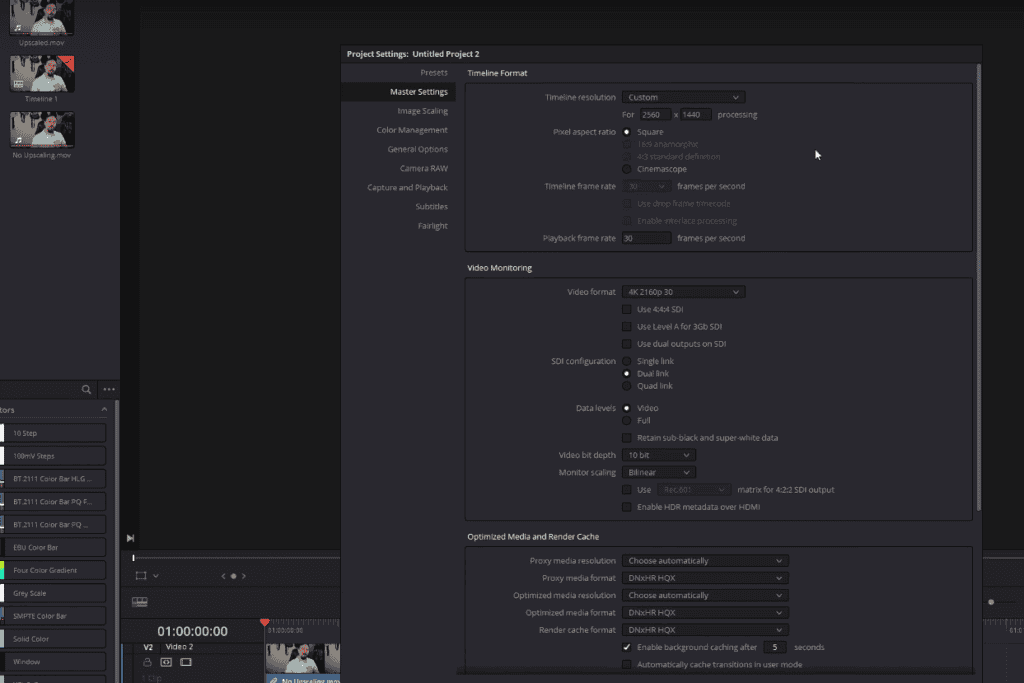
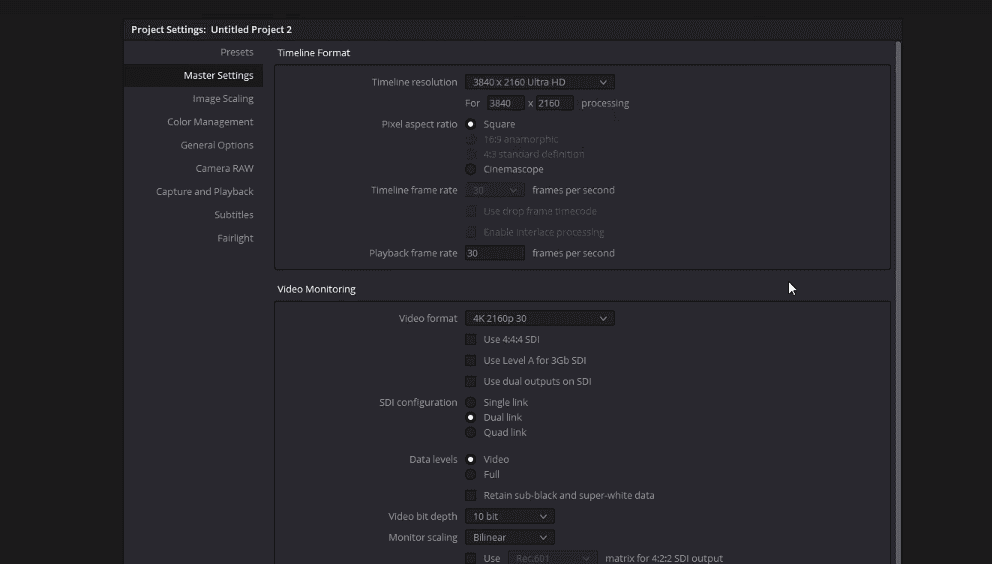
I want my final one to be in 1440p, which is what I currently have it set to. What I do is I change it to a 4K timeline. From there, I’m going to go into the image scaling and turn off the input scaling and turn off the center crop.
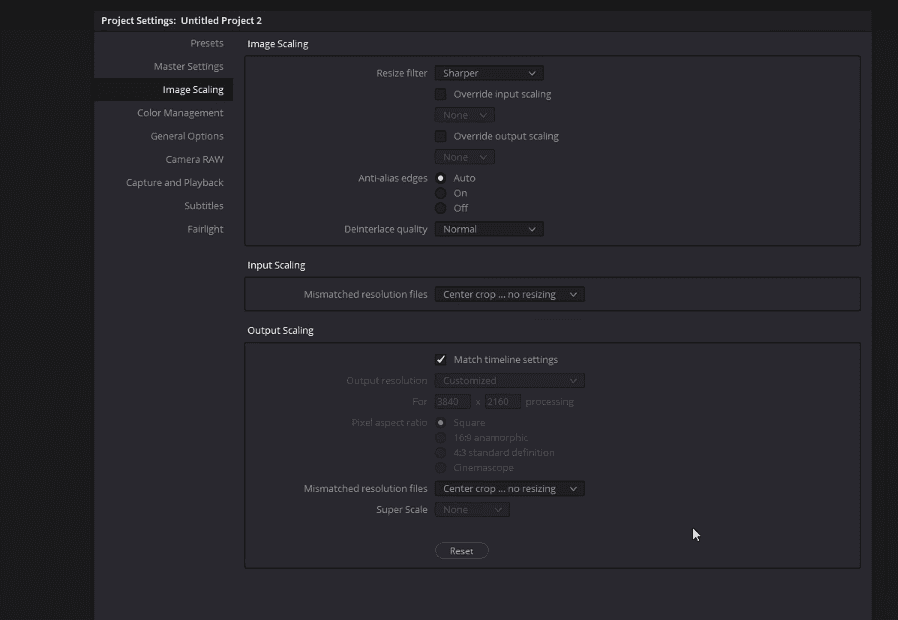
We don’t want this; we don’t want it to do anything. We just want the original stock size video right in the middle of the screen with nothing else happening.
The reason we want the timeline resolution to be more significant is just in my own testing; I found that you actually get a little bit of better image quality if you make it bigger and scale it down versus if you just make it the size that you want your final image to be.
This is why I’m suggesting you could try this with even a 4K video and just see if it gives you any improvement.
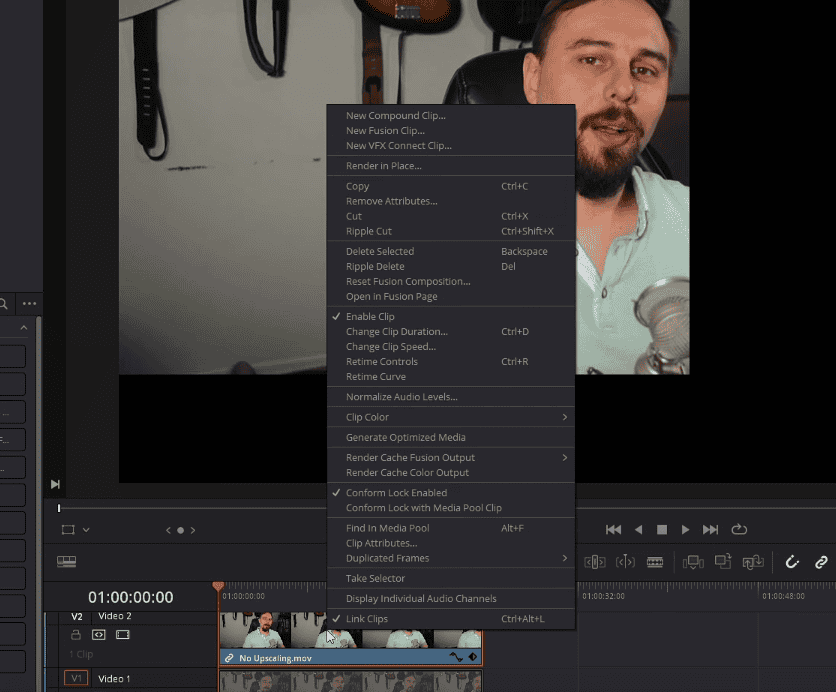
From there, if you wanted to do the actual upscale, you right-click on the video that you wanted, go to the clip attributes, and the super scale is right there. In my case, because I’m going from typically a 720p video to a 4K, I would do that to three times upscale and keep the settings at medium sharpness and a medium noise reduction.
- Also Read- 10 Best Movies To Watch If You Like Cyberpunk Aesthetic
- Also Read- How to Record Audio in DaVinci Resolve? (Record Voice-Over)
- Also Read- Improve Audio Quality In Davinci Resolve (3 Easy Steps)
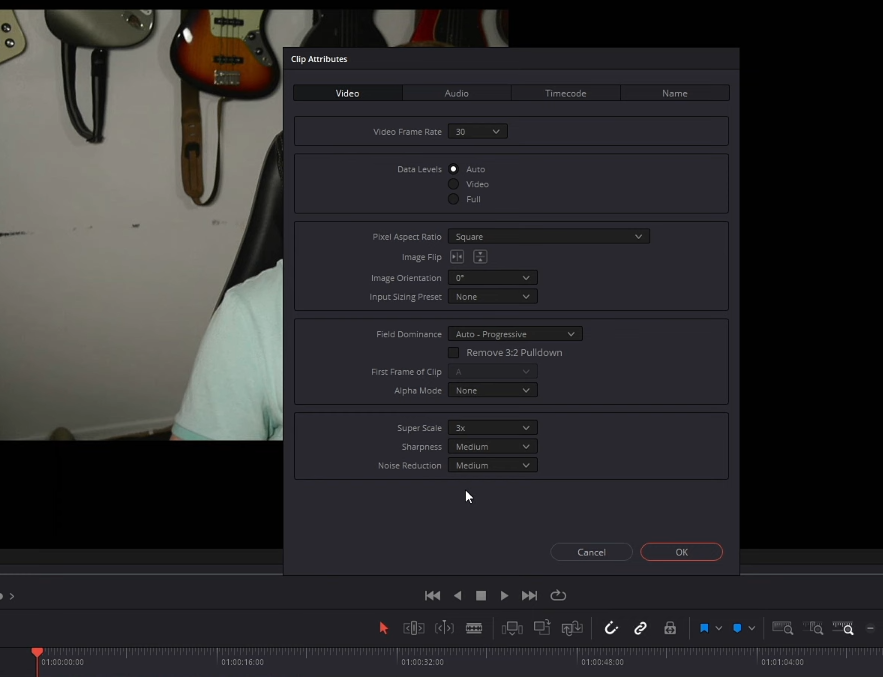
I find that that just gives you the best overall results, you can play around with this, but I found that these were the ones that work best for my videos and the style of videos that I’m doing.
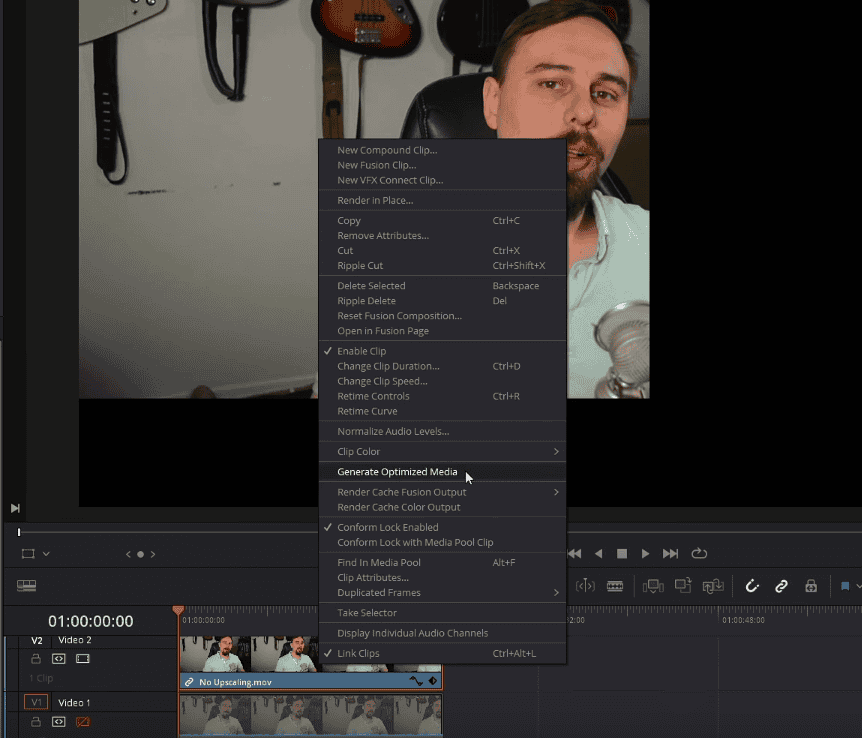
After that’s done, you should be doing either an optimized media or render cache. If you’re doing the optimized media, right-click on the video and click on generate optimized media. Or if you’re doing a render cache, it should probably start it by itself. I found that there’s really no difference between the two methods. Do whichever workflow works best for you.
The actual render time and the output export time were virtually identical with both of them, and I didn’t see any noticeable difference in image quality. Whichever workflow style you like, use that method.
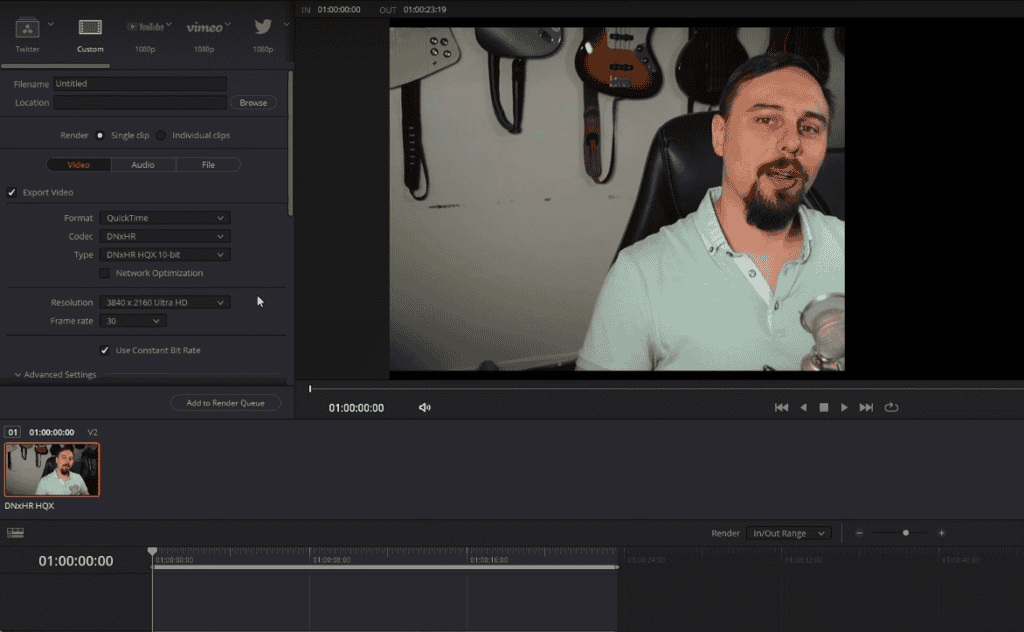
Finally, what you want to do when you’re actually delivering this is use a codec that DaVinci Resolve will like using, one that will be easy for it to edit in. I always choose DNxHR, and personally, I go with “DNxHR HQX 10 BIT” because I’m only doing this up to 1440p.
I know even this codec is overkill. I want to try to minimize any image quality losses I can for what I’m doing. This is the one that I choose. From there, Just export it out and bring it back into your original timeline, which brings me to my final point.
Do not do this on your original timeline. We’re making it twice the size or at least twice the size that it originally was. It doesn’t make sense to make the entire timeline twice as big just to go back in afterward and shrink it down. Just do this in a separate timeline.
When should you use the Super Scale feature?
Do this as the very first thing that you do the way that I think about this because I’m actually generating a new raw video for myself, so I’m taking what a 720p video was, and I’m developing a 4K video to start off with as a base video. That’s the way that I like to think about it, and then just put it into your timeline and assuming you’re using a codec that DaVinci Resolve likes, such as DNxHR, then it’s going to be straightforward to edit, and you shouldn’t experience any slowdowns. There you have it!
Conclusion

DaVinci Resolve is, without a doubt, the most excellent video and movie editing software currently available. It’s jam-packed with superior capabilities, has fantastic color correction tools, can be used for professional audio editing, has fantastic graphics, plus an animation package.
If you’re a professional editor, you should learn Resolve at the very least.
We’re likely just a few years away from a complete industry-wide acceptance of this software, given its pricing, functionality, and availability for Windows, Mac, and Linux. Resolve is also enjoyable to use, and the results are excellent.
Resolve is equipped with a lot of features which leaves other non-linear editing software way behind its league. Its color grading tools are even used in major Hollywood films and have had a significant increase in users in just a few years.
There are a lot of AI-based features packed in Davinci Resolve, as its auto color matching feature and others.
Thanks for reading it all the way!
Happy Editing!